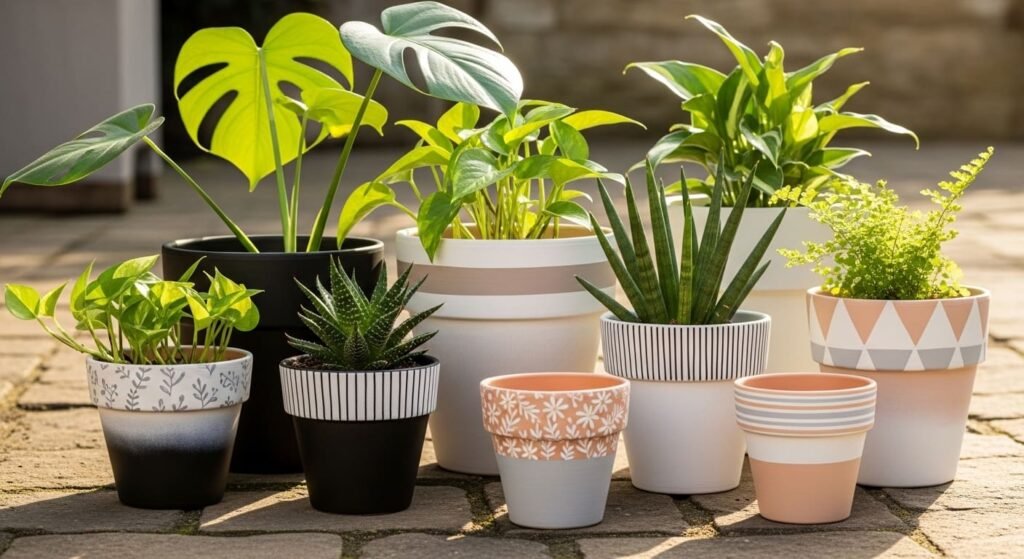
Terracotta pots already have warm color, texture, and charm. Paint just gives them direction. With acrylic paint, painter’s tape, sealant, sponge tools, and paint pens, you can turn plain clay planters into stylish home decor without spending much. The smartest approach is simple: seal the porous clay, add a clean base coat, paint your design, then protect the finish.
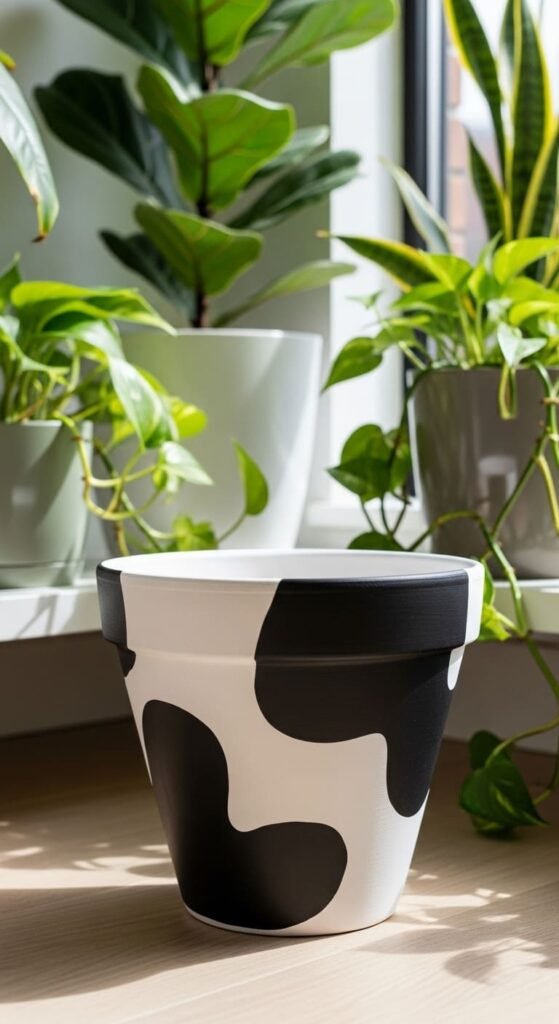
1. Matte Black Modern Pots
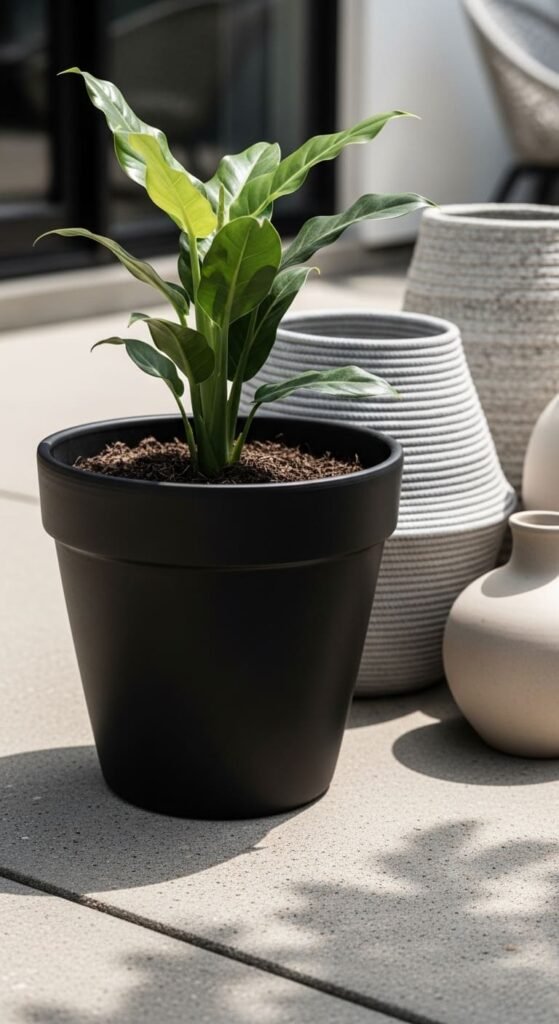
Matte black is the quickest way to make terracotta feel modern.
Start by wiping the pot clean.
Add a sealer first so the clay does not drink up all the paint.
Then apply two thin coats of black acrylic paint.
Use a foam brush if you want fewer brush marks.
Let each coat dry before adding the next one.
This design works well with snake plants, succulents, pothos, and olive trees.
The dark color makes green leaves stand out.
For a budget version, paint only the outside and rim.
Leave the inside plain.
That saves paint and time.
You can keep the pot solid black or add one small detail.
A thin white line near the rim looks sharp.
A tiny gold dot pattern also works.
Do not overload the pot.
The power of this look is restraint.
Finish with a matte topcoat.
Gloss will change the whole mood.
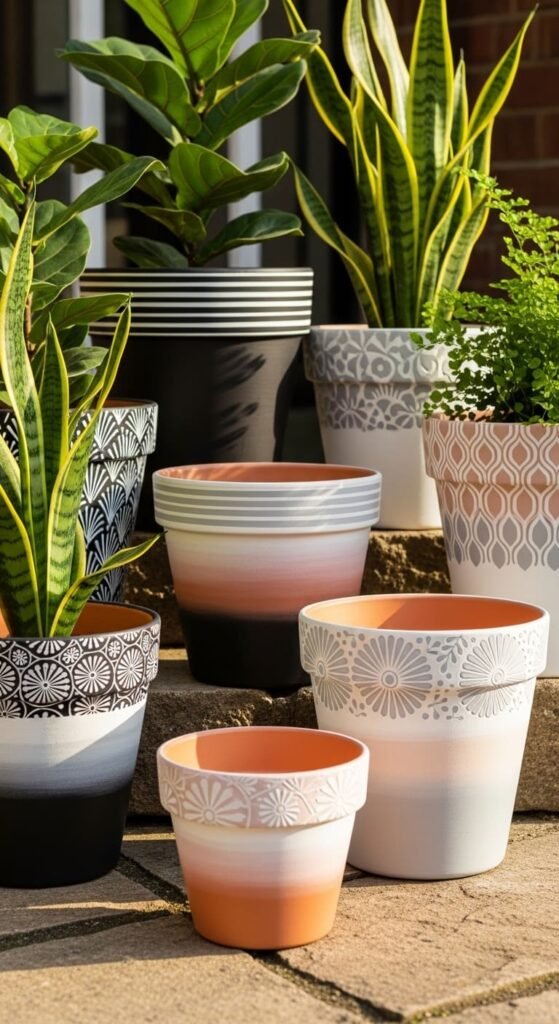
2. Whitewashed Terracotta Pots
Whitewash keeps the clay texture visible.
That is the point.
Mix white acrylic paint with a little water.
Brush it over the pot in thin strokes.
Wipe back some paint with a rag before it dries.
The result should look soft, aged, and uneven.
Do not aim for perfect coverage.
Full coverage turns this into a plain white pot.
Whitewashed terracotta works well in farmhouse, cottage, coastal, and neutral homes.
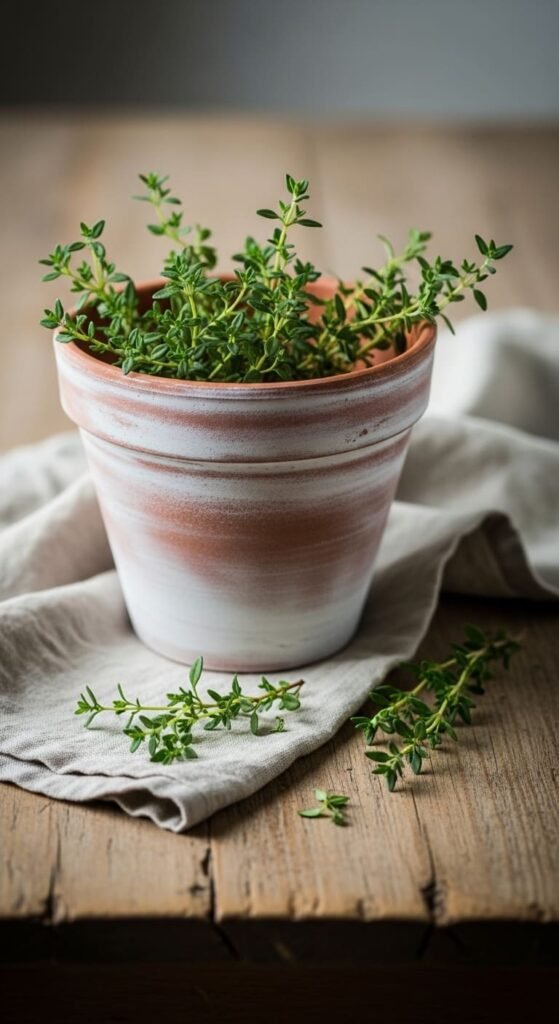
It also pairs nicely with herbs.
Try rosemary, basil, lavender, or thyme.
For a cheap project, use old white wall paint.
Test it on the back first.
If the finish looks too pale, add another thin layer.
If it looks too heavy, sand lightly after drying.
Seal the pot if it will sit outside.
For indoor use, a light clear coat is enough.
This is stylish because it feels relaxed, not forced.
3. Soft Ombré Clay Planters
Ombré makes a basic pot look designed.
Use colors that sit close together.
Cream, peach, clay, and brown work well.
Paint the lightest color near the top.
Add the darker color near the bottom.
While the paint is still wet, use a damp sponge to soften the middle.
Do not use the banned word for mixing colors here in your article copy.
Say “soften,” “fade,” or “smooth” instead.
Work quickly because acrylic paint dries fast.
This idea looks best on medium or large pots.
Tiny pots do not give enough space for the color shift.
Try it with leafy plants, trailing vines, or small citrus trees.
For a budget tip, mix one paint color with white to make lighter shades.
You do not have to buy four separate bottles.
Seal the final finish after it dries.
A satin topcoat gives a polished look without too much shine.
4. Painter’s Tape Stripe Pots
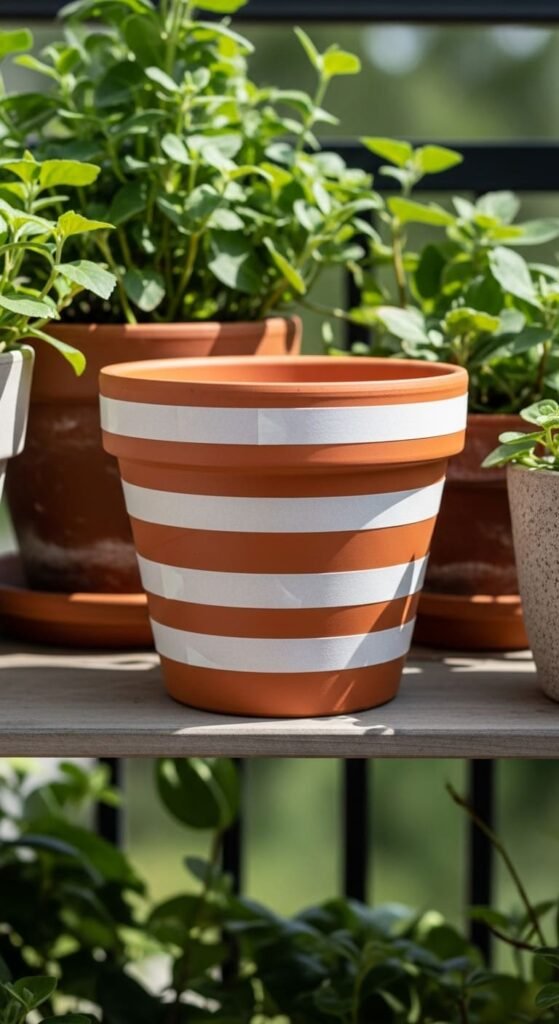
Stripes are easy if you let tape do the work.
Wrap painter’s tape around the pot.
Press the edges down firmly.
Paint the open spaces.
Let the paint dry.
Peel slowly.
That is the whole process.
White stripes on natural terracotta look clean and warm.
Black stripes look bolder.
Sage green stripes feel softer.
Use wide stripes for a modern look.
Use thin stripes for a more detailed style.
Do not rush the tape removal.
Wet paint can smear.
Old tape can pull paint up, so use decent painter’s tape if you have it.
If the line is not perfect, touch it up with a small brush.
Do not repaint the whole pot.
That is wasted effort.
This project is great for porch steps, balcony corners, and matching planter sets.
Finish with clear sealer for outdoor use.
5. Vertical Stripe Statement Pots
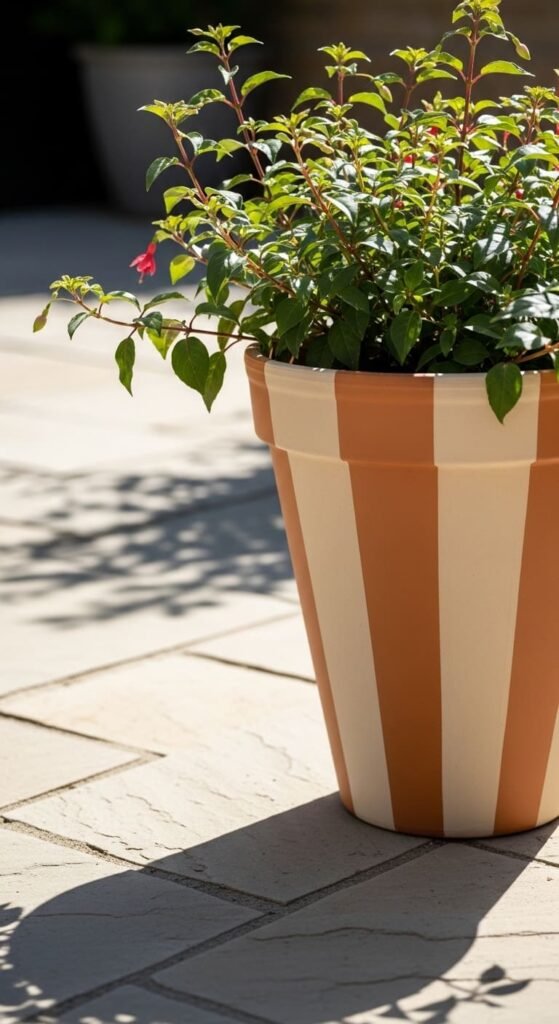
Vertical stripes make pots look taller.
That works well for short or wide planters.
Use painter’s tape from rim to base.
Space each strip by eye.
Perfect spacing is not required.
Paint between the tape lines.
Use cream, black, sage, or navy.
Let the paint dry fully before peeling.
This style works best on pots with simple shapes.
Heavy curves make tape harder to place.
For a budget version, paint only half the pot with vertical stripes.
Leave the back plain if it will face a wall.
That saves time.
Vertical stripes look great with upright plants.
Try snake plants, small palms, or ornamental grasses.
If you want a softer style, use a dry brush and paint freehand stripes.
They will look handmade instead of crisp.
Both options work.
Seal the pot once all paint is dry.
6. Geometric Color Block Pots
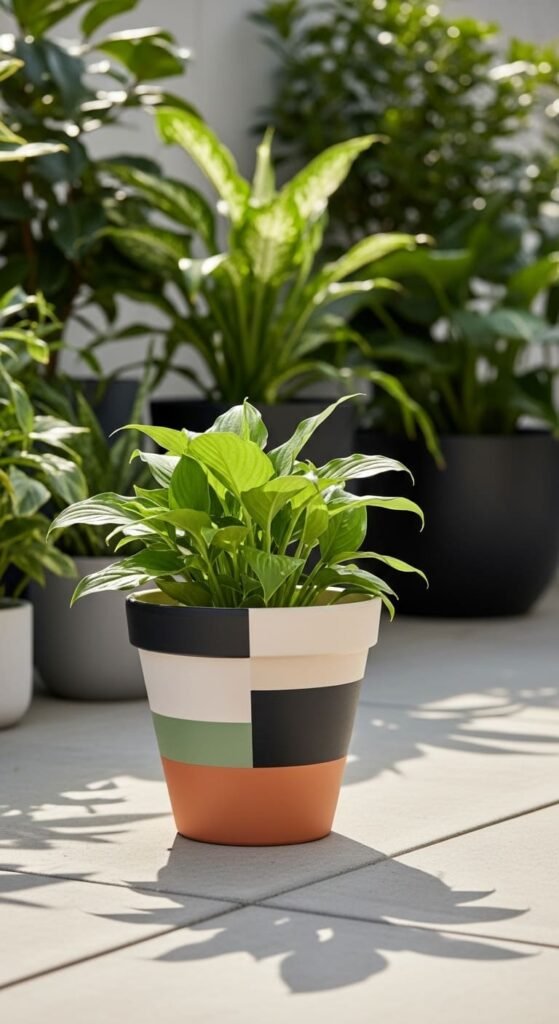
Geometric pots look stylish, but they are not hard.
Use tape to create triangles, rectangles, and angled blocks.
Pick three colors.
More than that can look messy.
Cream, black, and terracotta is a strong set.
Sage, blush, and clay feels softer.
Paint each open section with thin coats.
Let every color dry before placing tape over it.
That prevents peeling.
This project works well on old pots with stains.
The color blocks cover marks and make the pot look intentional.
Use leftover paint samples if you have them.
Small sample pots from hardware stores are usually enough.
For a clean look, keep some natural terracotta showing.
Negative space makes the design feel lighter.
Pair geometric pots with simple plants.
Busy leaves plus busy paint can fight each other.
Finish with matte sealer for a modern finish.
7. Gold Rim Terracotta Pots

A gold rim gives terracotta a polished touch.
Paint the pot body first or leave it natural.
Then tape below the rim.
Paint the rim with metallic gold acrylic.
Use thin coats.
Metallic paint can look streaky if applied too thick.
Let it dry fully.
Remove the tape slowly.
This idea works well for small indoor planters.
Use it for succulents, herbs, or desk plants.
For a budget version, paint only the front half of the rim.
No one will notice if the back faces a wall.
Gold pairs well with white, black, navy, olive, and natural clay.
Do not add too many other details.
The rim is enough.
If you want extra polish, paint a thin gold line near the base too.
Seal with a clear coat.
Use light coats so the metallic finish does not dull.
8. Minimal White Line Pots
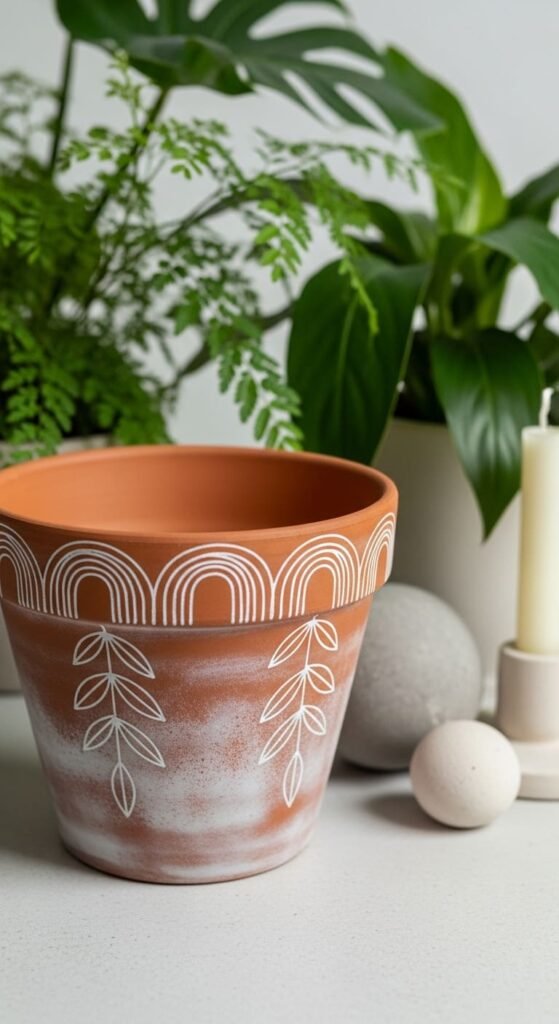
White line art works because it respects the terracotta base.
Leave the pot natural or seal it first.
Use a white paint pen for the design.
Draw simple arches, leaves, waves, or short curved lines.
Keep the spacing open.
Crowding ruins the style.
This idea is perfect for renters, small apartments, and shelf decor.
It looks handmade but still clean.
Use pencil first if you are nervous.
Draw very lightly.
Paint pens are easier than brushes for this design.
They give more control on curved surfaces.
If you make a mistake, let it dry.
Paint over it with terracotta-colored acrylic or turn it into part of the pattern.
This style works best with simple green plants.
Try pothos, peperomia, or succulents.
Seal gently so the white lines stay protected.
9. Terracotta and Cream Half-Dip Pots
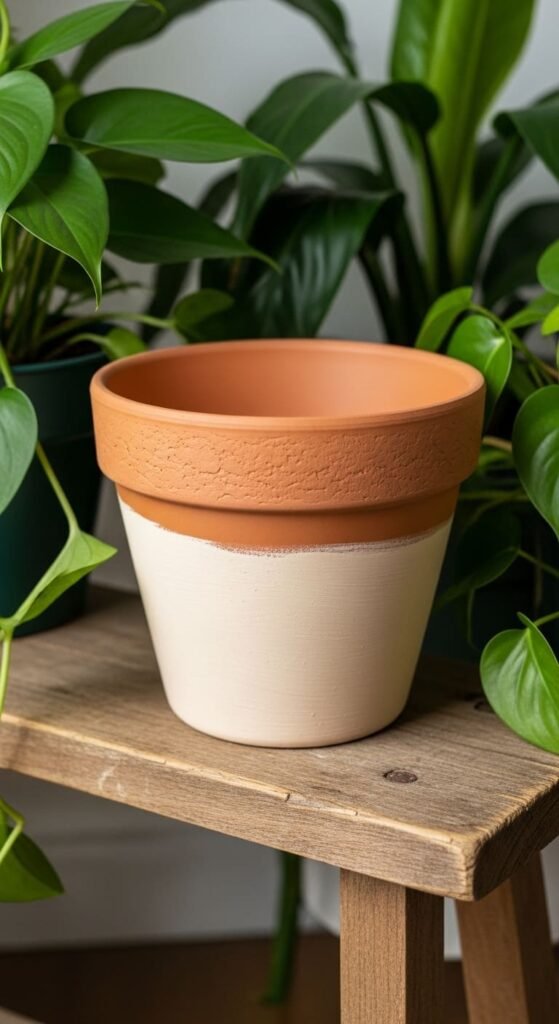
The half-dip look is clean and low-effort.
You do not have to dip anything.
Use painter’s tape to mark a line around the pot.
Paint one half cream, white, black, or sage.
Leave the other half natural terracotta.
That contrast is the whole design.
Paint the bottom half if you want a grounded look.
Paint the top half if you want more color near the plant.
Use two thin coats.
Remove tape after the paint dries.
This idea is great for making mismatched pots feel like a set.
Paint several pots in the same color.
Keep the line height consistent.
That makes them look more expensive.
For a budget project, use leftover house paint.
Just seal it after drying.
Half-painted pots work indoors and outdoors.
Use a matte or satin topcoat for a stylish finish.
10. Freehand Rose Pots
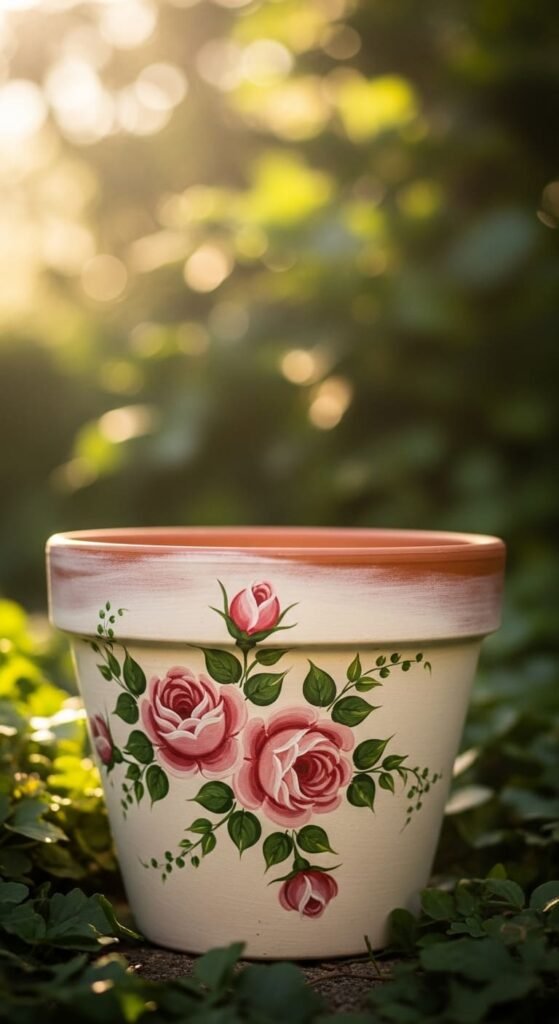
Roses look hard, but you can simplify them.
Paint a cream or pale pink base first.
Use a small brush to make loose curved strokes in pink.
Add darker pink near the center.
Add green leaves around the flower.
Do not try to paint every petal.
That makes the design stiff.
Loose roses look better on terracotta.
Paint one large rose on the front.
Or add several small roses around the rim.
This idea works well for cottage gardens, patios, and gift pots.
Use only three paint colors if you want to keep costs down.
Pink, white, and green are enough.
Let the base coat dry before adding flowers.
A paint pen can help with tiny leaf details.
Seal the design after drying.
Use a clear outdoor finish if the pot will sit in sun or rain.
11. Scalloped Rim Pots

Scalloped rims add charm without covering the whole pot.
Paint the pot body natural, white, or blush.
Use a pencil to mark half-circle shapes around the rim.
Paint the scallops with cream, black, green, or gold.
A small round brush works well.
You can also use a sponge dauber to create the half circles.
This is a good way to dress up cheap terracotta.
The rim detail feels custom.
Leave the rest of the pot plain so the scallops stand out.
For a matching set, use the same scallop color on different pot sizes.
This design works well with flowers, herbs, and trailing plants.
Do not make the scallops too tiny.
Small shapes are harder to paint on curved clay.
Seal the rim after drying.
That part gets touched often during watering.
12. Faux Rope Texture Pots
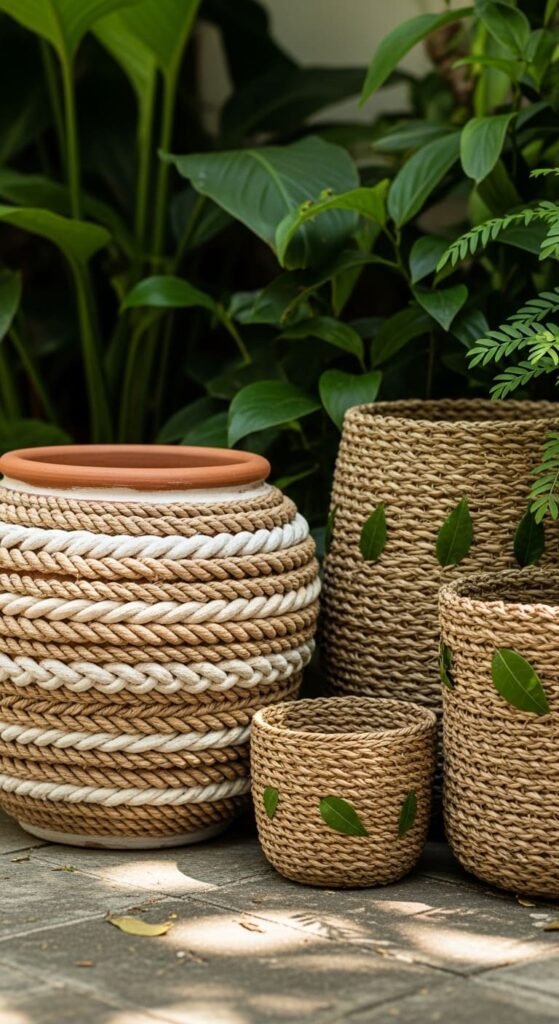
Faux rope gives texture without adding real rope.
Paint the pot in a neutral base color.
Use a thin brush to draw twisted rope lines around the pot.
Start with two curved lines crossing each other.
Repeat around the rim or middle.
Use beige, tan, or off-white paint.
This looks best when the lines are not too perfect.
You can also use raised paint for more texture.
Keep the rope detail to one area.
A full pot of rope lines can look too busy.
This style pairs well with woven baskets, jute rugs, and patio furniture.
For a cheaper version, paint only one rope band around the pot.
Use natural terracotta as the background.
Seal the finished design so raised paint does not chip.
This is a good idea for large outdoor pots.
13. Chic Black and White Pots
Black and white always looks sharp.
Paint the pot white first.
Let it dry fully.
Add black shapes, dots, lines, or arches.
Use a paint pen for cleaner details.
Keep the design simple.
One large black shape can look better than many tiny marks.
Try black arches on a white pot.
Or black dots around the rim.
You can also reverse the palette.
Paint the pot black and add white lines.
This works well in modern homes and offices.
It also makes green leaves look brighter.
For a budget version, use only craft paint and one paint pen.
No extra supplies required.
If the pot feels too stark, leave the rim natural terracotta.
That adds warmth.
Finish with matte sealer for a cleaner look.
14. Soft Sage Green Pots
Sage green is calm and stylish.
It works with almost every plant.
Paint the pot with two thin coats of sage acrylic.
Let dry between coats.
Leave the rim natural for contrast.
Or paint the full pot for a cleaner look.
This is one of the easiest upgrades for indoor plant decor.
It suits shelves, patios, kitchens, and bedrooms.
For a designer look, group sage pots with cream and terracotta pots.
Do not use too many bright colors nearby.
Sage works best with soft tones.
Add one small white line near the rim if you want detail.
Or keep it solid.
Solid color is not lazy if the color is strong.
Use sample paint if you want to save money.
Seal the pot with a satin topcoat.
That gives light protection without heavy shine.
15. Q-Tip Dot Border Pots
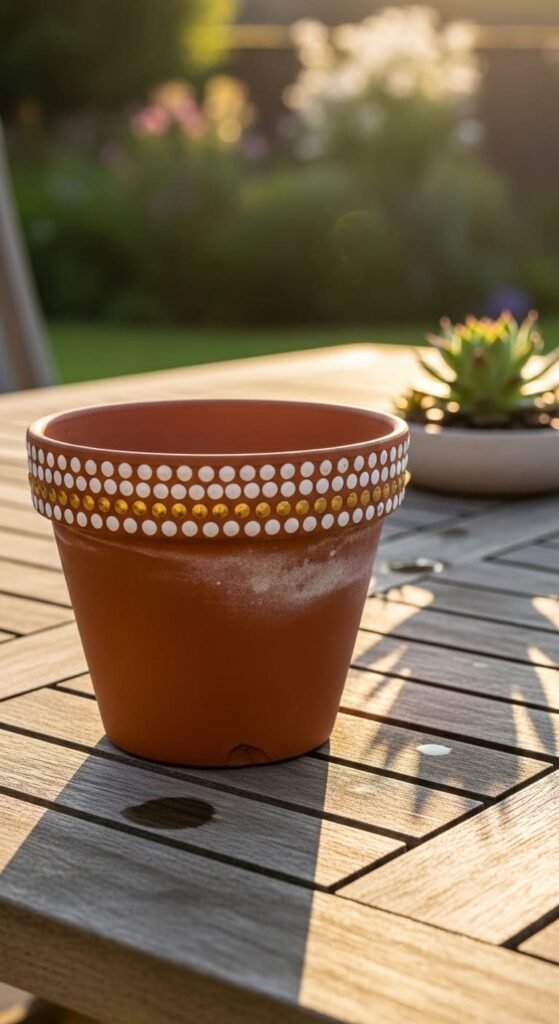
A dot border adds style fast.
Use a Q-tip or pencil eraser.
Dip it into paint.
Press dots around the rim or base.
White dots on natural clay look clean.
Gold dots feel dressier.
Black dots look modern.
Use one color for a simple border.
Use two colors if you want more contrast.
Keep the dots close enough to read as a pattern.
Do not cover the whole pot unless you want a playful look.
This is a good detail for pots that already have a solid base color.
Try a black pot with white dots.
Or a cream pot with terracotta dots.
Let the dots dry before handling.
Raised dots can smear easily.
Seal lightly after the paint dries.
This is one of the cheapest ways to make a plain pot feel styled.
16. Ice Cream Drip Terracotta Pots
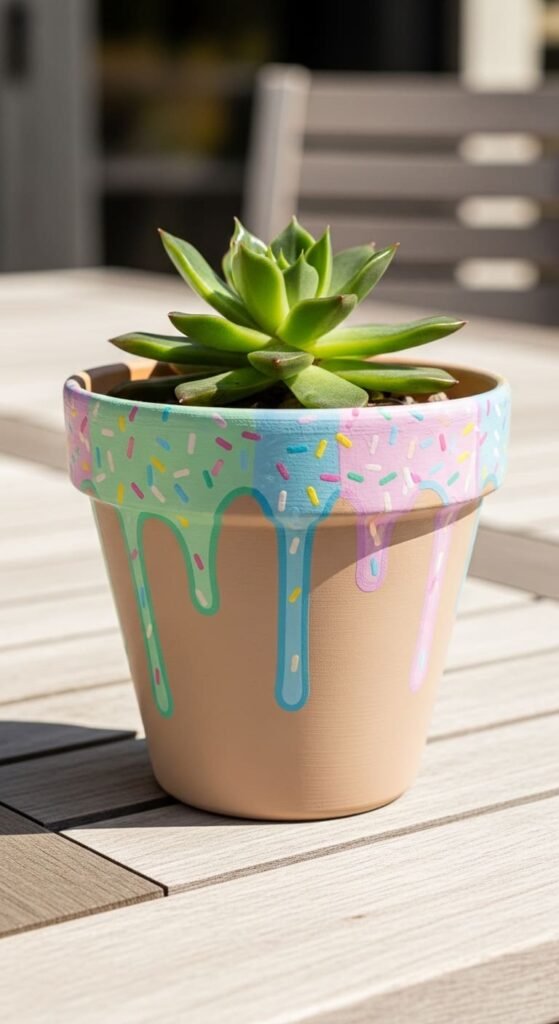
Ice cream drip pots are playful but still stylish if you use soft colors.
Paint the base beige or light brown.
Add pastel drips from the rim.
Pink, vanilla, mint, and chocolate tones work well.
Let the drip shapes curve naturally.
They do not have to match.
Add small sprinkle marks with a paint pen.
Keep them sparse.
Too many sprinkles can make the pot look childish.
This idea works best for small pots, kids’ rooms, summer patios, or gift planters.
Use cheap acrylic paint.
You only need a small amount of each color.
A succulent or cactus looks good inside because it keeps the top simple.
Seal the pot well if it will sit outside.
Drip designs have many exposed edges, so protection matters.
17. Sleepy Face Terracotta Pots

Sleepy face pots are cute but still clean.
Paint the pot lavender, cream, blush, or soft gray.
Use a black paint pen to draw two curved eyes.
Add short lashes if you want.
Use a cotton swab for pink cheeks.
Stop there.
Do not add too many facial details.
The plant becomes the “hair,” which completes the look.
Trailing plants make the face look relaxed.
Succulents make it look funny and bold.
This idea is great for bedrooms, nurseries, desks, and plant gifts.
For a grown-up style, use muted colors.
Avoid neon paint unless you want a playful look.
Paint pens are better than brushes for the face.
They give cleaner lines.
If you mess up, repaint the base and try again.
Seal after drying.
18. Bumble Bee Accent Pots
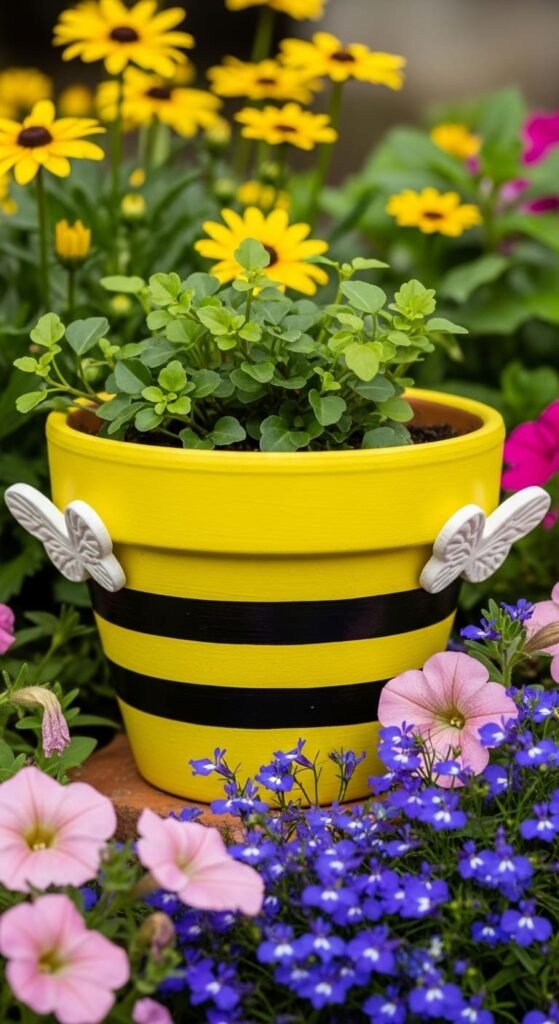
Bee pots work well in garden spaces.
Paint the pot yellow.
Add black stripes around the body.
Use tape if you want clean bands.
Paint tiny white wings near the front.
Add a small face if you want a cute version.
For a stylish version, skip the face and paint one small bee motif on a neutral pot.
Both approaches work.
This idea pairs nicely with flowering plants.
Try marigolds, lavender, zinnias, or basil flowers.
Use yellow and black paint you already have.
White paint can handle wings and tiny highlights.
Do not crowd the pot with too many bees.
One or three is enough.
A busy bee pattern can look messy fast.
Seal the pot if it will live outdoors.
Yellow paint can fade in direct sun without protection.
19. Graffiti Heart Pots
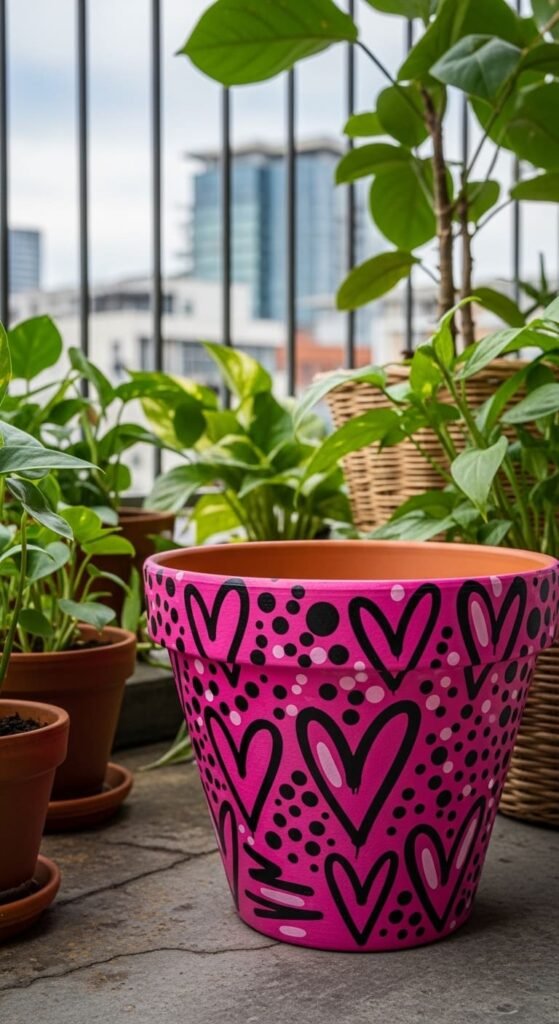
Graffiti hearts bring energy to plain terracotta.
Paint the pot white, blush, black, or natural clay.
Add large hearts in pink, red, or coral.
Outline them with black or white.
Add a few dots and quick marks around the hearts.
Keep the pattern loose.
This design works well for balconies, teen rooms, and bold plant corners.
Use paint pens for outlines.
Use a small brush for the heart shapes.
Do not add words if the pot already has many marks.
That can look cluttered.
For a budget version, paint only one big heart on the front.
Leave the rest plain.
Pair this pot with a cactus or spiky succulent for contrast.
Seal with gloss if you want a street-art shine.
Use matte if you want a softer finish.
20. Stacked Mini Pot Display
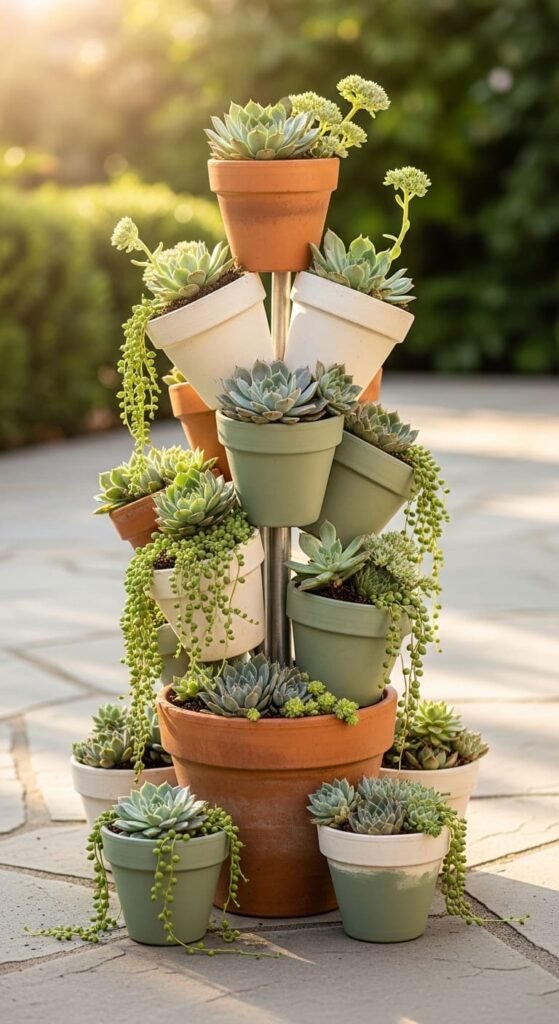
Stacked pots create height without buying a large planter.
Use small terracotta pots in two or three sizes.
Paint them in related colors.
Cream, sage, and natural clay work well.
Stack them at slight angles or use a center support.
Make sure the structure is stable.
Do not build this with heavy wet soil until you test the balance.
Use strong outdoor adhesive if attaching pots together.
This idea works well for succulents, herbs, and trailing plants.
Keep the paint design simple.
Solid colors or thin stripes are enough.
A stacked display already has visual interest.
Too much pattern will fight the shape.
This is a good way to use dollar-store or thrifted pots.
Paint each pot before stacking.
Seal all surfaces after painting.
Outdoor stacked pots face more handling and water exposure.
21. Painted Scallop Pattern Pots
Scallop patterns look stylish when kept simple.
Paint a base color first.
Cream, blush, sage, or white works well.
Use a pencil to mark rows of half circles.
Paint each scallop with a small brush.
Keep the rows loose if you want a handmade style.
Use tape only for the horizontal guide lines.
Do not try to tape every curve.
That is not worth the effort.
This pattern works best on medium pots.
Tiny pots make scallops frustrating.
Large pots let the design breathe.
For a softer look, use tone-on-tone colors.
Try clay pink over terracotta.
For a stronger look, use black scallops on white.
Seal after drying.
Scallop pots pair nicely with soft plants like ferns, pothos, and flowering annuals.
22. Chalky Matte Neutral Pots
Chalky matte paint gives terracotta a high-end look.
Choose neutral colors.
Beige, taupe, charcoal, cream, and clay pink work well.
Paint thin coats.
Matte paint can show streaks if rushed.
Use a flat brush or foam brush.
Let each coat dry fully.
This style works because it is quiet.
No patterns required.
Use it when your plants already have strong leaf shapes.
Monsteras, rubber plants, snake plants, and ferns look great in matte pots.
For a budget tip, mix leftover paint with a small amount of baking soda for a textured matte feel.
Test first.
Too much powder can make the finish gritty.
Seal lightly with a matte topcoat.
Do not use glossy sealer.
It defeats the look.
23. Painted Herb Label Terracotta Pots
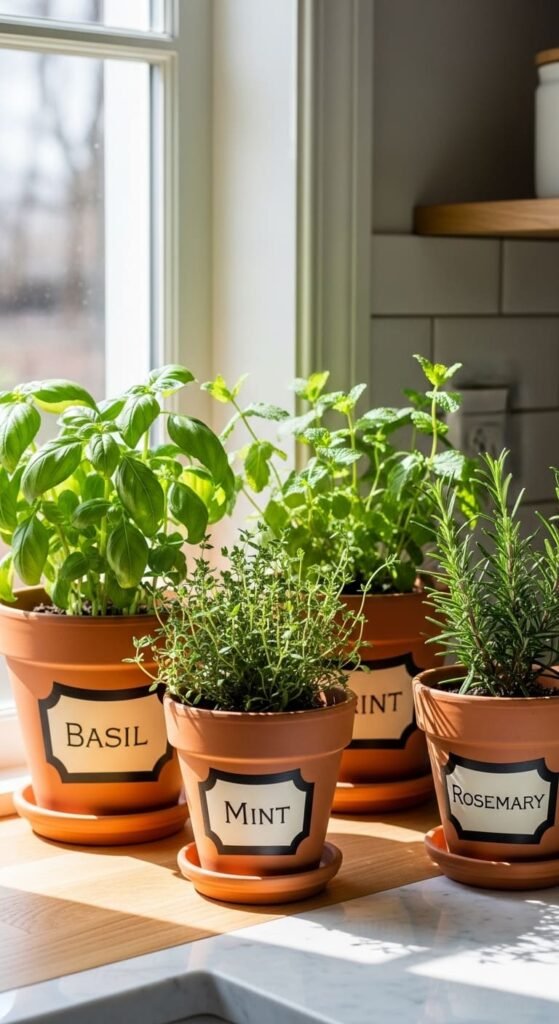
Herb label pots are stylish and useful.
Paint each pot in a solid base color.
Add a small label panel on the front.
Use black, cream, or chalkboard paint.
Write the herb name with a white paint pen or chalk marker.
Keep the lettering simple.
Large letters are easier to read.
This idea works well for kitchens, patios, and balcony gardens.
Use the same label shape on every pot so the set looks coordinated.
Try ovals, rectangles, or arches.
Add tiny leaf marks if the label feels plain.
Do not crowd the design.
The label should stay readable.
For a budget project, use old terracotta pots and leftover paint.
Clean them well before painting.
Seal around the label if using permanent paint.
Skip sealing over chalk if you want to erase and reuse.
Conclusion
Terracotta pot painting works best when you respect the material instead of fighting it. Let some clay show. Use clean colors. Seal before painting. Protect the finish after painting. Pick one idea from this list, finish it today, and build a matching set over time. Stylish plant decor comes from completed projects, not saved inspiration.