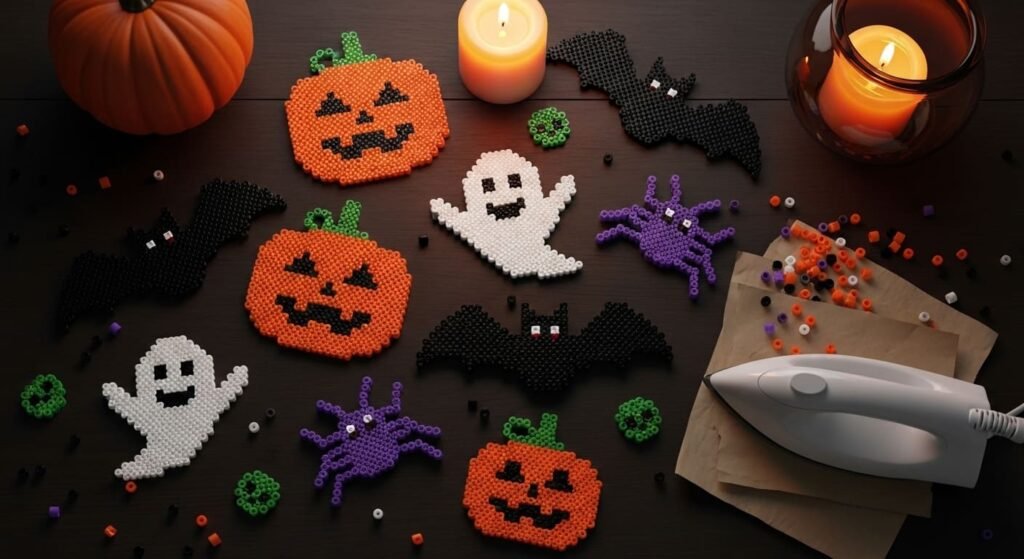
Halloween Perler beads turn tiny plastic pieces into spooky decorations, party favors, and homemade gifts. Whether you love cute friendly ghosts or creepy skulls, fuse beads give kids and adults an affordable way to craft seasonal magic. This list pulls together 24 ideas, from beginner pumpkin keychains to glow-in-the-dark cobweb coasters and 3D haunted houses. Each project includes bead counts, color palettes, and tips for turning flat designs into magnets, treat bag tags, or wall decor. Grab your pegboards and irons, because these crafts are simple, budget-friendly, and packed with Halloween fun.
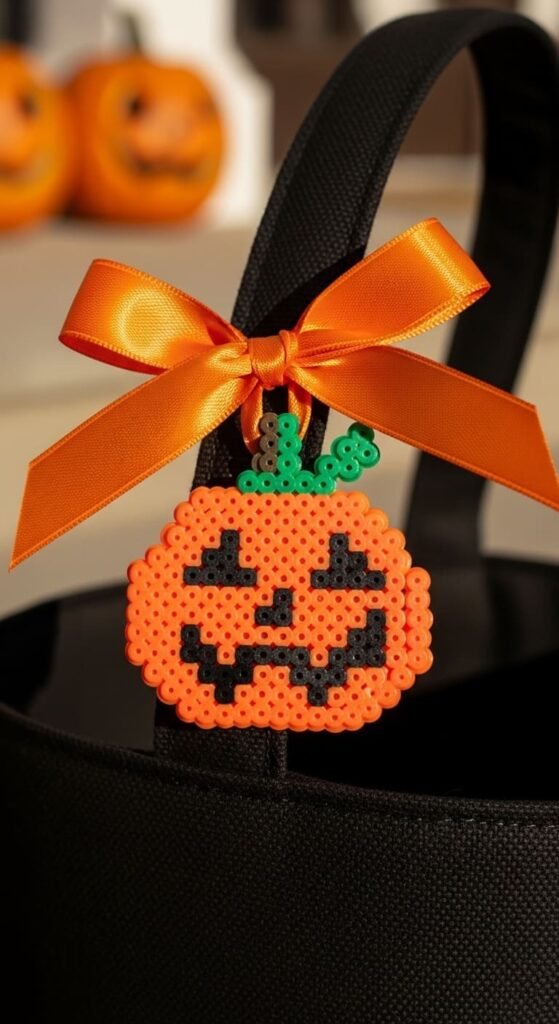
1. Classic Jack-O-Lantern Magnet
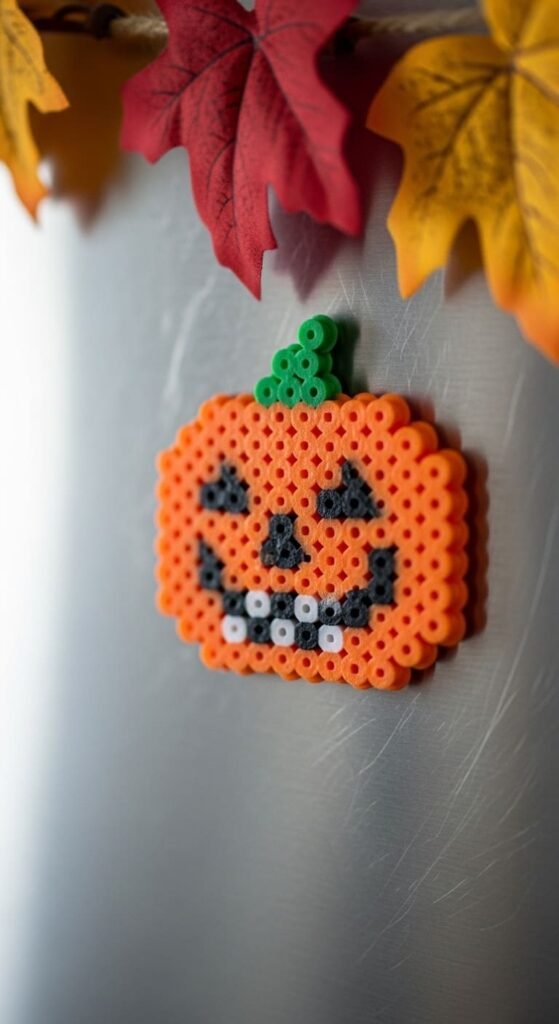
The classic jack-o-lantern is the perfect starter Halloween Perler bead project. Use about 60 orange beads, 8 black beads for the face, and 4 green beads for the stem.
A square pegboard works great for this round shape. Place the orange beads in a pumpkin outline, then add triangle eyes and a jagged smile.
Iron between parchment paper for around 20 seconds on each side. Let it cool flat under a heavy book so the beads stay even.
Glue a small magnet to the back using strong craft glue. Budget tip: save magnets from old promotional fridge giveaways instead of buying new ones.
This design takes about 15 minutes from start to finish. Make a batch of ten in an hour for Halloween party favors or treat bag toppers.
Kids as young as five can handle this pattern with help on the ironing step. Try variations with friendly smiling faces or scary fanged grins.
It is the simplest way to start a full Halloween Perler bead collection without spending much.
2. Friendly Ghost Keychain
Friendly ghosts make adorable Halloween keychains. The simple white shape uses only two colors, making it perfect for beginners.
You need around 50 white beads and 4 black beads for the eyes and mouth. A heart-shaped or square pegboard works well for the rounded ghost form.
After fusing, add a small jump ring through the top and clip on a keychain loop. Budget tip: white beads come in giant value packs at low prices.
These ghost keychains clip onto backpacks, lanyards, and zipper pulls. They make great party favors for Halloween-themed birthdays.
Make a batch of twelve in under an hour for a class treat. Each one costs only pennies in supplies.
Try different facial expressions: happy, surprised, sleepy, or silly. Kids love designing their own ghost personalities.
For extra fun, use glow-in-the-dark beads to make ghosts that light up at night. They cost a bit more but add a magical Halloween touch.
This pattern works for kids ages five and up.
3. Black Cat Silhouette
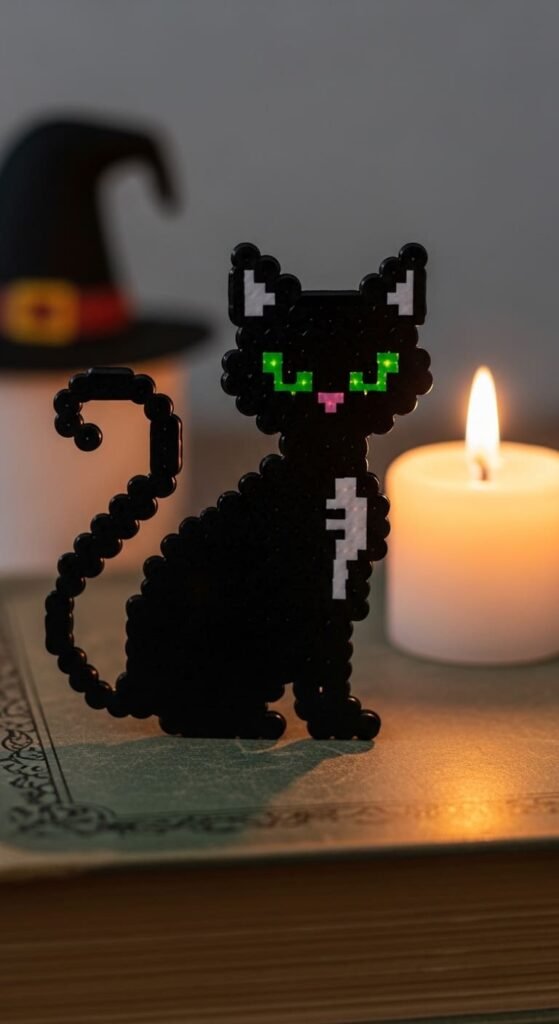
Black cats are a Halloween classic that turn out beautifully in fuse beads. Use about 70 black beads with 2 green beads for glowing eyes.
A square pegboard fits the cat sitting pose with arched back and curled tail. Print a free pixel pattern online to follow square by square.
Budget tip: black beads sell cheap because they are popular for many designs. Buy a giant tube and use it for many projects.
Iron well and let cool flat. Glue a magnet, pin back, or keychain ring depending on how you want to use it.
Black cat magnets look spooky on fridges or lockers. They make great gifts for cat lovers and Halloween fans alike.
Make a small set of three cats in different poses: sitting, walking, and arched back hissing. Display them together for a witchy decor scene.
Pair with a small witch hat or crescent moon for a complete Halloween look. This project takes about 25 minutes and works for kids ages seven and up.
The simple shape teaches good pattern reading without needing many color changes.
4. Spider Web Coaster Set
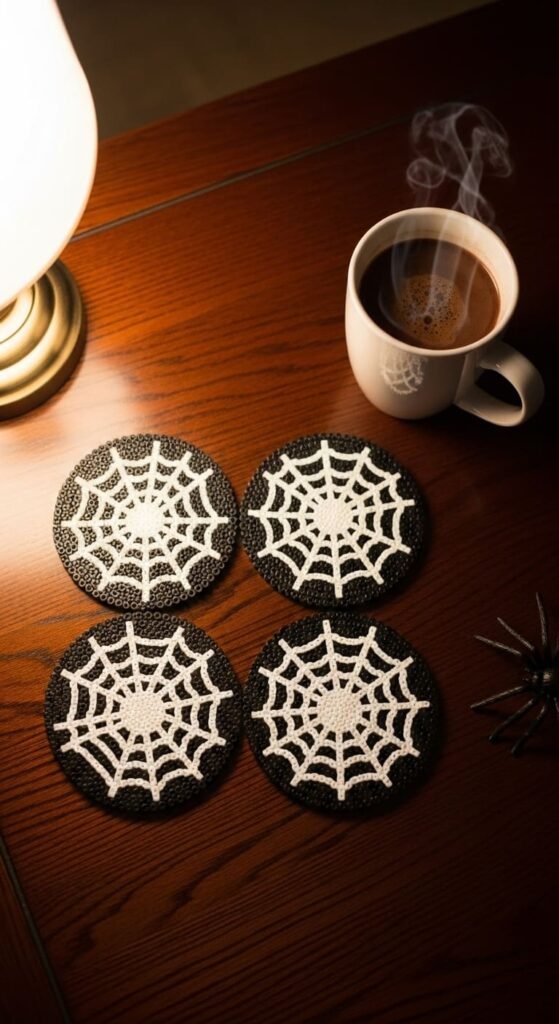
Spider web coasters bring spooky vibes to your Halloween table. Use white beads for the web and black beads for a small spider in the center.
Each coaster takes about 90 beads and 15 minutes of work. Use a square pegboard for clean edges.
Iron until fully fused on both sides for extra durability. Glue a square of felt to the bottom to protect your tables.
Budget tip: cut felt from old craft scraps or thrift store fabric instead of buying new sheets.
These coasters are heat-safe for warm mugs but not hot pans. Display them in a small wooden holder for Halloween parties.
Make a set of four matching coasters for your living room or kitchen. They cost less than store-bought Halloween decor.
Try glow-in-the-dark white beads for webs that shimmer in the dark. They add a magical touch perfect for nighttime Halloween gatherings.
Pair the spider web coasters with pumpkin or ghost designs for a full Halloween coaster set. Each piece takes the same time and bead count.
This project suits kids ages eight and up.
5. Bat Wall Hanging
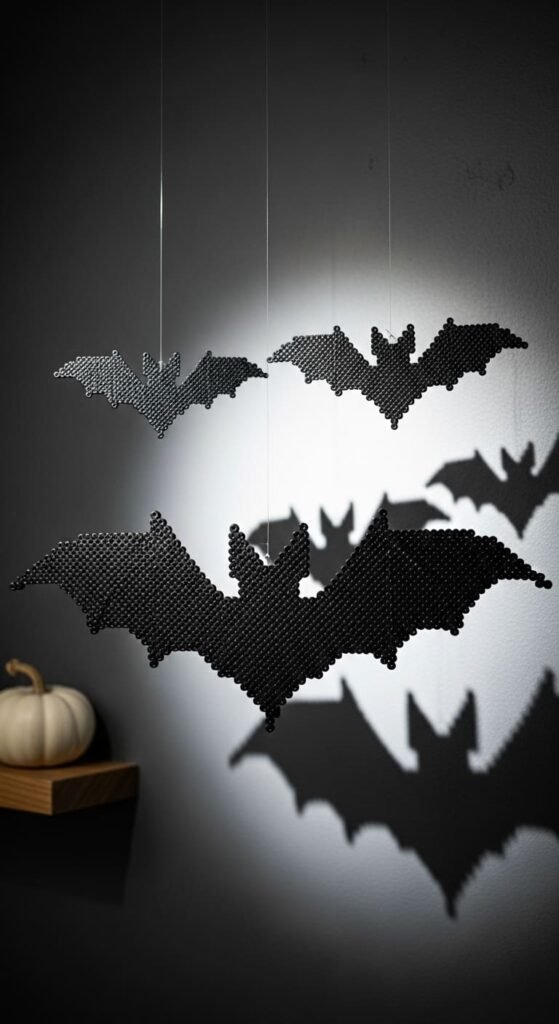
Bat wall hangings add instant Halloween mood to any room. Use about 80 black beads with 2 small red beads for tiny eyes.
A square pegboard fits the bat shape with spread wings. Print a free bat pixel pattern to follow row by row.
After ironing, add a small hole at the top and thread clear fishing line through it. Budget tip: use sewing thread or thin yarn instead of fishing line for a budget option.
Hang three to five bats at different heights for a flying flock effect. They look great on walls, in windows, or above doorways.
Make a batch of ten for a Halloween party display. Each bat takes about 20 minutes and costs only pennies in supplies.
Try smaller bat designs as keychains, magnets, or treat bag toppers. The same pattern scales down to fit a mini pegboard.
This project works for kids ages seven and up. The simple black color makes it forgiving for beginners.
Pair bats with moon or castle designs for a complete spooky scene. Each piece takes similar time and bead counts.
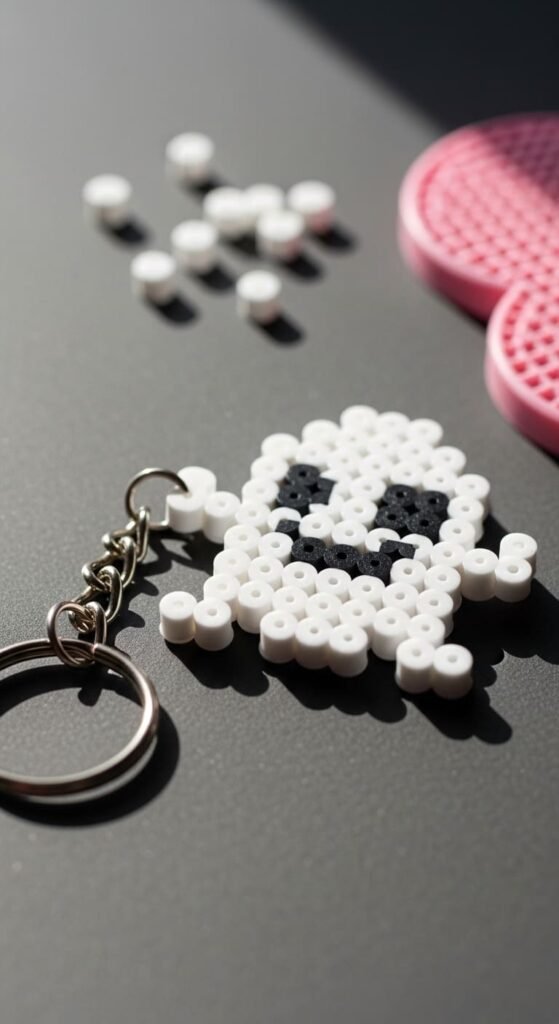
6. Skull And Crossbones Pin
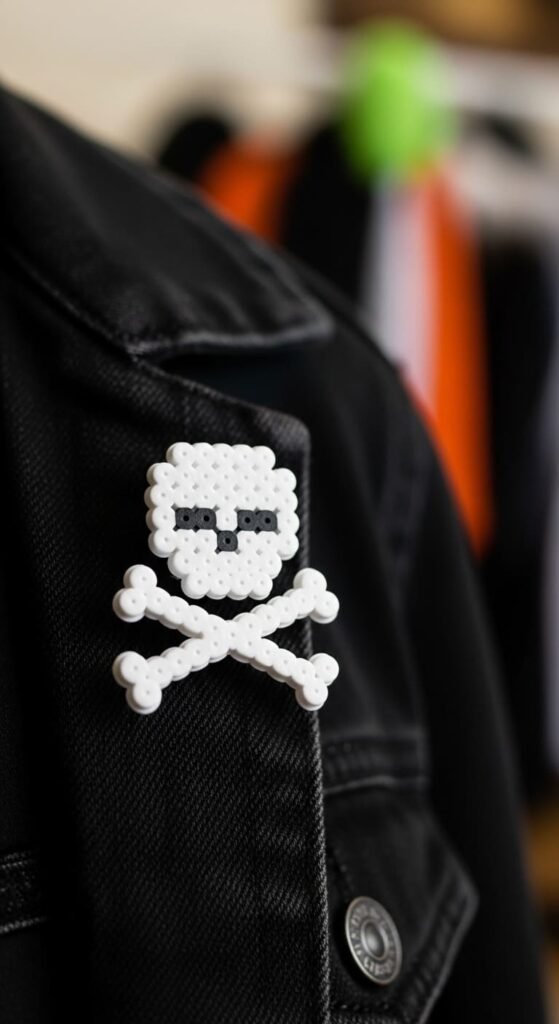
A skull and crossbones pin is a fun Halloween accessory for jackets and bags. Use about 60 white beads for the skull and crossbones.
Add 4 black beads for the eye sockets and 2 for the nose hole. A square pegboard works well for this design.
Iron carefully to keep the skull details sharp. Glue a metal pin back to the rear with strong craft glue.
Budget tip: buy pin backs in bulk packs of 50 online for pennies each instead of single packs at craft stores.
This pin clips onto denim jackets, hats, backpacks, or costume pieces. Halloween fans will love wearing their own handmade designs.
Make a set of three pins in different sizes for a layered jacket look. They cost less than store-bought enamel pins.
Try a sugar skull version with bright pink, blue, and yellow accents for a Dia de Muertos style. The same shape supports many color variations.
This project takes about 25 minutes and suits kids ages eight and up. The detailed face teaches good pattern skills.
Pair with a bat or ghost pin for a full Halloween accessory set.
7. Candy Corn Charm
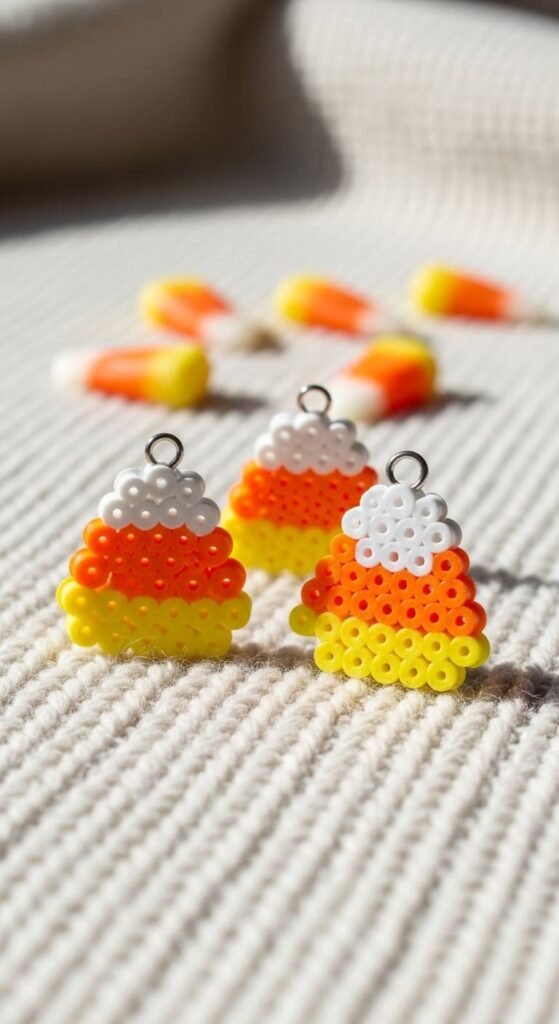
Candy corn charms are quick wins for Halloween treat bags. The classic three-color stripe pattern uses yellow, orange, and white beads.
Each charm takes only 25 to 30 beads and 10 minutes of work. Use a small triangle or square pegboard.
Layer the colors: yellow at the bottom, orange in the middle, and white at the tip. Budget tip: these three colors are common, so leftover beads from other projects work fine.
After ironing, add a jump ring through the top to make it a charm. Attach to keychains, necklaces, or treat bag pulls.
Make a batch of twenty in an hour for a school party. Pack each one in a small bag with handwritten name tags.
Kids love these because they look just like real candy. They make sweet party favors that cost only pennies each.
Try mini versions for earrings or bracelet charms. The same pattern scales down to fit jewelry-sized pegboards.
This project works for kids ages five and up. The simple stripe pattern builds confidence for more detailed designs.
Pair candy corn charms with pumpkin or ghost designs for a full Halloween treat set.
8. Witch Hat Magnet
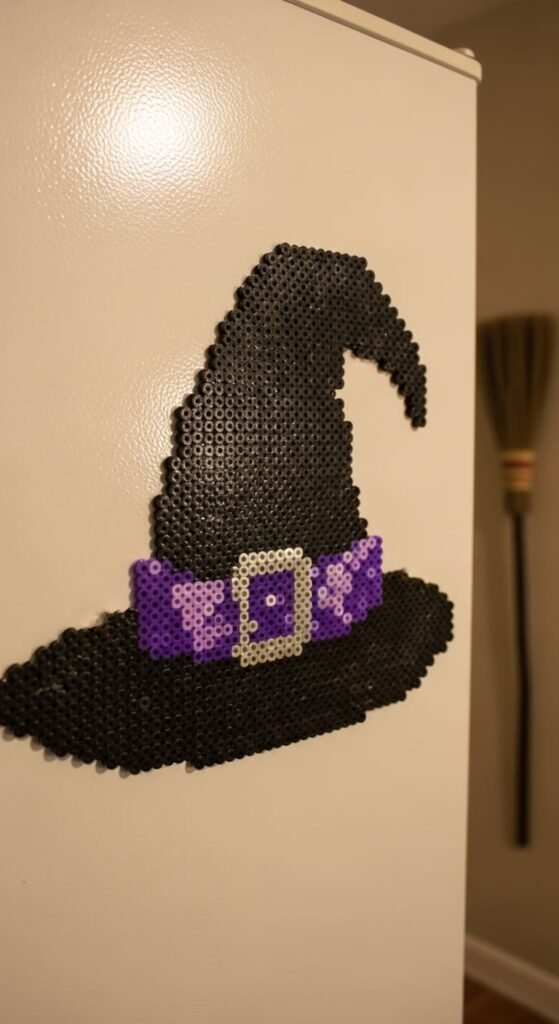
Witch hat magnets bring instant Halloween character to any fridge. Use about 70 black beads, 10 purple for the band, and 4 silver-gray for a small buckle.
A square pegboard fits the pointed hat shape with a wide brim. Print a free pattern online to follow the curves.
Budget tip: swap silver-gray beads with light gray or white if you do not have specialty colors. The buckle still pops against the band.
Iron well and add a strong magnet on the back. The witch hat sticks to fridges, lockers, or any metal surface.
Make a set of three witch hats in different colors: classic black, purple, and dark green. They look great as a trio on a Halloween-themed fridge display.
Try smaller hat designs as keychains, charms, or treat bag toppers. Each takes only about 40 beads in the mini version.
This project takes around 25 minutes and works for kids ages seven and up. The pointed shape teaches good pattern reading skills.
Pair witch hats with broomstick or cauldron designs for a full witchy set. Each piece adds character to your Halloween decor.
9. Frankenstein Monster Pattern
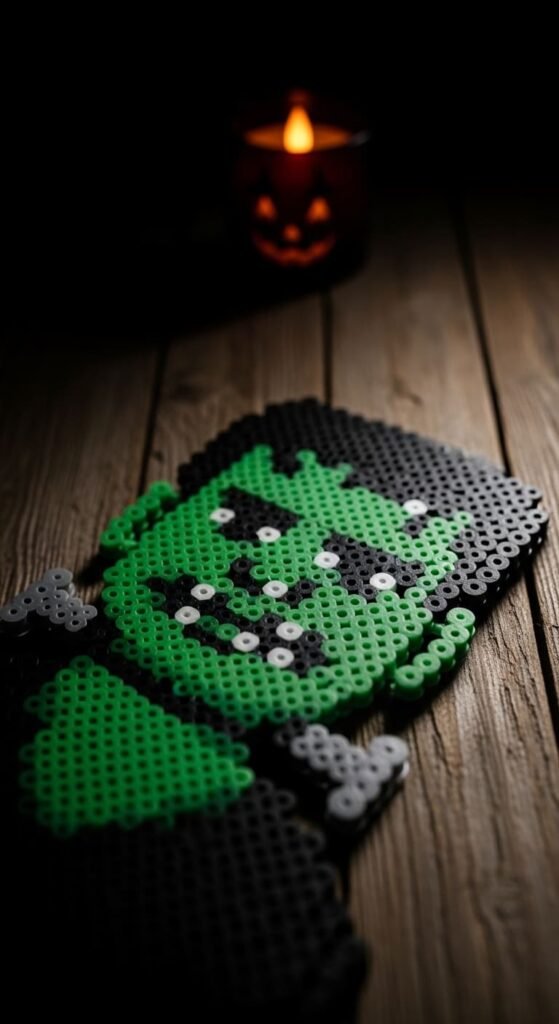
Frankenstein’s monster is a fun retro Halloween Perler bead design. Use green for the face, black for the hair, and gray for the neck bolts.
Around 100 beads create a medium-sized flat figure. A square pegboard fits the boxy head shape perfectly.
Add tiny details like stitched scars, sunken eyes, and a flat brow. Budget tip: green beads come in many shades, so any leftover green from other projects works.
After ironing, the design becomes a magnet, pin, or wall hanging. Frame it in a small black shadow box for vintage horror decor.
Make a set with other Universal Monsters like Dracula, the Mummy, and the Wolfman. Each one uses similar bead counts and time.
Display them together on a dark wooden shelf for a classic monster movie scene. They make great gifts for horror fans and retro Halloween lovers.
This project takes about 35 minutes and suits kids ages nine and up. The detailed face teaches careful color placement.
Pair with a small lightning bolt or laboratory beaker for a full Frankenstein scene. Each piece adds story to the design.
10. Glow-In-The-Dark Skull
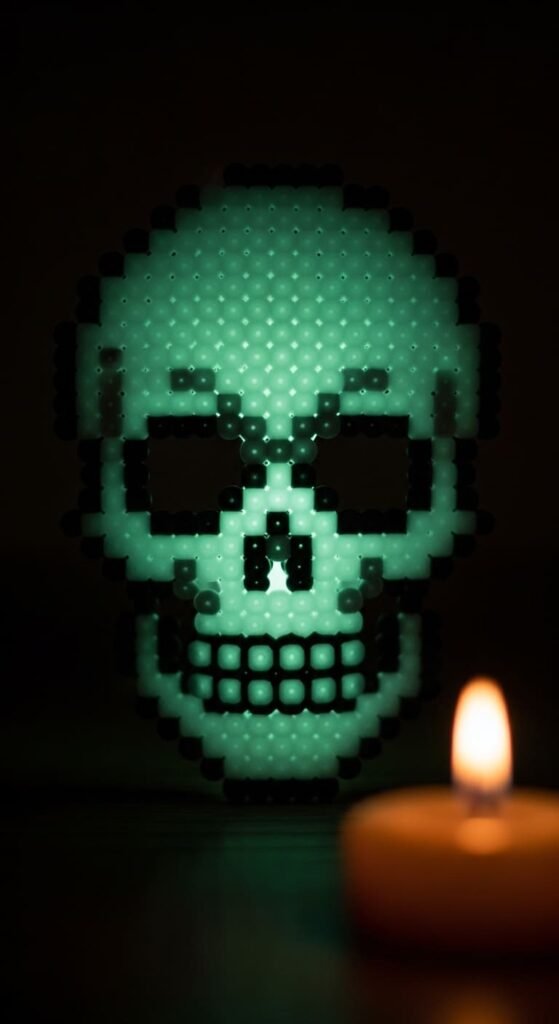
Glow-in-the-dark skulls are perfect for nighttime Halloween decor. Use special glow beads to create a skull that lights up after dark.
Around 80 glow-in-the-dark white beads make a medium skull. Add a few black beads for eye sockets and a nose hole.
A square pegboard works well for the skull shape. Budget tip: glow beads cost a bit more, but a small pack goes a long way for special projects.
Charge the beads under a lamp for a few minutes before display. Then turn off the lights to see them glow softly.
Use these skulls as wall hangings, magnets, or window decorations. They look amazing as a row above a doorway during Halloween night.
Make a set of three glow skulls for a haunted house effect. Pair with regular black bats or spiders for a contrast display.
This project takes about 30 minutes and works for kids ages eight and up. The glow effect makes the work extra rewarding.
Try other glow designs like ghosts, cobwebs, or moons. They all benefit from the same magical nighttime effect.
Each piece adds a spooky touch to Halloween parties or porch decor.
11. Mummy Bookmark
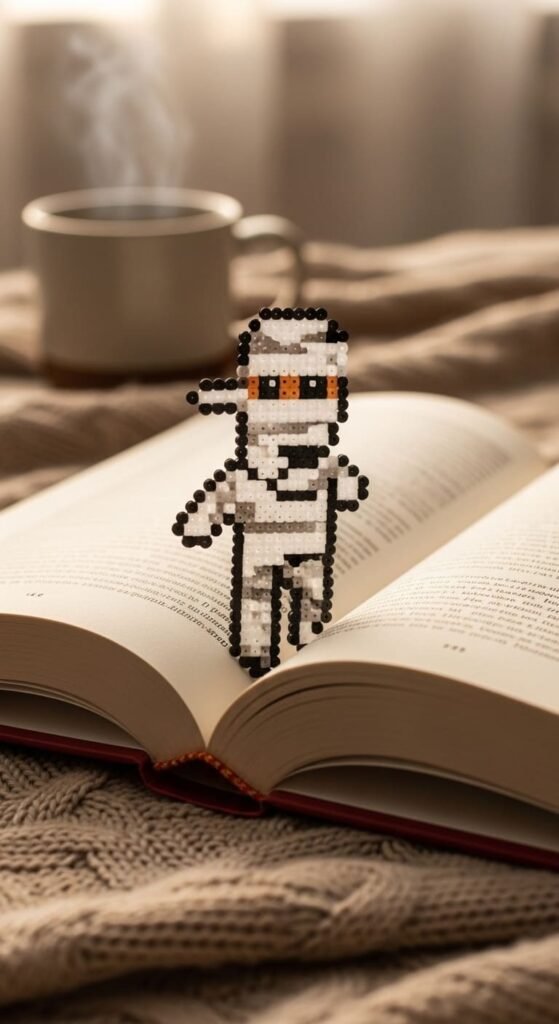
Mummy bookmarks add Halloween charm to your reading routine. Use white beads for the bandage wraps and 2 small black beads for the eyes.
The slim rectangular shape fits a long pegboard about 4 by 11 pegs wide. Around 35 beads make a small mummy bookmark.
Stagger the white beads slightly to create a wrapped look. Budget tip: white is a basic color that comes in giant value packs at low prices.
Add a small ribbon or yarn tassel through the top after ironing. The bookmark slides between pages without bending.
Make a set of five mummies in slightly different shades of white and cream. They make great handmade gifts for book-loving Halloween fans.
Sell them at school craft fairs for a few dollars each. Kids can earn pocket money while practicing bead skills.
This project takes about 15 minutes and works for kids ages six and up. The simple shape forgives small mistakes.
Pair with bat or pumpkin bookmarks for a full Halloween reading set. Each one fits a different book on your shelf.
Display them in a clear jar on a desk during Halloween season for festive decor.
12. Vampire Dracula Design
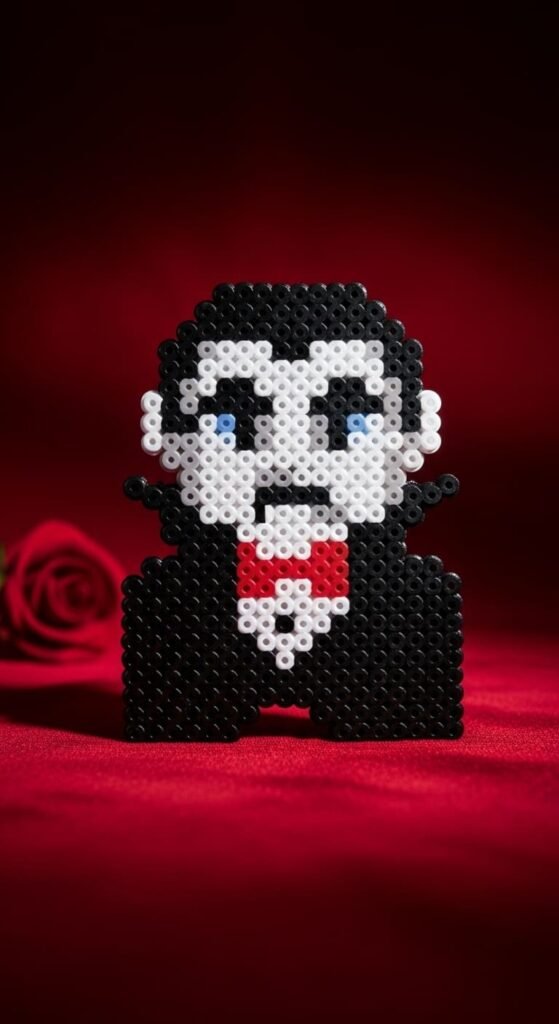
Dracula is a classic vampire design that turns out beautifully in beads. Use pale peach for the face, black for the hair and cape, white for fangs, and red for a bow tie.
Around 110 beads create a medium-sized flat figure. A square pegboard fits the body shape with cape spread out.
Print a free Dracula pixel pattern online and follow it section by section. Budget tip: classic colors like black, white, and red are basics that come in cheap mega packs.
Iron carefully because Dracula has many color changes. Press from both sides for an even melt.
After cooling, the design becomes wall art, a magnet, or a pin. Frame it in a small black shadow box for vintage horror decor.
Make a set with Frankenstein, the Mummy, and the Wolfman for a full Universal Monsters display. They look great together on a dark shelf.
This project takes about 40 minutes and suits kids ages nine and up. The detailed shading teaches good color placement.
Pair Dracula with a small bat or coffin design for a complete vampire scene. Each piece adds story to the display.
13. Mini Halloween Icon Set
Mini Halloween icons are quick wins for crafters who want variety. Each tiny design uses only 25 to 40 beads on a small section of pegboard.
Make a full set with six classics: pumpkin, ghost, bat, spider, witch hat, and skull. Each takes about 10 minutes once you have a pattern.
Use mini pegboards or clear sections of a large board. Budget tip: mini pegboards are cheap online and let you batch many designs at once.
These tiny icons work as charms for bracelets, necklaces, or earrings. Glue them to flat-back earring posts for handmade Halloween jewelry.
Stick small magnets on the back for a full Halloween fridge display. They cost less than store-bought seasonal magnets.
A whole set of six fits in a small gift bag with orange or black ribbon. Kids love receiving handmade favors instead of plastic toys.
This project works for kids ages seven and up. The small size teaches focus, and quick finishes keep them motivated.
Use these as treat bag toppers, party favors, or stocking stuffers for Halloween-loving family members.
14. 3D Haunted House
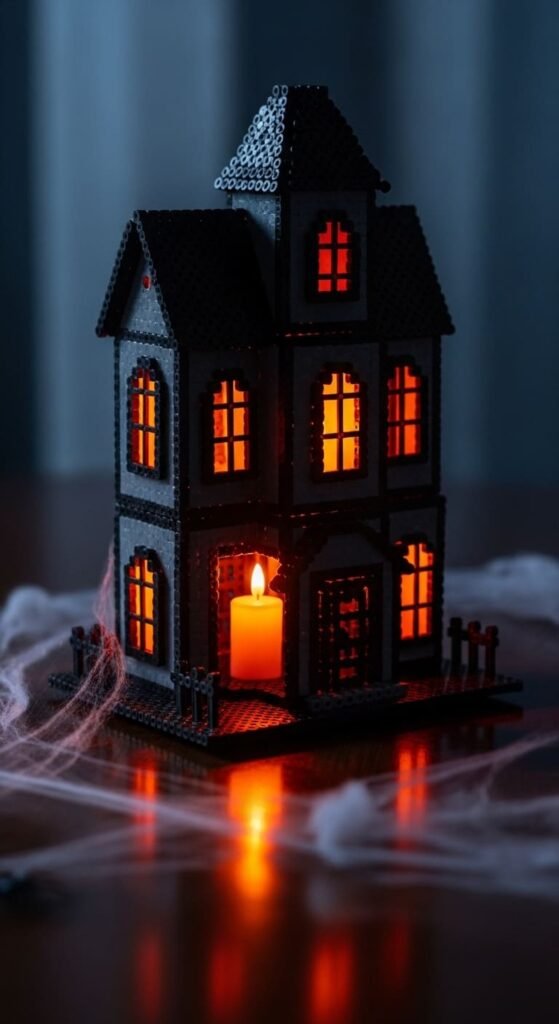
A 3D haunted house is a step up from flat Halloween designs. Make six panels and assemble them into a small house shape.
Each panel shows different details: front door, windows, side walls, and a pointed roof. Use about 100 beads per panel for a medium house.
After ironing each panel flat, glue or carefully fuse the edges together. Budget tip: clear craft glue from the dollar store works great for clean joins.
Use dark colors like gray, black, and purple for a spooky look. Add small yellow or orange windows for a glowing effect.
Place a battery-powered tea light inside for a glowing haunted house at night. The light shines through the window holes for magical decor.
This project takes about three hours and suits older kids ages ten and up. It teaches patience and basic engineering skills.
Display the haunted house on a mantel, shelf, or party table. It costs much less than store-bought Halloween decor.
Try other 3D shapes like coffins, tombstones, or jack-o-lantern boxes. Each one adds a fun three-dimensional element to your display.
Pair with smaller flat designs for a full Halloween village scene.
15. Sugar Skull Pattern
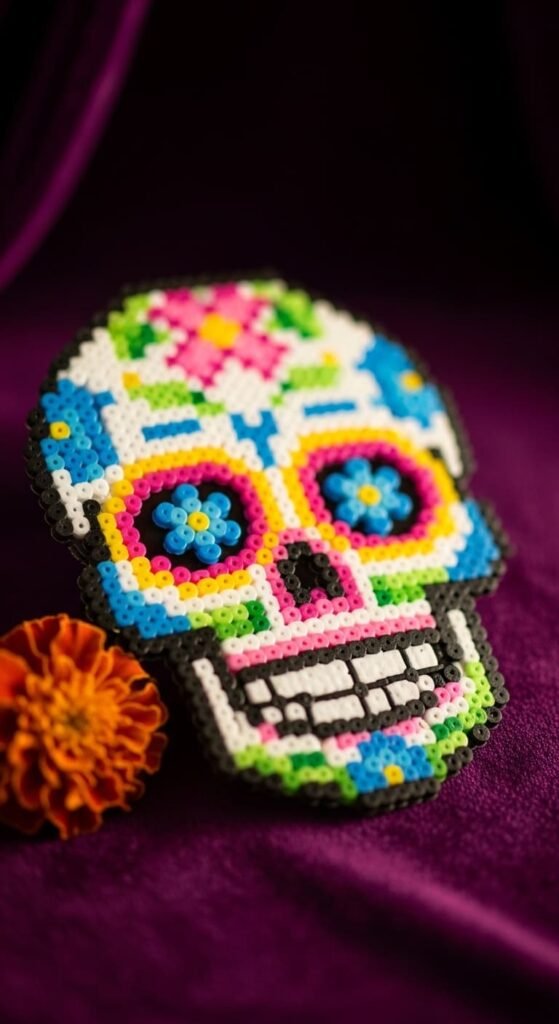
Sugar skulls bring Day of the Dead style to your Halloween Perler bead collection. Use bright pink, blue, yellow, green, and white for the colorful flower details.
A square pegboard fits the skull shape with room for decorative patterns. Around 100 beads create a medium-sized flat sugar skull.
Print a free sugar skull pattern online to follow the floral details. Budget tip: bright bead colors come in mixed assortment packs at low prices.
Iron well and let cool flat. The design works as wall art, a magnet, or a pin for festive Halloween decor.
Make a set of three sugar skulls in different color schemes: pink and blue, yellow and green, or rainbow style. They look beautiful displayed together.
This pattern takes about 40 minutes and suits kids ages nine and up. The detailed flower work teaches careful color placement.
Sugar skulls also fit Dia de Muertos celebrations on November 1st and 2nd. They extend your Halloween Perler bead use beyond October 31st.
Pair with marigold flowers or candle designs for a full cultural celebration display. Each piece adds meaning and beauty to your craft collection.
16. Spooky Tombstone Magnet
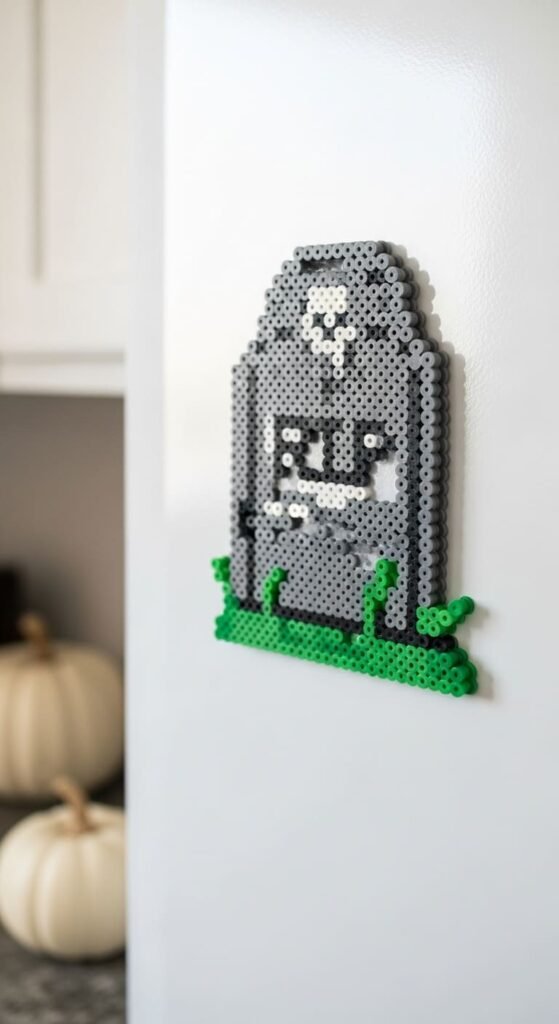
Spooky tombstones make creepy little Halloween magnets. Use gray beads for the stone shape and green for a small grass base.
Around 70 beads make a medium-sized tombstone. A square pegboard fits the rounded top and rectangular body shape.
Add a small black accent for a cross or shadow detail. Budget tip: gray beads come in light and dark shades, so any combination works for a worn stone look.
Iron well and stick a strong magnet on the back. The tombstone magnet looks great on fridges, lockers, or any metal surface.
Make a small graveyard set with three to five tombstones in slightly different shapes and shades. They create a spooky scene when grouped together on a fridge.
Pair with ghost or skull magnets for a full Halloween fridge display. Each piece adds character to your seasonal decor.
This project takes about 20 minutes and works for kids ages seven and up. The simple shape forgives small mistakes.
Try larger versions as wall art for a haunted graveyard scene. The same pattern scales up easily on a bigger pegboard.
Each tombstone costs only pennies in supplies, so you can make many for a full display.
17. Cute Halloween Owl
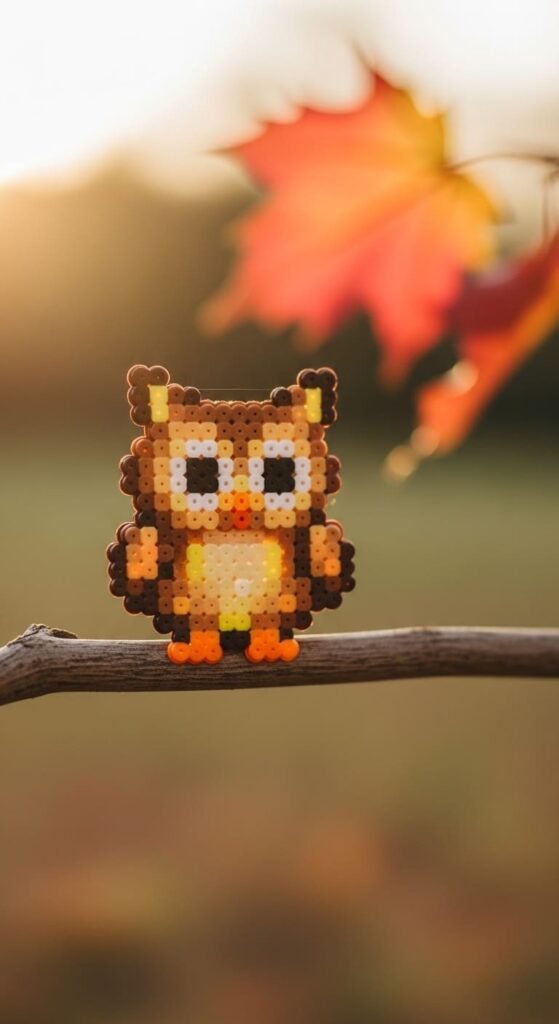
Cute Halloween owls bring autumn charm to your Perler bead collection. Use brown for the body, orange for the chest, and yellow for the big round eyes.
Around 80 beads create a medium-sized flat owl. A square pegboard fits the round body and large face shape.
Add tiny black accents for the pupils and beak. Budget tip: brown and orange beads come in assorted fall color packs at low prices.
Iron well and let cool flat. The design works as a magnet, keychain, or wall hanging.
Make a small forest scene with the owl, a moon, and a few autumn leaves. They look great grouped together as fall decor.
This project takes about 25 minutes and works for kids ages seven and up. The simple shape teaches good pattern reading.
Pair owls with witch hat or moon designs for a complete Halloween woodland scene. Each piece adds woodland character.
Try other autumn animals like raccoons, foxes, or hedgehogs. They all use similar earth-tone color palettes.
Owl Perler beads make sweet handmade gifts for nature-loving Halloween fans. Each one costs only pennies in supplies.
18. Pumpkin Spice Coaster
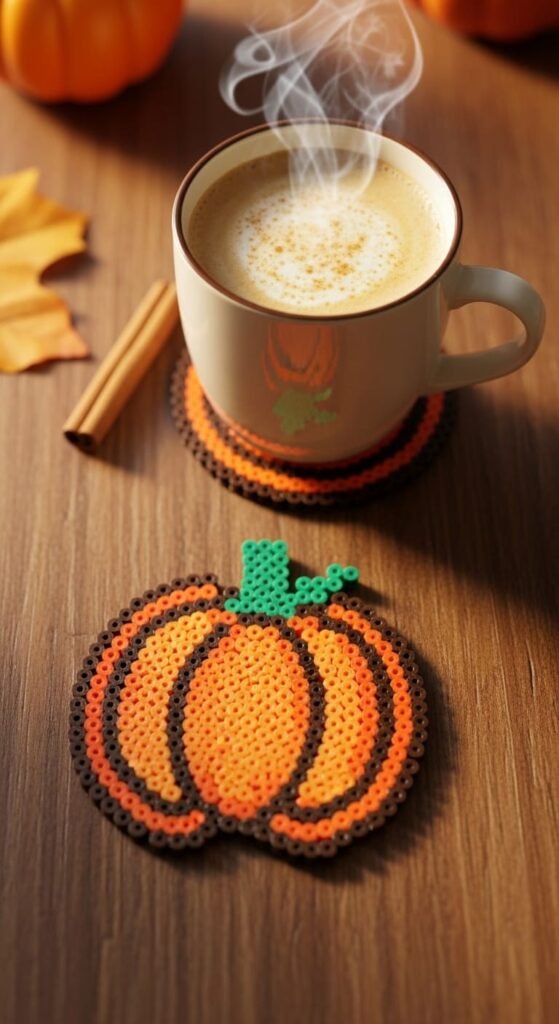
Pumpkin spice coasters bring Halloween charm to your fall coffee routine. Use orange beads for the pumpkin shape, green for the stem, and brown for ribbed accents.
Each coaster takes about 90 beads and 15 minutes of work. Use a square pegboard for clean edges.
Iron until fully fused on both sides for extra durability. Glue a square of felt to the bottom to protect your tables.
Budget tip: orange beads sell cheap right after Halloween, so buy them in November for next year’s projects.
These coasters are heat-safe for warm mugs but not hot pans. Display them in a small wooden holder for fall and Halloween parties.
Make a set of four matching pumpkin coasters in slightly different orange shades. They look great on a coffee table during fall season.
Try other fall designs like acorns, leaves, or apples for a full autumn coaster collection. Each piece uses similar bead counts and time.
This project works for kids ages eight and up. The simple shape teaches good ironing skills.
Pumpkin spice coasters make thoughtful housewarming gifts for fall season. They cost much less than store-bought autumn decor.
19. Trick-Or-Treat Bag Tag
Trick-or-treat bag tags add a personal touch to Halloween candy collecting. Use small Perler bead designs to mark each kid’s bag.
A small pumpkin, ghost, or bat design works perfectly. Each tag takes only 30 to 40 beads and 10 minutes.
Add a small hole at the top before ironing. After cooling, thread orange or black ribbon through it. Budget tip: ribbon scraps from gift wrapping work great for tag strings.
Tie each tag to a different trick-or-treat bag handle. Kids can identify their bags easily during candy sorting after a long night.
Make a set of five different designs for a family with multiple kids. Each child picks their favorite Halloween icon as their personal tag.
This project takes about 15 minutes per tag and works for kids ages six and up. The simple shapes build confidence for bigger designs.
Try adding the kids’ first initials in small letter shapes for personalized tags. Letter pegs are common in many fuse bead kits.
Bag tags make great Halloween party favors when paired with small treat bags. They cost only pennies each in supplies.
20. Halloween Mickey Mouse Pumpkin
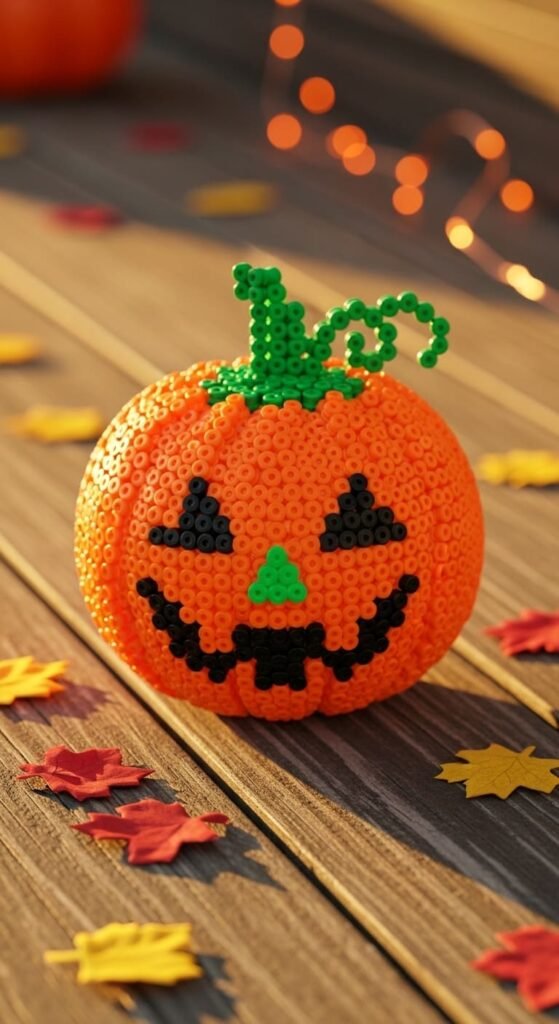
A Mickey Mouse pumpkin design brings Disney magic to Halloween. Use orange beads, black beads for the carved face, and a small bit of green for the stem.
Around 70 beads create a medium-sized Mickey pumpkin on a square pegboard. The classic three-circle Mickey shape forms the pumpkin face.
Carve simple eyes and a smile with black beads. Budget tip: orange beads sell cheap right after Halloween, so buy them in November for next year.
Iron well and add a magnet, hanging string, or hot glue to a Halloween wreath. The design looks great on doors, windows, or fall decor displays.
Make a batch of five for a porch or table display. They cost much less than store-bought Disney Halloween decor.
This project takes about 20 minutes and works for kids ages six and up. The simple shape makes it a great fall craft.
Try other Halloween Mickey versions: ghost Mickey, vampire Mickey, witch Mickey, or zombie Mickey. Each uses similar bead counts and time.
Pair with a Minnie pumpkin in pink for a couple’s display. Disney-loving Halloween fans will enjoy the crossover style.
21. Boo Sign Wall Art
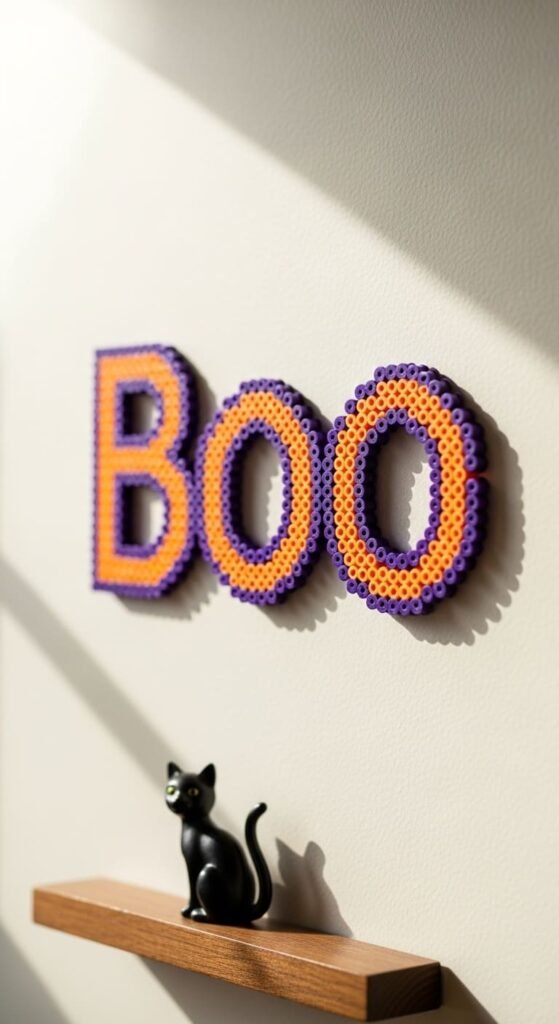
A Boo sign brings instant Halloween charm to any wall. Use bright orange and purple beads for spooky letter colors.
A long rectangular pegboard fits the three letters. Each letter takes about 40 beads, so the whole sign uses around 120 beads.
Print a free letter pattern online to follow the shapes. Budget tip: orange and purple come in mixed Halloween color packs at craft stores.
Iron well and add small holes at the top corners for hanging. Thread ribbon or yarn through the holes to mount on a wall.
This sign works in entryways, kids’ rooms, or living rooms during Halloween. It costs much less than store-bought lettering decor.
Make other Halloween lettering signs like Eek, Trick, or Treat for a full word collection. Each takes similar time and bead counts.
This project takes about 30 minutes and works for kids ages eight and up. Letter shapes teach good pattern reading skills.
Pair with small ghost or pumpkin designs hanging beside the letters for a complete display. Each piece adds character to the wall.
Try the lettering in different color schemes: classic black and orange, purple and green, or pastel pink and lavender for cute Halloween style.
22. Werewolf Pin
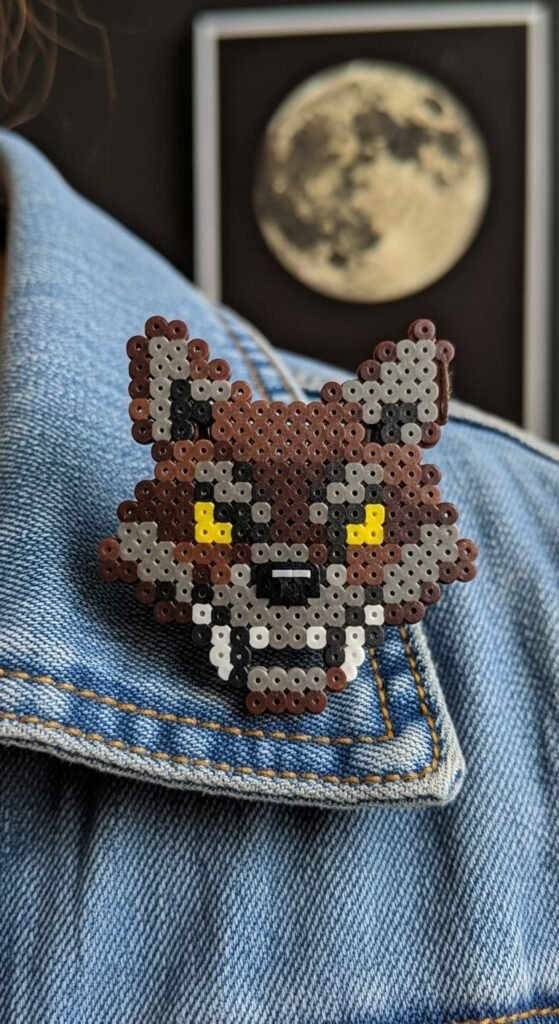
Werewolf pins are a fun Halloween accessory for older kids and teens. Use dark brown for the fur, gray for shading, yellow for the eyes, and white for the fangs.
Around 90 beads create a medium-sized werewolf head pin. A square pegboard fits the snarling face shape with pointed ears.
Print a free werewolf pattern online to follow the details. Budget tip: brown and gray beads are basics that come in big value packs.
Iron carefully because the werewolf has many color changes. Glue a metal pin back to the rear with strong craft glue.
This pin clips onto denim jackets, hats, costumes, or backpacks. Horror movie fans will love the classic monster style.
Make a set with Dracula, Frankenstein, and the Mummy for a full Universal Monsters pin collection. They look great on a jean jacket together.
This project takes about 35 minutes and suits kids ages nine and up. The detailed shading teaches good color placement.
Pair the werewolf with a small full moon design for a complete monster scene. Each piece adds story to the look.
Werewolf pins make great Halloween costume accessories for monster-themed outfits.
23. Cobweb Window Decoration

Cobweb window decorations cast beautiful Halloween light through windows. Use white beads to create a delicate spider web shape on a large pegboard.
Around 200 white beads make a medium-sized cobweb. The radial pattern starts from a center point and spreads outward.
Add a small black spider in the corner for extra Halloween charm. Budget tip: white beads are basics that sell in giant value packs cheaply.
Iron well and add a small piece of clear fishing line at the top. Hang the cobweb in a window where light can shine through it.
This decoration works in living rooms, kitchens, or kids’ rooms during Halloween season. It costs much less than store-bought window clings.
Make a set of three cobwebs in different sizes for a layered window display. They create beautiful shadow patterns when sunlight hits them.
This project takes about 45 minutes and suits kids ages eight and up. The radial pattern teaches careful symmetry skills.
Try glow-in-the-dark white beads for cobwebs that shimmer at night. They add a magical touch to nighttime Halloween parties.
Pair window cobwebs with bat or ghost cutouts on the same window for a complete spooky display.
24. Halloween Treat Bowl Marker
Halloween treat bowl markers add fun touches to candy displays. Use small Perler bead designs to mark different treat bowls at parties.
Make small ghosts, pumpkins, bats, or skulls. Each marker takes only 25 to 35 beads and about 10 minutes.
Add a small wooden skewer or wire to the back so it stands up in a bowl. Budget tip: wooden skewers cost pennies at grocery stores and last for many uses.
Place each marker on a different bowl: ghosts for white candy, bats for chocolate, pumpkins for orange treats, and skulls for sour candy.
This makes party serving easy because guests know what each bowl holds. It also adds Halloween charm to your treat table.
Make a set of six markers for a full party display. Each one takes only pennies in supplies.
This project works for kids ages six and up. The small designs build confidence for bigger Halloween projects.
Try theme-matched markers for specific party themes: monsters, witches, or vampires. Each set adds personality to your event.
Pair the bowl markers with matching cupcake toppers for a coordinated party look. Both pieces use the same small designs.
Conclusion
Halloween Perler beads turn simple plastic pieces into spooky decorations, party favors, and handmade gifts. From friendly ghost keychains to glow-in-the-dark skulls and 3D haunted houses, these 24 ideas cover every skill level and Halloween style. The best part is how affordable they are. Most projects use under 100 beads and cost less than a coffee. Grab some pegboards, print a few free patterns, and start building your own Halloween collection. Whether you make them for kids, parties, or porch decor, these crafts create lasting memories at a budget-friendly price.