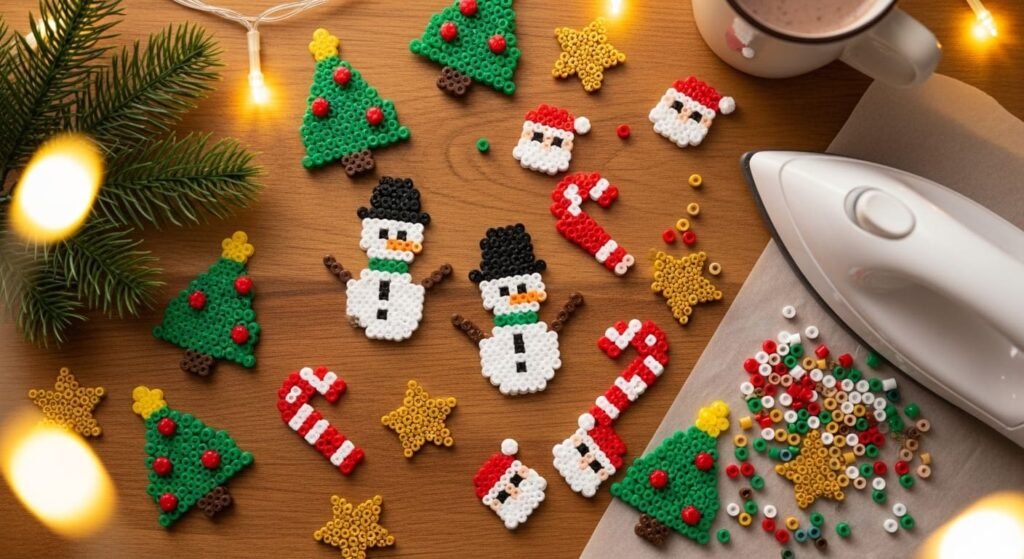
Christmas Perler beads turn tiny plastic pieces into ornaments, gift toppers, and homemade decorations that bring holiday magic to any home. Whether you love classic Santas, sparkly snowflakes, or 3D Christmas trees, fuse beads give kids and adults an affordable way to craft seasonal cheer. This list pulls together 22 ideas, from beginner candy canes to glitter-accented ornaments and nativity scenes. Each project includes bead counts, color palettes, and tips for turning flat designs into hanging ornaments, magnets, or gift tags. Grab your pegboards and irons, because these crafts are simple, budget-friendly, and packed with festive spirit.
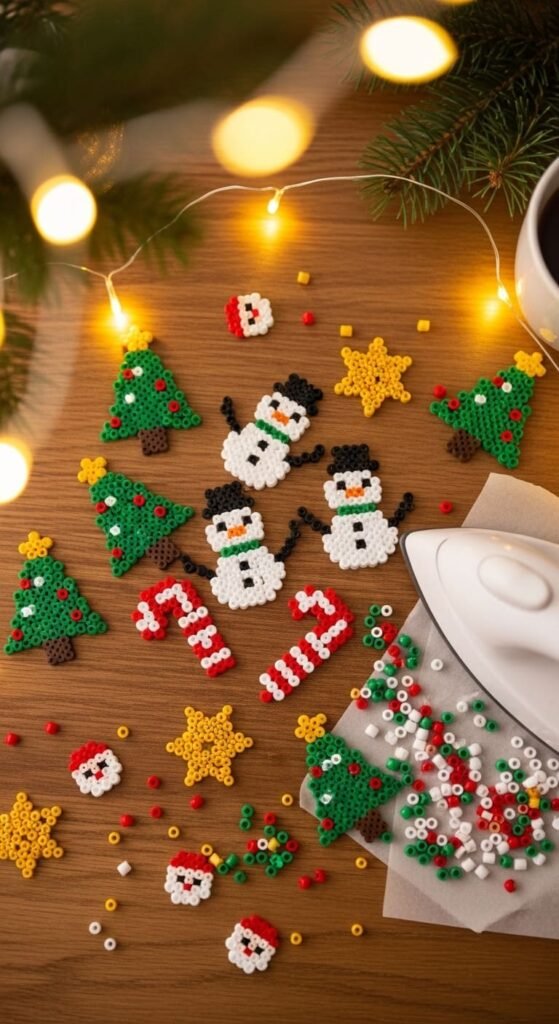
1. Classic Christmas Tree Ornament
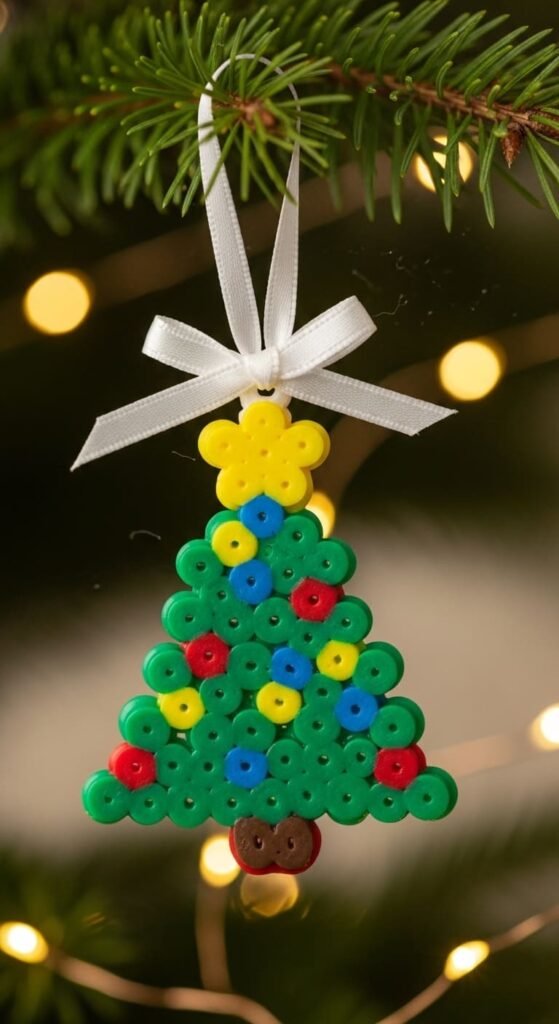
The classic Christmas tree is the perfect starter ornament. Use about 60 dark green beads for the triangle shape, with small red, yellow, and blue beads for ornaments.
Add a yellow star on top and a brown trunk at the base. A square pegboard fits this triangular shape with room for tiny details.
Iron between parchment paper for around 20 seconds on each side. Let it cool flat, then add a small hole at the top using a heated needle before fusing.
Thread a piece of red ribbon or twine through the hole. Budget tip: save ribbon scraps from gift wrapping all year for craft use.
This design takes about 20 minutes from start to finish. Make a batch of ten in two hours for tree decorating or gift toppers.
Kids as young as five can handle this pattern with help on the ironing step. Try variations with white snow-covered trees or pastel-colored ornaments.
It is the simplest way to start a full Christmas Perler bead collection without spending much.
2. Friendly Snowman Magnet
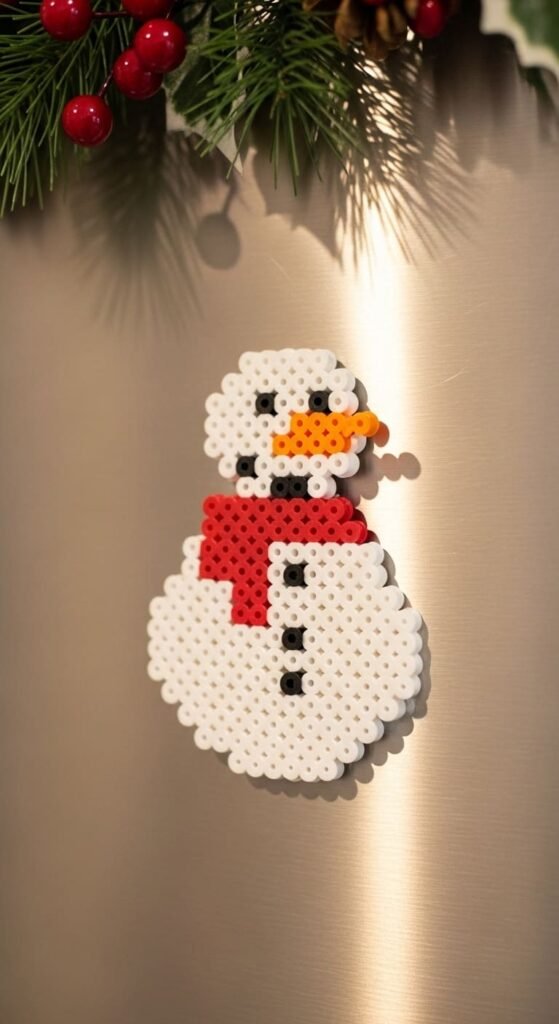
Friendly snowmen make adorable Christmas magnets. The simple white shape uses only a few colors, making it perfect for beginners.
You need around 70 white beads, 8 black for buttons and eyes, 4 orange for the carrot nose, and 10 red for a tiny scarf. A square pegboard works well for the round body.
After fusing, glue a strong magnet to the back. Budget tip: save magnets from old promotional fridge giveaways instead of buying new ones.
These snowman magnets stick to fridges, lockers, or any metal surface. They make great holiday gifts for teachers, neighbors, and grandparents.
Make a batch of twelve in under two hours for a class gift project. Each one costs only pennies in supplies.
Try different scarf colors: classic red, plaid green, or pastel pink for variety. Kids love designing their own snowman personalities.
For extra fun, use glow-in-the-dark white beads to make snowmen that light up at night. They add a magical touch to holiday decor.
This pattern works for kids ages five and up. The simple shape forgives small mistakes and still looks cute.
3. Candy Cane Ornament
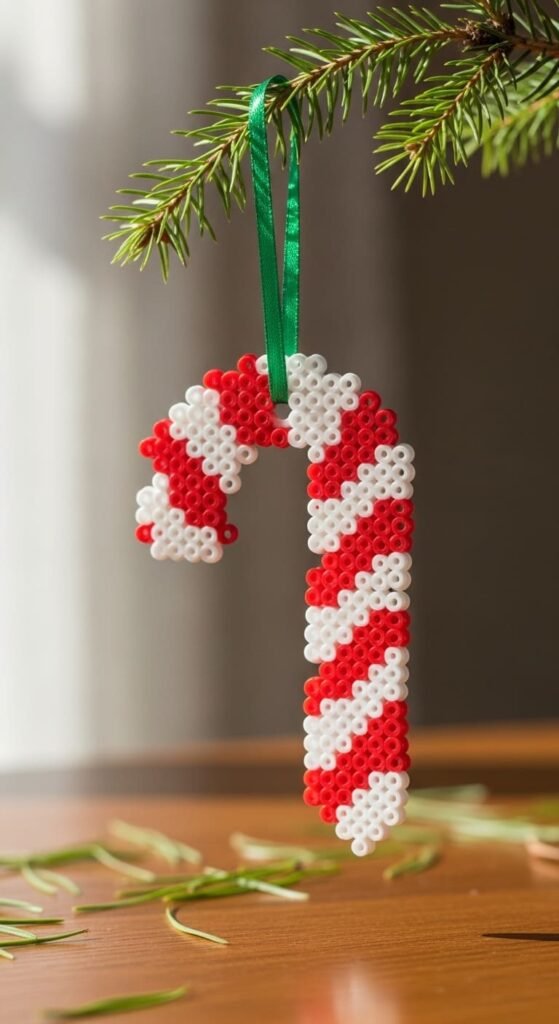
Candy canes are a Christmas classic that turn out beautifully in fuse beads. Use red and white beads to create the iconic striped pattern.
Around 50 beads make a small candy cane on a square pegboard. Alternate red and white in diagonal stripes for the classic look.
After fusing, add a small loop of green ribbon at the top for hanging. Budget tip: red and white beads come in giant value packs at low prices because they are basics.
Make a batch of eight candy canes in an hour. Hang them all over your tree or use as gift toppers for a unified holiday look.
Try peppermint twist variations with white and pink stripes. They look pretty as soft pastel ornaments for a non-traditional tree.
This project works for kids ages five and up. The simple stripe pattern teaches good color placement.
Pair candy canes with snowflake or bell ornaments for a full Christmas tree set. Each piece adds character to your decor.
Make extra candy canes as treat bag toppers for school holiday parties. Each one costs only pennies in supplies and adds personal charm.
4. Santa Claus Head Pattern
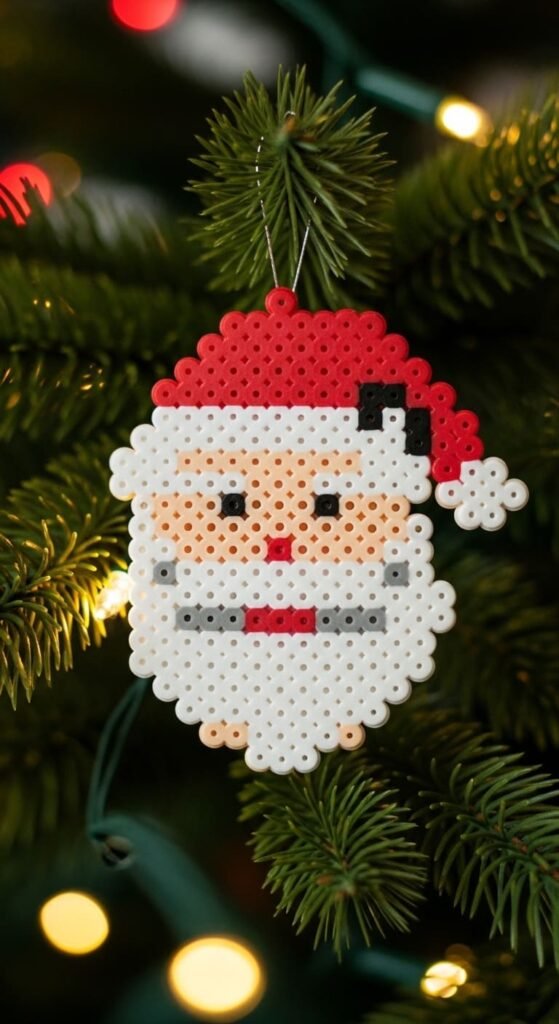
Santa Claus heads are a Christmas tradition in fuse bead form. Use peach for the face, white for the beard and hat trim, red for the hat, and small black accents for the eyes.
Around 80 beads create a medium-sized Santa head. A square pegboard fits the round face shape with the pointed hat on top.
Print a free Santa pixel pattern online and follow it section by section. Budget tip: white and red are basic colors that come in cheap mega packs.
Iron carefully because Santa has many color changes. Press from both sides for an even melt.
After cooling, add a small ribbon loop at the top for hanging. The Santa ornament works on Christmas trees, garlands, or wreaths.
Make a set of three Santas with different hat positions: standard, tilted, or with a green holly accent. They look great hung together on the tree.
This project takes about 30 minutes and works for kids ages seven and up. The detailed face teaches good pattern reading skills.
Pair Santa with reindeer or elf designs for a full holiday character set.
5. Reindeer With Red Nose
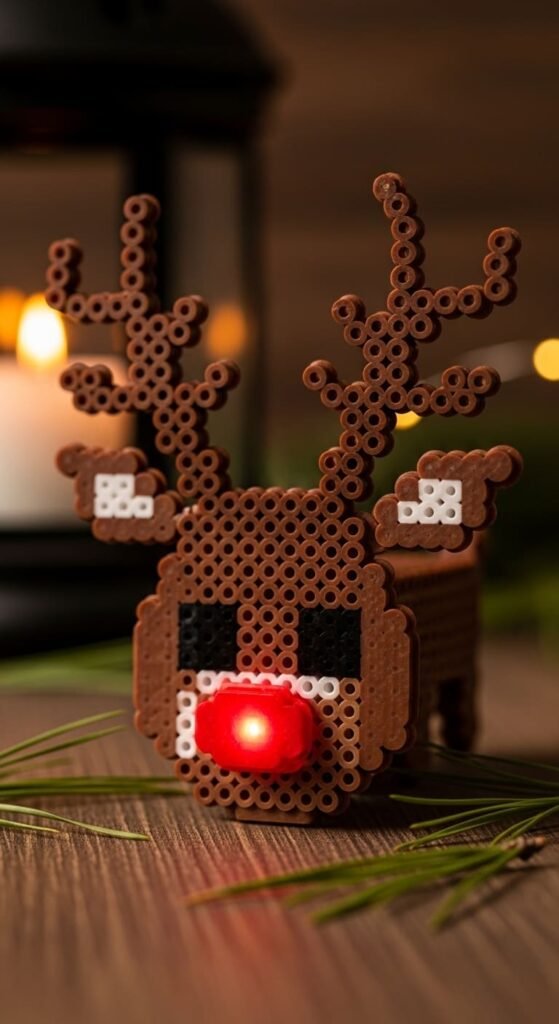
Rudolph the red-nosed reindeer is a beloved Christmas character. Use brown beads for the body, dark brown for antlers, red for the glowing nose, and small black accents for the eyes.
Around 100 beads create a medium-sized flat reindeer. A square pegboard fits the standing pose with antlers spread out.
Print a free reindeer pixel pattern online to follow the shape. Budget tip: brown beads come in many shades, so any combination works for a natural look.
Iron well and let cool flat. Add a small ribbon loop at the top for hanging as an ornament.
The reindeer also works as a magnet, pin, or wall hanging. Glue a small pin back for wearable Christmas accessories.
Make a set of nine reindeer with one red nose for Rudolph and the rest with black noses for his friends. They make a cute display when grouped together.
This project takes about 30 minutes and suits kids ages seven and up. The antler details teach careful pattern placement.
Pair the reindeer with a small Santa sleigh design for a complete Christmas Eve scene. Both pieces use similar bead counts and time.
6. Snowflake Ornament Set
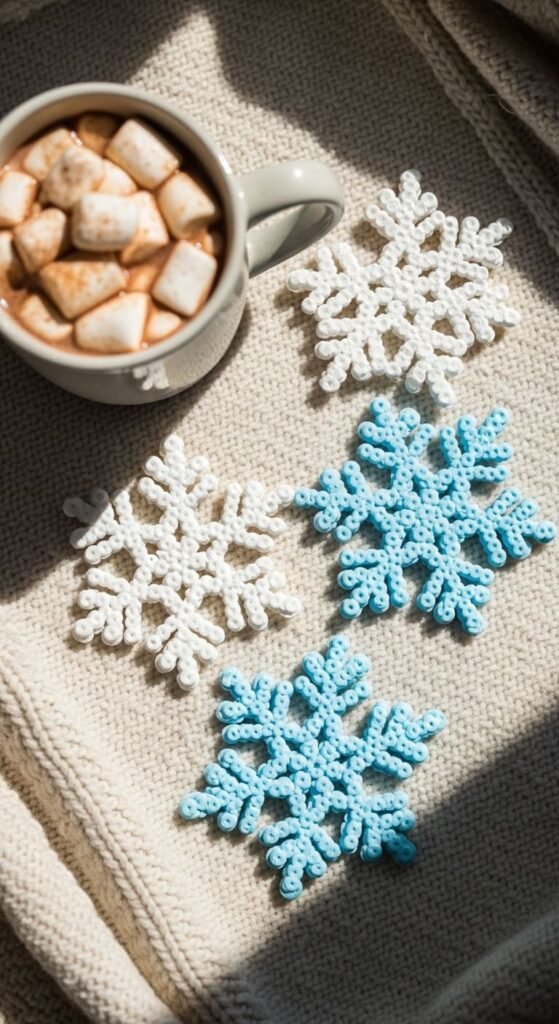
Snowflakes are pretty Christmas ornaments that look great in white and pastel blue. Each snowflake uses only one or two colors, making them perfect for beginners.
A round or square pegboard fits the symmetric six-point design. Around 50 beads make a medium snowflake.
Print a free snowflake pattern online to follow the radial design. Budget tip: white beads sell in giant value packs at low prices.
After fusing, add a small ribbon loop at the top for hanging. They work as Christmas tree ornaments, gift toppers, or window decorations.
Make a set of six snowflakes in slightly different patterns. Each one is unique, just like real snowflakes in nature.
Try glitter white beads mixed with regular white for sparkly snowflakes that catch light beautifully. They cost a bit more but add a magical touch.
This project takes about 25 minutes per snowflake and works for kids ages seven and up. The symmetric pattern teaches careful counting.
Pair snowflakes with snowman or winter tree designs for a full winter wonderland set. Each piece extends the season beyond Christmas.
Display them on a winter-themed tree all season long.
7. Gingerbread Man Cookie

Gingerbread men bring kitchen Christmas charm to fuse bead crafts. Use light brown beads for the body, white for icing details, and small red and green for buttons and accents.
Around 70 beads create a medium-sized gingerbread man. A square pegboard fits the figure shape with arms and legs spread out.
Add tiny details like piped icing trim, smiling face, and gumdrop buttons. Budget tip: light brown beads come in assorted neutral packs at low prices.
Iron well and let cool flat. Add a small ribbon loop at the top for hanging on a tree or in a kitchen window.
Make a set of three or four gingerbread men in slightly different sizes. They look adorable as a hanging garland in a kitchen during Christmas.
This project takes about 25 minutes and works for kids ages six and up. The icing details teach careful color placement.
Pair gingerbread men with candy cane or holly designs for a full kitchen-themed Christmas display. Each piece adds homey charm.
Try a gingerbread house variation with a brown roof, white snow trim, and colorful candy details. The same color palette works for both designs.
Each one costs only pennies in supplies.
8. Christmas Wreath Wall Hanging
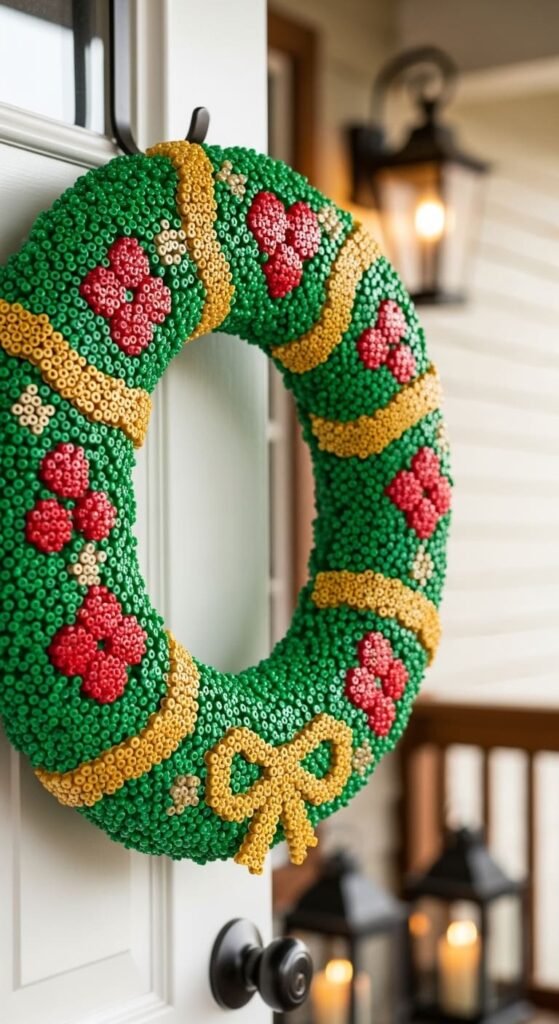
Christmas wreaths make beautiful door or wall decorations. Use dark green beads for the leaves, red for berries, and a touch of gold or yellow for ribbon accents.
A round pegboard fits the circular wreath shape. Around 200 beads create a medium-sized wreath.
After ironing, add a hanging loop at the top with red ribbon. Budget tip: ribbon scraps from gift wrapping make great hanging loops without extra cost.
Hang the wreath on a front door, wall, or window. It works as instant Christmas decor that costs much less than store-bought wreaths.
Make a smaller version as an ornament for the tree, or larger versions for above doorways. The same pattern scales easily.
This project takes about 40 minutes and works for kids ages eight and up. The circular pattern teaches careful symmetry skills.
Try variations with pinecone accents, holly leaves, or berries in different colors. Each variation adds personality to your holiday decor.
Pair wreaths with bell or candle designs for a full door display. Each piece adds character to your home entry.
The finished wreath lasts for years and saves money compared to buying new decor every season.
9. Holly Leaves And Berries
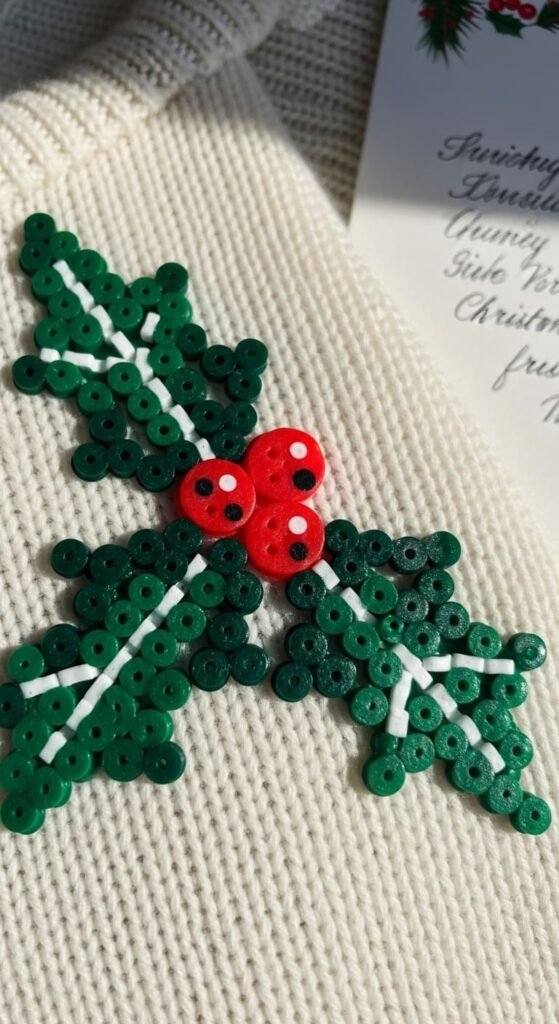
Holly leaves with red berries are classic Christmas accents. Use dark green for the leaves and bright red for the berry clusters.
Around 50 beads create a small holly design. A square pegboard fits the leaf shape with three berries grouped together.
Print a free holly pattern online to follow the pointed leaf edges. Budget tip: green and red beads are basic Christmas colors that come in mixed holiday packs.
After fusing, the holly works as a gift topper, magnet, brooch, or small wall hanging. Glue a pin back for wearable Christmas accessories.
Make a batch of ten holly designs as Christmas card embellishments. Glue one to each card for personalized handmade greetings.
This project takes about 15 minutes per holly piece and works for kids ages six and up. The simple shape forgives small mistakes.
Pair holly with bell, wreath, or candle designs for a full classic Christmas set. Each piece adds character to holiday displays.
Try variations with white berries for a winter wonderland style or gold berries for elegant decor. Each color choice creates a different mood.
Holly designs make sweet additions to handmade gift wrapping or Christmas package decoration.
10. Christmas Stocking Pattern
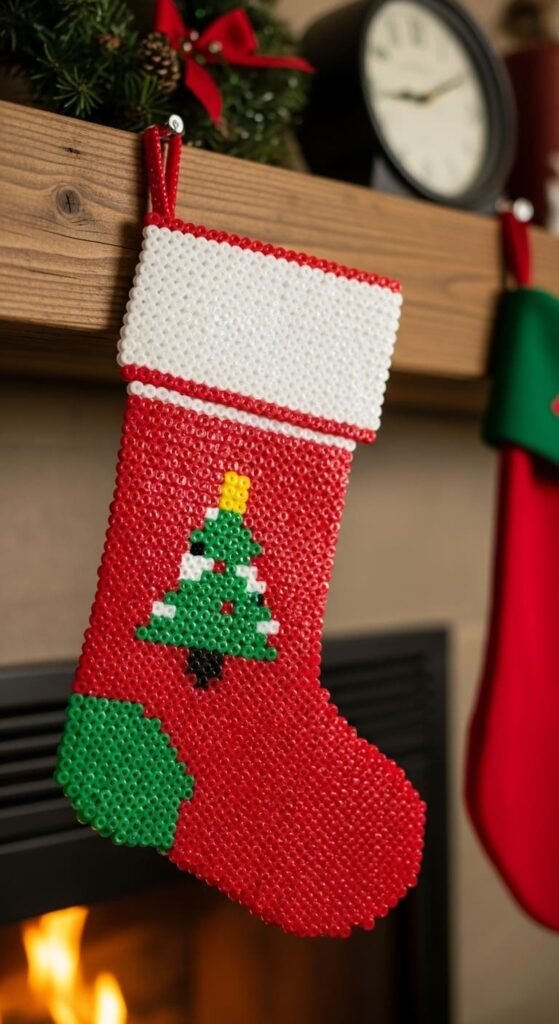
Christmas stockings make adorable Perler bead designs. Use red for the body, white for the cuff and toe trim, and small green or gold accents for decoration.
Around 80 beads create a medium-sized stocking. A square pegboard fits the elongated boot shape with a wide top cuff.
Add a small Christmas tree, snowflake, or initial in the middle for personalization. Budget tip: stockings work with leftover beads from many other Christmas projects.
After fusing, add a small ribbon loop at the top for hanging. The stocking works as a tree ornament, gift tag, or wall decoration.
Make a personalized set with each family member’s initial inside their own stocking. They make sweet handmade Christmas gifts.
This project takes about 30 minutes and works for kids ages seven and up. The simple shape teaches good pattern placement.
Try color variations: classic red and white, green and white, or pink and silver for non-traditional decor. Each scheme creates a different holiday mood.
Pair stockings with candy cane or gingerbread designs for a full holiday tag set. Each piece adds personal charm to gift wrapping.
Make extras as small Christmas card accents for friends and family.
11. Mini Bell Ornament

Mini bell ornaments add classic Christmas charm to any tree. Use yellow or gold beads for the bell shape with small accents in red or green.
A small square pegboard fits the bell shape with a curved bottom. Around 40 beads make a small bell ornament.
After fusing, add a tiny red ribbon at the top for hanging. Budget tip: yellow beads make a great gold substitute when actual gold beads are too expensive.
Make a batch of twelve mini bells in two hours. They cover a Christmas tree beautifully or work as gift toppers.
Try silver-tone variations using light gray beads. They look elegant on a frosted or pastel-themed tree.
This project takes about 15 minutes per bell and works for kids ages six and up. The simple shape forgives small mistakes.
Pair bells with holly, candy cane, or snowflake ornaments for a full classic Christmas set. Each piece adds traditional charm.
Try larger bell variations as door decorations. The same pattern scales up easily on a bigger pegboard for wreath-sized bells.
Mini bells make great handmade gifts when packaged in a small ornament box. Each set costs less than a single store-bought ornament.
12. Nativity Scene Pattern
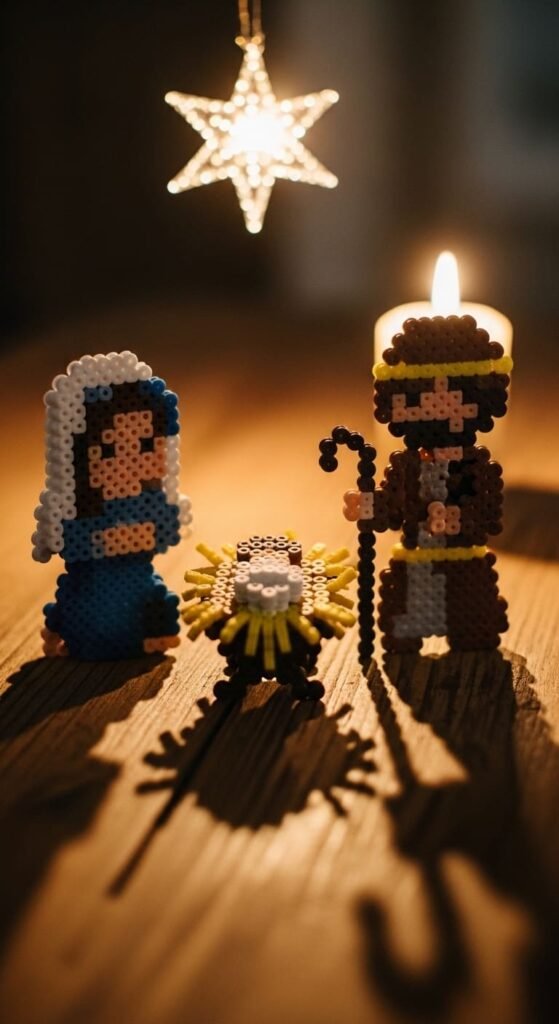
A nativity scene brings the Christmas story to life in fuse beads. Use blue for Mary’s robe, brown for Joseph, peach for skin tones, and yellow for straw and the star.
Each figure takes about 60 to 80 beads. Make Mary, Joseph, baby Jesus in a manger, and a star above as a starter set.
A square pegboard fits each small figure. Budget tip: classic colors like blue, brown, and yellow are basics that come in cheap mega packs.
Iron each piece carefully and let cool flat. Display the figures together on a small wooden shelf or windowsill.
Add three wise men, shepherds, and animals for a complete nativity scene. Each piece extends the story.
This project takes about three hours total for the basic five-piece set. It suits kids ages nine and up because of the figure details.
Make smaller versions as ornaments for the tree, or larger versions for a tabletop display. The same patterns scale easily.
Pair the nativity with angel or star designs for a full Christian Christmas display. Each piece adds meaning to the season.
Christian families enjoy creating handmade nativity sets that become treasured keepsakes year after year.
13. Angel With Halo
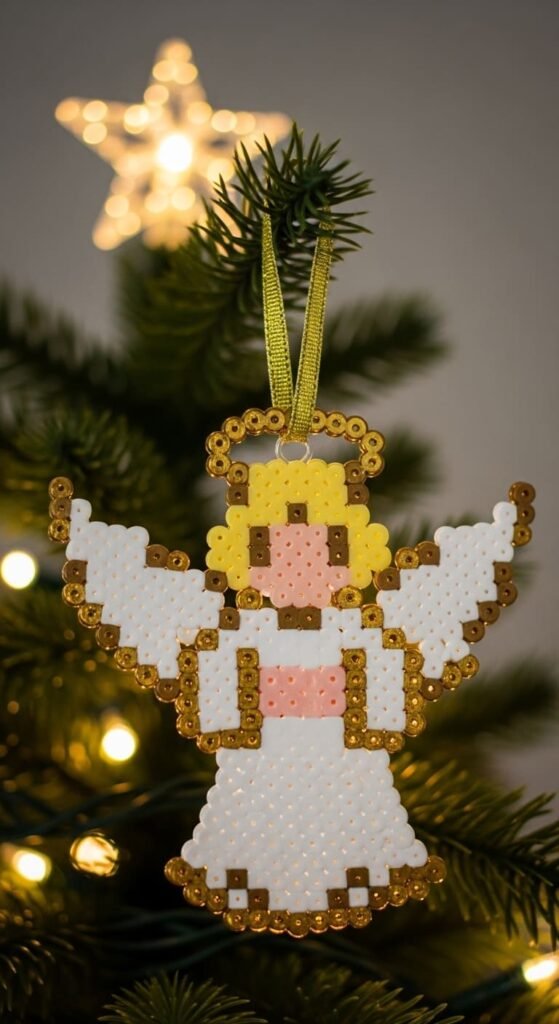
Angels are beautiful Christmas Perler bead designs. Use white for the robe and wings, yellow or gold for the halo and hair, and peach for the face.
Around 80 beads create a medium-sized angel ornament. A square pegboard fits the figure with wings spread wide.
Print a free angel pattern online and follow it carefully. Budget tip: white is a basic color that sells in giant value packs cheaply.
Iron well and add a small gold ribbon loop at the top for hanging. The angel works as a tree ornament, mantel decoration, or topper for special gifts.
Make a set of three angels with different colored halos: gold, silver, or rose for variety. They look beautiful displayed together on a tree.
This project takes about 30 minutes and works for kids ages seven and up. The wing details teach good pattern placement.
Pair angels with star or trumpet designs for a heavenly Christmas display. Each piece adds spiritual meaning to the season.
Try glitter white beads mixed in for sparkly wings that catch light beautifully. They add a magical glow to the design.
Angel ornaments make sweet handmade gifts for godparents, grandparents, or anyone celebrating their first Christmas.
14. Christmas Light String Garland
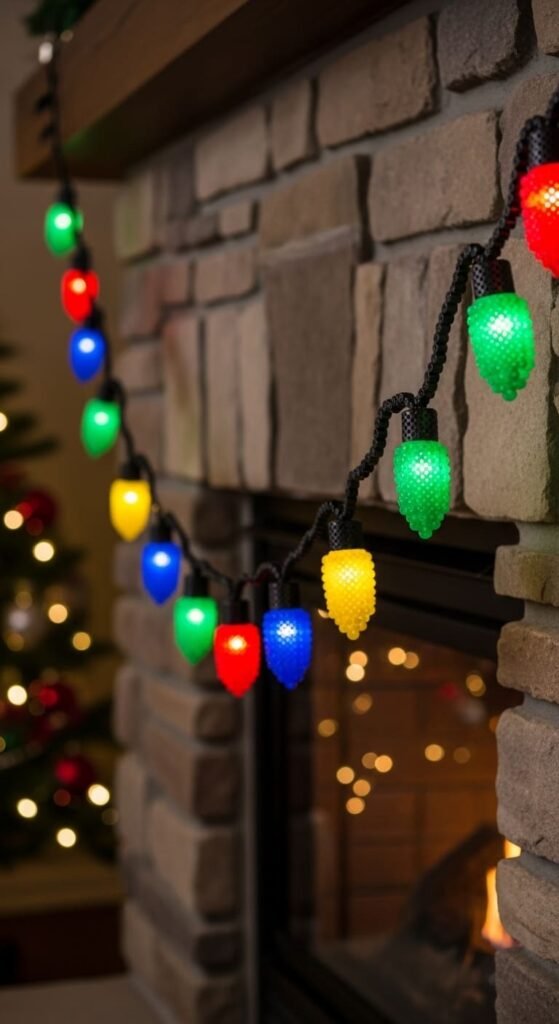
Christmas light string garlands bring retro charm to your decor. Use small bulb shapes in red, green, blue, and yellow with black wire connecting them.
Each bulb takes about 15 beads, and the wire takes about 30 beads. A long rectangular pegboard fits the string shape.
Print a free pattern online and work bulb by bulb across the wire. Budget tip: these classic Christmas light colors are basics that come in mixed holiday packs.
After ironing, hang the garland across a mantel, on a wall, or above a doorway. It looks just like vintage Christmas lights without electricity.
Make a long string with twenty bulbs for a full mantel display. Each one takes only pennies in supplies.
This project takes about an hour and works for kids ages seven and up. The repetitive bulb pattern teaches good production skills.
Try larger bulb variations for a single ornament. The same colors work for solo bulb designs as keychains or pins.
Pair the light garland with snowman or tree designs for a classic Christmas mantel scene. Each piece adds vintage holiday charm.
The garland lasts for years and saves money compared to replacing real Christmas lights every season.
15. 3D Christmas Tree

A 3D Christmas tree is a step up from flat ornaments. Make several green panels that interlock to create a standing tree.
Cut slits in each panel so they slide together at right angles for the 3D shape. Use about 80 green beads per panel for a medium tree.
Add small red, blue, and yellow accent beads for ornaments. Budget tip: clear craft glue from the dollar store works great for reinforcing the 3D joins.
After ironing each panel flat, slot them together carefully. The tree stands on its own as a tabletop decoration.
Place a small star or angel on top for a finishing touch. Budget tip: save your own bead scraps from other projects for the colorful ornament accents.
This project takes about two hours and suits older kids ages ten and up. It teaches patience and basic engineering skills.
Display the 3D tree on a mantel, shelf, or party table. It costs much less than store-bought decorative trees.
Try other 3D shapes like Christmas houses, present boxes, or snowmen. Each adds a fun three-dimensional element to your display.
Pair with smaller flat ornaments for a complete handmade Christmas village scene.
16. Mini Mitten Ornament
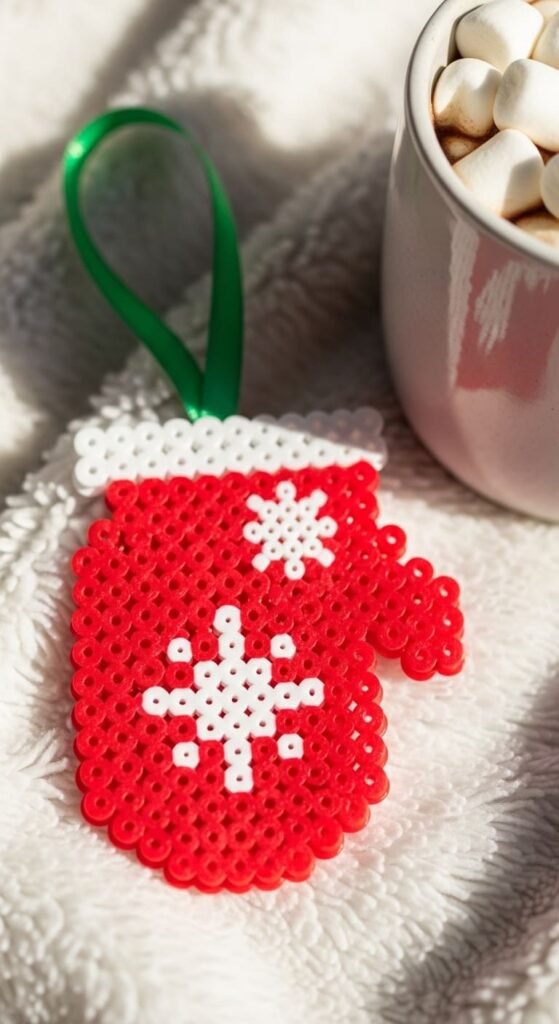
Mini mittens are sweet Christmas Perler bead ornaments. Use red, green, white, or blue for the mitten body with contrasting trim and snowflake details.
Around 50 beads create a small mitten on a square pegboard. The simple hand shape with thumb works as a beginner project.
Add small white dots for falling snow or a tiny snowflake design in the center. Budget tip: these classic winter colors are common basics in mixed holiday packs.
After fusing, add a green ribbon loop at the top for hanging. The mitten works as a Christmas tree ornament or gift tag.
Make a matching pair of mittens connected by a string for a cute hanging decoration. They look adorable on the tree.
Try color variations: red and green, blue and white, or pastel pink for non-traditional Christmas decor. Each scheme creates a different mood.
This project takes about 20 minutes per mitten and works for kids ages six and up. The simple shape teaches good pattern placement.
Pair mittens with hat or scarf designs for a full winter accessory set. Each piece adds cozy charm to your tree.
Make extra mittens as small gift tags for handmade Christmas presents.
17. Star Tree Topper

A star tree topper is a beautiful handmade addition to your Christmas tree. Use yellow or gold beads for the classic five-point star shape.
Around 100 beads create a medium-sized star. A large pegboard fits the wide pointed shape.
Add small darker yellow or orange accents for shading and depth. Budget tip: yellow beads come in cheap value packs because they are basics.
After fusing, attach a small wire or pipe cleaner to the back so the star sits on top of your tree. Bend the wire around a top branch for support.
Make extra small stars as ornaments to scatter throughout the tree. They tie the design together with a unified color scheme.
This project takes about 35 minutes and works for kids ages seven and up. The five-point shape teaches symmetry skills.
Try glitter yellow beads mixed with regular yellow for a sparkling star that catches tree lights beautifully. They cost a bit more but add real magic.
Pair the star topper with smaller star ornaments for a galaxy-themed tree. Each piece adds twinkle to the display.
The handmade topper becomes a treasured family keepsake that lasts for many holiday seasons.
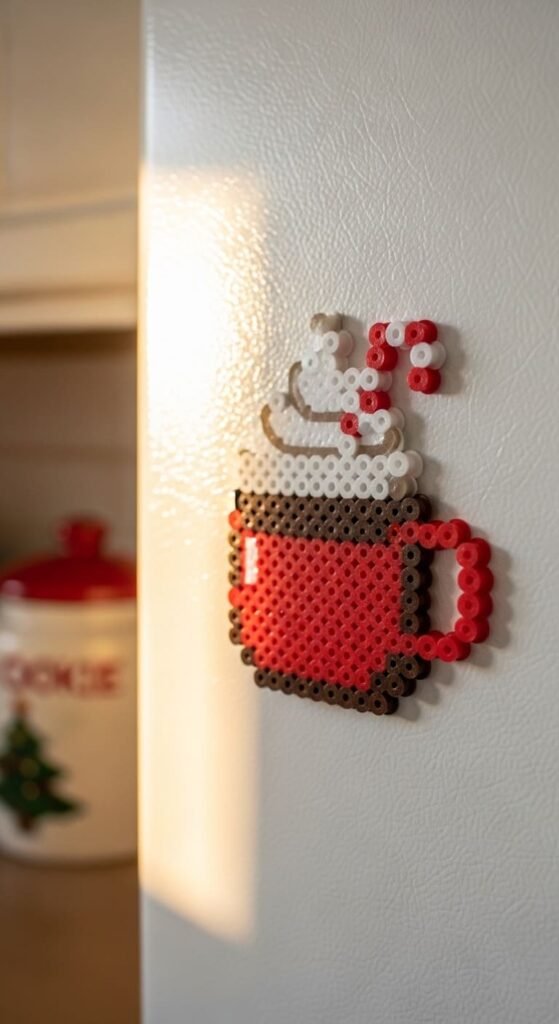
18. Hot Cocoa Mug Magnet
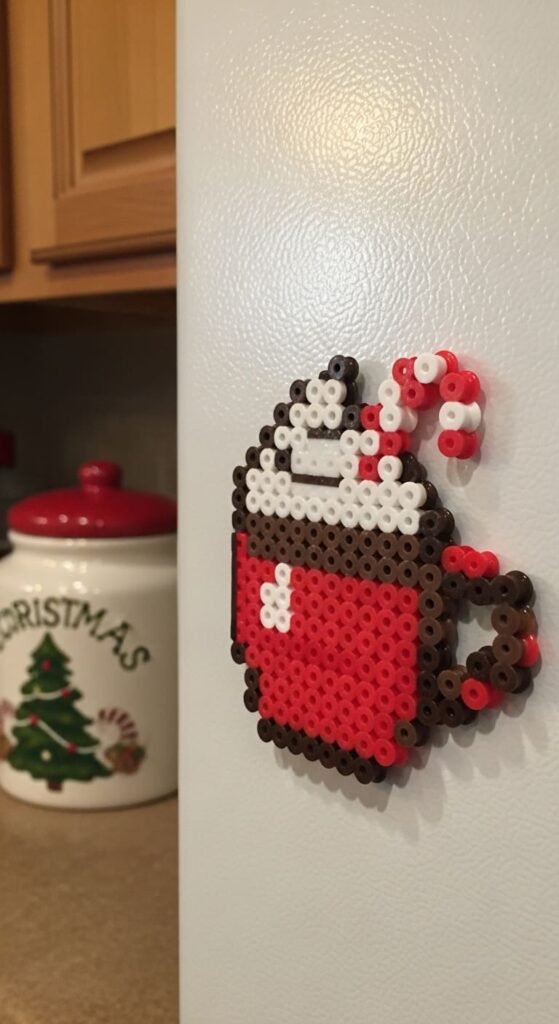
Hot cocoa mug magnets bring kitchen Christmas charm to your fridge. Use red for the mug, brown for the cocoa, white for whipped cream, and small red and white for a candy cane.
Around 60 beads create a medium-sized mug magnet. A square pegboard fits the cup shape with the handle on the side.
Add a tiny candy cane sticking out of the top for extra holiday detail. Budget tip: all these colors are common basics that come in mixed holiday packs.
After fusing, glue a strong magnet on the back. The cocoa mug sticks to fridges, lockers, or any metal surface.
Make a set of three mugs in different colors: classic red, dark green, or white with red trim. They look great on a kitchen fridge during winter.
This project takes about 20 minutes and works for kids ages six and up. The simple shape forgives small mistakes.
Try variations with different toppings: marshmallows, sprinkles, or chocolate shavings. Each creates a unique cozy mug.
Pair cocoa mugs with gingerbread or candy cane magnets for a full kitchen Christmas display. Each piece adds homey charm to your fridge.
Hot cocoa magnets make sweet handmade gifts for coffee and cocoa lovers in your life.
19. Present Gift Box Ornament
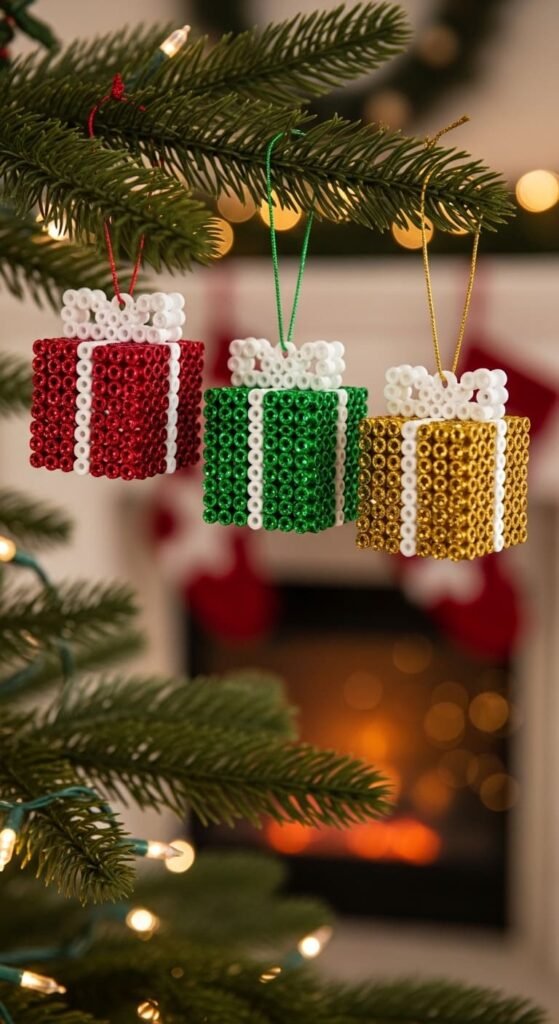
Present gift box ornaments add classic Christmas charm to any tree. Use red, green, blue, or gold for the box with white or contrasting ribbon and bow details.
Around 60 beads create a small gift box ornament. A square pegboard fits the box shape with a bow on top.
Make sets of three or four boxes in different colors and patterns. Budget tip: these Christmas colors are basics that come in mixed holiday packs cheaply.
After fusing, add a small ribbon loop at the top for hanging. The boxes work as tree ornaments, garland pieces, or gift tag accents.
Try variations with stripes, polka dots, or solid colors with bows. Each design adds personality to the present theme.
This project takes about 20 minutes per box and works for kids ages six and up. The simple shape teaches good pattern reading.
Pair gift boxes with bow or ribbon designs for a full present-themed tree. Each piece adds joyful holiday charm.
Make extra boxes as small package decorations for handmade Christmas gifts. Glue them onto wrapped presents for a personalized touch.
A set of twelve gift box ornaments fills a small tree beautifully. Each one costs only pennies in supplies.
The handmade boxes become charming additions to your holiday decor every year.
20. Penguin With Christmas Hat
Penguins with Christmas hats are adorable holiday designs. Use black for the body, white for the belly, orange for the beak and feet, and red and white for a tiny Santa hat.
Around 80 beads create a medium-sized penguin ornament. A square pegboard fits the standing pose with the hat tilted on the head.
Print a free penguin pattern online to follow the shape. Budget tip: black and white are basics that come in giant value packs at low prices.
After fusing, add a small ribbon loop at the top for hanging. The penguin works as a tree ornament, magnet, or gift tag.
Make a family of penguins with different hat colors: red, green, blue, or pink for variety. They look adorable hanging together on the tree.
This project takes about 30 minutes and works for kids ages seven and up. The penguin shape teaches good pattern placement.
Pair penguins with snowman or polar bear designs for a full winter animal set. Each piece adds cute holiday charm.
Try seasonal variations: Halloween penguin with witch hat, birthday penguin with party hat, or Easter penguin with bunny ears. The same base shape works year-round.
Penguin ornaments make sweet handmade gifts for animal-loving Christmas fans.
21. Elf On The Shelf Pattern

Elf on the Shelf style designs are popular Christmas Perler bead crafts. Use red, green, white, peach, and small black accents for the cheerful elf character.
Around 90 beads create a medium-sized elf design. A square pegboard fits the figure with arms and pointed hat extended.
Print a free elf pattern online to follow the cute pose. Budget tip: red and green are Christmas basics that come in mixed holiday packs cheaply.
Iron carefully because the elf has many color changes. Press from both sides for an even melt.
After cooling, the elf works as a magnet, ornament, or shelf decoration. Stand it up using a small piece of cardboard glued to the back.
Make a family of elves in different outfit colors: classic red and green, blue and white, or rainbow holiday colors. They make a cute shelf scene.
This project takes about 35 minutes and suits kids ages eight and up. The detailed face teaches good color placement.
Pair elves with reindeer or Santa designs for a full North Pole crew. Each piece adds story to your Christmas display.
Elf ornaments become treasured family keepsakes that make kids smile every holiday season.
22. Polar Bear With Scarf
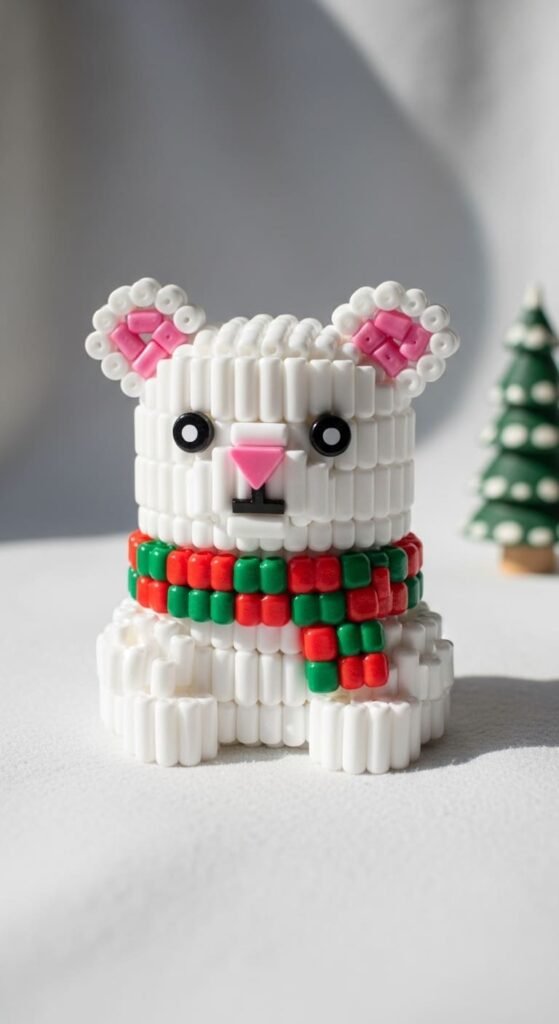
Polar bears with scarves bring winter charm to your Christmas Perler bead collection. Use white beads for the body, with red, green, or blue for a cozy scarf.
Around 100 beads create a medium-sized polar bear design. A square pegboard fits the sitting pose with the scarf around the neck.
Add small black accents for the eyes and nose. Budget tip: white beads sell in giant value packs at low prices because they are basics.
After fusing, add a ribbon loop at the top for hanging. The polar bear works as a Christmas tree ornament, magnet, or wall decoration.
Make a family of polar bears with different scarf colors and patterns. They look beautiful as a winter wonderland scene on your tree.
This project takes about 35 minutes and works for kids ages seven and up. The white-on-white shading teaches careful color placement.
Try glitter white beads mixed in for a snowy effect that catches tree lights beautifully. They add a magical winter glow.
Pair polar bears with snowflake or igloo designs for a full Arctic Christmas scene. Each piece extends the winter theme.
Polar bear ornaments make sweet handmade gifts for animal lovers. They also work beyond Christmas as winter decor through February.
Conclusion
Christmas Perler beads turn simple plastic pieces into ornaments, gift toppers, and handmade decorations that bring holiday warmth to any home. From candy cane keychains to 3D Christmas trees and nativity scenes, these 22 ideas cover every skill level and Christmas style. The best part is how affordable they are. Most projects use under 100 beads and cost less than a coffee. Grab some pegboards, print a few free patterns, and start building your own holiday collection. Whether you make them for kids, gift toppers, or tree ornaments, these crafts create lasting memories at a budget-friendly price that you will treasure for many seasons to come.