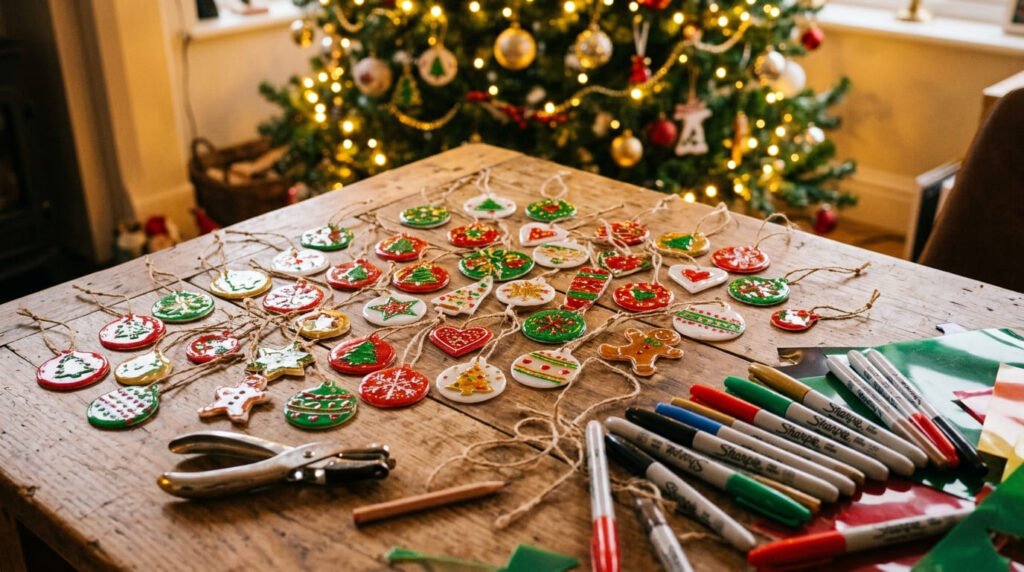
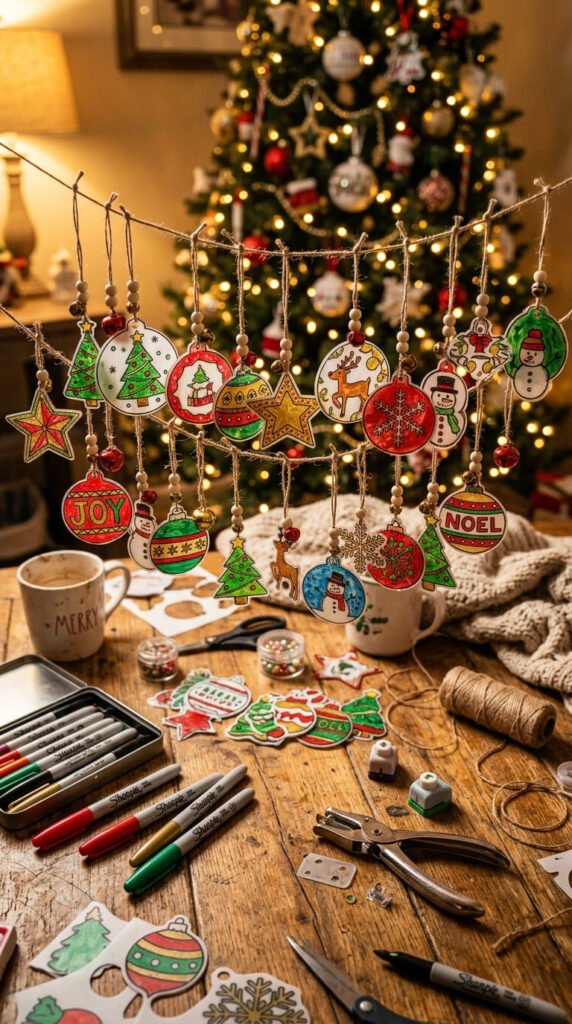
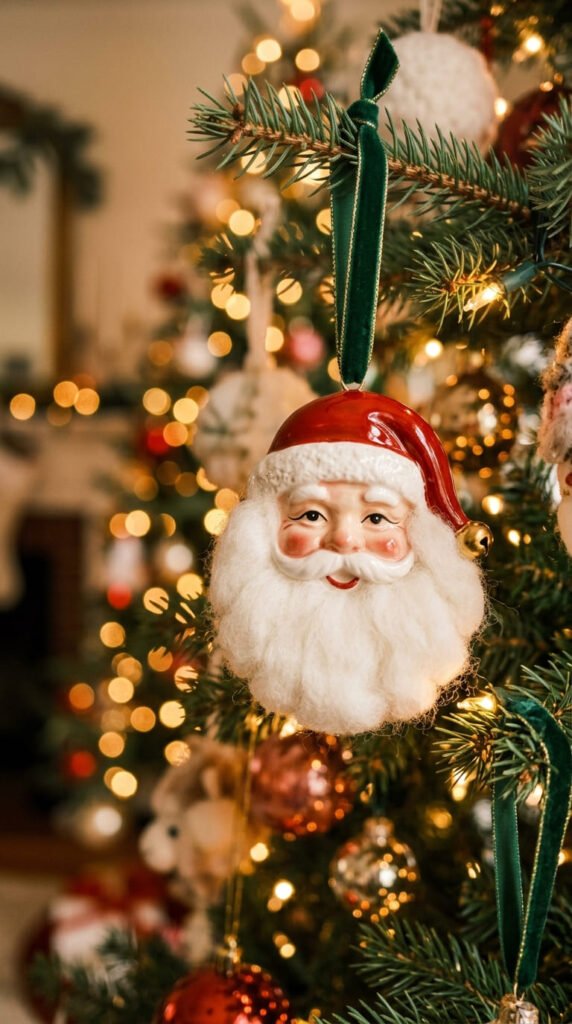
Shrink plastic ornaments turn one cozy afternoon into a tree full of handmade keepsakes. You draw a design, bake it, and watch it shrink into a thick, glossy ornament that lasts for years. It’s the rare craft that works for every age at the table, so little kids, big kids, and grown-ups can all make one. Each ornament costs almost nothing, especially if you trace simple templates or repurpose your kids’ own drawings. Below are 20 cozy ideas to make together this holiday season, each with a simple plan, a budget tip, and an easy way to start. Grab a sheet of shrink plastic, some markers, and a baking tray, and pick whichever one feels right.
1. Kid’s Drawing Keepsake Ornament
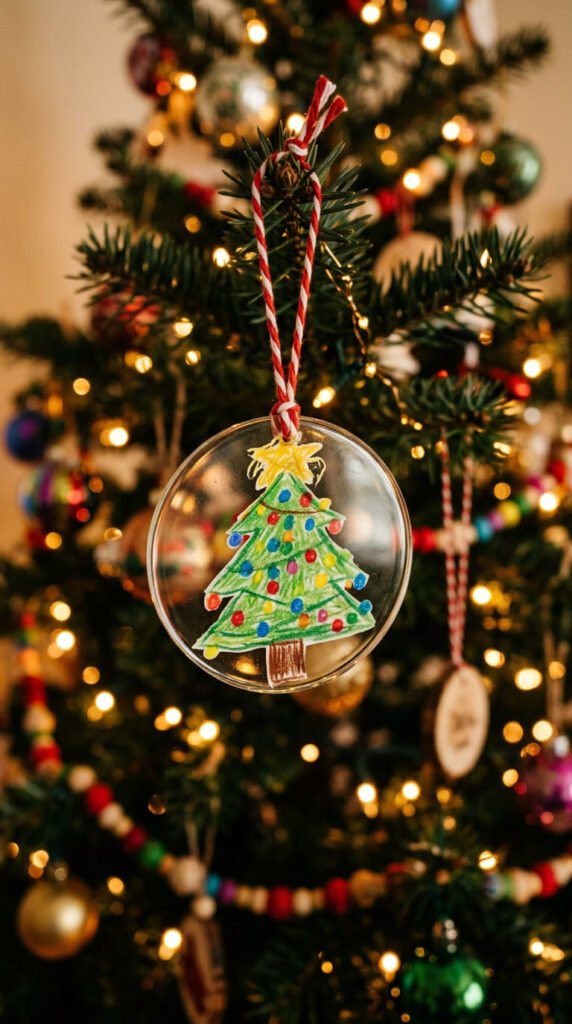
Turn a child’s artwork into a forever ornament. A kid’s drawing keepsake captures their exact style at this age. Have your child draw something small and festive directly on the shrink sheet with permanent markers. Or trace a doodle they already made onto the plastic.
Shrinking tightens the wobbly lines into a charming, detailed ornament. The childlike quality stays, just smaller and sturdier.
Budget tip: The art is free and one of a kind. Your kid is the designer, so there’s no template to buy and no skill needed from you.
Let them pick the colors and shapes. A tree, a snowman, a scribbled star.
Help with the hole and cutting for safety. Punch the hole before baking, always.
Bake it together as part of the activity. Watching it curl and shrink is half the fun for kids.
Flatten while warm and let it cool. Loop ribbon through the hole.
These become priceless gifts for grandparents. Each one captures a child’s drawing at a certain age. Date the back with a marker, and you’ve got a keepsake the whole family treasures for years, made for the cost of a plastic scrap.
2. Classic Santa Face Ornament
Trace a jolly Santa for a timeless look. A Santa face template makes this easy for any age. Print a simple Santa outline. Tape it under the shrink sheet and trace the shapes with markers. Color the hat red, the beard white, the face a soft pink.
Shrinking deepens the colors and sharpens the lines, so a simple trace bakes into a crisp, classic ornament.
Budget tip: Free Santa templates are all over the web. Print one and trace it for nothing. One sheet makes several Santas for the whole family.
Keep the shapes bold and simple. Big areas of color read best after shrinking.
Outline in black marker for definition. Punch the hole at the top of the hat before baking.
Bake on parchment, flatten while warm, and cool flat.
Loop red or green ribbon through the hole.
These suit family craft nights and classroom projects. Everyone can trace the same Santa and color it their own way. A row of slightly different Santas on the tree shows off each person’s hand, all made from one cheap sheet of plastic.
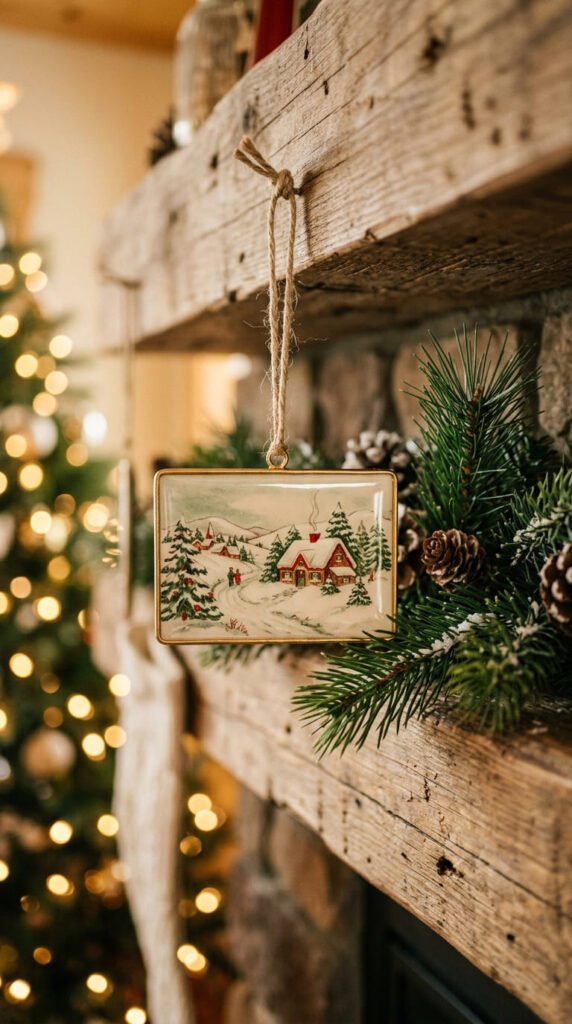
3. Vintage Postcard Ornament
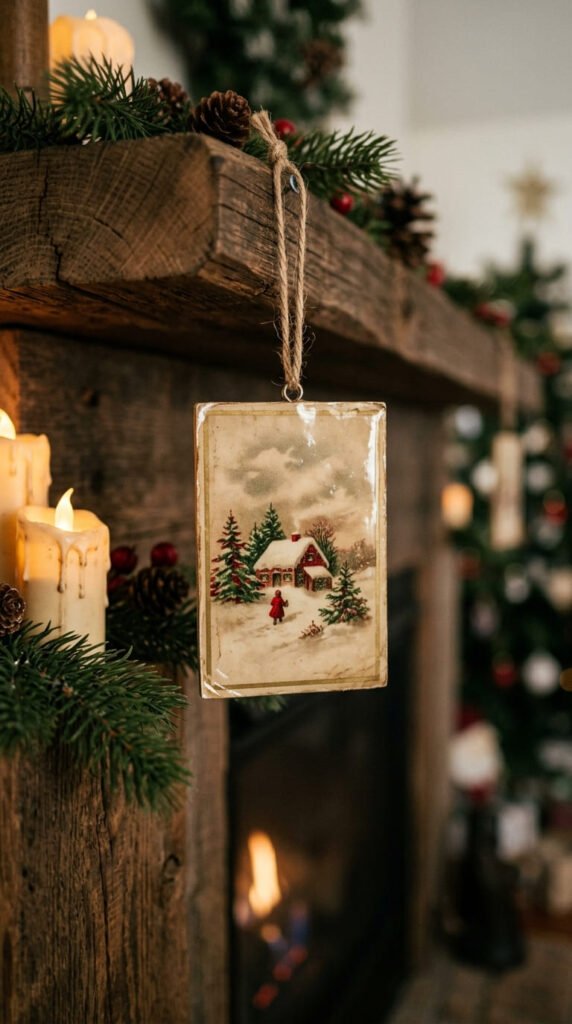
Bring old-fashioned charm to the tree. A vintage postcard design feels nostalgic and decorative. Find or draw a small winter scene. A snowy house, a sleigh, a deer in the trees. Trace it and color in muted, old-timey reds and greens.
Shrinking concentrates the detail, so a small scene becomes a tiny, jewel-like ornament. The colors deepen into a vintage feel.
Budget tip: Use free vintage clip art as a template. Print and trace it. The whole ornament costs only the plastic and a few markers.
Add a thin border around the edge to frame it like a real postcard.
Keep the scene simple. Detail gets tiny after shrinking, so don’t overcrowd it.
Punch the hole at the top before baking. Bake on parchment, flatten while warm, cool flat.
Seal with gloss for a finished, framed look.
These suit anyone who likes classic, grown-up holiday décor. A vintage postcard ornament looks like an antique-shop find but came off your kitchen tray. Make a set of different scenes for a collected, old-world tree that costs almost nothing.
4. Glitter Deer Silhouette
Add sparkle for a premium-looking ornament. A glitter finish turns a simple silhouette into something special. Cut a deer shape from the shrink sheet. Color it solid or leave it clear. After baking, brush on craft glue and dust with fine glitter.
Shrinking thickens the silhouette into a sturdy base. The glitter goes on after, so it stays bright and even.
Budget tip: A small pot of glitter goes a long way. One container covers dozens of ornaments. Add glue you already have.
Pick a clean silhouette. A deer, a tree, or a star reads well in glitter.
Punch the hole before baking. Bake on parchment, flatten while warm, cool flat.
Brush glue over the front. Sprinkle glitter, shake off the excess, and let it dry.
Seal with a clear topcoat so the glitter doesn’t shed.
These suit anyone who wants a glam, giftable ornament. A glitter deer looks like a boutique decoration. Make a few in gold and silver for a sparkly, coordinated tree. The glitter does the heavy lifting, so even a plain shape looks high-end for spare change.
5. Personalized Name Ornament
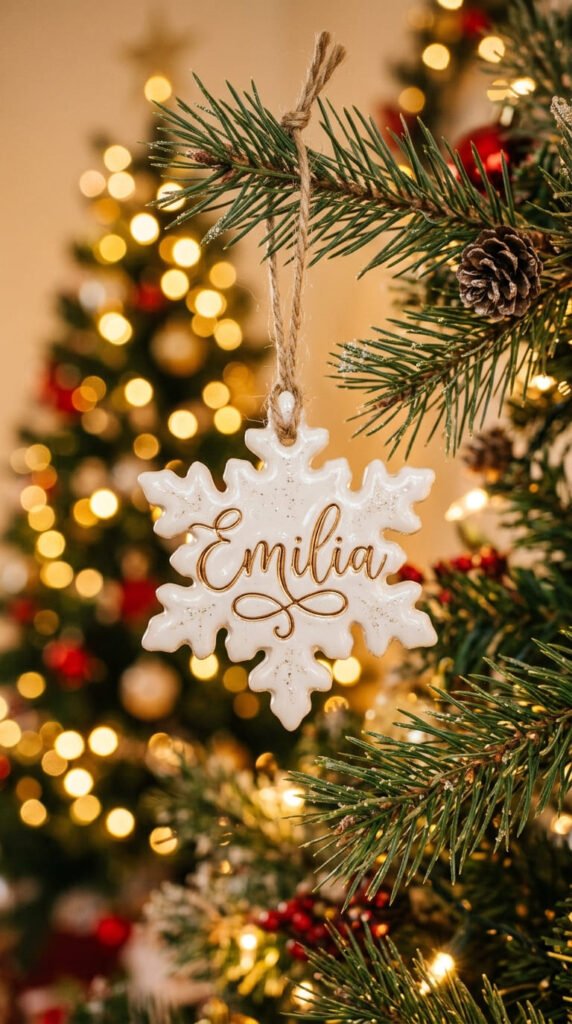
Give everyone their own named ornament. A name ornament makes each family member feel included. Write a name in your nicest script on the shrink sheet. Keep the rest of the design simple, maybe a small snowflake or star around it.
Shrinking thickens and smooths the letters, so a casual script bakes into clean, polished lettering.
Budget tip: No stencils. Write freehand or trace a printed name. One sheet makes a named ornament for every person at the table.
Pick a simple shape to frame the name. A circle, star, or snowflake works well.
Leave space around the letters. Crowded edges can tear after baking.
Punch the hole at the top before cutting and baking. Bake, flatten while warm, cool flat.
Seal with gloss for a refined finish.
These make a yearly tradition. Make one for each person every holiday and watch the collection grow. Date the back so you can track the years.
A set of named ornaments turns a plain tree into a family record, made for the cost of one cheap sheet and a marker.
6. Cozy Little House Ornament
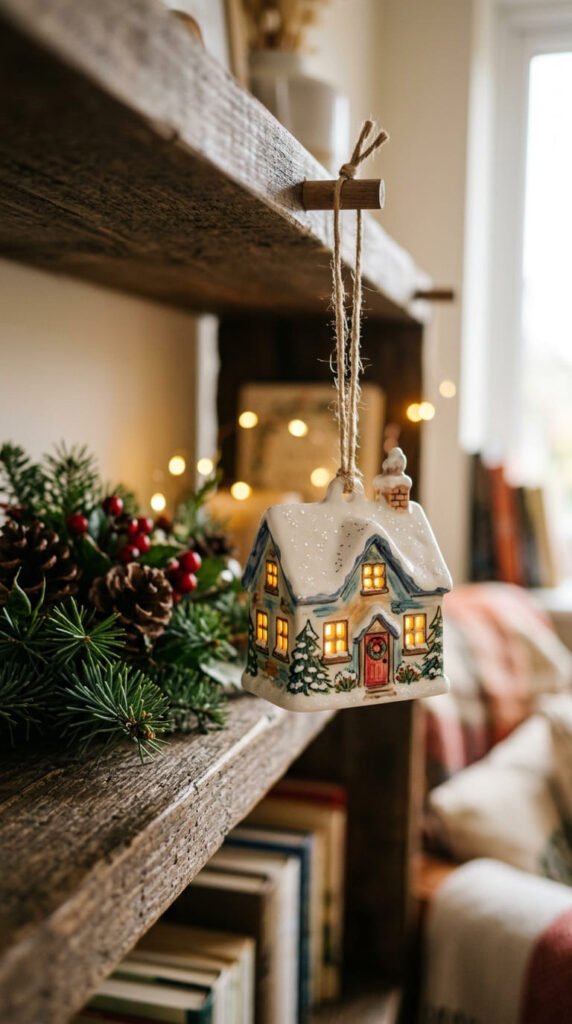
Make a tiny home for the tree. A house-shaped ornament feels warm and inviting. Draw a simple cottage. A roof, a door, a couple of windows. Add a dusting of snow on top and warm yellow light in the windows.
Shrinking sharpens the lines, so a simple house bakes into a crisp, cozy ornament. The little glowing windows read sweetly.
Budget tip: No template required. A house is easy to draw freehand with basic shapes. Costs only the plastic and markers.
Color the windows yellow for a lit-up look. Warm window light makes the house feel cozy.
Add snow on the roof with white or leave it as the plastic color.
Cut the house shape with a pointed roof. Punch the hole at the top before baking.
Bake on parchment, flatten while warm, cool flat. Seal with gloss for shine.
These suit family craft sessions where everyone makes their own little house. Line them up for a tiny village on the tree. You could even make one for each home in the family, a sweet way to represent everyone, all for spare change.
7. Delicate Snowflake Ornament
Craft a snowflake no two of which match. A snowflake design is simple, elegant, and endlessly variable. Draw a six-armed snowflake with a fine marker. Add small branches and dots along each arm. Color it white, silver, or pale blue.
Shrinking pulls the fine lines tighter, so a delicate snowflake bakes into a crisp, detailed ornament. Thin lines firm up nicely.
Budget tip: One white or silver marker makes the whole thing. No template needed. Each person can draw their own unique flake for free.
Keep the snowflake symmetrical. Six matching arms read as a real snowflake.
Use white or metallic marker on clear plastic for an icy look.
Cut around the snowflake shape or leave it in a circle. Punch the hole before baking.
Bake on parchment, flatten while warm, cool flat. Seal with gloss for a glassy shine.
These suit anyone who likes clean, wintry décor. Since no two snowflakes match, everyone’s comes out different. A tree full of unique snowflakes looks designed and costs only a marker and a plastic sheet.
8. Gingerbread Man Ornament

Bake a gingerbread man that won’t crumble. A gingerbread design is festive and fun for kids. Draw a gingerbread man shape. Color him warm brown. Add white squiggles for icing, two dots for eyes, and a little smile.
Shrinking deepens the brown and sharpens the icing lines, so a simple drawing bakes into a cute, glossy ornament.
Budget tip: Brown and white markers cover the whole thing. One sheet makes a batch of gingerbread men for the family.
Keep the icing details simple. A few white squiggles read as icing without crowding.
Give him a happy face. Punch the hole at the top of his head before baking.
Cut the gingerbread shape. Bake on parchment, flatten while warm, cool flat.
Seal with gloss for a baked-looking shine.
These suit kids who love the cookie connection. Everyone can decorate their gingerbread man differently. Hang a whole gingerbread family on the tree.
It’s a low-cost, playful project that looks adorable and lets each person add their own personality, all from one cheap sheet of plastic and two markers.
9. Scandinavian Minimalist Ornament
Go clean and modern with Nordic style. A Scandinavian design suits grown-up, neutral trees. Draw a simple tree, star, or heart in clean geometric lines. Color it in muted sage, cream, or soft gray. Keep everything minimal.
Shrinking sharpens the lines, so a simple modern shape bakes into a crisp, stylish ornament.
Budget tip: One or two muted markers make this. Restraint is the whole look, so you barely use any ink. Costs almost nothing.
Stick to a neutral palette. Sage, cream, and gray read as modern Scandinavian.
Keep the design simple and geometric. No busy detail.
Cut a clean shape. Punch the hole at the top before baking.
Bake on parchment, flatten while warm, cool flat. Seal with matte for a natural feel.
Loop natural twine through the hole instead of shiny ribbon.
These suit anyone who likes minimal, stylish holiday décor. A set of neutral Scandinavian ornaments looks like something from a design shop. They prove a cozy family craft can still look grown-up and modern, made for the price of a plastic sheet.
10. Tiny Handprint Ornament
Capture a little hand at this size forever. A handprint ornament is a sentimental keepsake. Trace a child’s hand onto the shrink sheet. Or have them draw around their own fingers. Color it in a festive red or green.
Shrinking tightens the traced shape into a tiny version of their hand. The smaller scale makes it precious.
Budget tip: The handprint is free. Just trace their hand with a marker. No template, no cost beyond the plastic.
Remember the plastic shrinks to about a third of its size. The final handprint will be small, which is part of the charm.
Color it solid or add a small year on the palm.
Cut around the hand shape. Punch the hole near the wrist before baking.
Bake on parchment, flatten while warm, cool flat. Seal with gloss.
These make treasured gifts for parents and grandparents. Make one each year to track how the hand grows.
A shrunk handprint captures a moment that passes fast. It’s the kind of keepsake families hold onto for decades, made for the cost of a plastic scrap and a marker.
11. Candy Cane Ornament
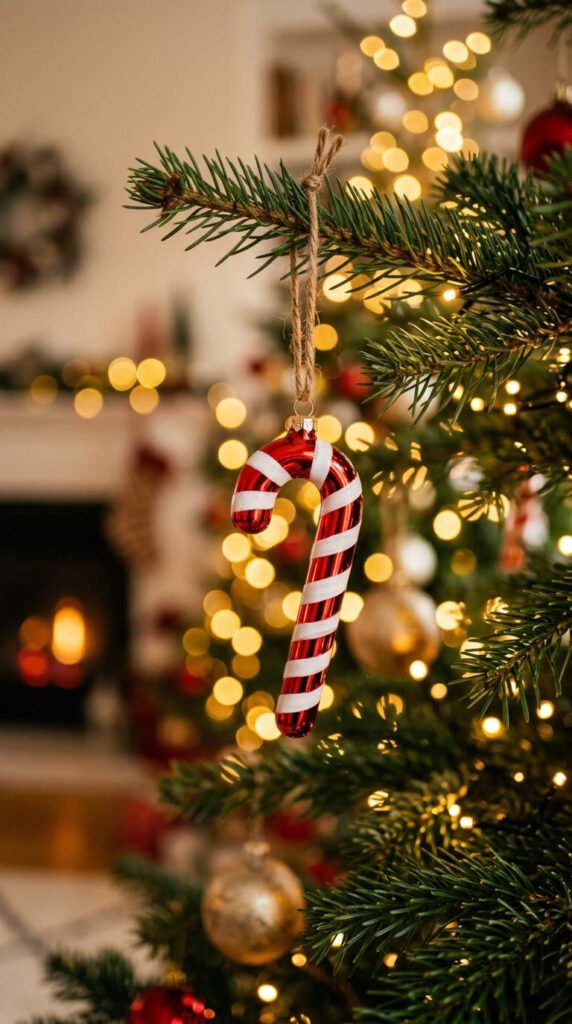
Make a sweet striped classic. A candy cane design is simple and instantly festive. Draw a candy cane shape. Add diagonal red stripes across the white. Keep the curve smooth at the top.
Shrinking deepens the red and sharpens the stripes, so a simple drawing bakes into a crisp, cheerful ornament.
Budget tip: One red marker makes the whole thing. The white is just the plastic showing through. Costs next to nothing.
Keep the stripes even and diagonal. Consistent stripes read as a real candy cane.
Cut the candy cane shape with its hooked top. Punch the hole near the top before baking.
Bake on parchment, flatten while warm, cool flat. Seal with gloss for a candy-like shine.
These suit younger kids who can draw simple stripes. Everyone can make a few quickly to fill the tree.
Make a bunch and tie them with red and white twine. A cluster of candy canes adds a classic, cheerful touch.
It’s one of the fastest, cheapest ornaments here, perfect for little hands and a big batch, all from one sheet and a single marker.
12. Friendly Snowman Ornament

Build a snowman that never melts. A snowman design is cheerful and easy for kids. Draw three stacked circles. Add a carrot nose, coal buttons, two dot eyes, and a little scarf. Keep him simple and friendly.
Shrinking sharpens the details, so a simple snowman bakes into a cute, glossy ornament. The little scarf adds a pop of color.
Budget tip: A few markers cover the whole snowman. The white is the plastic itself. Costs only the orange, black, and scarf color.
Give him a colorful scarf. One bright accent makes the snowman feel cozy.
Keep the face simple. Two dots and a smile do it.
Cut around the snowman shape. Punch the hole at the top before baking.
Bake on parchment, flatten while warm, cool flat. Seal with gloss for shine.
These suit kids who love building snowmen. Everyone can give theirs a different scarf or expression.
A row of friendly snowmen with different scarves looks playful and personal. It’s a warm, low-cost project that lets each person add their own touch, made from one cheap sheet of plastic.
13. Golden Star Ornament

Top the tree with a handmade star. A gold star ornament is simple and elegant. Cut a five-pointed star from the shrink sheet. Color it solid gold, or leave the center clear with a gold outline. Keep the points sharp.
Shrinking sharpens the star’s points, so a clean cut bakes into a crisp, pointed ornament. Gold deepens beautifully.
Budget tip: One gold marker or metallic pen makes this. A gold pen costs a couple dollars and makes dozens of stars.
Keep the star symmetrical. Even points read as a classic star.
Color it solid for a bold look or outline it for a lighter feel.
Cut clean, sharp points. Punch the hole at one point before baking.
Bake on parchment, flatten while warm, cool flat. Seal with gloss for a shiny, metallic finish.
These suit anyone who likes classic, sparkly décor. A cluster of gold stars looks coordinated and warm.
Make a few in different sizes for variety. Gold stars work on any tree style, from rustic to modern, and cost only a plastic sheet and a single metallic pen for the whole set.
14. Family Portrait Ornament
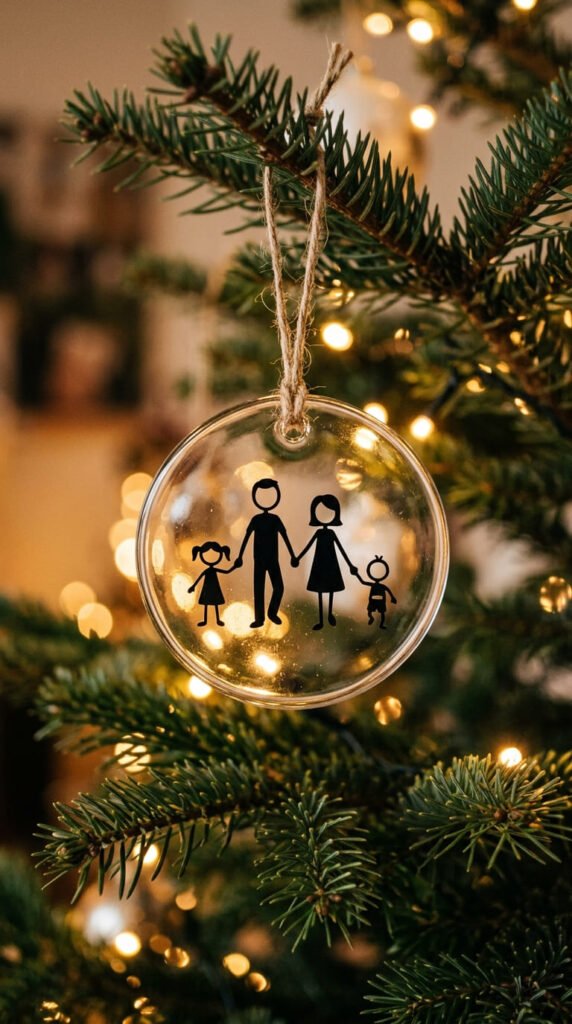
Put the whole family on one ornament. A family portrait design captures everyone together. Draw simple stick figures or silhouettes for each family member, including pets. Keep them small and lined up in a row.
Shrinking tightens the little figures, so a simple drawing bakes into a sweet, detailed ornament. The whole family fits on one charm.
Budget tip: No template. Simple stick figures are easy to draw and free. One sheet makes the whole portrait.
Include everyone. Add a figure for each person and pet for a complete family.
Add the year below the figures to mark the season.
Cut a circle or rectangle around the group. Punch the hole at the top before baking.
Bake on parchment, flatten while warm, cool flat. Seal with gloss.
These become treasured yearly keepsakes. Make one each holiday and watch the family grow on the tree.
A family portrait ornament tells your story at a glance. It’s a meaningful, low-cost tradition that captures who was at the table each year, made for the cost of a plastic scrap and a marker.
15. Holly and Berries Ornament
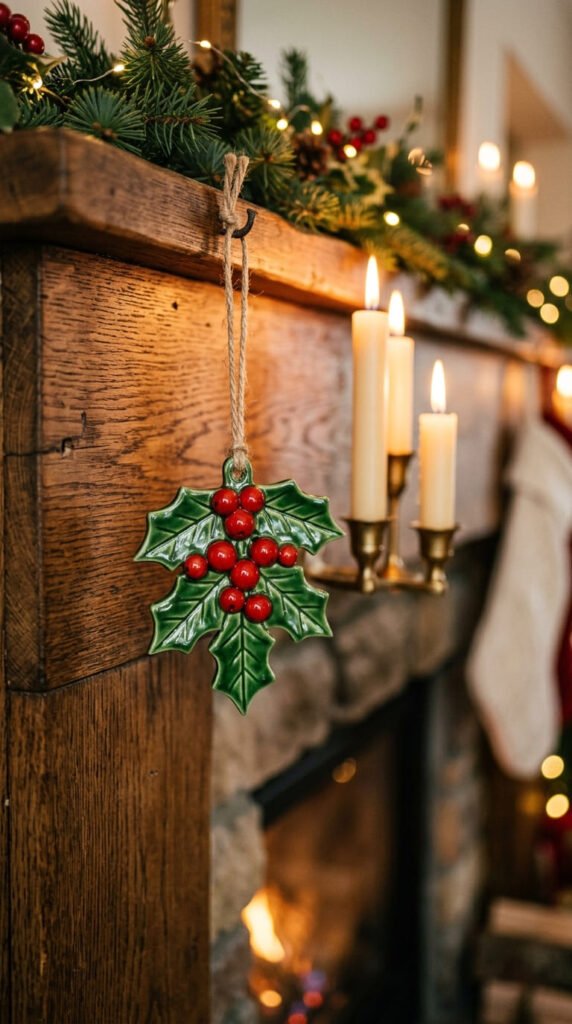
Add a touch of classic greenery. A holly design is traditional and decorative. Draw two or three pointed holly leaves. Add a cluster of round red berries in the middle. Color the leaves deep green.
Shrinking deepens the green and red, so a simple drawing bakes into a rich, classic ornament. The berries pop against the leaves.
Budget tip: Green and red markers cover the whole thing. One sheet makes a batch. Costs only two markers and the plastic.
Keep the leaves pointed and the berries round. The shape is recognizable even when simple.
Cluster three berries in the center for a classic look.
Cut around the holly shape. Punch the hole at the top before baking.
Bake on parchment, flatten while warm, cool flat. Seal with gloss for a shiny, real-leaf finish.
These suit anyone who likes traditional holiday décor. Holly works as ornaments, gift tags, or package toppers.
Make a set for the tree and a few extra to tie onto presents. It’s a classic, low-cost design that adds a traditional touch anywhere, all from one cheap sheet and two markers.
16. Hot Cocoa Mug Ornament

Capture a cozy winter drink. A hot cocoa design feels warm and inviting. Draw a mug. Fill it with brown cocoa and a few white marshmallows on top. Add a little swirl of steam rising up.
Shrinking sharpens the details, so a simple mug bakes into a cozy, glossy ornament. The marshmallows read sweetly.
Budget tip: Brown, white, and a mug color cover this. A few markers make the whole thing for almost nothing.
Add white marshmallows on top. A couple of white blobs read as marshmallows.
Draw a wavy line of steam for a cozy touch.
Pick a fun mug color. Cut around the mug shape. Punch the hole at the top before baking.
Bake on parchment, flatten while warm, cool flat. Seal with gloss for shine.
These suit anyone who loves cozy winter vibes. Everyone can give their mug a different color or pattern.
A hot cocoa ornament adds warmth to the tree and pairs nicely with other cozy designs. It’s a sweet, low-cost project that captures the feeling of the season, made from one cheap sheet of plastic.
17. Favorite Character Ornament
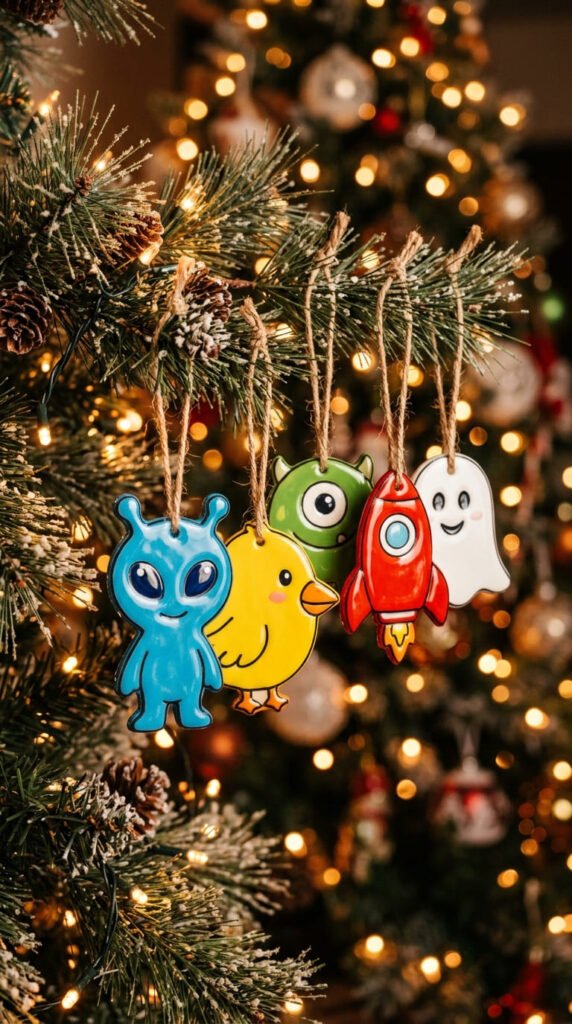
Make ornaments of beloved characters. A character design lets kids feature what they love. Pick a simple, iconic character with bold shapes. Trace a printed image onto the shrink sheet. Color it in the right colors and outline cleanly.
Shrinking thickens the outline and saturates the colors, so a clean trace bakes into a recognizable, glossy ornament.
Budget tip: Trace a printed picture for free. No drawing skill required. One sheet makes several character ornaments.
Pick characters with simple, bold shapes that read well when small.
Outline in black for a crisp, finished look.
Cut around the character. Punch the hole at the top before baking.
Bake on parchment, flatten while warm, cool flat. Seal with gloss for shine.
These suit kids who want their favorites on the tree. Everyone can pick a character they love.
A tree mixing classic ornaments with a few favorite characters feels personal and fun. It’s a low-cost way to let each family member add a piece of their personality, made from one cheap sheet of plastic and some markers.
18. Retro String Lights Ornament

Recreate old-fashioned holiday bulbs. A string lights design is colorful and nostalgic. Draw a row of classic teardrop-shaped bulbs connected by a wire. Color each bulb a different bright shade. Add a small base to each.
Shrinking deepens the colors, so a simple row of bulbs bakes into a cheerful, retro ornament.
Budget tip: A handful of bright markers make this. One sheet makes several. Costs only the markers and plastic.
Alternate the bulb colors. Red, green, yellow, and blue read as classic lights.
Connect the bulbs with a thin wire line.
Cut around the string of lights. Punch the hole at one end before baking.
Bake on parchment, flatten while warm, cool flat. Seal with gloss for a bright, glassy shine.
These suit anyone who loves a retro, vintage holiday feel. The bright bulbs pop against tree greenery.
Make a few strings in different color orders. They add a playful, old-fashioned touch that pairs well with vintage-style ornaments, all made from one cheap sheet of plastic.
19. Pet Paw Print Ornament
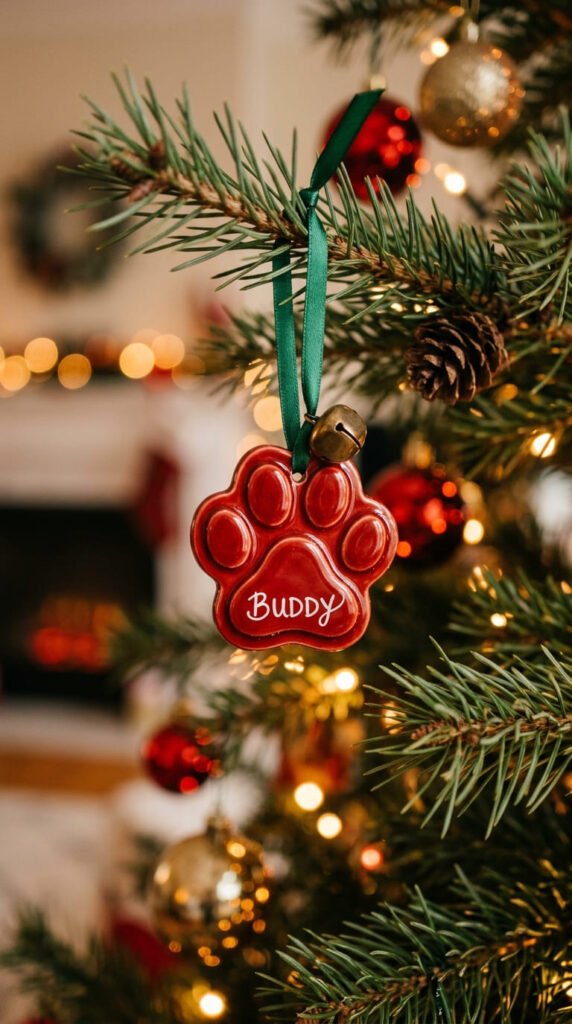
Include the family pet on the tree. A paw print ornament celebrates a furry family member. Draw a simple paw print. A large pad with four smaller toe pads above. Color it festive red or green. Add the pet’s name below.
Shrinking sharpens the paw shape, so a simple drawing bakes into a clean, cute ornament. The name reads clearly.
Budget tip: No template. A paw print is easy to draw with simple shapes. Costs only the plastic and a marker.
Add the pet’s name under the paw. A small name personalizes it.
Color the paw a festive shade for the tree.
Cut a circle or paw shape. Punch the hole at the top before baking.
Bake on parchment, flatten while warm, cool flat. Seal with gloss.
These make sweet keepsakes for pet-loving families. Make one for each pet in the house.
A paw print ornament keeps every family member on the tree, including the four-legged ones. It’s a thoughtful, low-cost touch that pet owners love, made from one cheap plastic scrap and a single marker.
20. Dated Year Ornament
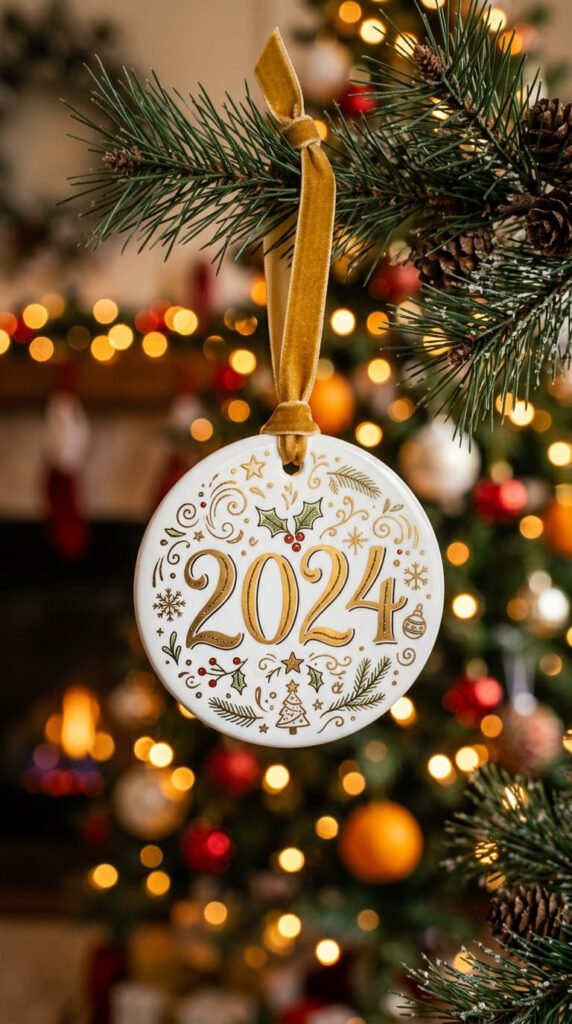
Mark the year with a keepsake ornament. A dated year ornament turns the tree into a timeline. Write the current year in bold, stylish numbers. Surround it with small holiday doodles. A tree, a snowflake, a star.
Shrinking thickens the numbers and sharpens the doodles, so a simple design bakes into a clean, dated keepsake.
Budget tip: No template. Write the year freehand or trace printed numbers. One sheet makes a dated ornament for the whole family.
Make the year the focus. Bold numbers read clearly after shrinking.
Add a few small doodles around the date for a festive touch.
Cut a circle or rectangle. Punch the hole at the top before baking.
Bake on parchment, flatten while warm, cool flat. Seal with gloss.
These build a yearly tradition. Make a dated ornament every holiday, and over time your tree tells the story of each year.
Looking back at past years on the tree becomes a sweet ritual. It’s a meaningful, low-cost tradition that grows richer every season, made for the cost of one cheap sheet and a marker.
Conclusion
Shrink plastic ornaments give your family a whole tree’s worth of handmade keepsakes from one cozy afternoon and a few cheap supplies. A sheet of plastic and some markers cover nearly every idea here, and most ornaments come together fast enough for kids and grown-ups to make side by side. Start with something easy like a kid’s drawing or a candy cane, then try a glitter deer or a vintage postcard once everyone finds their rhythm. Punch your holes before baking, flatten each piece while it’s warm, and seal with gloss for shine. Date the backs so each one becomes a marker of the year. Grab your supplies this weekend and make a batch together. The best part is that every ornament carries someone’s personal touch, so your tree fills up with memories you made by hand.