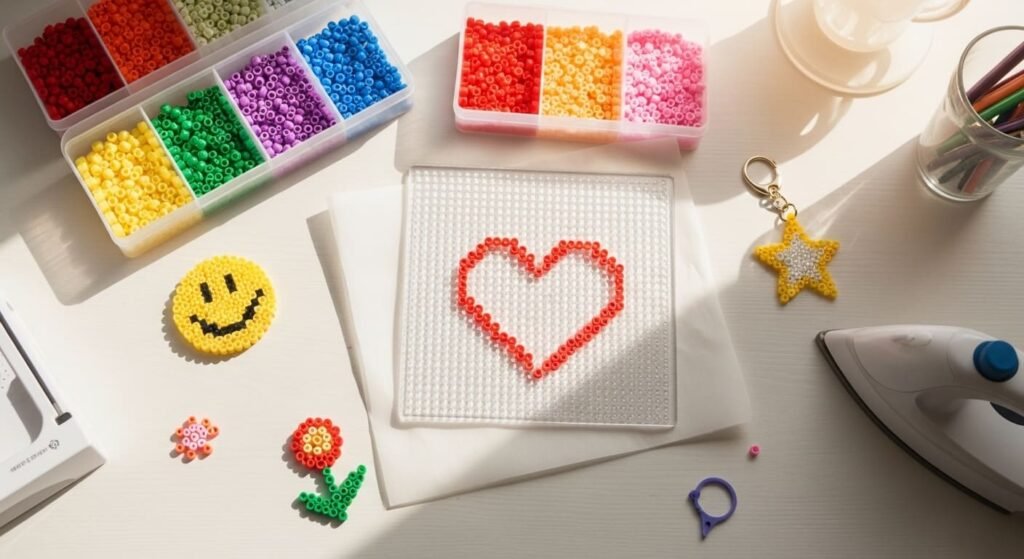
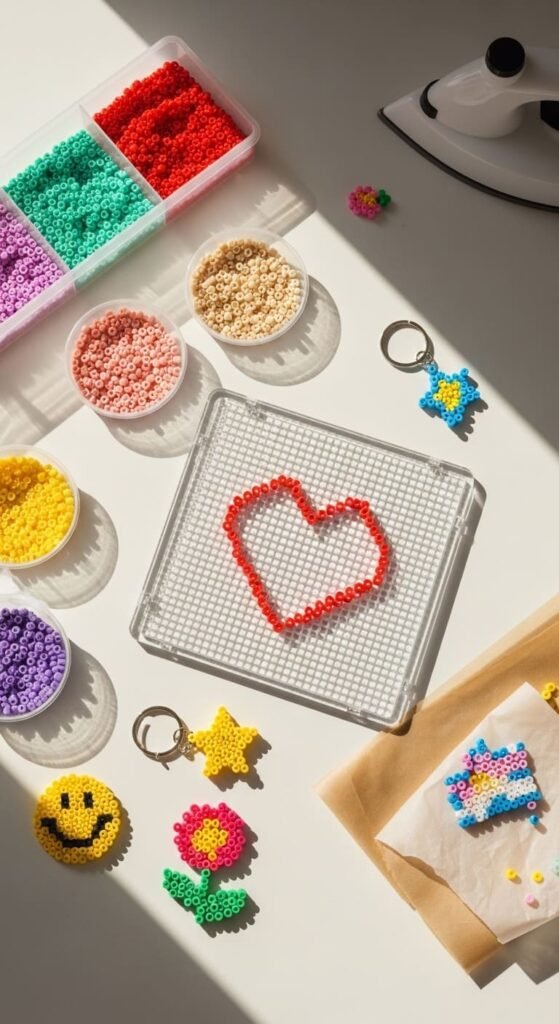
Perler beads turn into adorable keychains, magnets, coasters, and gifts in just minutes. They’re cheap, kid-friendly, and the perfect rainy-day craft. All you need is a pegboard, a bag of fuse beads, parchment paper, and an iron. These 25 beginner-friendly perler bead ideas use simple square grid patterns, basic shapes, and quick fusing techniques. Whether you want a fun activity for kids, a handmade gift, or a relaxing solo project, these designs finish fast and look great. Pick a pattern, place the beads, and iron them flat for a finished piece in under 15 minutes.
1. Classic Smiley Face Magnet
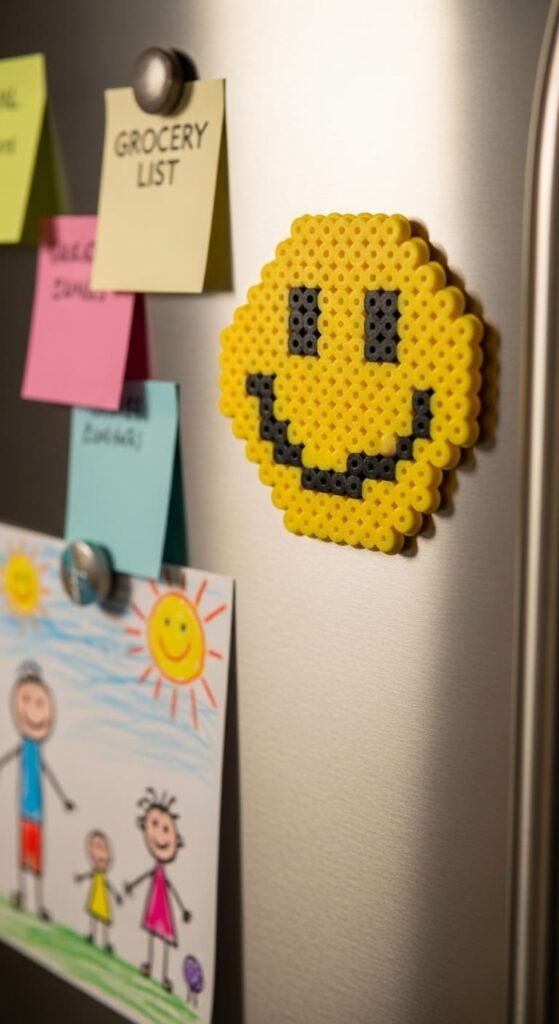
A smiley face is the perfect first perler bead project. Place yellow beads in a circle on a square pegboard. Add two black beads for eyes and a curved line for the mouth.
Cover with parchment paper and iron in slow circular motions. The beads fuse together in about 30 seconds. Let it cool, then peel it off the board.
Glue a small magnet to the back with hot glue or super glue. Stick it on the fridge to hold notes or kids’ artwork. The whole project costs under fifty cents in beads.
A bag of 1,000 yellow beads costs around four dollars at craft stores. That makes dozens of smiley faces with leftover beads. Buy a multi-pack of small adhesive magnets for under three dollars.
Make a set in different colors for a cheerful collection. Try pink, blue, green, or rainbow versions. Kids love picking their own face expressions.
This project teaches the basic skills you need for every other design. Even ironing pressure prevents warping. The simple shape forgives small placement errors. Once you nail the smiley, you’re ready for anything.
2. Heart Keychain
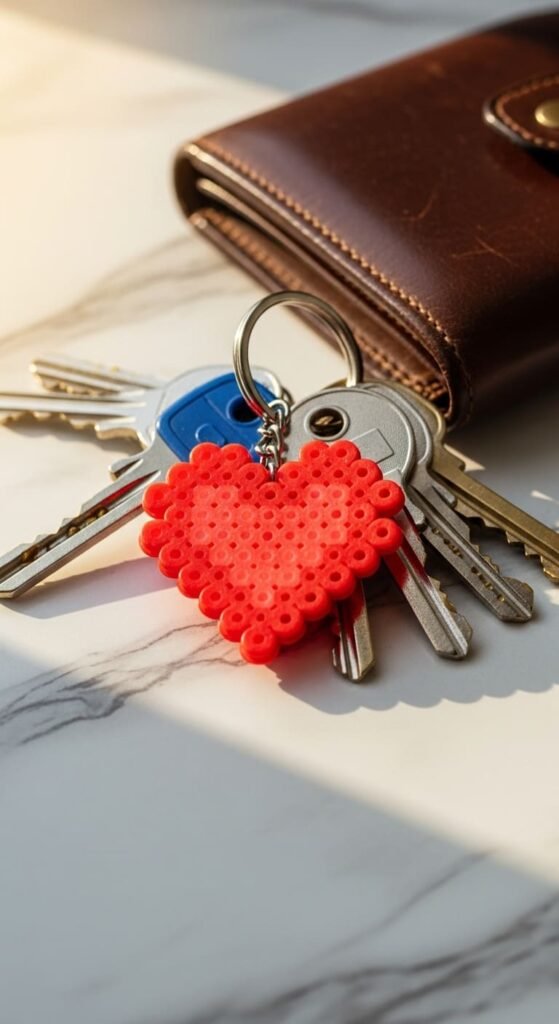
Heart keychains make sweet gifts for friends, parents, or partners. Place red or pink beads in a heart shape on a square pegboard. Use about 25 to 30 beads for a small heart.
Iron with parchment paper until the beads fuse. Flip and iron the other side too for strength. Let it cool completely before handling.
Add a small jump ring through one of the bead holes near the top. Attach a keychain ring or split ring through the jump ring. Both are sold in craft store packages for under three dollars.
Make hearts in different colors for personalized gifts. Pink for a sister, red for a partner, rainbow for a best friend. Each one takes about 10 minutes from start to finish.
Pair the keychain with a handwritten note for Valentine’s Day. Tie several together with twine for a charming gift presentation. Kids can make these for grandparents or teachers.
This project introduces hardware attachment to your perler skills. The hole in the bead acts as a built-in attachment point. Hearts also work as zipper pulls, backpack tags, or ornament hangers. Once you make one, you’ll find dozens of uses for the same shape.
3. Mini Flower Coasters
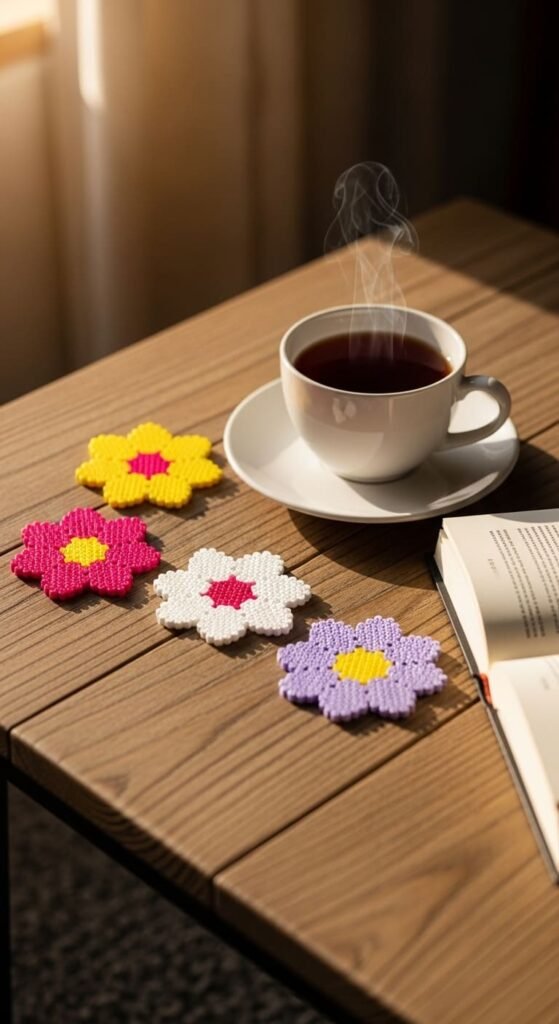
Flower coasters protect tables and look adorable on any surface. Make a simple flower shape on a large pegboard. Use one color for petals and a contrasting color for the center.
Daisies, tulips, and roses all work in basic grid patterns. Iron both sides until the beads fuse together solidly. The coaster should feel rigid and smooth.
Glue felt to the bottom to protect surfaces from scratches. A craft store felt sheet costs under a dollar and makes many coaster backings. Trace the coaster shape and cut the felt to match.
Make sets of four or six in matching or coordinating colors. Pastel sets look spring-like, while bright colors feel summery. The total cost per coaster stays under a dollar.
Pair a coaster set with a handmade mug for a thoughtful gift. Tie them together with ribbon and add a tag. Hostess gifts feel personal when you make them yourself.
This project teaches you to work with larger pegboards. The bigger size means more beads, but the technique stays simple. Coasters get daily use and last for years. Wipe them clean with a damp cloth between uses.
4. Star Ornament
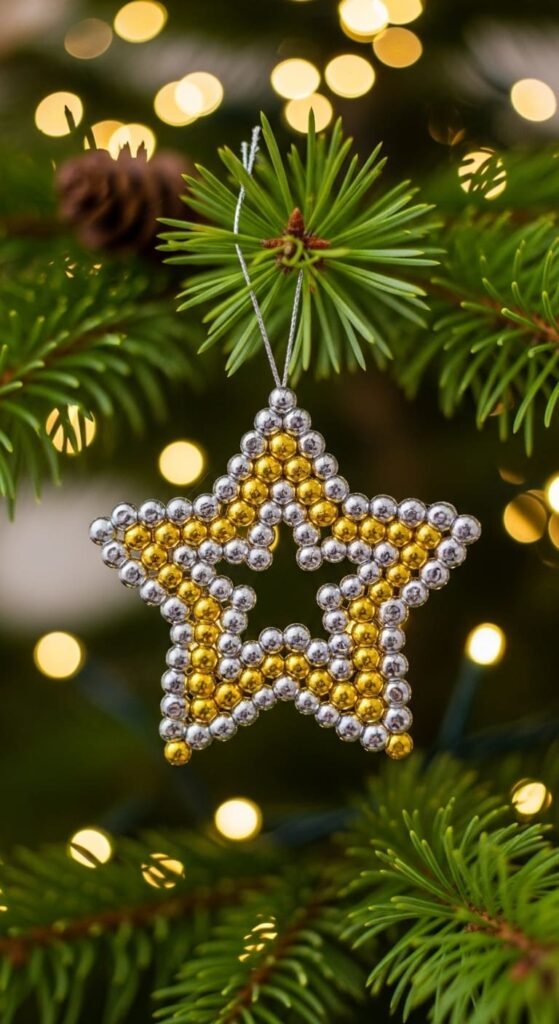
Star ornaments add handmade charm to Christmas trees or year-round decor. Place gold or silver beads in a five-point star shape. Use a star template printed from online for accuracy.
Iron carefully to avoid melting the points too thin. Star points fuse faster than the thicker center. Watch closely and stop ironing as soon as the beads connect.
Thread thin ribbon or string through one of the top bead holes. Tie a loop for hanging on the tree or a hook. Each star uses about 35 beads.
Make stars in different colors for a varied tree display. Traditional gold and silver work classic, while bright colors suit kids’ rooms. Hang them in windows for daytime sparkle.
Kids love making these as homemade gifts for grandparents. Wrap them in tissue paper for a special presentation. Each ornament costs almost nothing in materials.
Try variations like Star of David, shooting stars, or sheriff badges. The basic star shape adapts to many themes. Stars also work as bookmark toppers, magnet decorations, or backpack charms.
This project teaches you about thinner shapes and watching ironing time. The skill helps with snowflakes, sunbursts, and other detailed designs later.
5. Rainbow Pattern Magnet
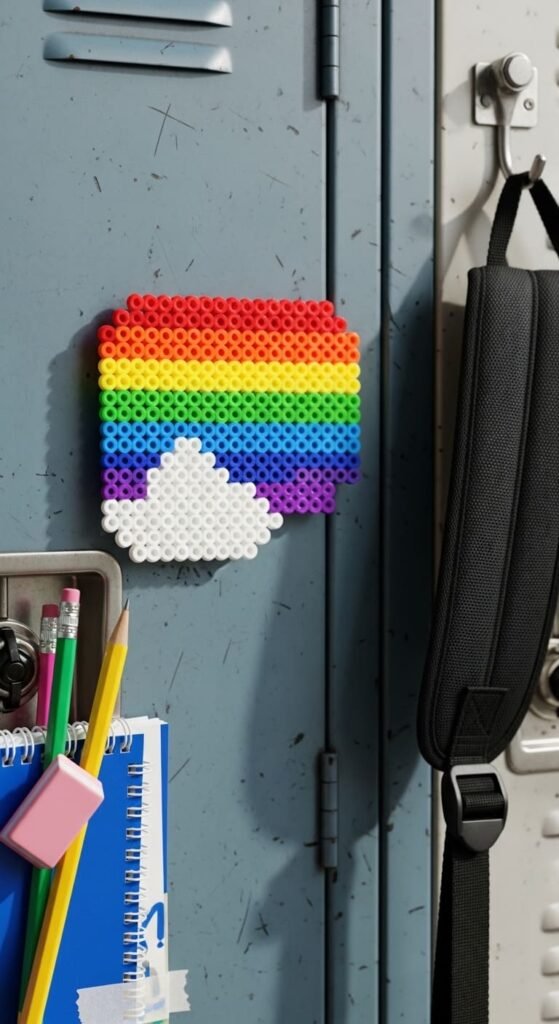
Rainbow magnets cheer up fridges, lockers, or magnetic boards. Place beads in arched rows: red, orange, yellow, green, blue, purple. Add white beads at the bottom for clouds.
Use a square pegboard for the easiest grid placement. Each color row uses about 6 to 8 beads. The whole rainbow finishes in about 10 minutes.
Iron evenly across all colors for uniform fusing. Check both sides for any unfused beads. Trim small bits with scissors if needed.
Glue an adhesive magnet strip to the back. Magnet packs cost under three dollars and last for many projects. Stick on lockers, fridges, filing cabinets, or magnetic boards.
Rainbow magnets work as classroom gifts for teachers. Pair with a small box of chocolates or a card. Kids can make a stack to share with friends.
Make smaller rainbows for earrings or necklace pendants. Just attach jewelry findings instead of magnets. The same pattern works in tiny size for charms.
This project teaches color sequencing and consistent row spacing. Children learn the rainbow color order while crafting. The cheerful result motivates kids to try more designs.
6. Sunflower Wall Decoration
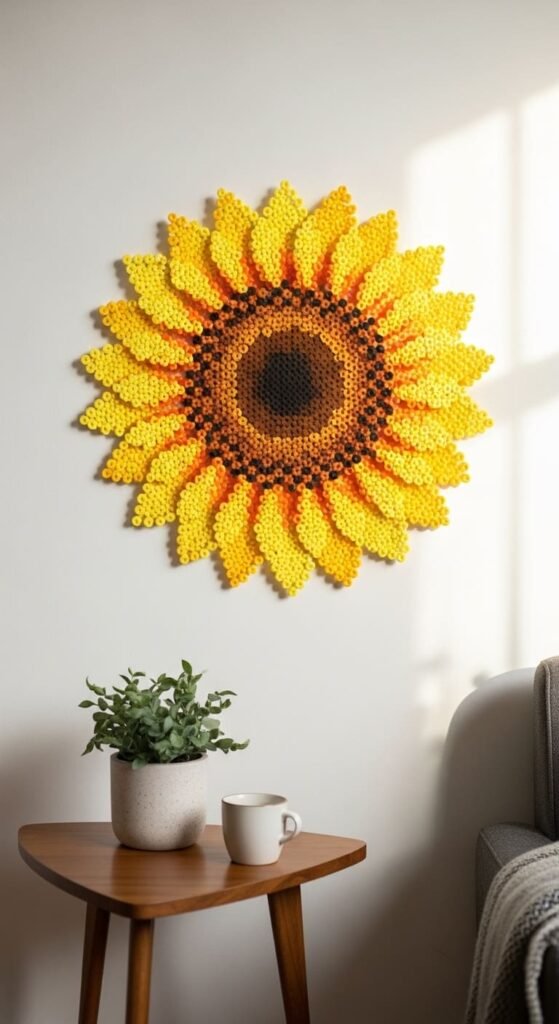
Sunflowers add summer cheer to walls or windows. Use a large round pegboard or arrange a square one with sunflower colors. Place brown beads in the center and yellow petals around them.
The pattern fills about half a large pegboard. Iron carefully across the wide design. Check that all beads fused before moving the piece.
Sunflowers in yellow and orange look like real garden blooms. Try mixing both colors for petals to add depth. Black beads in the center mimic real sunflower seeds.
Glue a string or thin ribbon to the back for hanging. Use removable adhesive squares to hang on walls without damage. Sunflowers also work in windows with suction cups.
Make smaller sunflowers as fridge magnets or coaster decorations. Tiny versions fit on hair clips or barrettes. The flexible shape adapts to many sizes.
Sunflower decorations brighten kids’ rooms, kitchens, or porches. Pair them with real potted plants for a coordinated look. Each one costs about a dollar in materials.
This project teaches you to plan larger designs. The radial petal pattern helps you visualize symmetric layouts. Once you master sunflowers, try roses, daisies, or peonies in similar styles.
7. Kawaii Bubble Tea Charm

Bubble tea charms ride the wave of cute kawaii crafts. Make a tall cup shape with pink or brown beads. Add a domed lid in white and a straw in striped colors.
Place small dark beads at the bottom for tapioca pearls. The whole design takes about 15 minutes on a square pegboard. Iron until everything fuses solidly together.
Attach a small jump ring at the top for charm hardware. Hook it onto phone cases, bag zippers, or keychain rings. Each charm uses about 50 beads total.
Make different flavors with color swaps. Brown for milk tea, pink for strawberry, green for matcha. Kids love picking their favorite flavor combinations.
Pair charms with real bubble tea gift cards for unique presents. Friends who love the drink will adore the matching charm. Each charm costs under a dollar in materials.
Try other kawaii food designs in the same style. Donuts, sushi rolls, and sandwiches all work. Build a collection of food charms for backpacks or jewelry.
This project teaches you to combine different shapes within one design. The lid, cup, and straw all use different bead arrangements. The skill helps with any complex multi-element pattern you try later.
8. Pixel Art Mushroom
Pixel art mushrooms are a beloved retro gaming icon. Make the classic red cap with white spots design. Add a cream-colored stem with a face below the cap.
Use a square pegboard for the grid-perfect pixel look. Search “8-bit mushroom pattern” online for free templates. The design uses about 60 to 80 beads.
Iron evenly to keep crisp pixel edges. Square shapes fuse better than rounded ones for that authentic retro look. Don’t over-iron, or the pixels blur together.
Make a stand by attaching the mushroom to a small wooden block. Display on shelves, desks, or game consoles. Gamers love handmade tributes to their favorite characters.
Try other pixel art icons in the same style. Coins, hearts, stars, and flower power-ups all work. Build a collection of game references for gift baskets.
Frame your pixel art in a small shadow box for wall display. The retro style fits gaming rooms or kids’ bedrooms. Each piece costs about a dollar but feels like a treasured collectible.
This project teaches you to follow grid-based patterns precisely. Pixel art forgives nothing in placement, so you build accuracy. The skill carries over to any detailed design with strict patterns.
9. Snowflake Decoration
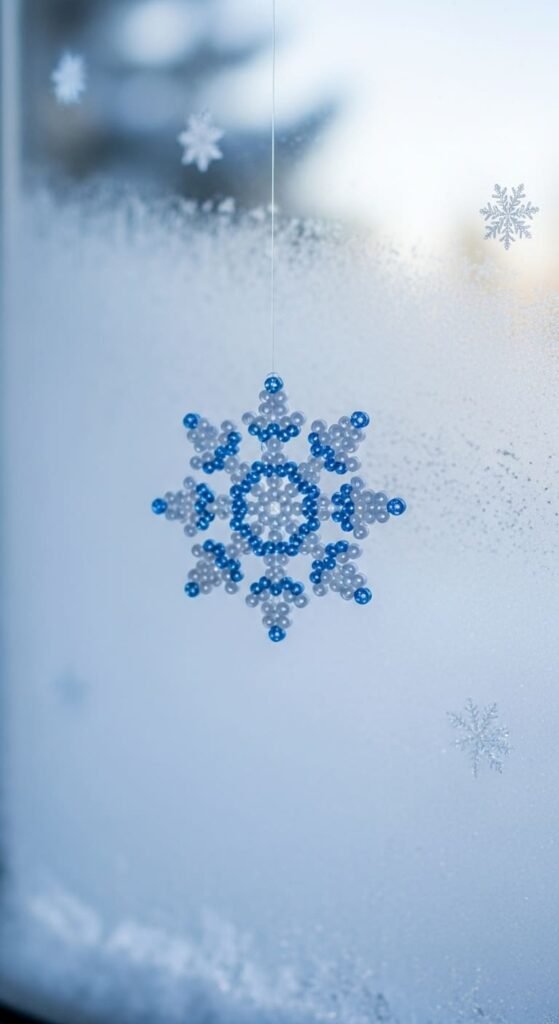
Snowflakes work as holiday ornaments, window decorations, or gift toppers. Use a hexagonal pegboard if you have one for authentic six-sided shapes. A square pegboard works too with creative bead placement.
Choose white, light blue, or silver beads for icy looks. Each snowflake has a unique pattern, so feel free to experiment. Print free snowflake templates from online resources.
Iron carefully since snowflake arms are thinner than solid shapes. Watch closely to prevent the points from melting flat. Stop as soon as the beads connect properly.
Thread thin clear thread or fishing line through a bead hole for hanging. Hang in windows, on Christmas trees, or above doorways. They look magical with sunlight or twinkle lights behind them.
Make a flurry of snowflakes for winter party decorations. Each one takes about 10 minutes. Hang them at different heights from the ceiling for a snowy effect.
Pair snowflake ornaments with handmade hot cocoa mix for winter gifts. Tie them to gift packages instead of bows. Kids enjoy making different patterns and comparing them.
This project teaches you symmetric design and gentle ironing. The delicate structure builds patience and care. Snowflakes also make beautiful suncatchers when hung in sunny windows.
10. Letter Initials
Letter initials personalize gifts, room decor, or backpack tags. Use a square pegboard and place beads in letter shapes. Print free alphabet templates from online sources.
Block letters work easiest for beginners. Curved letters like S or O take more practice. Start with simpler letters like H, T, or L for confidence.
Each letter uses about 30 to 50 beads. Iron carefully to keep clean edges on the letter shapes. Letters with thin parts need gentle ironing.
Make the recipient’s first initial in their favorite color. Spell out short names or words by making multiple letters. Use them as decorative pieces or attach to backpacks as charms.
Letter magnets organize fridges by family member. Each person has their own initial for notes or photos. The set costs only a few dollars for a whole family.
Personalize gifts with the recipient’s initial attached. Tie letters to gift bags as charming tags. Spell baby names for nursery decorations.
This project teaches you to interpret letter shapes in pixel form. The skill helps with custom text, names, and short messages in future designs. Once you master letters, try numbers, symbols, or short words.
11. Tiny Cactus Magnet
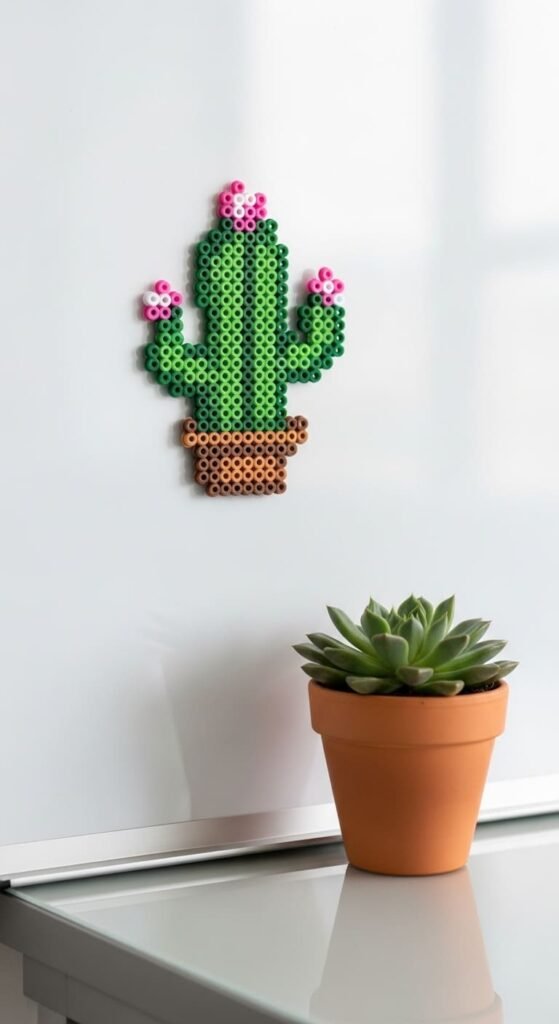
Cactus magnets bring desert charm to fridges or office boards. Use green beads for the cactus body and brown for a small pot. Add a tiny pink flower on top for cheer.
The simple shape uses about 40 beads total. Iron until everything fuses solidly. The thicker green body fuses well without thin spots.
Try different cactus shapes like saguaro, prickly pear, or barrel. Each looks distinctly different but uses the same basic technique. Build a collection of desert friends.
Glue an adhesive magnet to the back. Stick on fridges, lockers, magnetic boards, or filing cabinets. They cheer up dull metal surfaces beautifully.
Pair cactus magnets with real succulent gifts. Friends who love plants will appreciate the plant-themed magnet bonus. Tie one to a watering can or plant pot.
Make a whole desert scene with multiple cacti. Different sizes and shapes create a mini landscape. The collection grows over many crafting sessions.
This project teaches you to add small details like flowers within larger shapes. The skill transfers to faces, accents, and decorative elements. Cactus designs also work as keychains, pins, or pendant necklaces.
12. Fish Shape
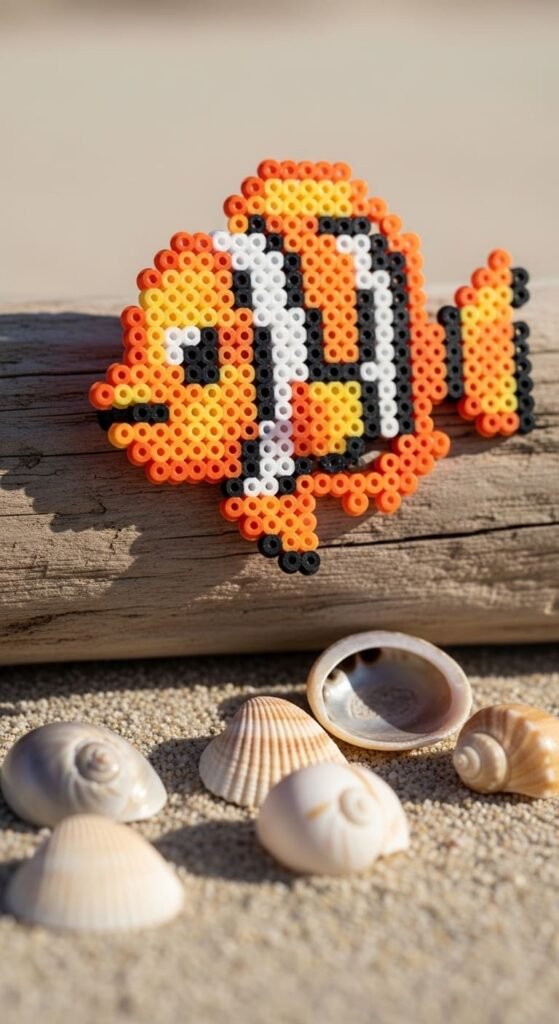
Fish designs work for kids’ rooms, beach themes, or aquarium-loving friends. Make a simple fish shape with a triangular tail and round body. Add a circle for the eye.
Use bright tropical colors like orange, yellow, blue, or pink. Stripe patterns mimic real clownfish or angelfish. Each fish uses about 50 beads.
Iron evenly across body and tail. The thinner tail fuses faster than the body. Stop ironing as soon as the tail connects to prevent thinning.
Make schools of fish in different sizes for a larger display. Hang them from clear thread for a hanging mobile. Babies and toddlers enjoy watching them spin and sway.
Glue a magnet on the back for fridge display. Kids can rearrange them into ocean scenes. Pair with whale, octopus, or starfish designs for a complete ocean theme.
Use as bath toy decorations for kids who love sea creatures. Just keep them out of water since the beads can absorb moisture over time. Display on shelves or tape to bathroom walls.
This project teaches you to make recognizable creature shapes. The simple silhouette method works for many animals. Try birds, butterflies, or other animals using the same approach.
13. Ice Cream Cone
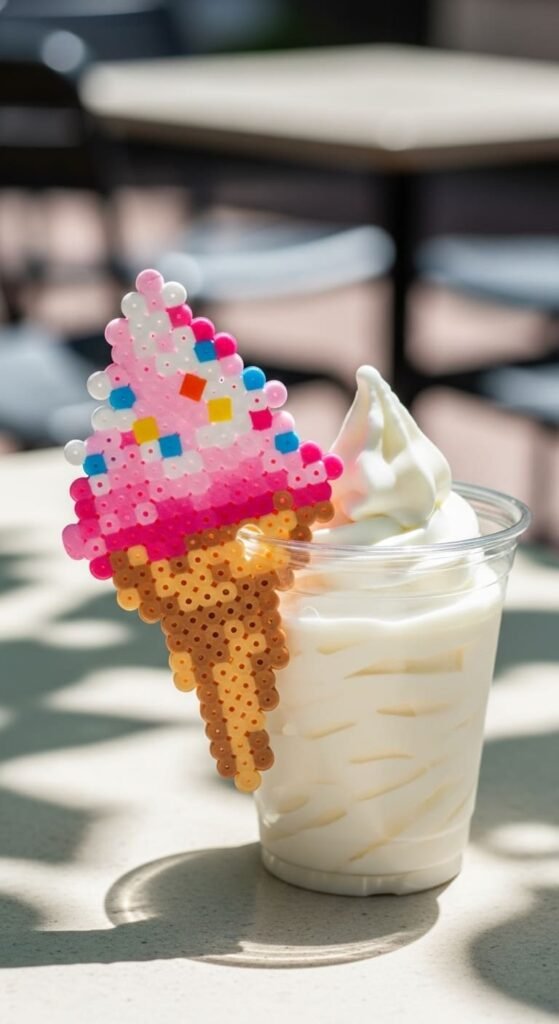
Ice cream cones add summer sweetness to keychains or magnets. Make the cone with tan or brown beads in a triangle shape. Add a scoop of ice cream on top in pink, white, or chocolate brown.
Tiny colored beads mimic sprinkles on the scoop. Mix bright colors for funfetti or one color for theme treats. The detail makes the design pop.
Iron all parts together as one piece. The cone bottom and ice cream top fuse into one solid charm. Each design uses about 60 beads.
Make different flavors by changing the scoop color. Mint chocolate chip in green with brown bits. Strawberry in pink with darker pink chunks. The variations feel endless.
Attach to keychains, backpack zippers, or summer hat charms. Pair with a real ice cream gift card for a sweet present. Kids love making these for summer birthday parties.
Make double-scoop versions by stacking two scoops. Add a cherry on top with a single red bead. The taller design adds visual interest.
This project teaches you to layer different elements within one design. The cone, scoop, and toppings each use different beads. The skill helps with hamburgers, sandwiches, or other layered food designs.
14. Frame Around a Photo
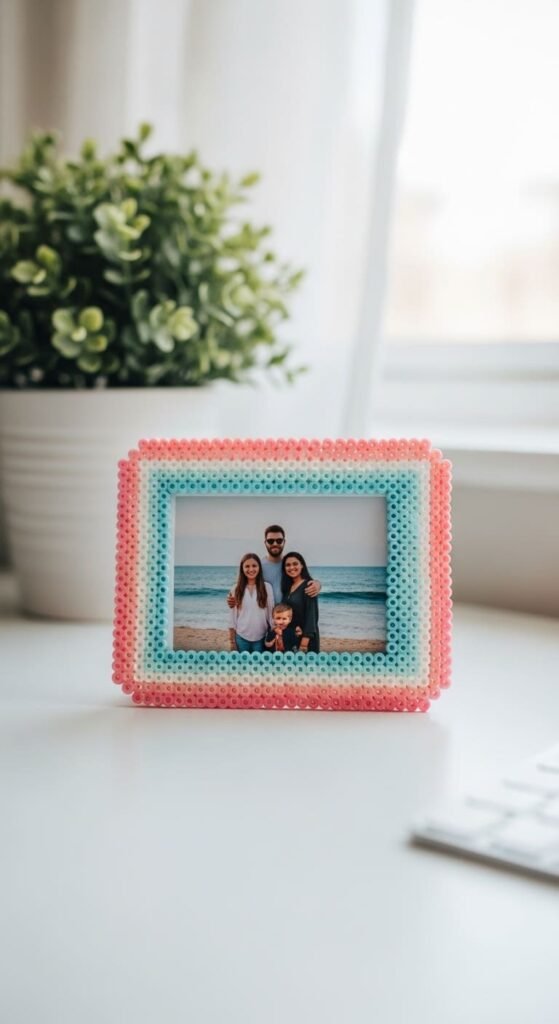
Perler bead frames showcase favorite photos with handmade charm. Make a rectangular shape on a large pegboard. Leave the center empty for the photo opening.
The frame width should be about 4 to 6 beads thick. Outer dimensions match standard photo sizes like 4×6 inches. Iron the frame solidly without warping.
Use coordinating colors that match the photo’s tones. Pastel frames look soft and feminine. Primary colors suit kids’ photos in bright frames.
Glue a small piece of cardboard to the back as a photo holder. Slide photos into the open center. Add a small stand or hanging hook to display.
Personalize frames with letters, hearts, or stars in the corners. Initials of the people in the photo make special touches. Make matching frames for a series of photos.
Frames also work as small mirrors with a tiny mirror glued behind. Use as compact mirrors or wall decorations. Each frame costs about two dollars in beads.
This project teaches you to create empty spaces within designs. The skill helps with windows, doorways, and other inset elements. Frames make heartfelt gifts paired with personal photos.
15. Watermelon Slice
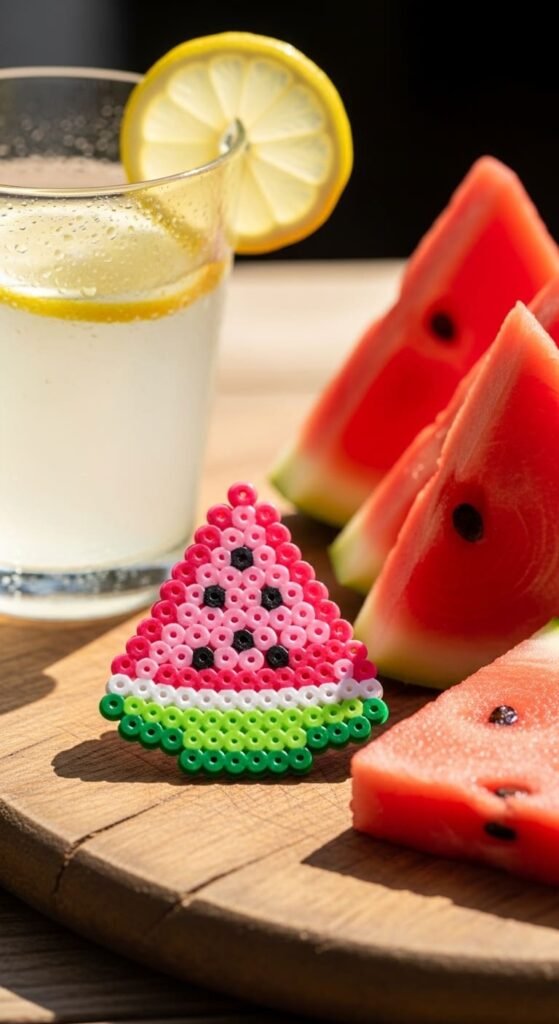
Watermelon slices burst with summer color and cheer. Make a half-circle shape with the curved side up. Use pink beads for the fruit center and green for the rind.
Add tiny black beads for seeds scattered through the pink. Light green beads between pink and dark green show the rind layers. The classic colors look immediately recognizable.
Each slice uses about 70 beads. Iron carefully to keep the half-circle shape clean. The straight bottom should stay flat after ironing.
Make different sizes for a stacked display. Tiny slices work as keychains or earring designs. Larger ones become coasters or magnets. The flexible scale adapts to many uses.
Pair watermelon designs with actual watermelon at summer parties. Use as drink charms or napkin weights at picnics. The cheerful colors fit any summer celebration.
Try other fruit designs in the same style. Strawberry slices, orange wedges, and apple cores all work. Build a fruit basket collection over time.
This project teaches you to combine straight and curved edges in one design. The half-circle shape practices both. Watermelon designs also work as necklace pendants for summer outfits.
16. Mini Pizza Slice
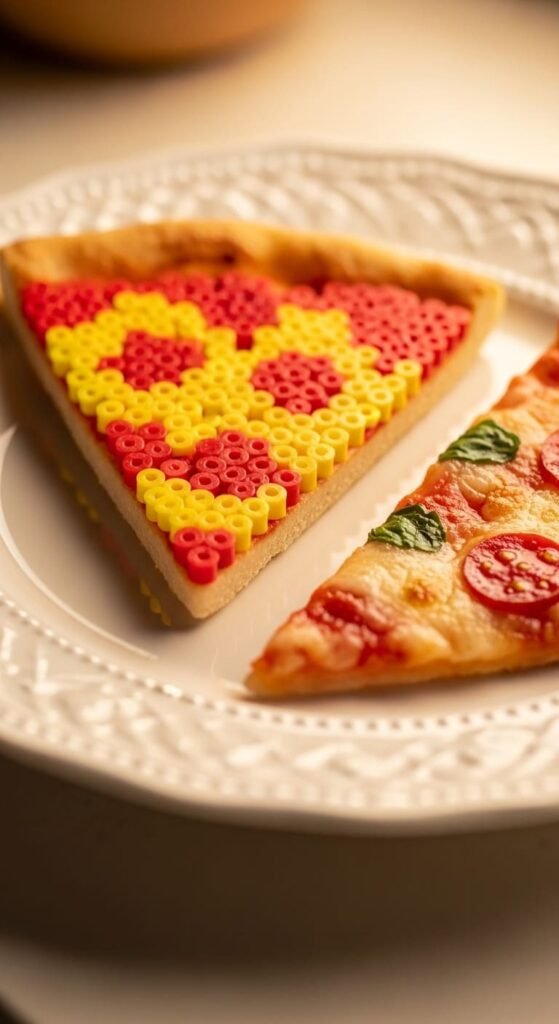
Pizza slice charms are crowd pleasers for any age. Make a triangle shape with the point at the bottom. Use tan beads for crust around the edge and red for sauce.
Add yellow beads on top of the sauce for melted cheese. Sprinkle red dots for pepperoni or other toppings. The recognizable shape brings smiles instantly.
Each slice uses about 50 beads. Iron the triangle shape carefully so the point doesn’t thin out. The thicker crust edges fuse well.
Customize toppings to match real pizza preferences. Green for veggies, brown for mushrooms, white for extra cheese. The toppings make each slice unique.
Make a whole pizza by arranging multiple slices in a circle. Connect them with a single iron pass for an impressive group project. Kids enjoy this collaborative approach.
Pair pizza charms with pizza party invitations or gift cards to favorite pizzerias. Tie one to a homemade pizza dough kit gift. Pizza lovers will adore the matching detail.
This project teaches you to add small details within a basic shape. The toppings sit on top of base layers. The technique helps with cookies, cupcakes, or other detailed food designs.
17. Pumpkin Magnet
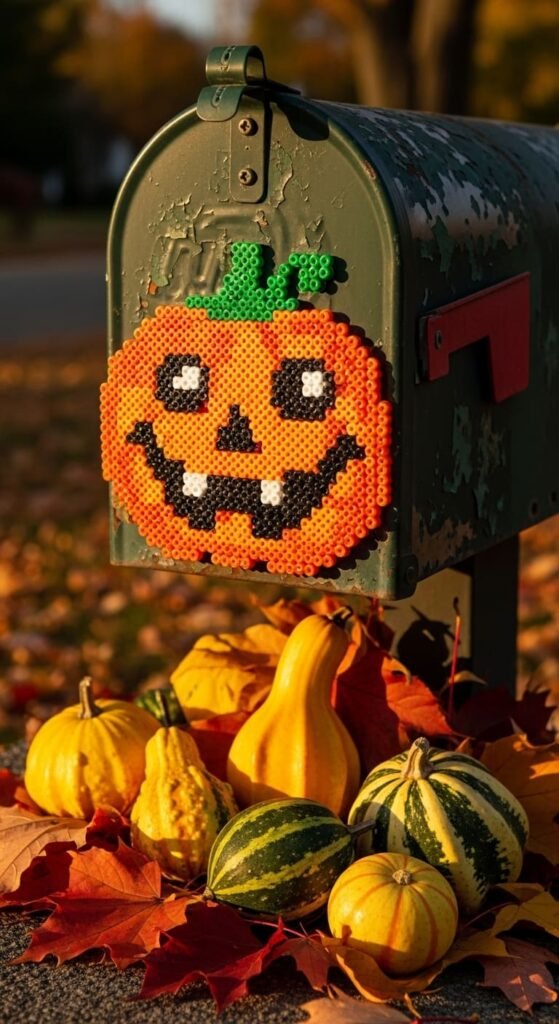
Pumpkin magnets bring fall vibes to fridges and lockers. Use orange beads for the round body and green for the stem. Add darker orange or brown lines for pumpkin ridges.
The classic shape uses about 70 beads. Iron in slow circles to fuse the round shape evenly. Watch the stem area to prevent thinning at the connection point.
Make a jack-o-lantern version with black beads for eyes and a smiling mouth. Add as much detail as you want for spooky or friendly faces. Each version takes about 12 minutes.
Glue magnets to the back for fridge display. Stick on lockers for fall school spirit. Pair with autumn leaves for a complete fall theme.
Make pumpkins in white, gray, or tan for trendy modern colors. Teal pumpkin designs support food allergy awareness on Halloween. The color flexibility fits any decor style.
Decorate doors, mantels, or porches with strings of pumpkin charms. Tie them to autumn wreaths for handmade detail. Each pumpkin costs less than a dollar.
This project teaches you to handle round shapes with stems or extensions. The skill helps with apples, fruits, and other round food designs. Pumpkins also work as keychains, ornaments, or pendant necklaces.
18. Cloud Charm
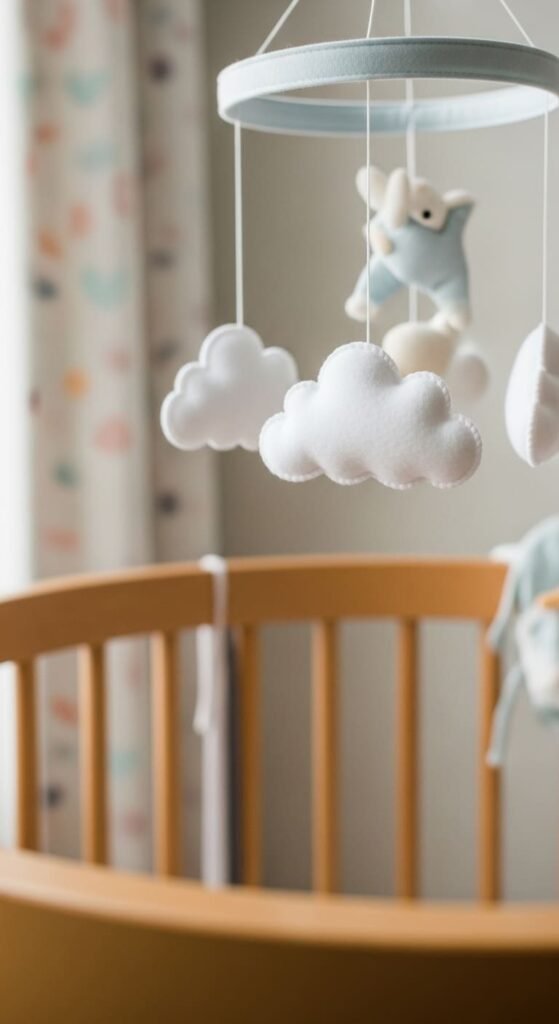
[Image Prompt: A fluffy white perler bead cloud charm hanging from a baby’s mobile above a wooden crib in a soft pastel nursery. Gentle natural light from a window, photographed with a high-end camera, peaceful nursery atmosphere with shallow depth of field, no text visible.]
Cloud charms add dreamy detail to nurseries, mobiles, or window hangings. Use white beads in a fluffy bumpy shape. The bottom stays flat while the top has rounded peaks.
Each cloud uses about 40 beads. Iron evenly across the wide shape. The simple white design works for any color palette.
Add tiny blue beads for raindrops below the cloud. Make a sunny version with yellow rays around the edges. Both variations use the basic cloud shape.
Hang clouds from clear thread for a dreamy mobile effect. Babies enjoy watching them sway gently. Adults love them as suncatchers or ceiling decorations.
Pair cloud charms with rainbow magnets for a sweet weather theme. Make storm clouds in gray for variety. The flexible color choices fit any theme.
Use as zipper pulls on baby bags or toddler backpacks. The soft, friendly shape suits children’s items. Each charm costs only a few cents.
This project teaches you to make organic, irregular shapes. The bumpy cloud edges are forgiving and creative. The skill helps with bushes, trees, or other natural shapes. Clouds also work in kids’ room decor or window hangings for soft natural light effects.
19. Geometric Pattern Coaster
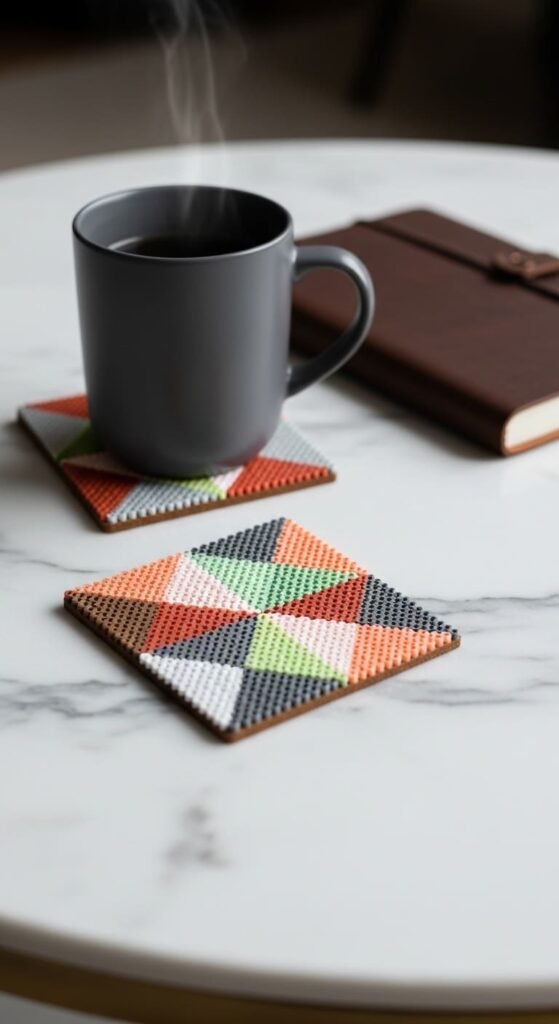
Geometric patterns suit modern decor and adult tastes. Make repeating triangles, diamonds, or chevrons across a square pegboard. Use two or three muted colors for sophistication.
The grid-based patterns work perfectly with bead placement. Use online geometric pattern generators for inspiration. Each coaster takes about 20 minutes.
Iron the entire surface evenly for a smooth, flat coaster. Geometric patterns require precise alignment, so check before ironing. Adjust any out-of-place beads carefully.
Make sets of four coasters in matching patterns. Different color combinations within the same pattern look cohesive. Earth tones, monochrome, or jewel tones all work.
Glue felt to the bottom to protect tables. Coordinate the felt color with the bead colors. The finished coasters look store-bought but feel personal.
Pair coaster sets with coffee or tea gift baskets. Modern recipients appreciate the clean, contemporary style. Each set costs about three dollars in materials.
This project teaches you to plan and execute repeating patterns. The skill helps with tile patterns, fabric-style designs, and other regular layouts. Geometric perler designs also work as wall art when framed in shadow boxes.
20. Animal Faces
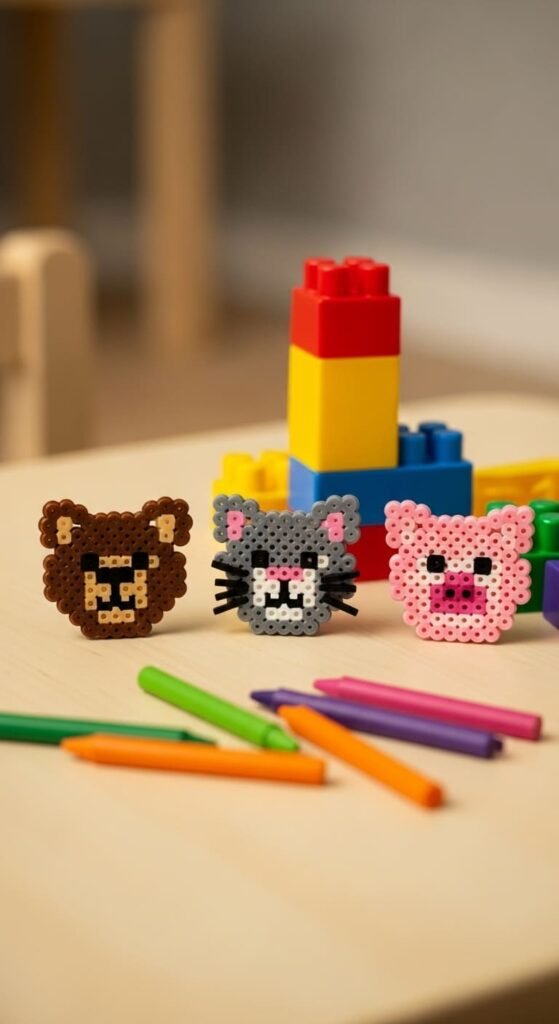
Animal face designs make kids smile and learn animal recognition. Make round shapes with characteristic features. Bears get round ears, cats get pointy ears, and pigs get tiny round noses.
Use brown for bears, gray for cats, pink for pigs, and white for sheep. Add black beads for eyes and noses. Simple two-color designs work best for beginners.
Each face uses about 50 beads. Iron the round shape evenly with attention to the smaller ear details. The features should remain visible after fusing.
Make a whole farm or zoo collection over time. Kids can name each animal as they make it. The educational angle adds value beyond crafting.
Glue magnets on the back for fridge play. Kids rearrange them into zoo scenes or pretend petting zoos. The interactive aspect extends play far beyond crafting.
Pair animal faces with stuffed animals or animal books for gifts. The matching theme delights kids. Each face costs under a dollar in materials.
This project teaches you to add distinguishing features within a basic round shape. The technique helps with character creation in many other designs. Animal faces also work as keychains, backpack tags, or pendant necklaces for animal-loving kids.
21. Lightning Bolt
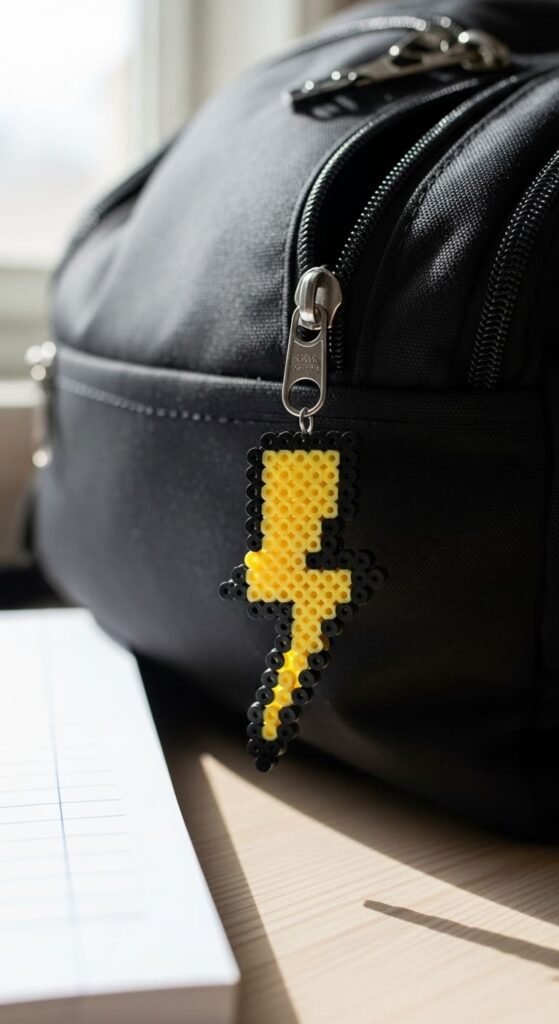
Lightning bolts feel energetic and fun for kids’ designs. Use yellow or gold beads in a classic zigzag bolt shape. The angular shape uses about 30 beads.
The shape works on any pegboard with grid placement. Sharp angles define the bolt clearly. Iron carefully so the points don’t thin out.
Add a thin black border for comic book style. Or keep solid yellow for clean simplicity. Both versions look great for different aesthetics.
Make lightning bolts in different colors for variety. Pink for sparkle effects, purple for magic, blue for ice. Each color tells a different visual story.
Attach to keychains, zipper pulls, or hair clips. Lightning bolt earrings make stylish jewelry pieces. The bold shape stands out in any setting.
Pair lightning bolts with superhero gift themes. Tie one to a comic book or superhero costume gift. Kids who love powers will treasure the matching charm.
This project teaches you to handle angular, jagged shapes. The skill helps with stars, lightning effects, or any design with sharp points. The bold shape also works as wall decor when made in larger sizes.
22. Butterfly Decoration
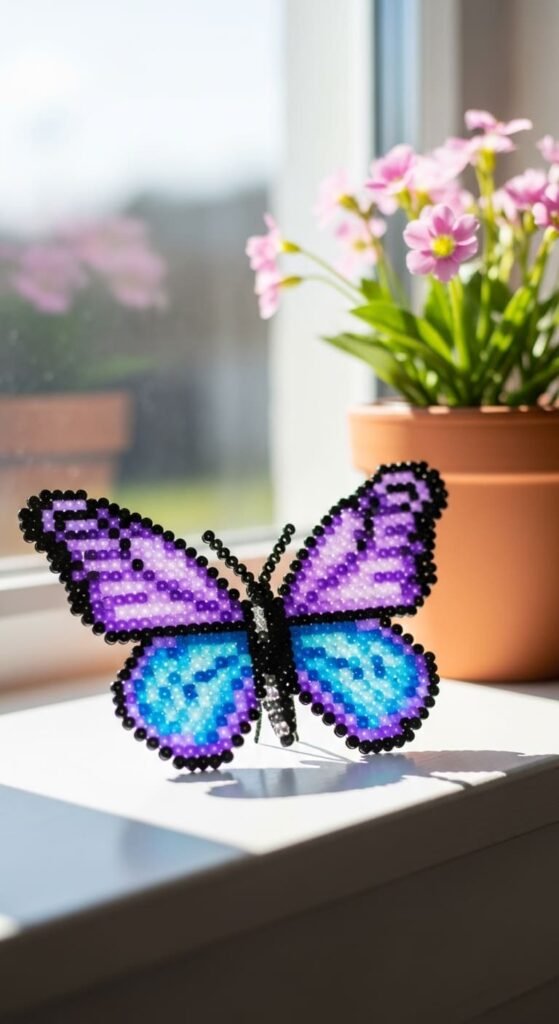
Butterfly designs add springtime cheer to walls and windows. Make symmetrical wings with mirror-image patterns. Use bright colors for tropical butterflies or earth tones for moths.
Each wing uses about 30 beads, plus the body and antennae. Iron the design evenly across the wide wingspan. Thin antennae need gentle ironing to prevent breakage.
Use multiple colors within each wing for realistic butterfly patterns. Monarch orange and black, swallowtail yellow and black, or fantasy purple and pink. The detail makes each butterfly unique.
Glue clear thread to the back for hanging in windows or as mobiles. Butterflies catch light beautifully when hung. Make several at different heights for a fluttering effect.
Pair butterfly charms with garden-themed gifts. Tie to flower pots, garden tools, or outdoor accessories. Spring birthday gifts feel extra special with butterfly touches.
Make smaller butterflies as hair clips, earrings, or bracelet charms. The flexible scale adapts to jewelry or larger decor. Each piece costs about a dollar.
This project teaches you about symmetry and pattern repetition. The skill helps with any design that has mirrored elements. Butterflies also work as bookmarks, gift tags, or wall art.
23. Christmas Tree
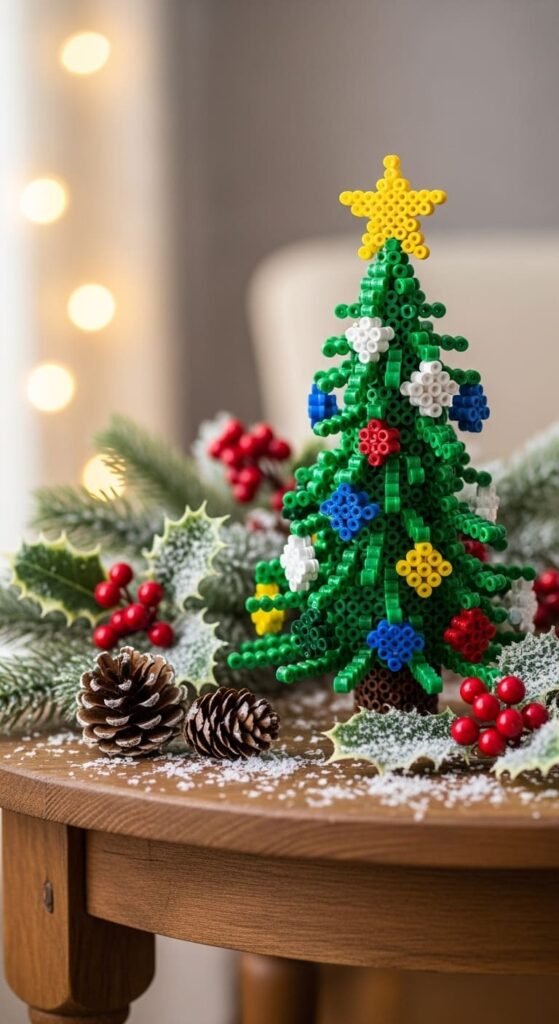
Christmas tree charms feel festive throughout December. Make a triangle shape with green beads. Add a brown trunk at the bottom and a yellow star on top.
Decorate with single beads in red, blue, gold, and silver as ornaments. Each tree uses about 50 beads total. Place ornaments evenly for balanced decoration.
Iron the whole design at once. The triangle fuses solidly across the wider base and narrower top. The star and trunk fuse with the main tree.
Make a forest of small Christmas trees as table decorations. Different sizes create depth and interest. Tie them with red ribbon for tree garlands.
Glue to wooden disks for standing trees. Display on mantels, shelves, or window sills. The handmade touch beats store-bought decorations every time.
Pair tree charms with hot cocoa gift kits. Tie to holiday card envelopes for special touches. Kids love making these for grandparents and teachers.
This project teaches you to add small accent beads within a larger shape. The ornament details practice precision placement. Christmas trees also work as gift tags, ornaments, or holiday card embellishments.
24. Donut Charm
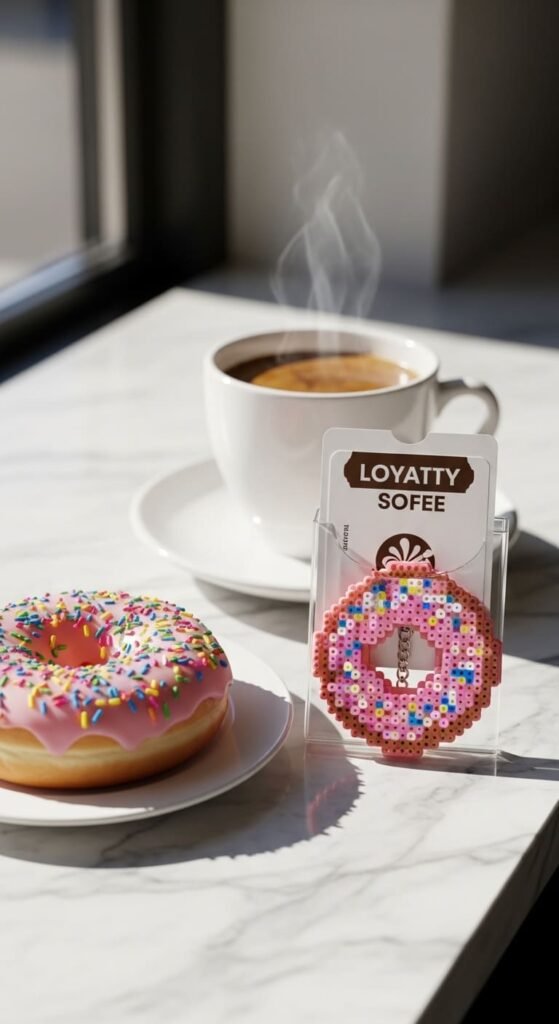
Donut charms taste so cute they’re almost edible looking. Make a circle with a hole in the middle. Use pink, brown, or white for frosting on top.
Add tiny multicolored beads for sprinkles. The classic donut shape uses about 60 beads. Iron carefully around the center hole to keep the opening clean.
Make different flavors with frosting color changes. Chocolate brown, strawberry pink, vanilla white, or matcha green. Sprinkle colors add even more variety.
Glaze designs without sprinkles look elegant for adult tastes. Keep the simple two-tone look for sophisticated donut charms. Both styles work for different gift recipients.
Attach to keychains, phone charms, or backpack zippers. Donut lovers carry their treats with them everywhere. Pair with real donut shop gift cards for sweet presents.
Make a baker’s dozen for party favors. Tie them to napkin rings or place card holders. Donut-themed parties love the matching detail throughout.
This project teaches you to create shapes with center holes. The skill helps with rings, bagels, life preservers, or any design with empty centers. Donuts also work as earrings or pendant necklaces for food-loving fashion.
25. Apple for the Teacher
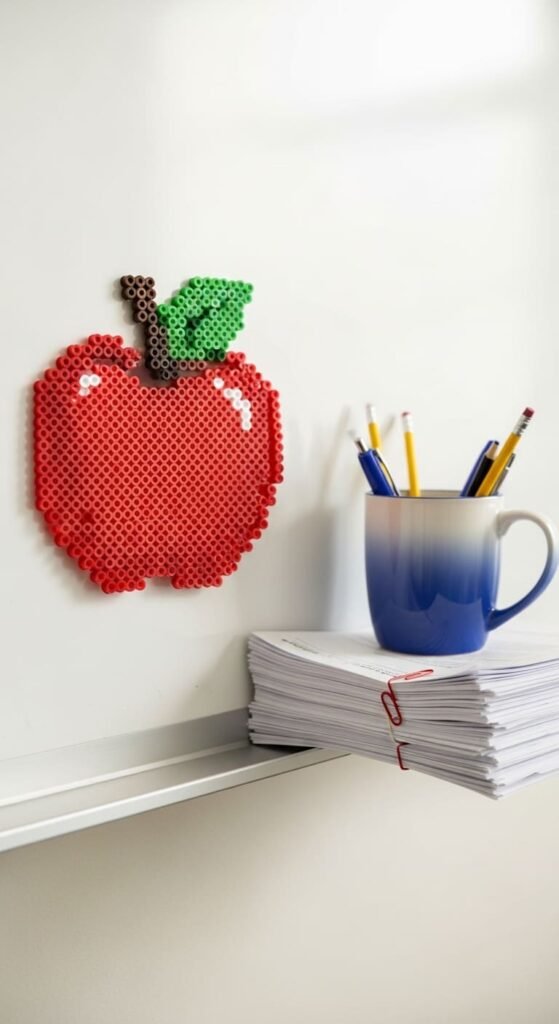
Apple designs make perfect teacher gifts year-round. Make a round red apple with a brown stem and green leaf. The classic shape feels universally recognizable.
Use about 50 beads for the apple, stem, and leaf together. Iron the round shape evenly. The leaf and stem details add character to the simple apple shape.
Make red, green, or yellow apples for variety. Each color suggests different apple types. The recognizable silhouette stays consistent across colors.
Add a magnet to the back for classroom display. Teachers love handmade gifts from students. Pair with a personal note for back-to-school season.
Make apples as keychains for students who love their teacher. Tie one to gift cards or thank-you cards. The gesture means more than store-bought gifts.
A bushel of apple charms works for whole-class gifts to teachers. Each student decorates their own. The collective effort feels touching.
This project teaches you to combine multiple small elements into a recognizable design. The apple, stem, and leaf each contribute distinct features. Apples also work as ornaments, gift tags, or summer fruit bowl decorations.
Conclusion
Perler bead crafts give you an affordable, low-stress way to make charming gifts and decorations. These 25 beginner-friendly ideas use simple shapes, basic ironing techniques, and minimal supplies. A starter kit with beads, pegboards, and parchment paper costs under twenty dollars and supplies dozens of projects. Pick one design that catches your eye and try it today. You’ll have a finished piece in 15 minutes or less. Keep practicing with different colors and patterns until you build a whole collection of magnets, keychains, and ornaments. Share them as gifts, decorate your home, or craft alongside kids for screen-free family time. Grab your beads and start creating something handmade right now.


