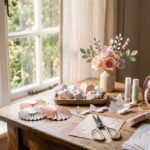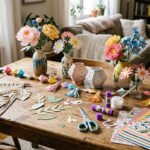
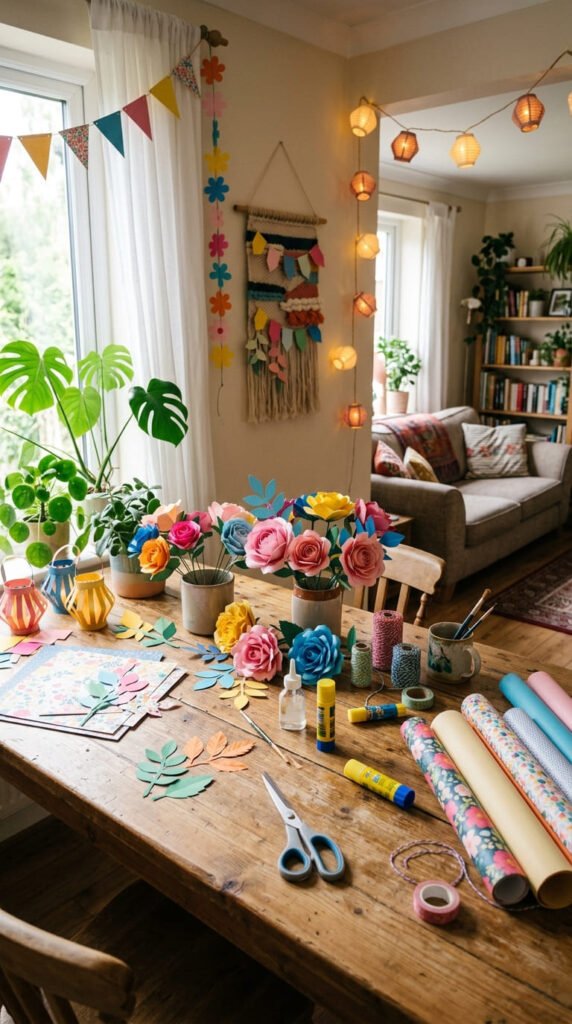
Paper crafts for home decor are a simple way to add color, texture, and handmade warmth to any room without spending much. This topic fits readers who want low-cost wall decor, paper flowers, garlands, lanterns, mobiles, upcycled paper art, and easy room accents that can be made at home with basic supplies. Research around paper crafts for home decor shows strong interest in affordable handmade wall pieces, seasonal decorations, paper flowers, garlands, lanterns, mobiles, and recycled paper decor.
1. Paper Flower Wall Backdrop
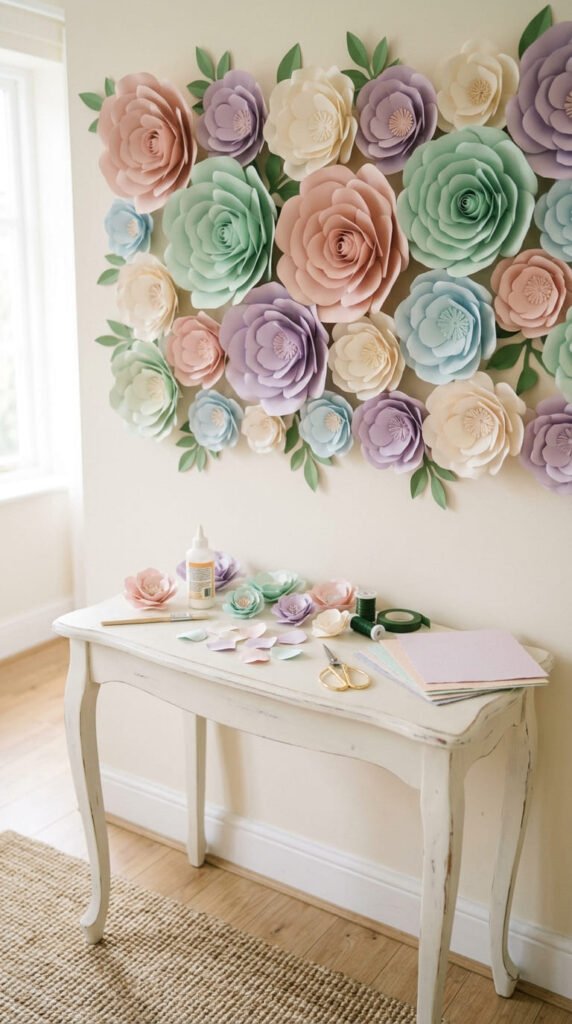
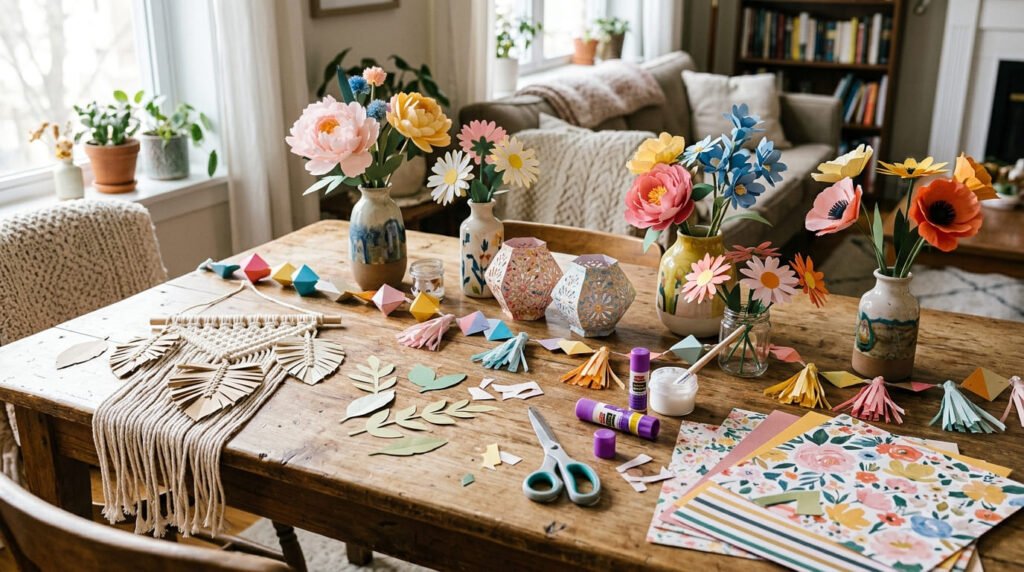
A paper flower wall backdrop can make a plain wall feel warm and decorated with very little cost. Use colored cardstock, construction paper, or thick scrapbook paper. Cut large petal shapes, curl the edges with a pencil, and glue the petals in circles.
Start with three large flowers, then add smaller ones around them. This keeps the wall from looking crowded. Add green paper leaves between the flowers for a fuller display.
This idea works well above a bed, sofa, desk, entry table, or party corner. Soft pink, cream, and sage paper can feel calm. Bright colors work better for kids’ rooms or birthday decor.
For a budget-friendly option, use printer paper painted with watercolors or markers. Let it dry flat before cutting petals. You can also reuse old gift bags if the paper is strong.
Attach flowers with removable wall dots so renters can decorate without damage. A few handmade blooms can give the room a cheerful focal point in one afternoon.
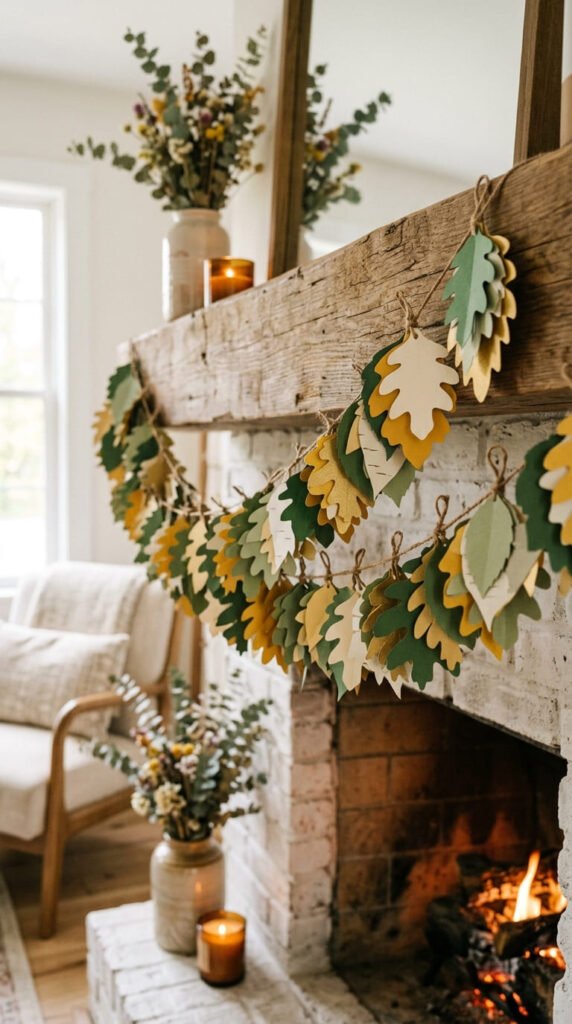
2. Layered Paper Leaf Garland
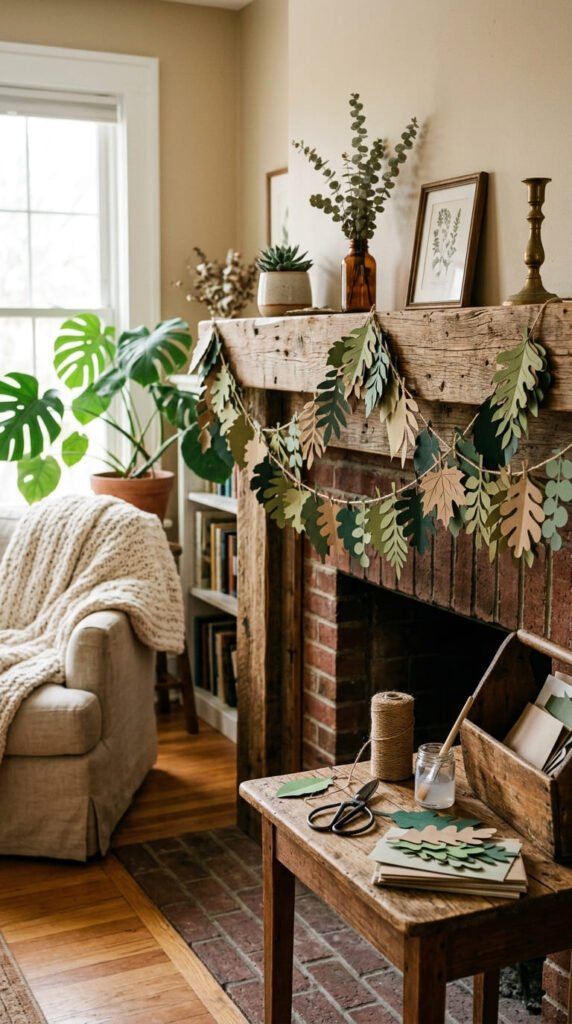
A layered paper leaf garland is an easy way to bring a soft natural look into a room. Cut leaf shapes from green, olive, beige, or kraft paper. Fold each leaf down the center so it has a light 3D shape.
Glue the leaves along a piece of twine, yarn, or thin ribbon. Place some leaves flat and some angled. This gives the garland movement without hard steps.
Hang it across a mantel, shelf, window, headboard, mirror, or doorway. Use dark green paper for a botanical look. Use orange and brown paper for fall decor. Use white and gold paper for party styling.
This craft is very affordable because it uses small pieces of paper. Save scraps from other projects and cut them into leaves later.
For a realistic DIY example, make a short garland for a bathroom shelf. Add it near candles, jars, or small plants. The paper leaves soften the space and add handmade charm without taking up surface space.
3. Paper Butterfly Wall Trail
A paper butterfly wall trail is perfect for bedrooms, craft rooms, nurseries, and party walls. Fold paper in half, draw half a butterfly shape along the fold, and cut it out. Open the paper to reveal a matching butterfly.
Fold the wings slightly upward so each butterfly lifts from the wall. Make different sizes to create a flying pattern. Place larger butterflies near the bottom and smaller ones higher up.
Use patterned paper for a detailed look. Magazine pages, old calendars, and wrapping paper also work well. For a softer room, choose one color family, like blush, cream, and dusty rose.
Attach the butterflies with removable wall dots or small loops of painter’s tape. This keeps the wall safer and makes the design easy to move.
A budget-friendly idea is to decorate a dull corner above a desk. Add twenty small butterflies in a curve. The display looks light, playful, and polished, but it costs almost nothing if you use paper scraps.
4. Folded Paper Fan Display
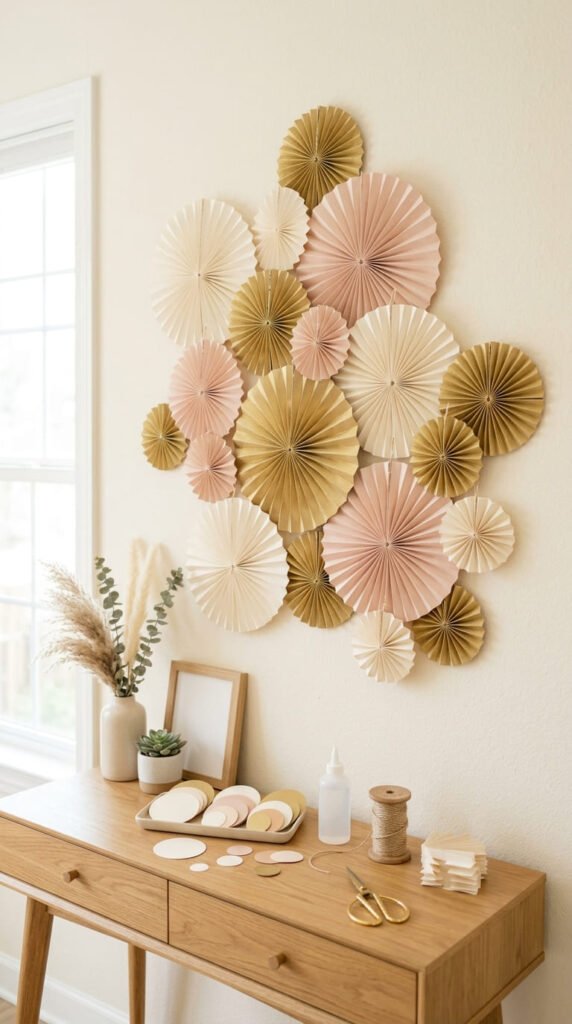
Folded paper fans are a quick way to create bold wall decor. Start with rectangular sheets of paper. Fold each sheet back and forth like an accordion. Press every fold firmly with your fingers.
Fold the pleated strip in half and glue the inner edges together. Make two or three fans, then glue them side by side to form a round rosette. Add a small paper circle in the center to hide the join.
Hang several rosettes together in different sizes. This looks beautiful over a dessert table, desk, reading corner, or hallway wall. Use neutral paper for a calm home style or bright paper for parties.
This craft is low-cost because one pack of colored paper can make many fans. Gift wrap can also work if it is not too thin.
For a simple DIY setup, make five paper fans in cream, tan, and soft pink. Place them in a cluster above a shelf. The repeated circles add texture and make the room feel decorated without heavy frames or nails.
5. Paper Lantern Shelf Decor
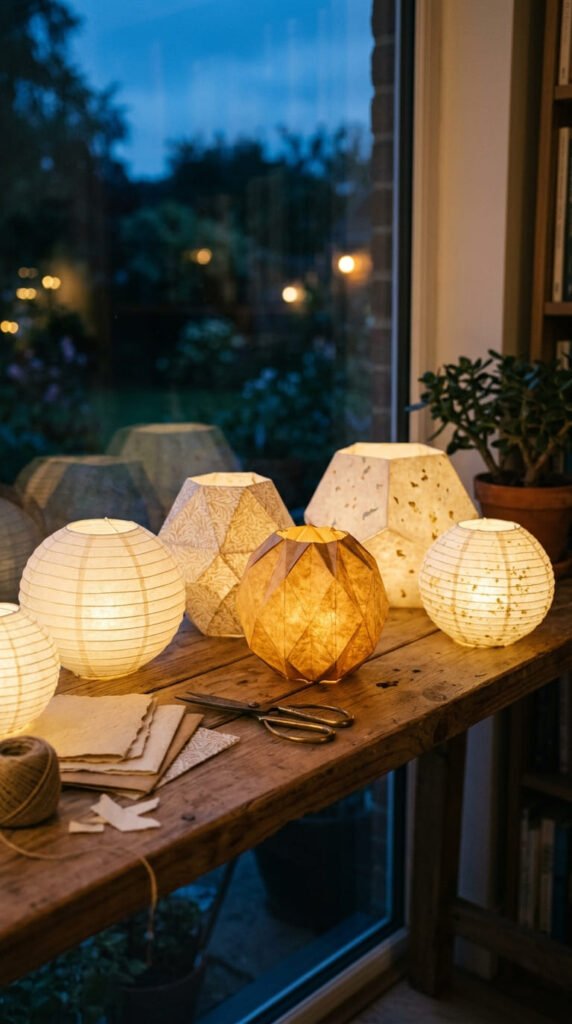
Paper lanterns can add soft decor to shelves, side tables, or party corners. Fold a sheet of paper in half lengthwise. Cut short lines from the folded edge toward the open edge, leaving space at the top. Open the paper, roll it into a cylinder, and tape the side.
Add a thin paper handle if you want a hanging lantern. For shelf decor, leave the handle off and place the lantern upright. Use battery lights only. Never place real candles inside paper.
Choose cream, gold, rust, white, or pastel paper based on the room. Patterned paper creates a more decorative look. Thin cardstock holds shape better than printer paper.
A budget-friendly idea is to use plain paper and add punched holes or small cutout shapes before rolling. When light passes through the openings, the lantern looks lovely.
Set three lanterns together on a shelf with a small plant or vase. The soft glow creates a cozy feeling without expensive lighting.
6. Framed Paper Cutout Art
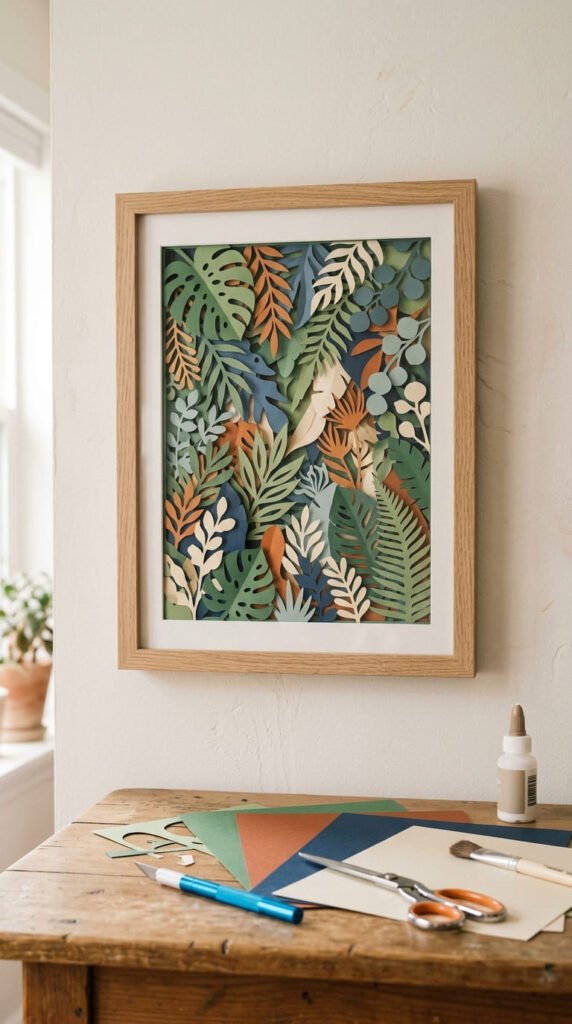
Framed paper cutout art is a clean way to decorate walls without buying prints. Start with a piece of cardstock as the background. Cut simple shapes from other paper, such as leaves, arches, circles, flowers, waves, or mountains.
Layer the shapes on the background before gluing. Move them around until the layout feels balanced. Keep the color palette small so the art looks calm and intentional.
Place the finished piece inside an old frame. If you do not have a frame, use cardboard as a backing and add a paper border. Hang it with tape, ribbon, or a small hook.
This project is budget-friendly because it can use scraps, old folders, wrapping paper, or magazine pages. You can make a set of three matching pieces for a hallway or bedroom wall.
For a modern look, use beige, black, white, and tan paper. For a kids’ room, use bright paper and larger shapes. Paper cutout art is simple, personal, and easy to change when your style changes.
7. Paper Star Hanging Mobile
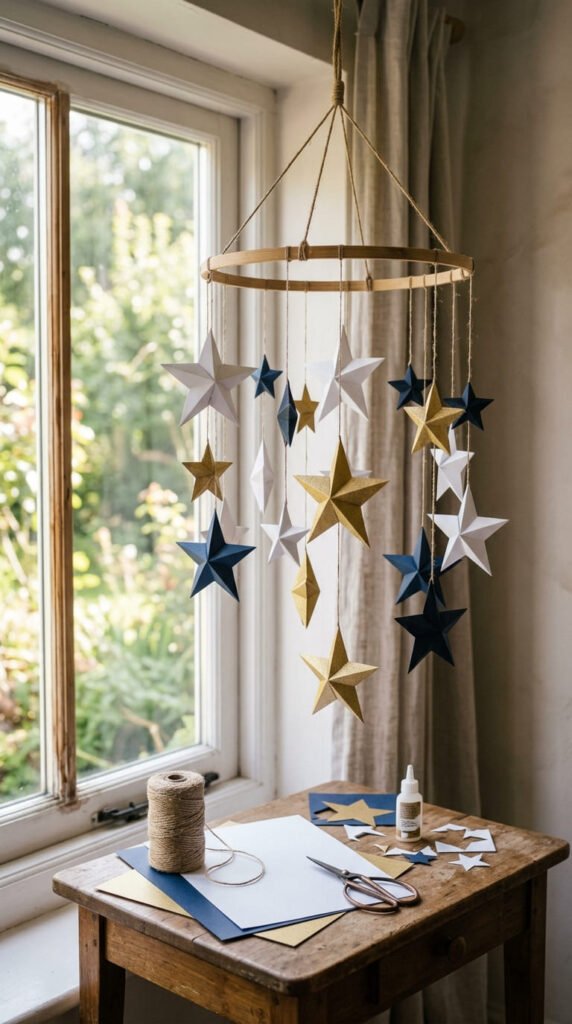
A paper star hanging mobile adds gentle movement to a room. Cut stars from cardstock, scrapbook paper, or recycled paper. Make several sizes so the mobile has depth. Punch a tiny hole at the top of each star.
Tie the stars onto thin string, yarn, or fishing line. Attach the strings to a wooden hoop, embroidery hoop, branch, or cardboard ring. Keep the strings different lengths so the stars hang naturally.
This craft works well for nurseries, kids’ rooms, reading corners, windows, and craft spaces. White and gold stars feel soft. Navy and silver stars create a night-sky style.
For a low-cost version, use cardboard from a cereal box and cover it with paper. You can also paint the stars before hanging them.
Hang the mobile where it can move slightly, but keep it out of reach of small children. It adds decoration without taking up table space. A paper mobile is light, pretty, and easy to remake in new colors.
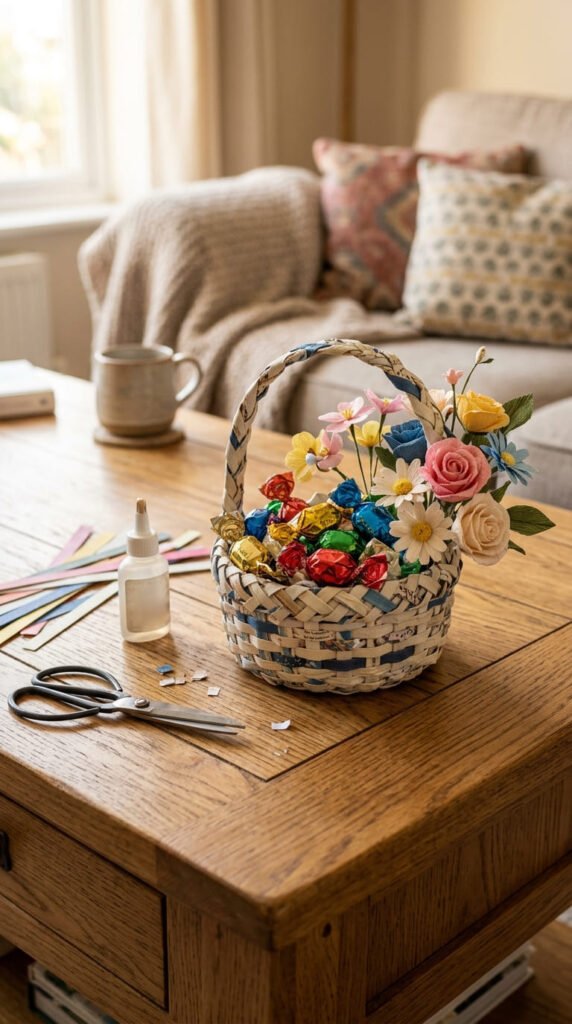
8. Rolled Paper Rose Vase Filler
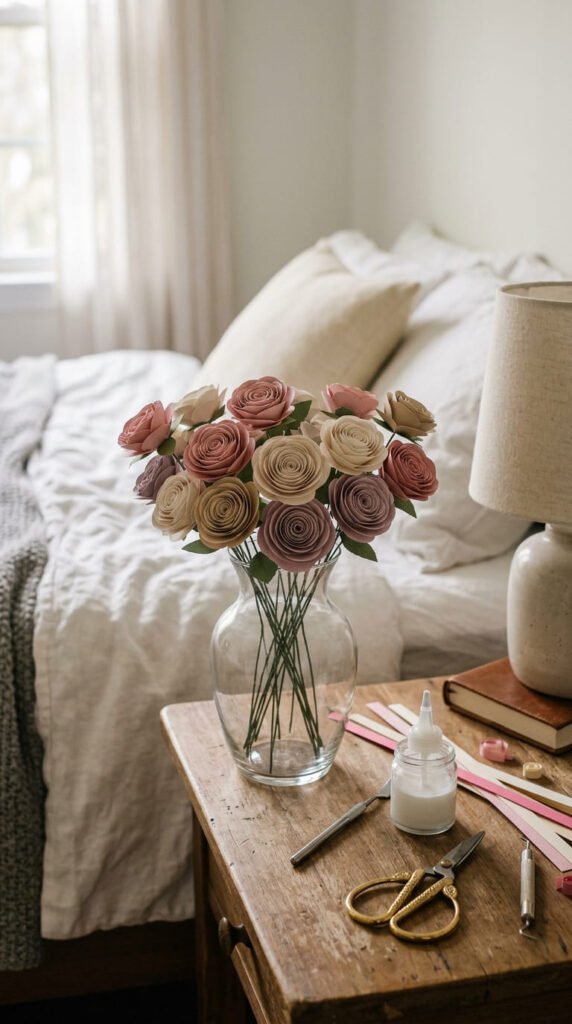
Rolled paper roses make lovely vase filler, shelf accents, or gift table decor. Cut a circle from paper, then cut the circle into a spiral. Start rolling from the outer edge toward the center. Let the roll loosen slightly, then glue the bottom.
Make several roses in similar colors for a soft bouquet. Add green paper leaves or place the roses directly in a shallow bowl. Cardstock makes firm roses, while lighter paper gives a softer shape.
This craft is affordable because each rose uses one small paper circle. Old book pages, music sheets, and wrapping paper can create beautiful texture.
For a realistic home decor idea, fill a small glass vase with paper roses and place it on a nightstand. It adds color without water, wilting, or weekly replacement.
You can also glue rolled roses onto wreaths, picture frames, or gift boxes. Keep a small batch ready for quick decorating. They are easy to make while watching TV or listening to music.
9. Paper Wreath for Doors
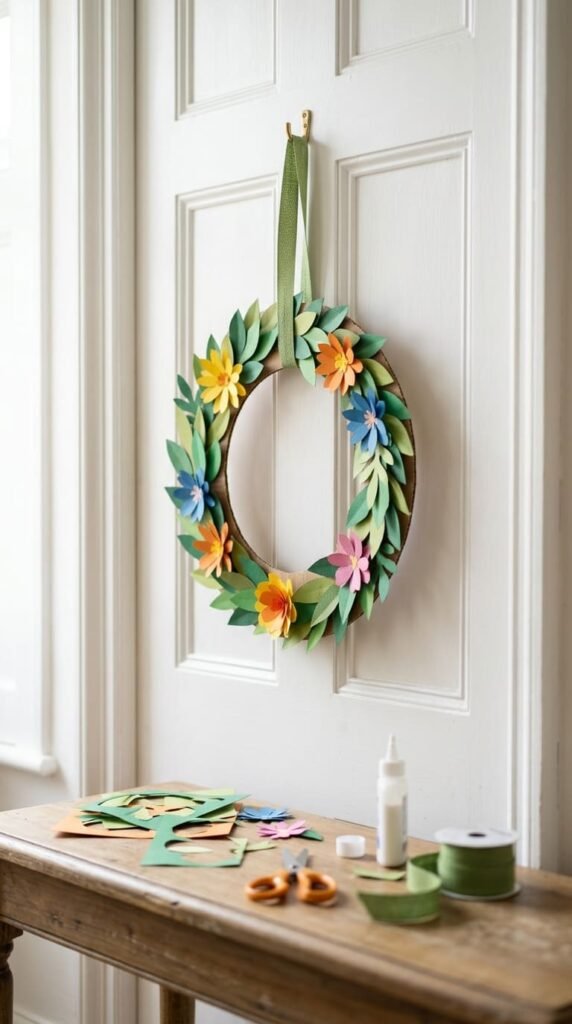
A paper wreath is a pretty way to decorate a door, wall, shelf, or mantel. Cut a ring from cardboard as the base. Then cut paper leaves, flowers, circles, stars, or seasonal shapes. Glue them around the ring until the cardboard is hidden.
Choose the colors based on the room or season. Green and white work for spring. Orange and brown fit fall. Red, white, and gold work well for holidays. Soft neutrals can stay up all year.
This craft is low-cost because the base can come from a delivery box. Paper scraps can cover most of the wreath. Add ribbon at the top for hanging.
For a full look, layer large pieces first and smaller pieces on top. Fold leaves down the center to give them shape. Curl flower petals with a pencil before gluing.
Hang the wreath on an inside door or above a console table. Paper wreaths are light, easy to store, and simple to remake whenever you want a new color story.
10. Geometric Paper Wall Shapes
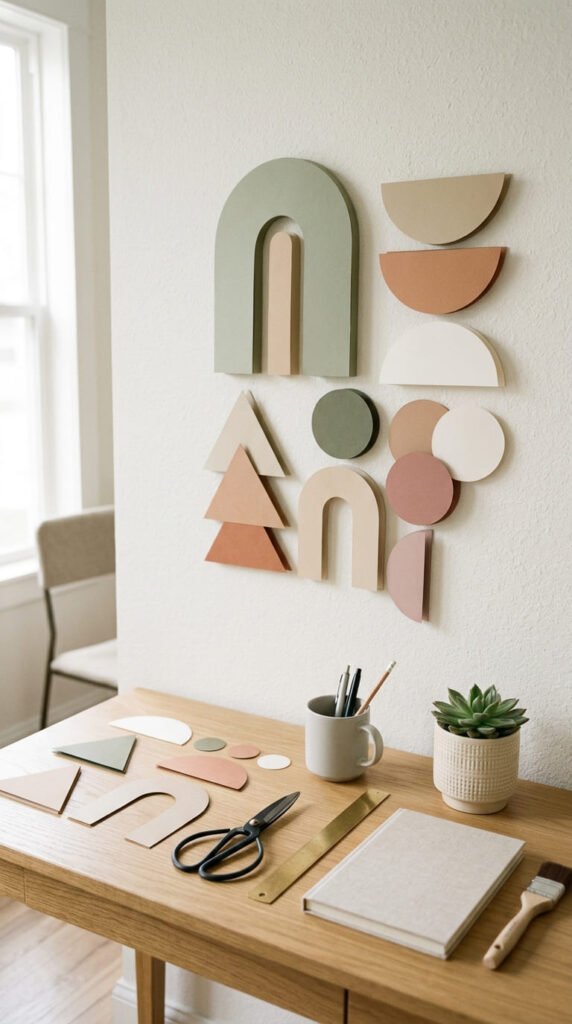
Geometric paper wall shapes are great for modern home decor. Cut circles, arches, triangles, half-moons, diamonds, and rectangles from cardstock. Pick three or four colors that match the room.
Lay the shapes on the floor before attaching them to the wall. Try a loose pattern above a desk, sofa, or bed. Keep some space between each shape so the design feels clean.
Use removable wall dots or painter’s tape to attach the pieces. This makes the project rental-friendly and easy to move. You can change the layout later without repainting or buying new art.
For a budget-friendly version, use paint sample cards, old folders, or packaging paper. Cut around logos or cover printed cardboard with plain paper.
A simple DIY idea is a neutral arch wall above a desk. Use tan, cream, rust, and black paper shapes. It creates a custom art wall for a tiny cost and works well in small apartments, dorm rooms, or craft corners.
11. Paper Chain Curtain
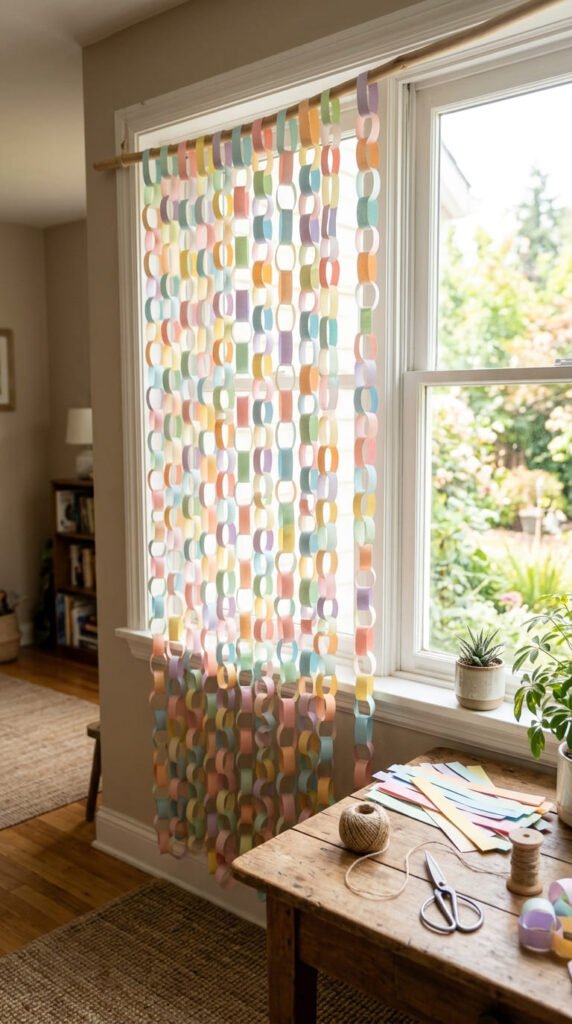
A paper chain curtain is a fun way to decorate a doorway, window, kids’ room, or party area. Make long paper chains using strips of paper looped together with glue or tape. Create several chains in the same length.
Attach the top of each chain to a strip of cardboard, ribbon, or a tension rod. Hang the chains side by side so they form a light curtain. Use soft colors for a bedroom or bright colors for a playroom.
This decor is very affordable because it uses basic paper strips. It is also easy for kids to help with, making it a family craft project.
For a stylish look, use two or three colors only. For a playful look, use every color you have. Magazine paper creates a lively patterned curtain.
A paper chain curtain can also work as a photo backdrop for birthdays or craft parties. When the event is over, save the chains for another room or recycle the paper. It is simple, colorful, and easy to adjust.
12. Tissue Paper Pom-Pom Corner
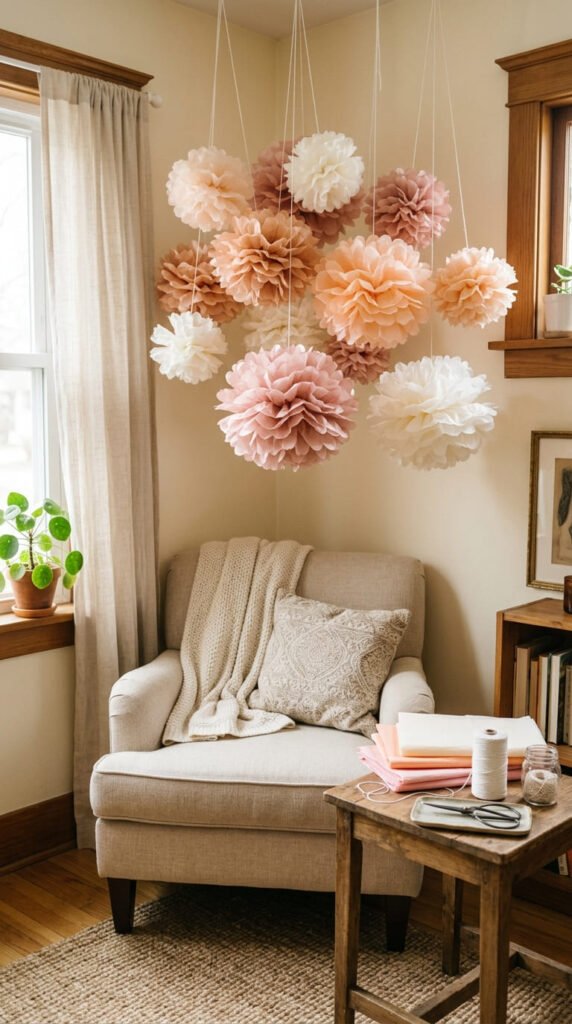
Tissue paper pom-poms can fill an empty corner with soft color. Stack several sheets of tissue paper and fold them back and forth like an accordion. Tie the center with string, trim the ends into rounded or pointed shapes, then gently pull each tissue layer outward.
The result is light, fluffy decor that works for bedrooms, nurseries, parties, and craft rooms. Hang a few pom-poms at different heights for a fuller corner display.
Use tissue paper from gift bags to save money. Wrinkled paper still works because the pom-pom shape hides creases. Choose colors that match the room, such as blush and cream for a soft look or rainbow colors for a kids’ room.
This project is easy, but the tissue can tear, so pull the layers slowly. If a piece rips, tuck it into the pom-pom and keep going.
Hang pom-poms with clear tape, hooks, or string from the ceiling. They add volume to a room without heavy decor or expensive supplies.
13. Paper Feather Wall Hanging
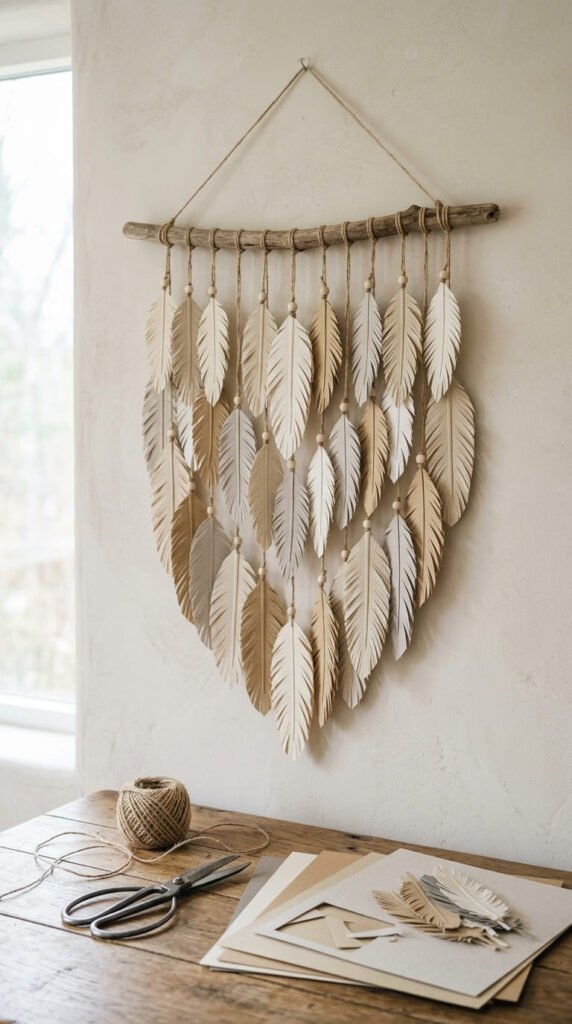
A paper feather wall hanging adds a soft handmade touch to a bedroom, hallway, or reading nook. Cut long feather shapes from cardstock, kraft paper, book pages, or colored paper. Fold each feather down the center, then cut small angled slits along both sides.
Tie each feather to a piece of string. Attach the strings to a small branch, dowel, or cardboard strip. Hang the feathers at different lengths so they move gently.
Use neutral paper for a calm boho style. Use bright paper for a kids’ room. Metallic paper can work well for party decor or a festive wall.
This craft is budget-friendly because branches, cardboard, and recycled paper can all be used. Old book pages create a textured look, but use damaged books only.
For a simple DIY example, make seven feathers in cream, tan, and brown. Hang them above a nightstand or small chair. The result feels warm, light, and handmade without buying wall art.
14. Paper Scroll Wall Sign
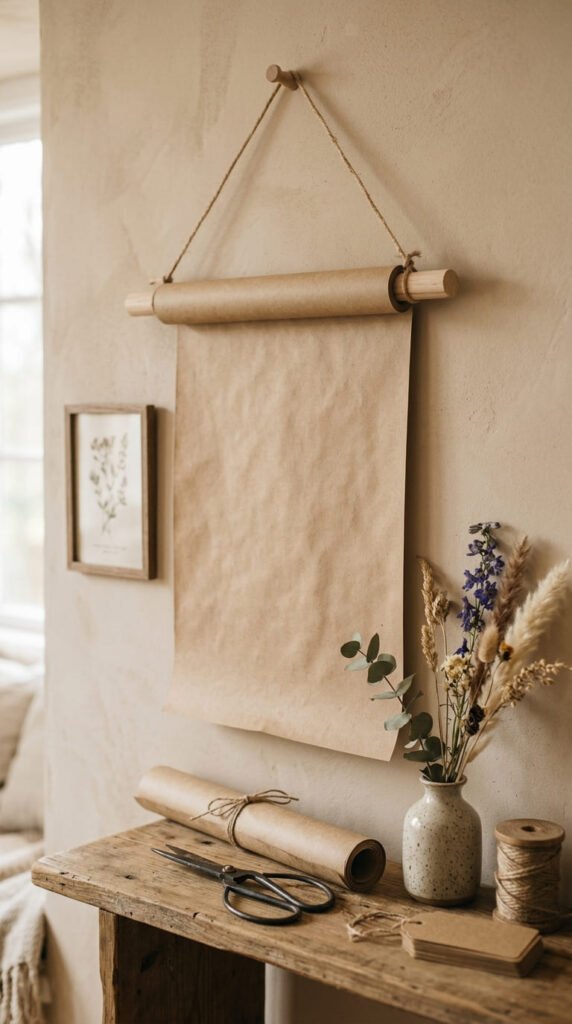
A paper scroll wall sign is a simple way to decorate a wall, entryway, kitchen, or craft room. Use kraft paper, thick wrapping paper, or plain cardstock. Roll the top and bottom edges slightly around a wooden dowel, straw, or cardboard tube.
Tie string to the top for hanging. You can leave the paper plain with painted shapes, botanical drawings, or simple line art. Since image prompts avoid words, home versions can include hand lettering, but a pattern-only design also looks beautiful.
Use black paint, marker lines, pressed paper leaves, or cut paper shapes to decorate the scroll. Keep the design simple so it feels clean on the wall.
For a budget-friendly version, cut kraft paper from a paper shopping bag. Flatten it under books before using. Add twine from old packaging or yarn from your craft box.
Hang the scroll in a narrow wall space, above a small bench, or near a desk. It gives the room a handmade accent with very little cost.
15. Magazine Paper Bowl
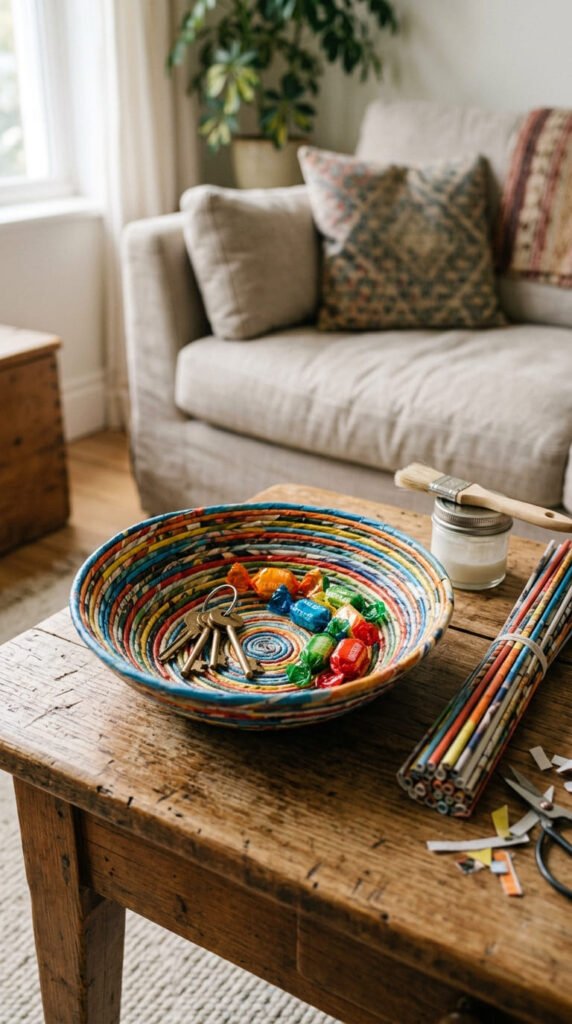
A magazine paper bowl turns old pages into functional decor. Cut magazine pages into long strips. Roll each strip tightly, then coil it into a flat circle. Glue the ends as you go. Keep adding strips until the base reaches the size you want.
To form the bowl, build the sides upward by gluing more coils around the edge. Let sections dry as you work so the shape stays firm. The bowl is best for light items, such as keys, clips, wrapped candy, or hair ties.
This project takes more time than quick crafts, but it is relaxing and low-cost. The printed colors create natural patterns, so no paint is required.
For a cleaner style, choose magazine pages with similar colors. For a playful style, use random pages and let the colors stand out.
Place the finished bowl on an entry table, desk, or shelf. It adds color and gives old paper a second life. Seal it with clear glue if you want a firmer finish.
16. Paper Snowflake Window Decor
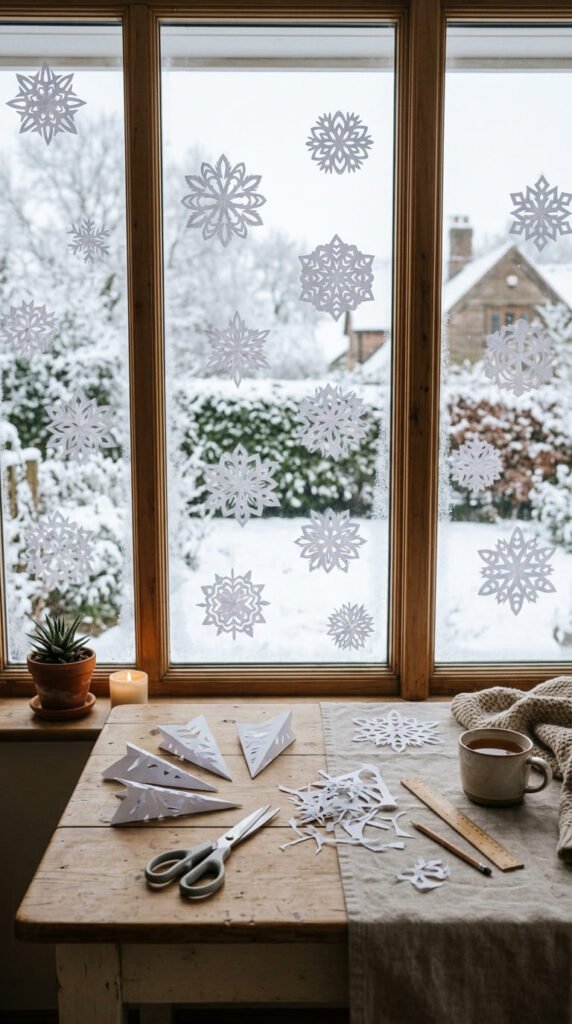
Paper snowflake window decor is simple, classic, and beautiful for winter rooms. Fold square paper into a triangle, fold it again, then cut small shapes along the edges. Open the paper slowly to reveal the snowflake.
Use white printer paper for a clean look. Blue, silver, or pale gray paper can add soft color. Thin paper is easier to cut, so save cardstock for other crafts.
Tape snowflakes to windows, mirrors, or glass doors. You can also string them into a garland for a mantel or shelf. Make different sizes so the display feels more natural.
This craft is very budget-friendly. One sheet of paper can make several small snowflakes if you cut it into squares. Save the scraps for collage projects.
For a cozy room idea, place snowflakes on a window above a reading chair. Add a blanket and a small lamp nearby. The snowflakes make the space feel seasonal without buying plastic decorations.
17. Paper Daisy Mirror Frame

A paper daisy mirror frame can make a plain mirror feel playful and handmade. Cut white petal shapes from paper and yellow circles for the centers. Glue several petals around each center to make daisies.
Cut green leaves and tuck them between the flowers. Arrange the daisies around one side of the mirror or around the full frame. Use removable glue dots if you want the design to be temporary.
This craft works well for bedrooms, bathrooms, vanity corners, and kids’ rooms. White daisies feel clean and cheerful. Pink, peach, or lavender flowers can match softer decor.
For a budget-friendly version, use printer paper for petals and color the centers with markers. If you have an old mirror frame, this project gives it a new look without paint.
A realistic DIY idea is to decorate only the top corner of the mirror. It takes fewer flowers and still looks charming. Paper daisies add a handmade accent to everyday decor.
18. Paper Basket Table Accent
A paper basket table accent is both decorative and useful. Cut strips from cardstock, kraft paper, or magazine pages. Weave the strips over and under to create a flat base. Fold the side strips upward and weave more strips around them.
Glue the ends neatly and trim any uneven edges. Add a paper handle if you want a basket shape, or leave it open like a small tray.
Use the basket for wrapped candy, paper flowers, clips, keys, or small craft supplies. Keep heavy items out, since paper baskets are best for light decor.
For a budget-friendly version, use grocery bag paper or old gift bags. The paper is often strong enough for weaving and already has a nice texture.
A simple home decor idea is to make a small basket for a coffee table. Fill it with rolled paper roses or wrapped treats. It adds a handmade touch and gives small items a tidy place to sit.
19. Paper Moon and Star Garland
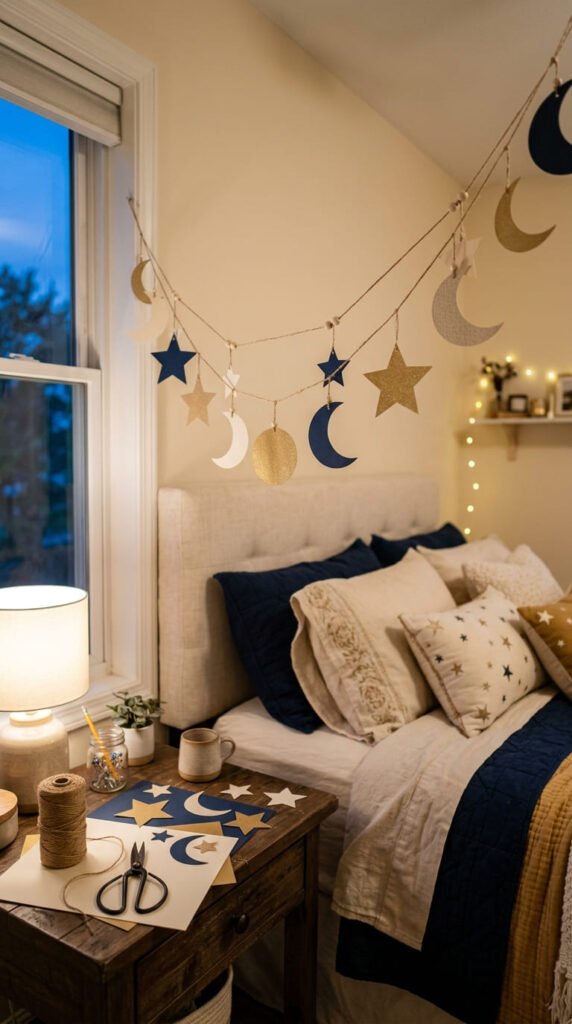
A paper moon and star garland is lovely for bedrooms, nurseries, reading corners, or cozy party decor. Cut crescent moons and stars from cardstock. Make different sizes so the garland feels layered and interesting.
Punch small holes near the top of each shape and thread them onto string. You can also tape them to the back of the string if you do not have a hole punch.
Use gold, cream, navy, silver, or soft gray paper for a night-sky look. For a kids’ room, add pastel colors or glitter paper. Keep the shapes light so the garland hangs neatly.
This craft is affordable because it uses only paper and string. Cardboard from cereal boxes can also work if covered with colored paper.
Hang the garland above a headboard, across a window, or along a bookshelf. It adds a dreamy handmade accent without taking up space. Make a matching mobile or framed moon art if you want a coordinated room corner.
20. Upcycled Book Page Art
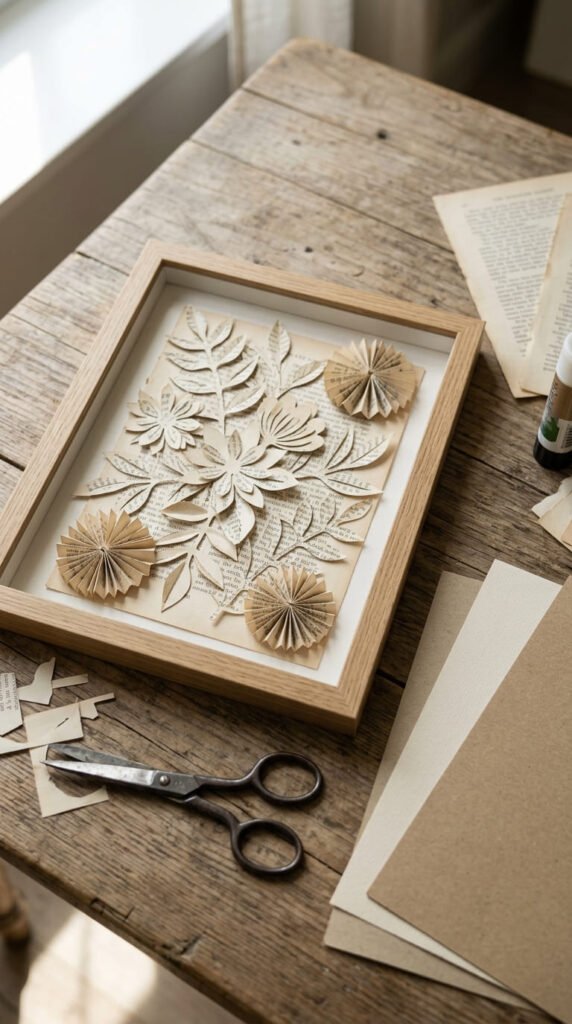
Upcycled book page art is a beautiful way to reuse damaged books, old paperbacks, or loose pages. Choose pages that are no longer readable or useful. Cut circles, leaves, petals, hearts, or strips from the pages.
Glue the shapes onto cardstock in a simple design. Try a flower, wreath, tree, abstract circle pattern, or layered leaf branch. The printed texture gives the piece character without much extra work.
Place the finished art in a thrifted frame or make a paper border from cardstock. Hang it in a hallway, reading nook, office, or bedroom.
For a budget-friendly version, use newspaper, old music sheets, or junk mail with interesting texture. Add a few colored paper pieces if the design feels too plain.
A simple DIY example is a framed book page flower. Cut petals from old pages, layer them in a circle, and add a kraft paper center. It looks thoughtful, warm, and handmade while keeping paper out of the trash.
Conclusion
Paper crafts for home decor can turn simple supplies into wall art, garlands, lanterns, flowers, wreaths, mobiles, and table accents. These ideas are affordable, easy to personalize, and useful for bedrooms, living rooms, entryways, shelves, doors, windows, and party spaces. Pick one room, choose a color palette, and start with one small project. A few sheets of paper can make any room feel brighter, warmer, and more personal.