Your bathroom vanity deserves better than a cluttered pile of half-open palettes and rolling lipsticks. Whether you have a tiny apartment bathroom or a spacious double sink, the right storage setup makes your morning routine faster, calmer, and actually enjoyable. The good news? You do not need to spend a fortune or tear down walls. From acrylic risers to magnetic boards, from spice racks to lazy Susans, there are smart, affordable ways to organize every lipstick, brush, and palette you own. This guide walks you through 20 real, doable ideas to turn your bathroom vanity into a tidy, photo-worthy beauty station.
1. Use a Clear Acrylic Organizer on Your Vanity Counter
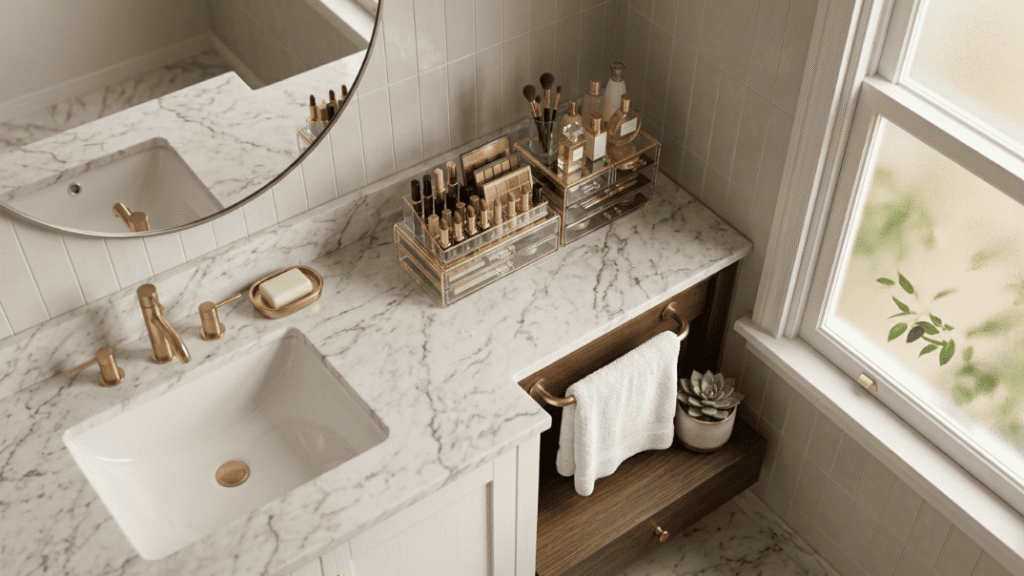
Clear acrylic organizers are one of the most popular bathroom makeup storage tools for a reason. You can see everything at a glance. No digging. No guessing.
Why it works: When products are visible, you actually use them. Things hidden in drawers get forgotten.
Pick a multi-compartment acrylic set with different section sizes. Use the tall slots for brushes and liners. Use the wide flat sections for palettes and compacts.
Budget tip: You do not need a designer brand. Affordable acrylic sets from local home stores or online marketplaces work just as well. Look for sets under $20 that include three to five pieces.
Keep it simple. Do not overfill every section. Leave a little breathing room so you can grab items without knocking others over.
Maintenance is easy. Wipe acrylic down with a damp cloth weekly to keep it looking clean. Avoid harsh sprays that can cloud the surface.
If your vanity counter is small, choose a taller, narrower acrylic tower instead of a wide flat tray. It gives you storage without eating up precious counter space.
2. Add a Tiered Makeup Tray for a Layered Display

A tiered tray creates a mini display shelf right on your counter. It lifts some products up so you can see everything clearly without spreading items flat across the surface.
Use the top tier for things you grab every single day — your go-to foundation, mascara, and tinted moisturizer.
Use the bottom tier for slightly less-used items like setting powder, blush, or highlighter.
Tiered trays come in marble-look resin, white ceramic, bamboo, and gold metal finishes. Pick one that matches your bathroom’s color scheme.
DIY version: Stack two shallow plates or wooden cutting boards of different sizes using short wood blocks or doubled-up cork trivets as risers between them. Costs almost nothing.
Keep the front row for the smallest items so taller bottles in the back remain visible. It is like a little theater stage for your makeup.
Why it beats a flat tray: A flat tray forces everything onto one level. A tiered version doubles your display space without taking up extra counter room.
This works especially well on small vanities where every inch matters.
3. Mount a Magnetic Board Inside Your Cabinet Door
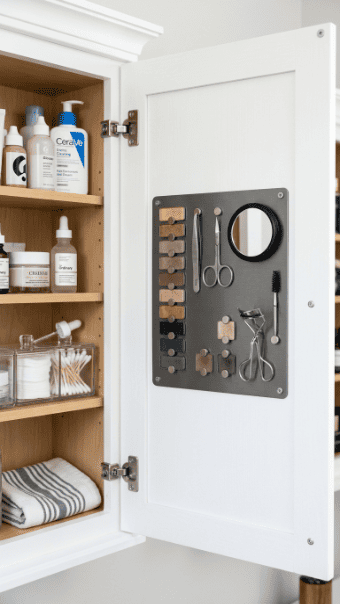
The inside of your cabinet door is wasted space most people ignore. A magnetic board turns it into a hidden storage wall.
This works perfectly for metal-backed eyeshadow pans, tweezers, bobby pins, small scissors, and nail tools.
Buy a thin sheet magnetic board from a craft store and cut it to fit the door panel. Use adhesive mounting strips to attach it — no drilling needed. This makes it a great option for renters.
Attach small round magnets to the back of any product that is not already magnetic using a glue gun. Palettes, lip liners, and even small compacts can be magnetized this way.
Why it is useful: It clears off counter and drawer space instantly. Everything is behind the cabinet door, out of sight, but accessible in seconds.
Budget tip: A basic magnetic sheet costs around $5 to $10 at most craft stores. Adhesive strips are under $5. Total project cost is under $15 and takes about 20 minutes.
You can also use a small pegboard or adhesive pockets instead if you prefer non-magnetic options.
4. Store Backups Under the Sink with Drawer Dividers
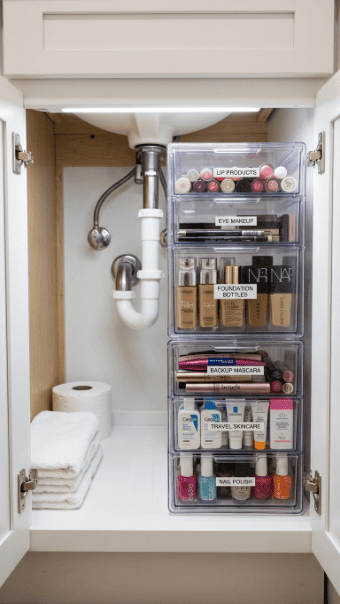
Under your sink is one of the most underused spots in a bathroom. It tends to become a dumping ground, but with the right setup it becomes a proper backup supply zone.
Divide it into two zones:
- Zone 1: Backup makeup products (extra mascara, foundation, lip color)
- Zone 2: Bathroom supplies (cleaning products, spare soap, toilet paper rolls)
Never mix the two zones. Cleaning chemicals near makeup is a hygiene problem.
Use stackable plastic drawer units that fit inside the cabinet. Label each drawer clearly — “lips,” “eyes,” “face,” “backups.”
Renter-friendly note: These units do not require any installation. You simply place them inside the cabinet and fill them up.
Budget tip: Small stackable drawers are available for $10 to $20 at most home goods stores. Look for clear versions so you can see contents without pulling drawers open.
Check every few months for expired or old products hiding in backup stock. Keeping this area purged means you always know exactly what you have left.
5. Use Over-Toilet Shelves for Makeup Overflow
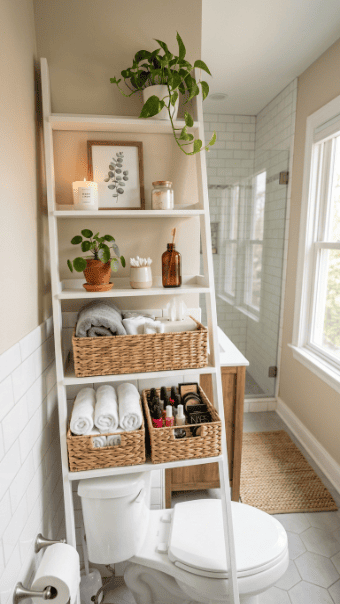
If your vanity counter is full, look up. The space above your toilet is a completely free vertical zone.
An over-toilet shelf unit gives you two to four extra shelves without using any floor space. You can store makeup backups, nail care kits, and hair tools up there in small baskets.
What to put up there:
- Wicker or fabric bins labeled “nail care,” “hair tools,” or “makeup backups”
- Candles and small plants to keep it looking styled
- Rarely-used products like special-occasion palettes
Over-toilet units come in freestanding ladder styles that require zero drilling. They stand on their own feet and lean slightly against the wall.
Budget tip: Basic freestanding over-toilet shelves start at around $25 to $40. Bamboo versions are affordable and look clean.
Style tip: Keep items in matching containers. Mismatched bottles and loose products make even a tidy shelf look messy. Use labeled bins to keep everything grouped.
This is a particularly helpful setup for small bathrooms where counter and drawer space is genuinely limited.
6. Repurpose a Spice Rack as a Lipstick Holder
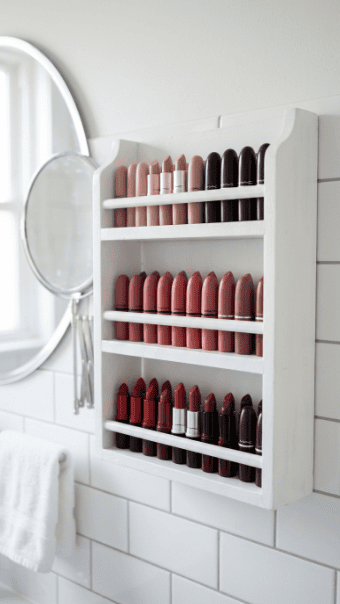
Lipstick collection getting out of hand? A small spice rack is one of the cleverest low-cost storage solutions hiding in plain sight.
Mount a three-tier spice rack on the wall beside your mirror or inside a cabinet. Stand your lipsticks upright in each row, organized by shade range. Nudes in one row, pinks in another, reds in the next.
Why it works: Lipstick bullets look attractive displayed upright. You can see all your shades at once, which actually makes you wear more of your collection.
Spice racks are available at kitchen stores and budget retailers for as little as $8 to $15. Wall-mounted versions use two small screws. Freestanding counter versions need no installation at all.
Beyond lipstick: Use the same rack for nail polish bottles, small foundation tubes, eye drops, or perfume minis.
DIY version: Take a narrow wooden shelf or cut a long piece of wood into three rows. Stack them using small wooden blocks as supports. Paint white or gold to match your bathroom.
This hack works well in humid climates too, since it keeps products off counters where moisture tends to collect.
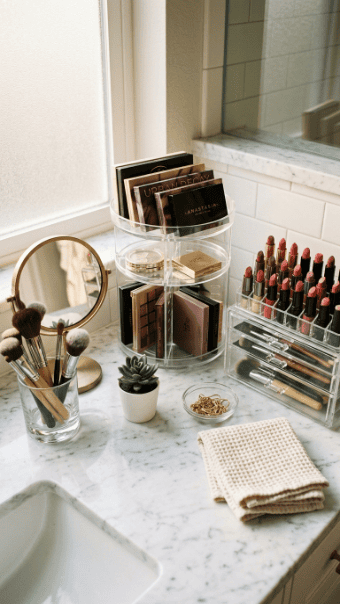
7. Organize Brushes in a Glass Jar or Mason Jar
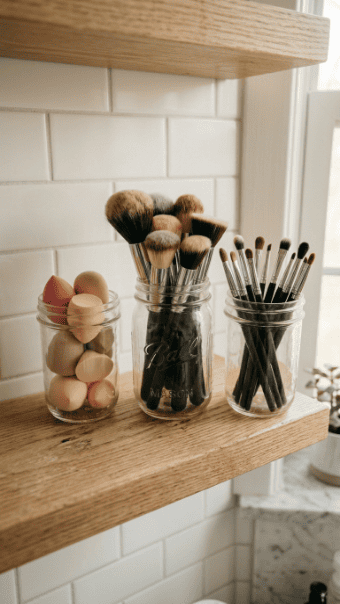
Makeup brushes stored flat in a drawer get tangled, damaged, and forgotten. Standing them upright in glass jars solves all three problems immediately.
Use two or three jars of different heights. Group brushes by function — one jar for large face brushes, one for smaller eye brushes, one for blending sponges.
Why glass jars? They are heavy enough to stay upright without tipping. They look clean and simple. And they are practically free if you repurpose old pasta sauce or pickle jars.
Clean the jar first, remove the label, and optionally spray-paint the outside with matte white or gold spray paint for a more polished look.
Other containers that work: ceramic mugs, small terracotta pots, short drinking glasses, or bamboo cups. The key is that they should be tall enough to hold brushes without them flopping over.
Budget tip: You likely already own something that works. Before buying anything, check your kitchen for jars or mugs you can repurpose.
Keep brushes bristle-side up always. This protects the shape of the bristles and helps them air dry properly after cleaning.
8. Install a Rotating Lazy Susan for Palettes
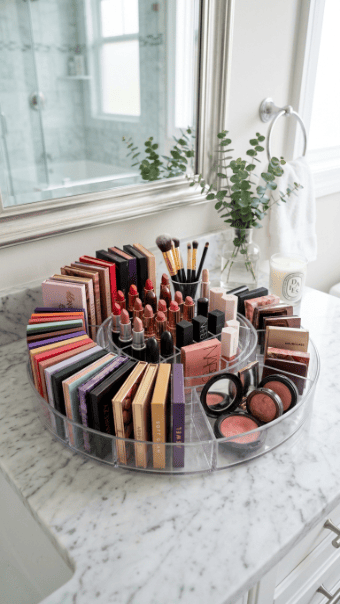
A lazy Susan is not just for kitchen cabinets. It is one of the most practical bathroom vanity tools for anyone with more than five palettes.
Place it in the center of your vanity. Arrange palettes standing upright around the outer edge. Fill the center with smaller items like blush, bronzer, and lipsticks.
Spin and grab. No more digging through a stack of palettes to find the one at the bottom.
Lazy Susans come in clear acrylic, bamboo, white plastic, and marble-look finishes. A 10-inch or 12-inch version works well on most vanity counters.
Budget tip: Clear plastic lazy Susans are available for $8 to $12. Bamboo versions cost slightly more but look more polished.
For small vanities: Use a smaller 8-inch version and keep only your current-season palettes on it. Store seasonal palettes elsewhere.
You can also place a lazy Susan inside a cabinet or under the sink. It turns a deep, hard-to-reach cabinet into an easy-access spinning station.
Best for: People with large makeup collections, shared vanities, or anyone who gets frustrated hunting for products in the morning.
9. Create a Daily Makeup Zone with a Flat Vanity Tray
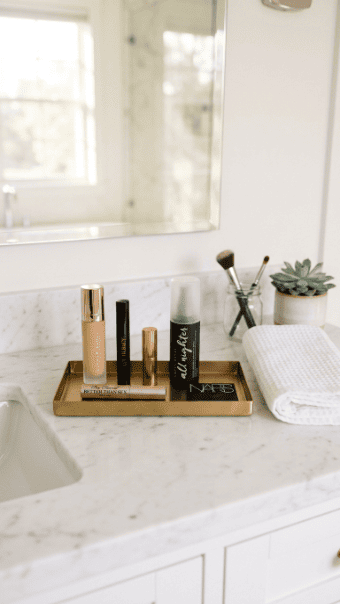
A vanity tray gives your most-used products a dedicated home. When everything has a place, you stop leaving things scattered across the counter.
The rule is simple: Only your daily essentials live on the tray. Nothing else.
Pick five to eight products that you use every single morning and place only those on the tray. Foundation, mascara, brow pencil, lip color, and setting spray, for example.
Why this works: A tray creates a visual boundary. When your counter has no tray, products spread endlessly. A tray keeps them contained and intentional.
Choose a tray in a finish that matches your bathroom. Gold trays work in warm-toned bathrooms. White ceramic works in minimal spaces. Marble-look resin looks luxurious at a low price.
Budget tip: Decorative trays are widely available for $10 to $20. You can also repurpose a wooden cutting board, a picture frame (face-up), or a flat serving dish.
Daily routine benefit: When you finish your makeup, you put everything back on the tray. In the evening it takes 30 seconds to tidy up. Your bathroom looks clean every single night.
10. Use Stackable Clear Boxes for a Beauty-Store Look
Stackable clear boxes let you build a mini beauty-store display right on your counter or shelf. Every product is visible through the sides, so you always know what is where.
Use different-sized boxes for different product categories. A wide flat box for palettes. A narrower box for lip products. A small square box for travel-size items.
Label the front of each box with a small strip of washi tape and a handwritten label. This makes locating the right box instant even before you open it.
Why stacking works: It uses vertical space instead of horizontal spread. A stack of four boxes takes up the same counter footprint as one box but holds four times the content.
Budget tip: Clear stackable storage boxes are sold at most home goods stores and online markets. Sets of three to five boxes can cost $15 to $25 total. For even less, repurpose clear shoebox-style containers you already own.
Style tip: Keep all boxes the same brand and size for a cleaner stacked look. Mismatched box sizes create visual clutter even when the contents are tidy.
11. Mount a Small Wall Shelf Just for Makeup
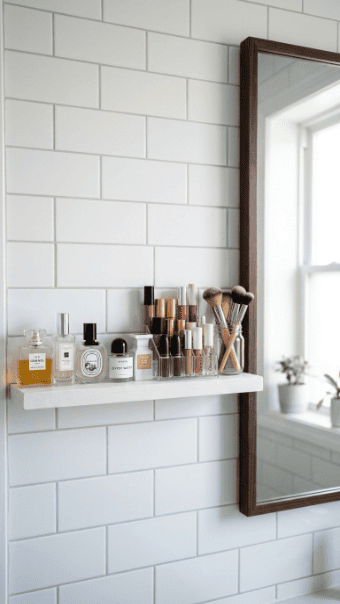
If your vanity counter is full, the answer might be going vertical. A small wall shelf mounted beside your mirror adds storage without touching your counter at all.
Keep this shelf dedicated to makeup only. Do not let it drift into skincare, hair tools, or random bathroom items. One purpose = one shelf.
What to place on it:
- A glass jar of brushes
- A small acrylic tray of daily products
- A few display-worthy perfume bottles
Wall shelves are available at home stores starting at around $10 to $20 for basic wood or MDF versions. They require just two screws to mount.
Renter note: If you cannot drill, use large adhesive wall shelf brackets rated for light loads. These typically hold up to 10 to 15 pounds, which is plenty for makeup.
Placement tip: Mount the shelf at eye level so you are not reaching up or bending down to grab items. It should be at a comfortable grab height when you are standing at the sink.
Keep the shelf looking tidy by storing only items you genuinely love the look of. Anything that looks messy goes into a drawer or cabinet.
12. Sort Products by Category Using Labeled Bins
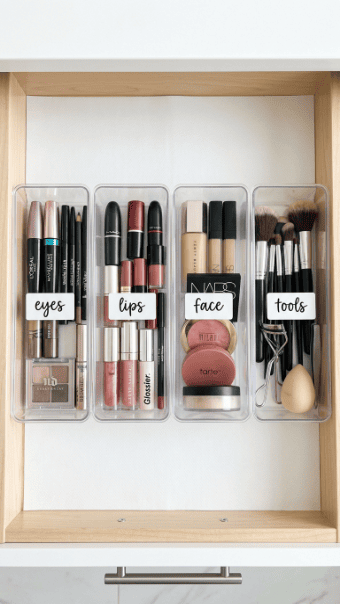
Unlabeled drawers turn into chaos fast. Labeled bins inside drawers are one of the simplest systems for keeping makeup permanently sorted.
Buy four to six small rectangular bins that fit inside your drawer side by side. Label each one — eyes, lips, face, tools, backups, skin.
Every product has a category home. When you finish using something, it goes back in its bin. Not beside the bin. In the bin.
Why labels matter: Even the most organized person slips into old habits without labels. Labels remove the decision. You know exactly where everything belongs every single time.
Budget tip: Small plastic bins cost $1 to $3 each at most dollar stores or discount home shops. Washi tape and a marker make perfect labels at zero extra cost.
DIY version: Cut a cereal box into small rectangular sections and line them up inside your drawer. Cover with decorative paper or spray paint. It is genuinely free if you have a cereal box available.
This system works in any drawer size. Even a shallow single drawer can hold four or five small bins, keeping your entire daily makeup collection sorted and visible.
13. Try an Inside-Cabinet-Door Pocket Organizer

The back of a cabinet door is one of the most overlooked storage spots in any bathroom. A pocket organizer transforms it into a small but useful makeup wall.
These organizers hang over the door on a metal bar or attach with adhesive strips. They come with multiple clear pockets in different sizes.
What to store there:
- Small products like lip gloss, eyeliner, concealer
- Cotton rounds in a small zip bag
- Travel-size makeup items
- Makeup sponges
Why it works: Items that usually clutter a drawer find a proper place here. The pockets keep everything upright and separated.
Budget tip: Over-door pocket organizers are available for $8 to $15. Look for clear-pocket versions so you can see contents at a glance without opening each pocket.
For cabinet doors that open inward, measure the internal clearance first to make sure the organizer does not block the shelves inside when the door closes.
Renter option: Use adhesive hooks rated for light weights to attach a fabric pocket organizer to the door without drilling any holes.
14. Use a Makeup Brush Roll for Drawer Storage
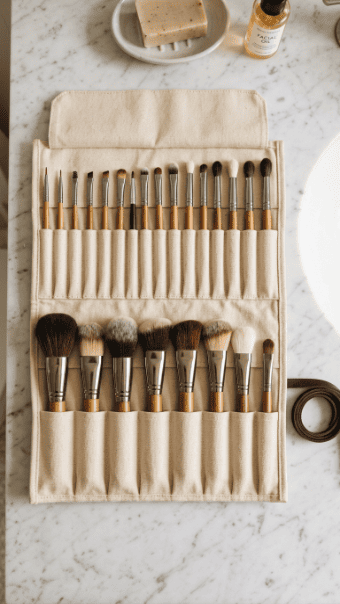
Loose brushes in a drawer get damaged bristles, tangled handles, and broken ferrules. A brush roll protects all of them and keeps them perfectly organized.
A brush roll is a fabric or canvas strip with individual slots for each brush. Roll it up and tie it closed. Unroll it on your counter when you need access.
Why this works for bathrooms: You can store it flat in a shallow drawer, hanging on a hook, or rolled up in a cup. It takes up almost no space.
What to look for: Get a roll with enough slots for your full brush collection plus two or three extra. A 20-slot roll handles most collections comfortably.
Budget tip: Basic canvas brush rolls cost $5 to $12. Leather or vegan leather versions cost $15 to $25. For budget-friendly DIY, sew a simple roll using fabric scraps and ribbon ties — this costs almost nothing if you have basic sewing supplies.
Daily habit: Keep the brush roll closed in the drawer during the day. Unroll it when you apply makeup. Roll it back up when done. This single habit keeps brushes cleaner and your drawer looking neat.
15. Add a Pegboard Panel Inside Your Vanity Cabinet

A small pegboard panel inside your cabinet back wall turns the inside into a customizable storage system. You can move hooks and baskets around whenever your collection changes.
This is a less common idea, but it works remarkably well for large vanity cabinets with deep shelves.
Mount the pegboard to the back wall using small standoff screws so there is a slight gap between the board and wall for hooks to seat properly.
What to hang:
- Small wire baskets holding palettes
- S-hooks holding brush bags
- Flat hooks holding makeup bags or pouches
Budget tip: A small pegboard panel costs $10 to $20 at hardware stores. Hooks and baskets are typically $5 to $10 extra. Paint the pegboard white or the same color as your cabinet interior so it blends in.
Best for: Large bathroom vanity cabinets where standard shelving wastes the deep space. Pegboard hooks bring items closer to the front where you can actually reach them.
This is a longer project than most on this list, but once set up it can completely change how much makeup storage you actually have available.
16. Display Perfume and Palettes on a Marble Slab
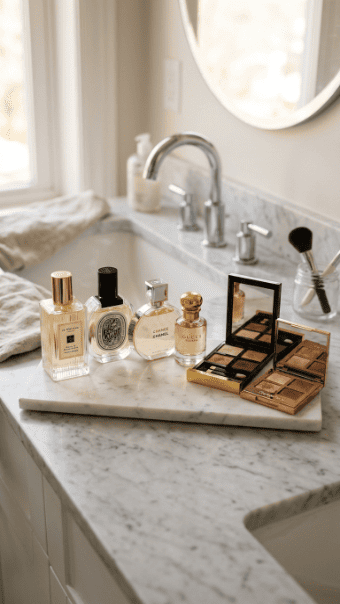
Not all bathroom makeup storage needs to hide everything away. Some products deserve to be on display.
A small marble slab — the kind sold as a cheese board or trivet — makes the perfect pedestal for products you love the look of.
What works well on display:
- Designer or pretty-packaged perfume bottles
- Large eyeshadow palettes stood upright
- High-end foundation or skincare in attractive packaging
Why marble? It looks elevated without any effort. A $12 marble trivet from a kitchen store instantly makes your vanity look more expensive.
Budget versions: Marble-look resin boards are available for even less. Ceramic tile squares from a hardware store work equally well and cost almost nothing.
The rule for display storage: Only put something on display if you genuinely like looking at it. Products in cheap or damaged packaging belong in a drawer. Display is not for everything. It is for your favorites.
Keep the display area small and curated. Three to five items maximum. This makes it look intentional rather than crowded.
17. Dedicate One Drawer Entirely to Foundation and Concealer
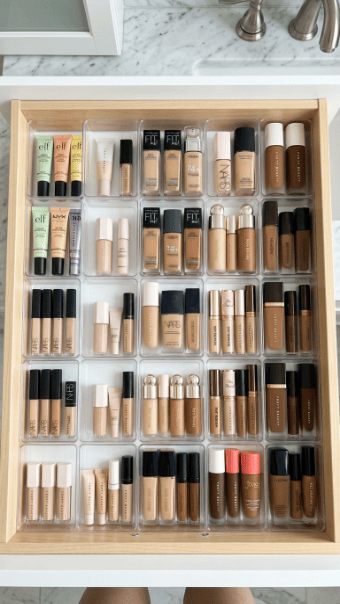
Foundation and concealer are the products most people own too many versions of. Shades for different seasons. Backups. Old bottles you cannot quite throw away.
Give these products their own dedicated drawer. Nothing else goes in it.
Sort bottles from lightest to darkest shade. Stand them upright if the drawer is deep enough. Use small clear bins to keep them from sliding and tipping.
Why a dedicated drawer? Foundation is a daily product. Giving it its own drawer means you spend zero time searching every morning.
Purge step first: Before organizing this drawer, pull everything out and check expiration dates. Liquid foundation typically lasts 6 to 12 months after opening. Old foundation causes breakouts and applies poorly. Get rid of anything past its prime.
Budget tip: A few small $2 plastic bin sections from a dollar store keep the drawer organized. You do not need fancy dividers.
Label the front of each bin if you have shade variations — light/medium/deep. This is especially useful if someone else in the household uses your vanity too.
18. Store Nail Polish on a Dedicated Counter Rack

Nail polish bottles are awkward. They are heavy at the bottom, topple easily, and take up surprising amounts of drawer space. A dedicated nail rack solves all of this.
Nail polish racks are designed specifically to hold these bottles upright in rows. You can see every color at a glance without picking up a single bottle.
Where to place it:
- On the vanity counter as part of a display
- Inside a cabinet on a shelf
- On an over-toilet shelf in a labeled basket
Budget tip: Wire nail polish racks hold 20 to 50 bottles and cost $10 to $20. Acrylic versions with tiered rows look cleaner but cost a little more.
Organize by color family. Group nudes together, pinks together, reds together, and so on. It makes choosing a shade for the week much quicker.
For small collections: A simple flat tray or even a small cupcake tin keeps nail polish upright and grouped without needing a dedicated rack at all.
Keeping nail polish separate from makeup means you are not knocking polish bottles over while reaching for your mascara every morning.
19. Use a Hair Tool Holder to Free Up Makeup Space

Hair tools are the biggest space thieves in most bathroom setups. Flat irons, curling wands, and blow dryers take up enormous drawer and counter space that your makeup actually needs.
Give hair tools their own storage home so they stop taking over makeup space.
Options:
- A wall-mounted heat-resistant pouch holder inside the cabinet door for flat irons and wands
- A large basket or bin on the bathroom floor or under the sink for the blow dryer
- Velcro cord ties to keep cables bundled and tidy
Budget tip: Heat-resistant pouch holders cost $10 to $15. They attach to cabinet doors with screws or strong adhesive strips.
Once you move hair tools out of your makeup drawers, you will be surprised how much space opens up for actual makeup storage.
The big shift: Most people mix hair and makeup storage by default. Separating them is one of the single most effective steps you can take. Makeup drawers become cleaner. Hair tool access becomes easier. Both zones work better when they are separate.
20. Build a “Daily Kit” Travel Pouch System
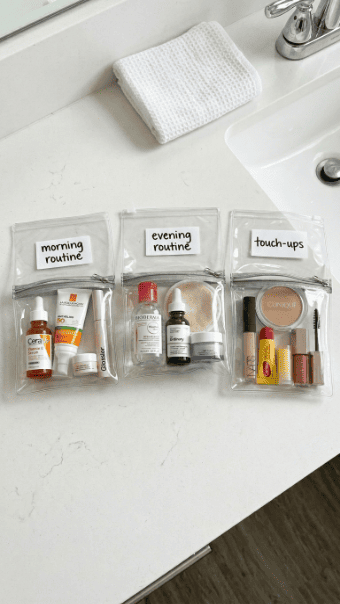
Keep your most-used products in small zip pouches rather than loose in a drawer. This one habit makes both daily routines and travel packing dramatically faster.
Set up three pouches:
- Morning pouch: Foundation, mascara, brow pencil, lip color, SPF
- Evening pouch: Makeup remover wipes, cleansing balm, night skincare
- Touch-up pouch: Powder, lip color, blotting sheets, small concealer
Each pouch lives in its own drawer section or in a small basket. When you travel, grab the pouches instead of packing individual products.
Budget tip: Clear zip pouches cost $1 to $2 each at most stores. Label them with washi tape and a marker.
Why it works: You are not organizing products — you are organizing routines. Your morning pouch contains exactly what you need for a morning routine. Nothing more. Nothing less.
Maintenance: Refill pouches whenever a product runs out. Check them monthly for anything expired or unused. A pouch system only works when it is kept current.
This is especially helpful in shared bathrooms where multiple people need to grab their own products quickly without disturbing anyone else’s setup.
Conclusion
A tidy bathroom vanity is not about owning less makeup. It is about giving every product a proper home. Whether you start with a single labeled bin in your drawer or go all-in with a tiered tray, lazy Susan, and magnetic wall board, the goal is the same — a bathroom that works for you every morning without chaos.
Start small. Pick one or two ideas from this list that match your current space and budget. A $10 acrylic organizer and a few labeled bins can completely change how your bathroom feels in under an hour.
The best system is the one you will actually maintain. Keep it simple, keep it visible, and purge expired products regularly. Your vanity will stay tidy not because it is perfect, but because your system makes tidy the path of least resistance.