Your bathroom walls are doing nothing for you right now. While your counter overflows and your floor fills up with baskets and bins, all that vertical space above your head sits completely empty. Wall storage changes that completely. It pulls clutter off the floor, off the counter, and off every flat surface — and puts it exactly where it belongs: on the wall, at eye level, within easy reach. Whether your bathroom is a tight city apartment space or a larger family bathroom that has just lost control, these 29 wall storage ideas give you real, affordable solutions that actually work in everyday life. No major renovation required.
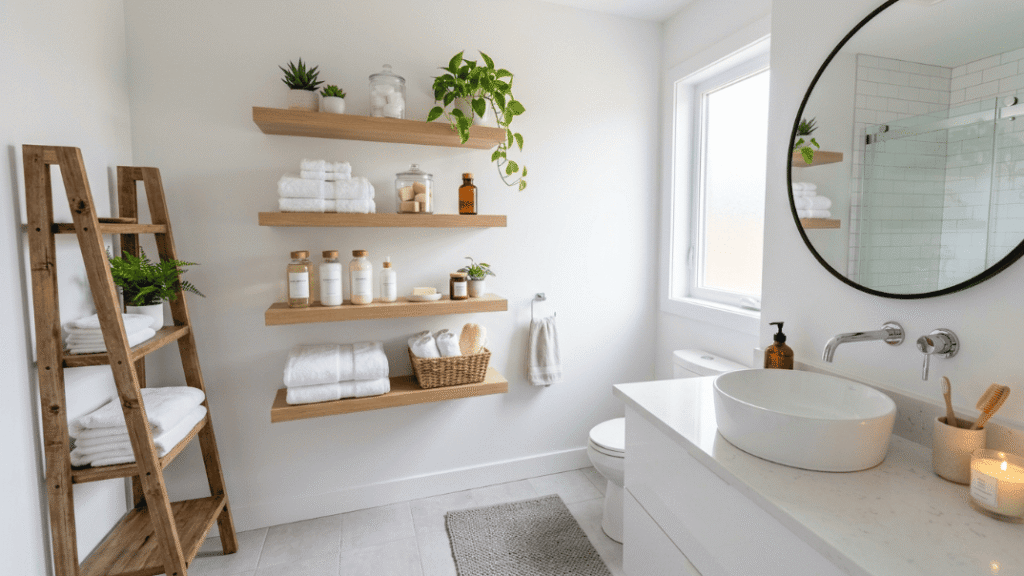
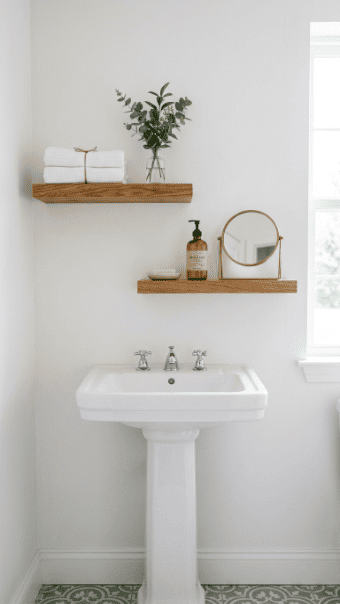
1. Mount Floating Shelves Beside Your Mirror
The wall beside your bathroom mirror is prime real estate that most people ignore.
A pair of floating shelves mounted there gives you instant storage for everyday toiletries without touching your counter space at all.
Mount them at two different heights. The lower shelf holds your daily products — hand lotion, a small candle, face wash. The upper shelf holds less-used items or purely decorative pieces.
Floating shelves come in white MDF, natural wood, and black metal. White versions blend into most bathroom walls. Natural wood adds warmth.
Budget tip: Basic floating shelves start at around $8 to $15 each at most home improvement stores. Brackets are usually included. Installation takes about 20 minutes with a drill and level.
Renter note: Use adhesive floating shelf brackets rated for 10 to 15 pounds if you cannot drill. These hold small bathroom items reliably when applied correctly to a clean, dry wall.
Keep each shelf lightly styled. Three to five items per shelf looks intentional. More than that looks cluttered.
The golden rule: One plant, one functional item, one decorative piece per shelf. This simple combination makes any bathroom wall look like it was styled on purpose.
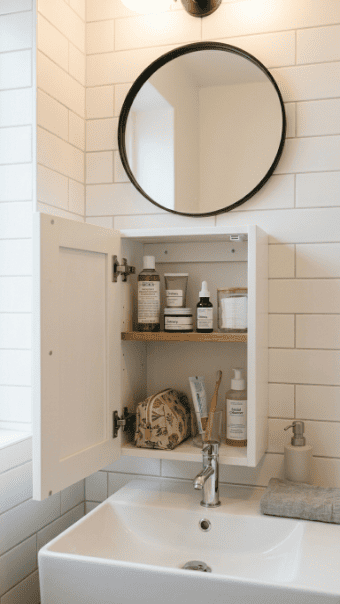
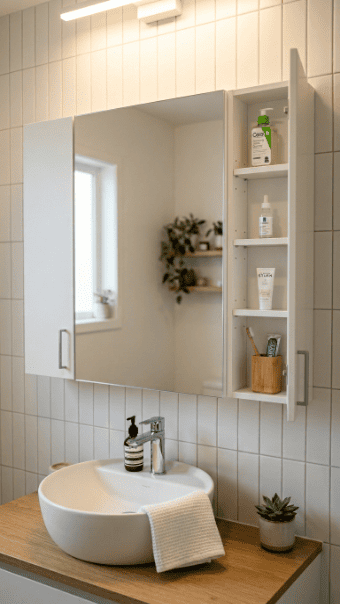
2. Install a Wall-Mounted Mirrored Cabinet
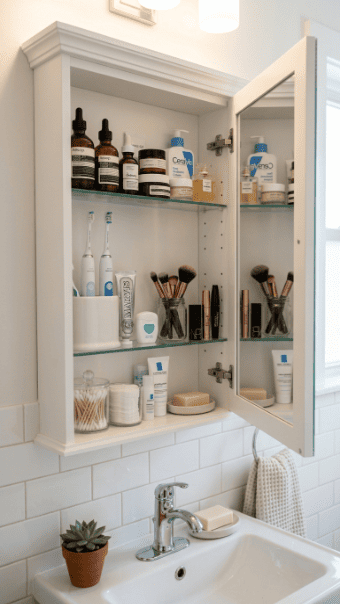
A mirrored cabinet does two jobs at once. It gives you a mirror for your morning routine and hidden storage behind it.
Everything inside stays concealed. No one sees your medicine bottles, your backup tubes, or your daily vitamins. The front just looks like a clean mirror on the wall.
What fits inside:
- Prescription medications and vitamins
- Skincare serums and small bottles
- Toothbrush, toothpaste, floss
- Backup items like travel-size toiletries
Mirrored cabinets come in surface-mount versions (attached to the wall surface) and recessed versions (set into the wall). Surface-mount is simpler to install and works for renters.
Budget tip: Basic surface-mount mirrored cabinets are available for $40 to $80. They require just four screws and about 30 minutes to install.
Size tip: A 16-inch wide cabinet fits most bathroom walls comfortably. Larger 24-inch versions work above double sinks.
The hidden storage aspect is particularly useful for bathrooms that feel visually noisy. One mirrored cabinet can replace an entire cluttered counter worth of products with a single clean wall fixture.
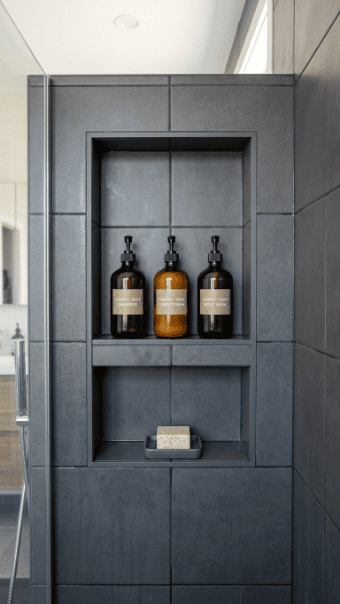
3. Build a Recessed Wall Niche for a Spa Look
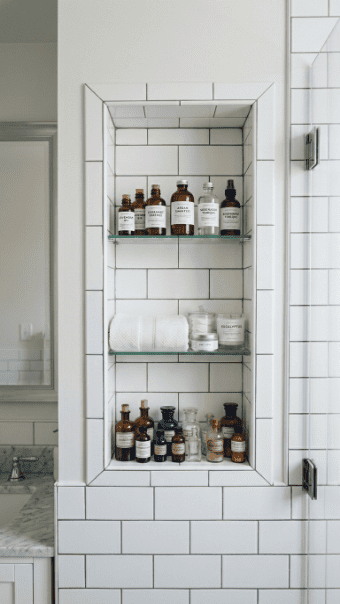
A recessed niche is cut into the wall between two studs, tiled to match the surrounding wall, and finished flush. It creates a storage shelf that takes up zero room — because it lives inside the wall itself.
This is the most space-efficient wall storage solution available. It adds depth without adding any outward protrusion.
Where to add one:
- Beside the vanity for skincare and daily products
- Inside the shower for shampoo and soap
- Above the toilet for small decorative items
Depth is typically 3.5 inches — the exact width of a standard wall stud cavity. That is enough for most bottles, soaps, and small folded towels.
Cost range: A professionally tiled niche typically costs $200 to $500 depending on tile choice and labor. DIY versions using a recessed niche kit (pre-framed foam inserts) cost $30 to $60 for the kit, plus tile and grout.
Best placement: Avoid exterior walls as these often contain insulation. Interior walls between rooms are the safest and easiest option.
This is the storage solution that makes bathrooms look genuinely designed rather than organized after the fact.
4. Use a Ladder Shelf Against the Wall
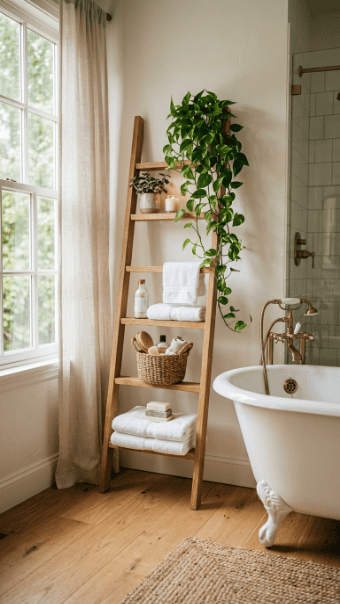
A ladder shelf leans against the wall without any drilling at all. It gives you four to five extra shelf levels and genuinely looks like a design choice rather than a storage hack.
Use each rung for a different category:
- Top rung: small plant or candle for decoration
- Middle rungs: folded towels, rolled hand towels
- Lower rungs: baskets holding toiletries, hair tools, or backups
Ladder shelves come in natural pine, white-painted wood, black metal, and bamboo. Choose a finish that works with your bathroom’s existing colors.
Budget tip: Bamboo and pine ladder shelves start at around $25 to $45. Metal versions cost slightly more. All are available flat-packed with no tools required.
Stability tip: Add small rubber feet to the bottom legs so the ladder does not slide on tile or wood floors. Rubber furniture pads from a hardware store cost under $5 and work perfectly.
This is one of the best options for renters because it requires no wall damage whatsoever. You simply lean it against the wall and style it.
5. Hang a Wall-Mounted Towel Ladder or Rail System
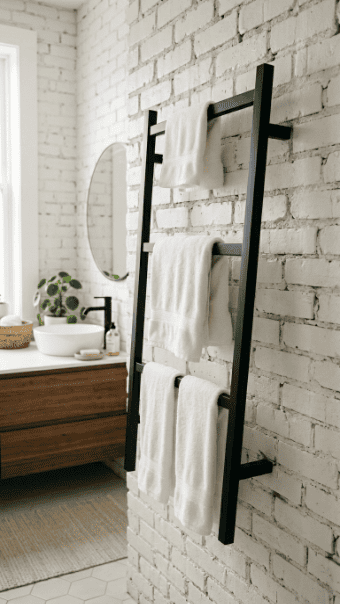
A wall-mounted towel ladder gives towels a dedicated wall home while looking intentionally styled. It keeps towels off the floor, off the back of the door, and off the counter.
This is different from a basic towel bar. A ladder system has multiple horizontal rails stacked vertically, giving you space for bath towels, hand towels, and washcloths on one compact wall fixture.
Mount it:
- Beside the shower or tub for grab-and-reach convenience
- On the wall opposite the vanity to balance the room visually
- Behind the bathroom door on the wall panel if space is tight
Finishes available: Matte black, brushed nickel, chrome, and brass. Matte black works well in modern and industrial bathrooms. Brushed nickel suits neutral and Scandinavian spaces.
Budget tip: Wall-mounted towel ladders start at $20 to $35 for basic versions. Premium versions with heavier gauge metal cost $50 to $80.
Installation: Two wall anchors and four screws. Most come with a paper template to mark the drill points before you commit.
Fold towels in thirds lengthwise before hanging. This simple folding method makes any towel rail look styled and hotel-ready.
6. Add Corner Wall Shelves to Use Dead Space
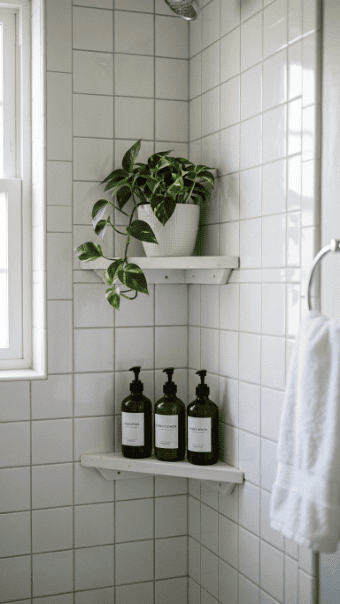
The corners of your bathroom are wasted space in almost every layout. Corner shelves mount directly into the angle where two walls meet and turn that dead zone into useful storage.
Corner shelves work especially well for:
- Small plants that add life without taking counter space
- Decorative items like candles, diffusers, and apothecary bottles
- Rolled hand towels
- Small baskets of bathroom backups
Corner shelves come in triangular floating versions (true corner-fit) and quarter-round shapes. Both work well. Triangular versions give a more modern look.
Budget tip: Small corner floating shelves are available for $10 to $20 per pair. Most include wall anchors. Installation takes about 15 minutes per shelf.
Renter option: Adhesive corner shelf brackets rated for light loads (under 10 pounds) work in bathrooms if the wall surface is smooth and clean. Apply to dry tile or painted drywall for best adhesion.
Stacking tip: Mount two corner shelves at different heights — one at 5 feet and one at 4 feet — to create a small layered corner display. This looks deliberately styled rather than purely functional.
7. Install Over-Toilet Double Rail Shelves
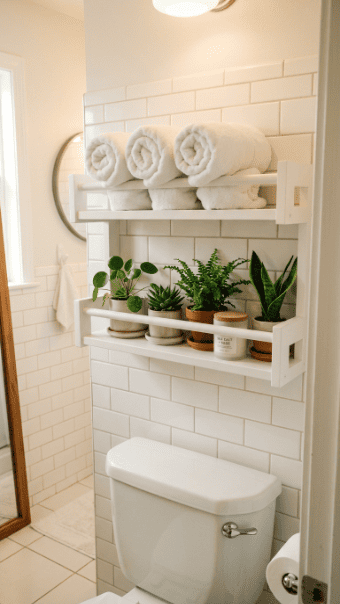
The wall above your toilet is one of the largest unused vertical strips in most bathrooms. A double rail shelf system mounts directly to this wall and immediately gives you two full shelves worth of storage.
Top rail uses:
- Folded or rolled towels
- Extra toilet paper rolls in a small basket
- Candles or a small decorative plant
Bottom rail uses:
- Toiletries in small labeled bins
- A soap dispenser backup
- Small woven baskets
Why double rail instead of single? Two rails let you separate decorative items from functional ones. The top rail stays styled. The bottom rail stays practical.
Double rail wall shelf units are available in white, chrome, and matte black. Most are sold as complete kits with all mounting hardware included.
Budget tip: Basic over-toilet wall rail shelf systems start at $20 to $35. Look for versions with adjustable rail heights so you can customize the spacing.
Installation note: Measure the width of your toilet tank before buying. Most standard units are 18 to 24 inches wide. You want the shelf to align visually with the tank below it.
8. Mount a Pegboard Panel for Flexible Wall Storage

Pegboard gives you a completely adjustable wall storage system. You can move hooks, baskets, and shelves anywhere on the board at any time. No new holes. No new hardware.
Mount a single 24×24 inch pegboard panel on an open wall section. Use standoff screws to create a small gap between the board and wall — this is necessary for hooks to seat properly.
What to hang on it:
- S-hooks for small bags and pouches
- Wire basket inserts for cotton rounds, hair ties, and bobby pins
- Small shelf brackets for bottles and jars
- Flat hooks for hanging mirrors or small tools
Paint the pegboard the same color as your wall for a built-in look. White pegboard on a white wall almost disappears while still being fully functional.
Budget tip: A 24×24 inch pegboard panel costs $10 to $15 at hardware stores. Hooks and accessories add another $10 to $20. Total project under $35.
DIY level: Easy. The board needs four screws with standoff spacers. Takes about 30 minutes including layout planning.
This is the most adaptable wall storage system on this list. As your bathroom storage changes, the pegboard changes with it.
9. Use Wall-Mounted Glass Shelves for an Airy Feel

Glass shelves make a bathroom feel larger rather than smaller. Because light passes through them, they visually disappear while still holding your products.
This is the best wall shelf choice for bathrooms that already feel tight or dark.
What glass shelves do well:
- Hold decorative items and perfumes that look good on display
- Work in bathrooms with patterned tile walls where wooden shelves would clash
- Reflect light and brighten the space
Glass shelf thickness: 6mm glass handles light items. 10mm glass handles heavier items like full toiletry bottles. Always check the weight rating before loading them up.
Bracket styles: Chrome, brushed nickel, and matte black brackets are available. The bracket choice matters more visually than the glass itself since the glass is nearly invisible.
Budget tip: A pair of glass floating shelves with brackets costs $25 to $50 depending on size and finish. IKEA and similar stores carry budget versions in the $20 to $30 range.
Cleaning tip: Wipe glass shelves with a streak-free glass spray weekly. Soap residue and water spots are more visible on glass than on wood, so regular cleaning keeps them looking sharp.
10. Create a Towel and Product Zone Above the Sink
Pedestal sinks are beautiful but they offer zero storage. The wall directly above a pedestal sink is the natural place to compensate for that.
Two staggered floating shelves mounted at 50 and 60 inches create a mini storage zone directly above the sink without blocking the water or the mirror.
Lower shelf: Daily essentials — hand soap, small moisturizer, a compact mirror.
Upper shelf: Towels and decorative items that do not get wet during daily sink use.
Spacing matters. Leave enough room between the bottom shelf and the sink faucet so you are not knocking bottles over while washing hands.
Budget tip: Two narrow wood floating shelves cut to 16 to 18 inches wide cost under $30 total. A 1×6 inch pine board from a hardware store cut to length and sanded smooth can work for even less.
Style tip: Keep the above-sink zone in matching materials — same color, same wood, same finish. When two shelves clearly belong together visually, the wall looks designed rather than randomly filled.
This setup works especially well in small bathrooms where every inch of vertical space counts and the floor plan offers no room for a traditional vanity cabinet.
11. Hang a Wall-Mounted Basket Rack
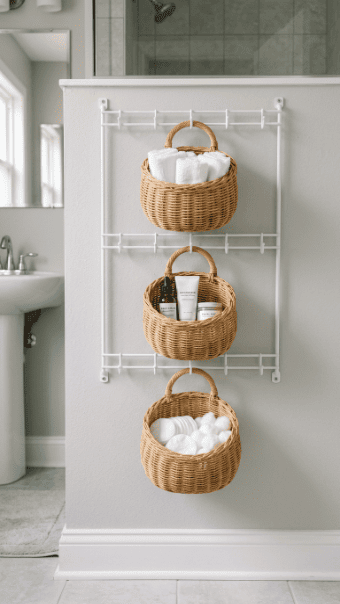
Wall-mounted basket racks combine open storage with a warm, natural texture. Each basket holds a category of items and hangs on a wall hook at eye level.
This works particularly well as an alternative to shelves in bathrooms where you want a softer, more organic look rather than a clinical white-shelf setup.
What each basket holds:
- Basket 1: Rolled washcloths or hand towels
- Basket 2: Skincare bottles and daily products
- Basket 3: Cotton rounds, makeup pads, small tools
Buy baskets with handles so they hang cleanly on simple wall hooks. Round wicker baskets, small wire baskets, and fabric storage baskets all work.
Mount the hooks in a row at the same height or stagger them in a gentle diagonal for a more casual look.
Budget tip: Basic wall hooks cost $2 to $5 each. Small wicker baskets with handles cost $3 to $8 each from discount home stores. A three-basket wall rack system can be set up for under $25 total.
Humidity note: Wicker and natural fiber baskets handle bathroom humidity reasonably well but avoid placing them directly beside a shower or above the bathtub where steam is constant.
12. Install a Wall-Mounted Drawer Unit
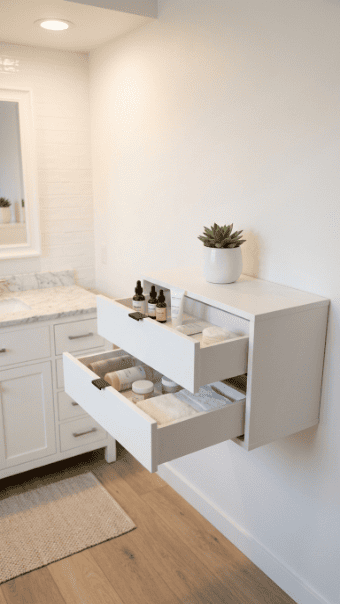
Wall-mounted drawers give you closed, hidden storage that does not touch the floor. Everything inside stays out of sight behind clean drawer fronts.
Perfect for storing:
- Medications and vitamins
- Backup personal care products
- Razors, trimmers, and small tools
- Hair ties, bobby pins, and small accessories
The visual appeal is that it looks like a piece of furniture floating on the wall. No legs. No floor footprint. Just a clean rectangular unit at a useful height.
Standard height: Mount the bottom of the unit at about 36 to 40 inches off the floor — around counter height. This makes the drawers easy to open and reach into.
Budget tip: Small wall-mounted floating drawer units are available from IKEA and similar retailers for $40 to $80. Look for “wall-hung cabinet” or “floating bathroom cabinet” search terms.
Installation: These units typically attach to a wall-mounted metal rail or directly to wall studs. Follow the included instructions carefully and use a stud finder for secure mounting.
Avoid overloading. Wall-mounted units have weight limits usually stated in the product specifications. Stay within the limit to keep wall anchors holding securely.
13. Use Industrial Pipe Shelves for a Modern Edge
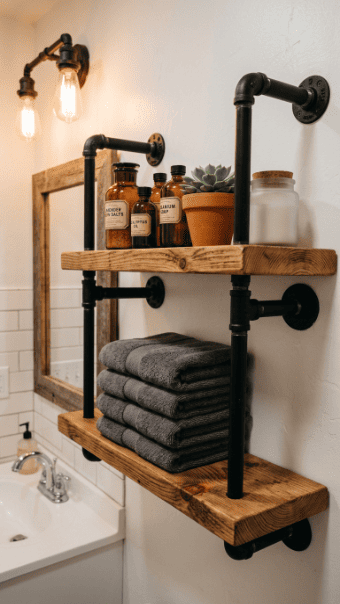
Industrial pipe shelves use black iron pipe as the bracket system and raw or stained wood as the shelf surface. They look deliberately designed and feel completely different from standard bracket-and-board shelving.
This style works well in bathrooms with subway tile, exposed brick, or dark grout lines. The raw materials feel intentional alongside those textures.
DIY version: Buy a length of black iron pipe from a hardware store, cut it to the right bracket length, and mount it to a pine shelf board. A full DIY pipe shelf can be built for $20 to $35.
Pre-made option: Ready-built industrial pipe shelf sets are widely available online for $30 to $60 per shelf. These come with all hardware and a mounting template.
What to store on them:
- Folded towels in a neat stack
- Apothecary-style glass bottles of cotton rounds and bath salts
- Small trailing plants in terracotta pots
Width tip: Keep pipe shelves under 30 inches wide without a center support bracket. Wider shelves need a mid-point bracket to prevent sagging under the weight of towels and bottles.
This is a great option if you want your bathroom storage to feel curated and design-driven rather than purely functional.
14. Add a Small Wall-Hung Vanity Cabinet Below the Mirror
A wall-hung vanity cabinet mounts to the wall and floats above the floor. Underneath it stays completely clear, making the bathroom feel larger than it actually is.
This is a genuine storage upgrade. A wall-hung cabinet with one or two internal shelves holds significantly more than any open counter display.
What goes inside:
- Daily skincare products
- Makeup pouches and small tools
- Hair accessories and styling items
- Small cleaning supplies for the vanity
Floor clearance benefit: Because the cabinet floats above the floor, you can mop underneath it easily. No awkward floor junction to clean around.
Size options: Small wall-hung vanity cabinets start at 16 inches wide and scale up to 36 inches for larger bathrooms. Depth is typically 12 to 16 inches — enough for full-size product bottles.
Budget tip: Basic wall-hung single-door bathroom cabinets are available for $60 to $120. This is a slightly larger investment than a shelf, but the storage capacity is dramatically greater.
Style note: Match the cabinet finish to your mirror frame or towel rail hardware to keep the bathroom looking cohesive. White cabinet with chrome hardware is the most universally clean combination.
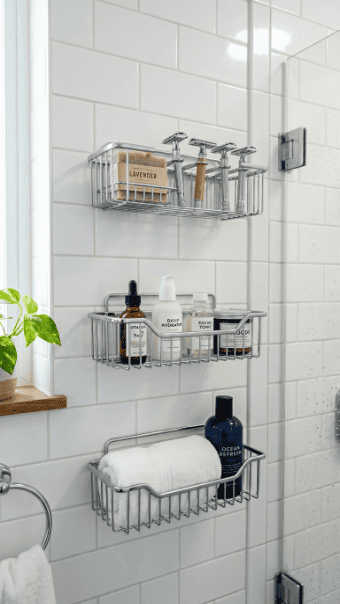
15. Mount a Shower Wall Caddy for Bottles and Soap
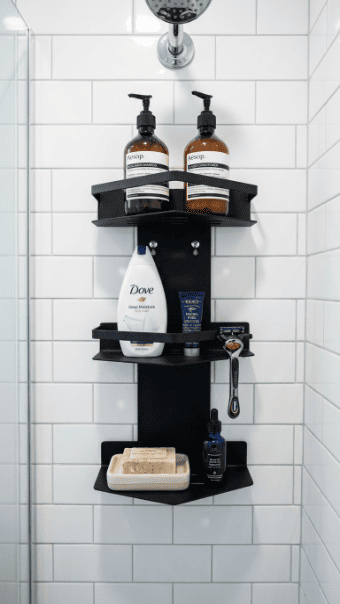
Shower bottles sitting on the floor or the edge of the tub are a safety hazard and a visual mess. A wall-mounted shower caddy solves both problems permanently.
Wall-mounted caddies attach directly to the shower wall using screws into the tile — which means they do not slide, tip, or fall. They are far more stable than shower-head-hanging versions.
What to look for:
- Angled shelves so bottles drain instead of pooling water underneath
- Rust-resistant materials — stainless steel or matte-coated aluminum
- Enough tiers for your full shower lineup (shampoo, conditioner, body wash, razor)
Budget tip: Basic two or three tier wall-mounted shower caddies start at $15 to $30. Stainless steel versions in matte black or chrome cost $30 to $50 and last significantly longer.
Installation in tile: Use a tile drill bit to avoid cracking the tile surface. Insert plastic tile anchors before screwing in the mounting bracket. This takes about 20 minutes.
Renter tip: Some wall-mounted shower caddies use strong suction cup systems rated for wet surfaces. These hold surprisingly well on smooth tile and leave no permanent marks.
16. Hang a Wall Organizer with Multiple Pockets
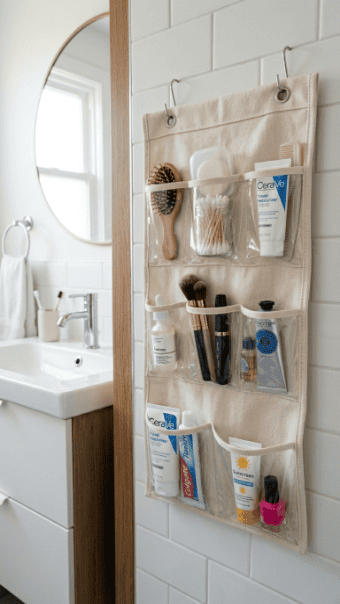
A wall pocket organizer is one of the fastest, cheapest, and most renter-friendly storage solutions available. It hangs on two nails or command hooks and holds a surprising amount of product.
Best for:
- Small items that get lost in drawers — bobby pins, cotton swabs, lip balm
- Products you use every day and want visible and reachable
- Travel-size backups you want accessible without opening a cabinet
Clear plastic pockets let you see exactly what is inside without searching. Fabric pocket organizers look softer but require pulling items out to see them.
What to look for: Buy a version with mixed pocket sizes — some small for individual items, some larger for bottles and pouches. Single-size pockets are less practical.
Budget tip: Wall pocket organizers cost $8 to $20. Most include mounting hardware. For renters, two large adhesive hooks hold most versions securely.
Placement: Mount it beside your mirror or inside the bathroom door. It should be at eye level so you can see all pockets at a glance.
Keep pocket organizers edited. When they overflow, they look messy immediately. Maximum two to three items per pocket keeps it functional and tidy.
17. Create a Styled Shelf Display Using the Rule of Three
Wall shelves look messy when they are overloaded with random items. They look styled when you follow one simple principle: the rule of three.
Group items in threes. One plant, one functional item, one decorative piece. Three items that vary in height. Three bottles in a matching material family.
Why three works: An odd number of items creates visual tension that the eye finds more interesting than even-numbered rows. Two items look like they are missing something. Four starts to look crowded.
Height variation: Choose one tall item, one medium, and one short. A tall candle beside a medium jar beside a low dish creates a shelf that has movement and interest.
Material rule: Stick to two to three materials per shelf. Glass plus ceramic plus greenery works. Glass plus ceramic plus wood plus metal plus wicker starts competing with itself.
Budget tip: You do not need to buy new decor. Look around your home for a jar, a small plant cutting, or a ceramic dish. A styled shelf costs nothing if you use what you already own.
This approach works on every wall shelf, in every bathroom size, in every style. Learn it once and every shelf you style will look intentional.
18. Use a Wall-Mounted Magazine Rack for Hair Tools
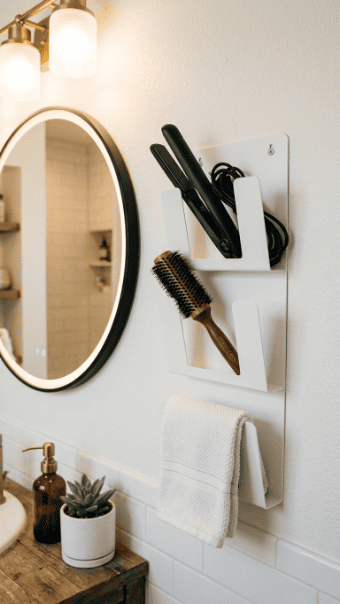
Hair tools are awkward to store. Flat irons and round brushes are too long for most drawers and too bulky for shelves. A wall-mounted magazine rack holds them perfectly in vertical slots.
Mount it beside the vanity at a comfortable reach height — roughly 36 to 42 inches off the floor. Each tool goes in its own slot and hangs there cooling down safely after use.
What fits in a standard three-slot rack:
- Flat iron or hair straightener
- Curling wand or tong
- A large paddle brush or round styling brush
Heat safety note: Make sure the rack is metal, not plastic. Metal handles the residual heat from styling tools safely. Plastic can warp or melt from a warm flat iron.
Budget tip: Wall-mounted magazine racks cost $10 to $25. Look for metal versions — white-coated or matte black are the most common finishes. Most mount with just two screws.
Cord management bonus: Tie cords with a velcro strap before placing tools in the rack. Loose cords hanging out of the slots make even a tidy rack look messy.
Freeing your hair tools from a shared drawer also means your makeup drawer finally has room to breathe.
19. Install a Wall-Mounted Soap and Toothbrush Holder Set
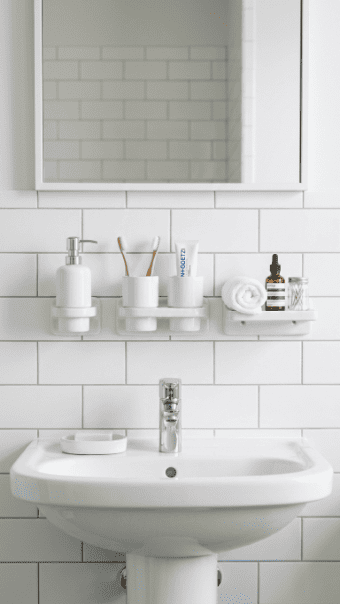
Countertop toothbrush holders and soap dispensers take up space that could simply be empty. Moving them to the wall with mounted versions frees counter space completely.
A matching wall-mounted set includes a soap holder, a toothbrush cup, and sometimes a small item shelf — all mounted at the same height in a clean row above the sink.
This is a small change with a big visual effect. A counter with nothing on it looks significantly larger and cleaner than one with three or four product holders scattered across it.
Materials available: Ceramic, stainless steel, chrome-plated zinc, and matte ABS plastic. Ceramic looks the cleanest in most bathrooms. Stainless steel works in modern spaces.
Budget tip: Matching wall-mount bathroom accessory sets (soap dispenser + toothbrush holder + cup) are available for $20 to $40. Look for sets that use the same wall-anchor system so spacing is consistent.
Installation: Each piece typically uses two small screws and plastic anchors. Measure carefully before drilling so the set mounts in a level, evenly spaced row.
Hotel-style effect: Mounted accessories in matching finishes are what give hotel bathrooms their clean, deliberate look. This exact effect is easy to replicate at home for very little cost.
20. Add a Towel Bar at Each Height Level
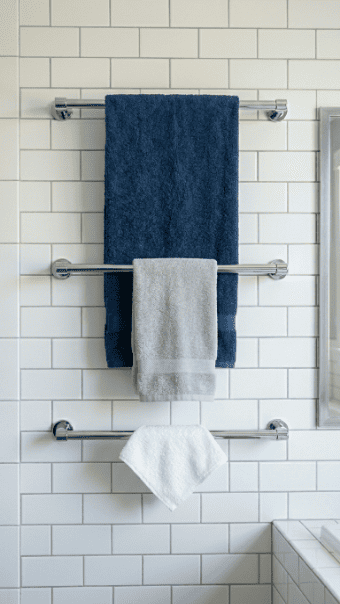
Most bathrooms have one towel bar. That single bar ends up overloaded with multiple towels that never dry properly because they are stacked on top of each other.
The solution is simple: add a bar at each height level.
Three-bar system:
- High bar (60 inches): Full bath towel
- Mid bar (48 inches): Hand towel
- Low bar (36 inches): Washcloth or face cloth
Each towel hangs flat and has airflow around it. Towels dry faster. The bathroom wall looks ordered and layered rather than randomly hung.
Budget tip: Basic chrome towel bars cost $8 to $15 each. Brushed nickel and matte black versions run $15 to $30. Buying three bars in the same finish costs $25 to $50 total — a genuinely small investment for a big organizational change.
Spacing: Mount bars directly above each other, centered on the same wall section. Keep the horizontal center of each bar aligned so the stack looks intentional rather than random.
For shared bathrooms: Assign one bar column per person. Each person has their high, mid, and low bars — color-coded towels make this system immediately clear.
21. Hang Framed Baskets as Decorative Wall Storage
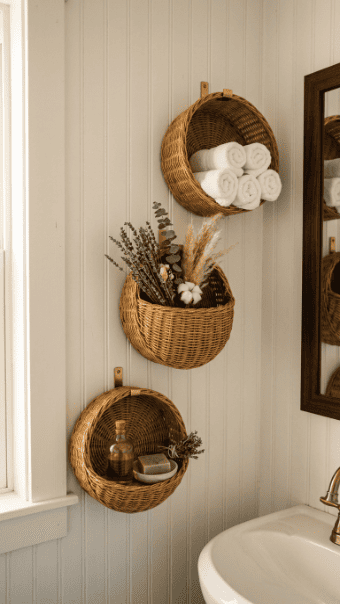
Baskets mounted face-out on a wall function as both wall art and storage at the same time. They hold items inside their depth while looking like a deliberately styled wall display.
What works in wall-mounted baskets:
- Rolled washcloths or hand towels
- Dried botanicals or eucalyptus sprigs
- Small glass bottles of bath salts or cotton rounds
- A folded extra hand towel
Use matching baskets in the same style and material for a cohesive wall display. Three round wicker baskets of slightly different sizes create a natural, organic wall arrangement.
Mount them using picture-hanging hooks or large adhesive wall strips rated for the basket weight. Most empty wicker baskets weigh under two pounds, so standard adhesive strips handle them easily.
Budget tip: Round wicker baskets cost $4 to $10 each from craft stores or discount home retailers. Three baskets plus mounting hardware costs under $35.
Arrangement tip: Stagger the heights — do not mount them in a perfectly straight row. A gentle diagonal or triangle arrangement looks more like intentional wall art and less like a storage rack.
This is a particularly good solution for bathrooms where you want wall storage to serve double duty as decoration.
22. Mount a Foldable Wall Hook Row for Robes and Bags
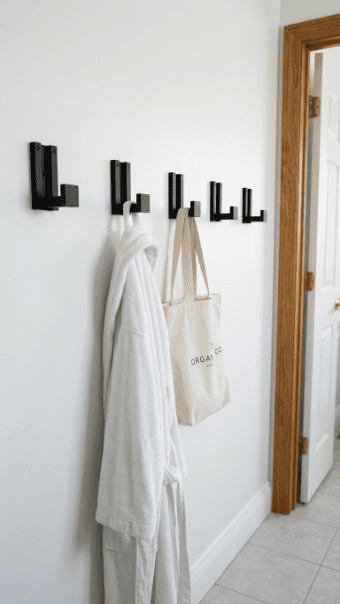
A row of wall hooks beside the bathroom door gives robes, towels, and bags a permanent wall home. When not in use, foldable hooks sit flat against the wall and become almost invisible.
What hangs well on wall hooks:
- Bathrobes
- Hanging makeup bags
- Reusable tote bags used for gym or travel toiletries
- Extra hand towels
Choose foldable hooks rather than fixed projecting hooks. Fixed hooks project into the room constantly and catch clothing as you pass. Foldable hooks fold flat when empty and project only when holding something.
Budget tip: A set of five matte black foldable wall hooks costs $10 to $20. Individual hooks start at $3 to $5 each. Matte black, brushed nickel, and white finishes are all widely available.
Spacing: Mount hooks 6 to 8 inches apart in a row. This gives enough room to hang a full bathrobe without it touching the item on the next hook.
Height: Standard hook height is 60 to 66 inches off the floor — comfortable to reach for most adults and high enough that a full-length robe clears the floor without dragging.
23. Use an Adhesive Wall Strip System for a Drill-Free Setup
Command strips and adhesive wall mount systems have improved significantly. They now hold bathroom accessories, small shelves, and lightweight baskets without any drilling required.
This is the best option for renters or for anyone who wants to try a wall storage layout before committing to permanent holes.
What adhesive systems handle well:
- Small shelves up to 5 to 7 pounds
- Single hooks for robes and towels
- Toothbrush holders and soap dishes
- Small baskets under 3 pounds when loaded
Weight ratings matter. Always check the adhesive strip’s weight capacity. Using a strip rated for 3 pounds to hold a basket of shampoo bottles will result in it falling eventually.
Application rules:
- Clean the wall surface with isopropyl alcohol first
- Press and hold for 60 seconds
- Wait 24 hours before loading with weight
- Never apply over painted surfaces less than one week old
Budget tip: A pack of large adhesive wall strips (eight pairs) costs $8 to $12. Dedicated adhesive bathroom accessories — pre-paired with appropriate adhesive — cost $10 to $25 per item.
This system lets you try a wall storage layout with zero commitment, then drill for permanent versions of the positions that work best.
24. Create a Vertical Toiletry Column Using Stacked Caddies
Stacked wall caddies create a vertical toiletry column — a single, narrow wall strip that holds your entire daily routine organized from top to bottom.
Each caddy holds one category:
- Top caddy: Daily face products (cleanser, razor, face wash)
- Middle caddy: Body products (body lotion, deodorant, body spray)
- Bottom caddy: Towel rolls or spare soap bars
Why a column layout? It uses a narrow strip of wall efficiently. A 6-inch wide column of three stacked caddies occupies almost no horizontal wall space while giving you three full storage tiers.
This works particularly well in extremely narrow bathrooms where a wide shelf would block movement.
Budget tip: Individual wall-mount wire caddies cost $8 to $15 each. A matching set of three in the same finish from the same brand costs $25 to $40 and looks deliberately designed.
Spacing: Mount caddies about 8 to 10 inches apart vertically so items in the lower caddy do not interfere with items in the one above it.
Finish: Chrome, matte black, and brushed nickel are the most common. Pick one and stay consistent — mixing finishes in a small column makes it look accidental.
25. Tile a Niche Into Your Shower for Shampoo Bottles
A shower niche is the shower version of a recessed wall niche. It is built directly into the shower wall and tiled to match, creating a seamless, waterproof shelf for shampoo, conditioner, and body wash.
Advantages over a shower caddy:
- No hanging hardware to rust or corrode
- No drilled brackets on wet tile
- Completely flush with the wall — nothing to bump into
- Unlimited weight capacity once properly built
Standard size: A single shower niche is typically 12 inches wide, 24 inches tall, and 3.5 inches deep. This fits most full-size shampoo and conditioner bottles with room left over.
Tiling tip: Slope the niche floor slightly toward the drain opening so water does not pool on the shelf. A 1/8 inch slope per 12 inches is sufficient.
Budget range: Adding a single shower niche during a tile job adds $100 to $300 to the project cost. DIY using a pre-framed foam niche insert cuts material cost to $25 to $50 for the insert, plus tile.
For existing showers: Cutting into an existing tiled shower wall is possible but requires removing tiles, adding framing, waterproofing, and retiling. Most people do this during a planned bathroom refresh rather than as a standalone project.
26. Mount a Wall-Hung Mirror with Hidden Side Storage
A mirror with side storage wings is a smarter version of the standard mirrored medicine cabinet. The center panel is a plain mirror. The two side panels open as shallow storage cabinets.
The advantage: The mirror looks like just a mirror when the side cabinets are closed. No one walking into the bathroom sees a cluttered storage unit — they see a clean wall mirror.
What each side panel holds:
- One side: Daily skincare routine products
- Other side: Dental care, razors, small tools
Combined, both side panels hold as much as a standard medicine cabinet while the visible face remains a full mirror.
Size range: Mirror-with-side-storage units come in widths from 24 inches to 48 inches. Height is typically 24 to 36 inches.
Budget tip: Basic units with side storage start at $80 to $150. Premium versions with lighting built into the mirror frame cost $200 to $400 but last for many years.
Installation: These units mount to the wall using two mounting brackets at the top. A single person can install one in about 45 minutes with a drill and level.
This is one of the most space-efficient wall storage purchases you can make because it combines a mirror you already need with storage you did not have before.
27. Use a Rail System with Interchangeable Accessories
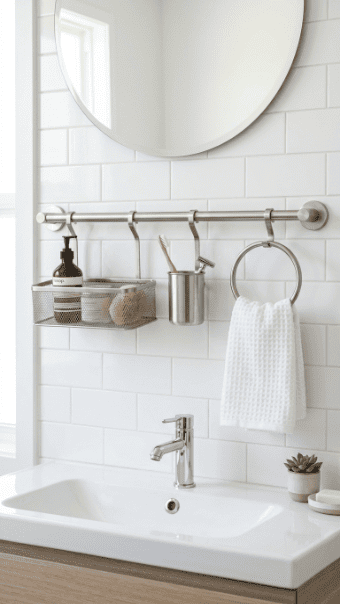
A wall rail system is a horizontal bar mounted to the wall with interchangeable accessories that clip onto it. Think of it like a modular bathroom wall kit.
You can slide accessories along the rail, add new ones, and remove old ones at any time without drilling new holes.
Common accessories:
- Cup holders for toothbrushes
- Small shelf baskets for bottles
- Towel rings or hand towel bars
- Soap dish holders
- Hooks for small bags
Why rails beat individual mounts: One pair of wall holes handles the entire rail. If you want to add a new accessory later, it clips onto the existing rail — no new drilling.
Budget tip: Basic rail systems with three accessories cost $25 to $45. Premium GROHE or Keuco systems cost more but the accessory quality is significantly better. Mid-range options from home improvement stores offer a strong middle ground.
Rail length: Standard rails are 18 to 24 inches. This fits most bathroom walls beside or above a vanity sink comfortably.
Finish matching: Choose a rail finish that matches your existing faucet hardware. If your taps are chrome, use chrome rail. If your taps are matte black, use a matte black rail.
28. Hang a Wooden Crate or Box Shelf on the Wall
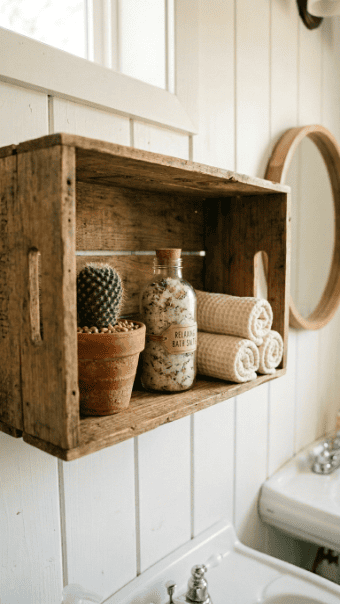
A wooden crate mounted face-out on the wall functions as an open box shelf. It has sides, a back, and a floor — giving it natural compartments and a contained look.
Why crates work well as wall storage:
- The enclosed sides keep items from sliding off
- They look warm and natural without any additional styling
- They work in farmhouse, Scandinavian, and natural-material bathroom styles
Mount a single crate horizontally for a wide shallow shelf. Mount it vertically for a taller, narrower storage box.
DIY version: Wooden produce crates from a market or garden store cost $3 to $8. Sand them smooth, apply a coat of white paint or wood stain, and mount with two L-brackets screwed into the crate back. Total cost under $15.
Pre-made option: Ready-made wall-mount wood box shelves in pine or MDF cost $15 to $30 online.
What to put inside:
- Small plants in pots that fit the crate depth
- A basket of rolled towels
- A few apothecary bottles or small glass jars
Weight note: A standard wooden crate wall shelf handles about 10 to 15 pounds safely when mounted with two sturdy L-brackets into wall studs or drywall anchors.
29. Build a Floor-to-Ceiling Shelving Strip in a Narrow Space
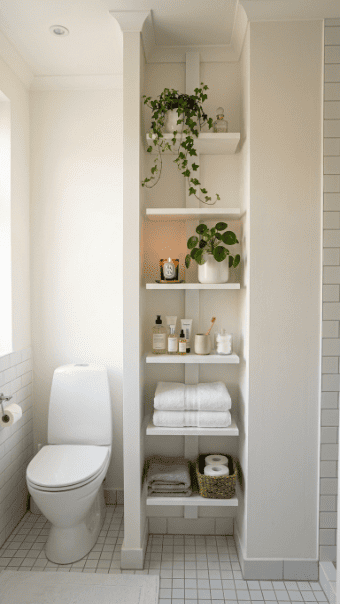
A narrow floor-to-ceiling shelving strip uses the full height of a wall in a vertical band as little as 10 to 12 inches wide. It turns a skinny alcove or unused wall strip into a complete storage column.
Best locations:
- The narrow wall beside the toilet
- The sliver of wall between the vanity and the door
- An alcove at the end of the bathroom
Shelf spacing recommendations:
- Lower shelves (floor to 36 inches): Baskets and bulkier items
- Middle shelves (36 to 60 inches): Daily products at easy reach
- Upper shelves (60 inches and above): Backups, decor, and seasonal items
Budget tip: Adjustable pin-style shelf systems use one set of vertical tracks mounted to the wall with brackets that clip in at any height. A full floor-to-ceiling system with five shelves costs $40 to $80 in materials. Pre-built narrow shelving units start at $35 to $60 flat-packed.
Width matters: A 10-inch deep shelf holds most bathroom products. A 6-inch deep shelf works for narrower products like bottles and rolled towels and fits into very slim alcoves.
This is the highest-density wall storage option on this list. A single floor-to-ceiling strip can hold more than most bathroom linen closets while occupying less than one square foot of floor space.
Conclusion
Bathroom walls are the most underused storage resource in your home. Every empty wall strip, every bare tile panel above the toilet, and every dead corner is a storage opportunity you are not yet using. The ideas in this list range from a $10 basket on a hook to a fully tiled shower niche — and every single one of them adds real, usable storage without requiring more floor space.
Start with one wall. Pick the idea that matches your budget, your bathroom size, and the tools you have available. Add one floating shelf. Mount one rail. Hang one basket row. A single well-placed wall storage addition makes a bathroom feel more organized than an entire drawer reorganization.
The best wall storage is the kind you actually use every day. Choose what fits your routine, install it properly, and keep it edited. Your bathroom walls are ready to start doing real work.