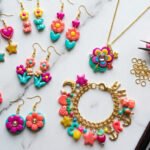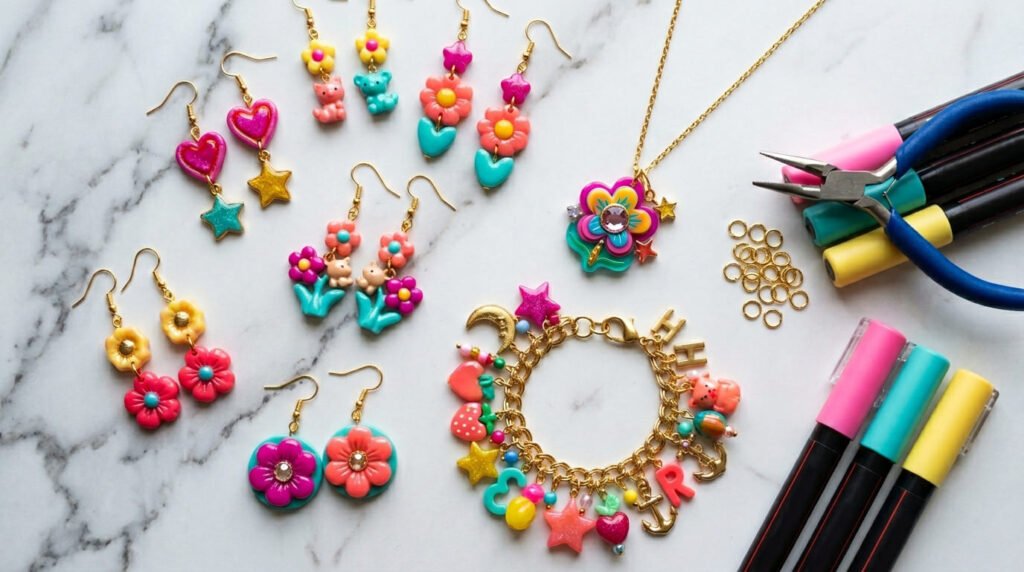
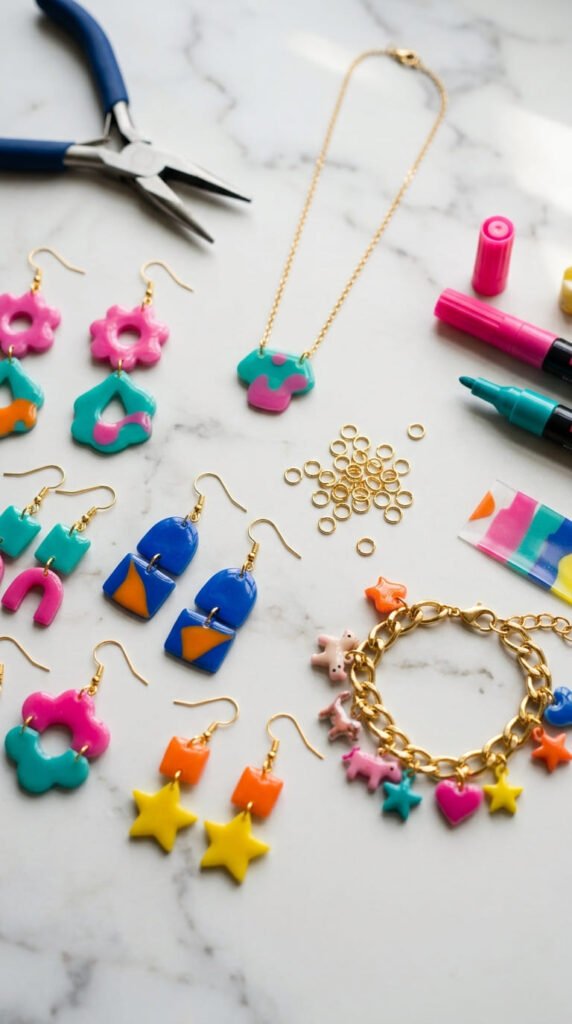
Shrink plastic turns a kid’s craft into jewelry that looks like it came from a boutique. You draw, you cut, you bake, and a flat sheet curls into a thick, glossy charm in about three minutes. The whole thing costs around $5 a pair, far less than anything in a shop. Earrings, rings, pendants, bracelets — all of it comes from one cheap sheet of #6 plastic and a few markers you likely already own. The pieces are light, so even big designs stay comfortable to wear. Below are 23 jewelry ideas, each with simple steps and money-saving tips. Most take about 25 minutes start to finish, and almost all are beginner-friendly. Grab your markers and let’s make something tiny and beautiful.
1. Bold Statement Dangle Earrings
Big earrings get noticed, and shrink plastic makes them light enough to wear all day. Draw two matching shapes about three times your target size. Bold abstract blobs, leaves, or arches all work. Color them, then punch a 1/8-inch hole at the top of each before baking. Bake at 325°F for 2 to 3 minutes, then press flat while warm. After cooling, add a jump ring and an earring hook. Budget tip: a pack of 50 hooks costs about the same as one pair from a store, so your cost per pair drops fast. Use needle-nose pliers to open the jump rings sideways, not by pulling them apart. Layer two marker colors for a shaded look. Translucent #6 plastic gives a glassy finish that catches the light. Because the pieces weigh almost nothing, even palm-sized designs feel light on the ears. Make a few pairs in one oven session. Seal the front with clear acrylic varnish so the color survives daily wear against skin and hair.
2. No-Hole Stud Earrings
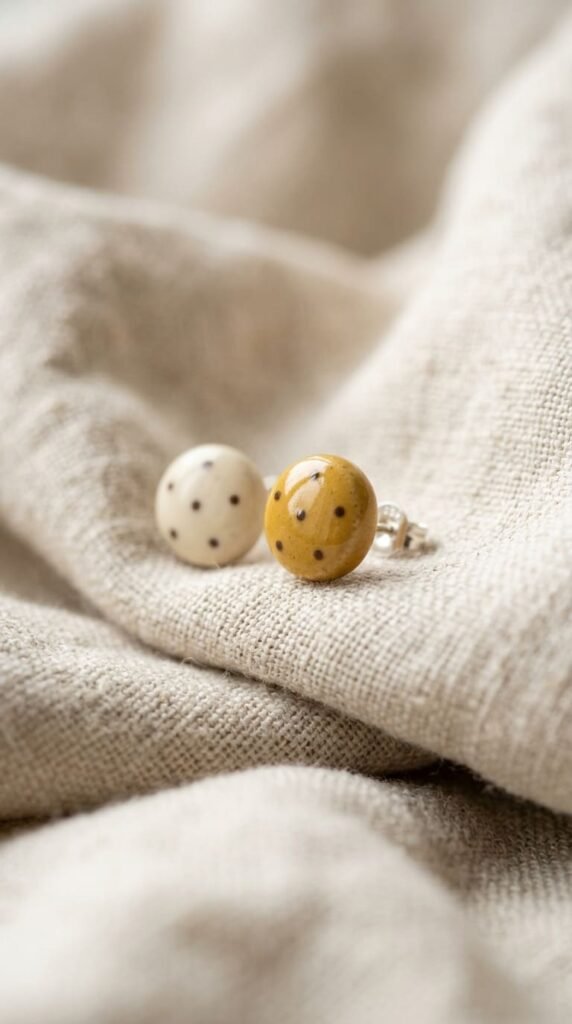
Studs skip the dangle entirely. No hole punch needed here. Draw two small matching shapes, color them, and bake as usual. Once cool, glue a flat earring post to the back of each piece. Use strong jewelry glue or two-part epoxy for a hold that lasts. Money-saver: flat post backs come in big packs for very little, so a single bag makes dozens of pairs. Keep these designs small and simple, since studs sit close to the ear. Tiny fruit, hearts, stars, or geometric shapes all suit the scale. Let the glue cure fully overnight before wearing, or the post can pop off. Sand the back lightly before gluing so the post grips better. Seal the front so the color stays put. Studs are a great way to use up scraps too small for bigger earrings. They feel modern and understated. Make a matched set in one color family for a tidy gift. Because they are flat and light, they stay comfortable through a long day at work.
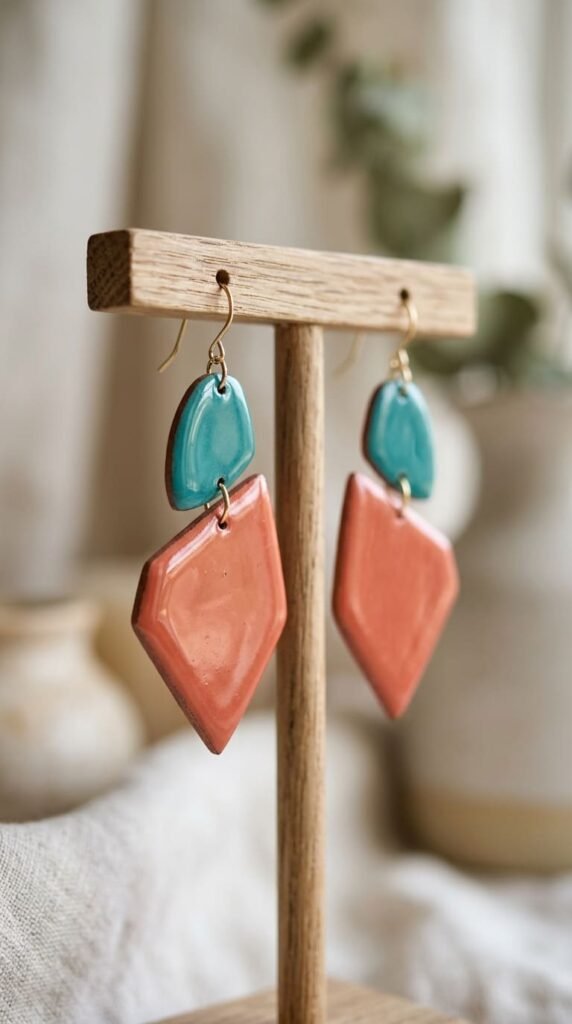
3. Silhouette Pendant Necklaces
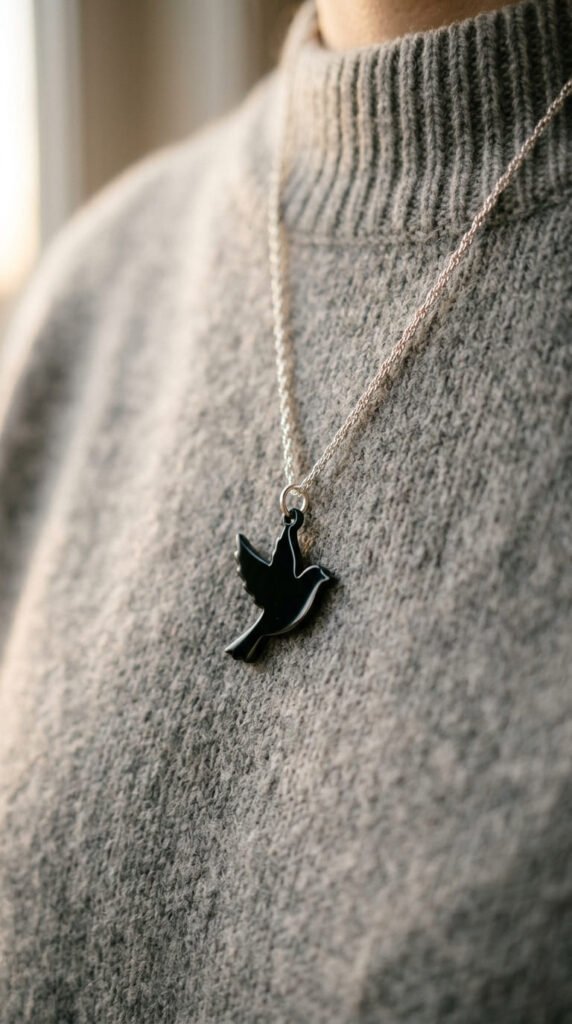
A pendant turns one drawing into a centerpiece. Sketch a single bold shape, color it solid, and punch a hole near the top. After baking, the piece comes out thick and glossy, just like a bought charm. Add a jump ring and thread it onto a chain or cord. Save cash: a long roll of waxed cord costs little and makes dozens of necklaces. Silhouettes work especially well here. A solid black bird, a leaf, or a moon reads clearly from across a room. Keep the design large and simple, since fine lines can blur as the plastic shrinks. Color the back too if you want it to look finished from both sides. Translucent plastic gives a soft glow when light passes through. Seal the front so the color stays bright against clothing. These feel personal because no two are alike. Make a matching set for a friend with linked shapes like a sun and a moon. Because each one costs pennies, you can experiment freely and turn early flops into practice for better designs.
4. 1950s-Style Charm Bracelets
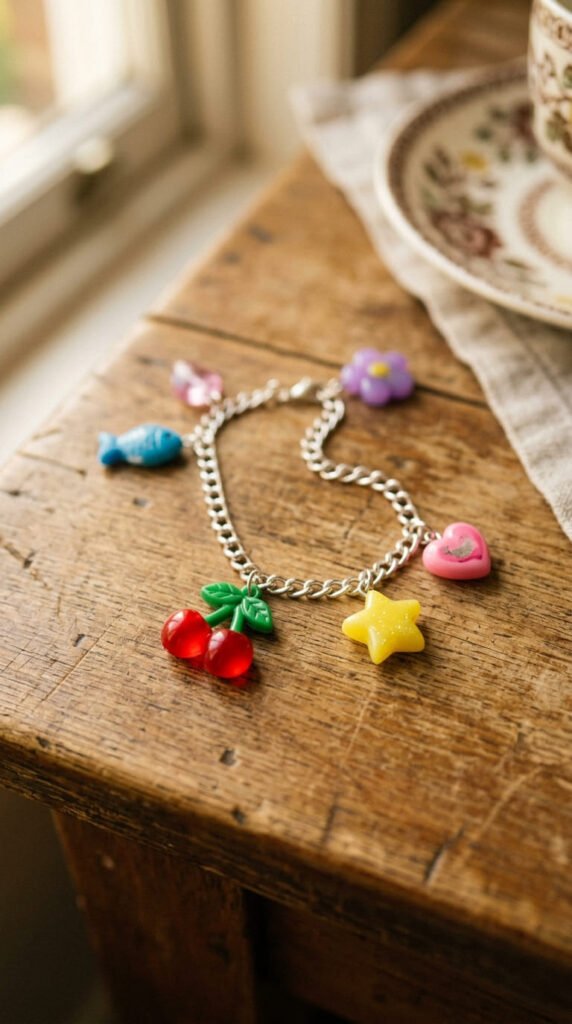
Charm bracelets are back, and shrink plastic makes filling one cheap and fun. Draw a handful of tiny charms, each about three times its final size. Color them, punch a small hole in each, and bake. After cooling, attach every charm to a plain chain bracelet with a jump ring. Thrifty move: salvage the chain from a broken bracelet instead of buying new. Pick a retro theme like cherries, dice, and stars for that 1950s feel. Space the charms evenly so the bracelet sits balanced on the wrist. Keep each charm small and snag-free with smooth, rounded edges. Seal them so the color survives daily knocks. Add new charms over time to mark events, turning the bracelet into a little story. Because the pieces are light, you can load up the chain without it feeling heavy. Make a themed one as a birthday gift, packaged in a small tin. A full custom bracelet costs a fraction of a store charm bracelet, and every piece on it means something to the person wearing it.
5. Kawaii Pastel Earrings
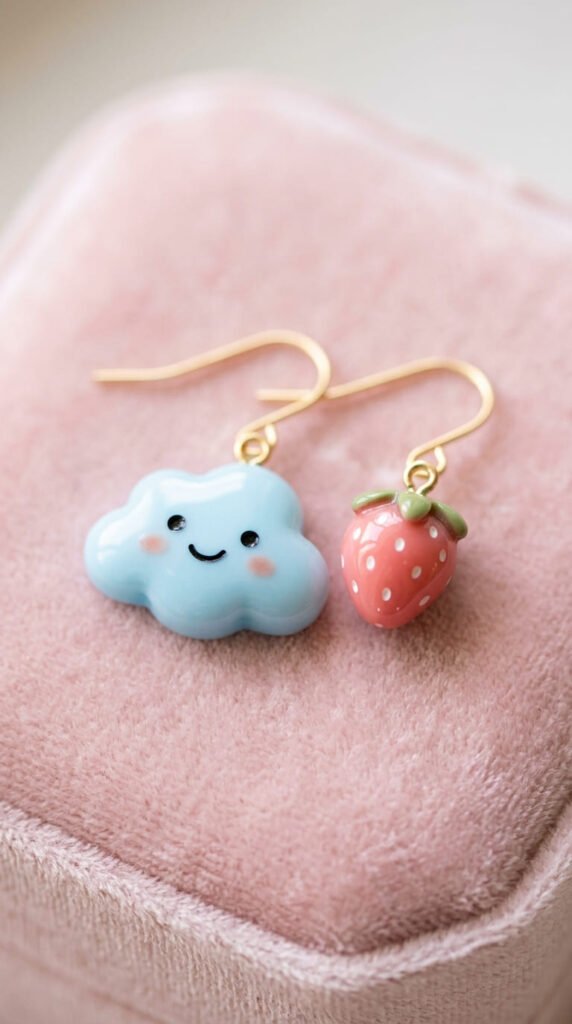
Cute, pastel, and cheerful — kawaii designs are a fan favorite. Think smiling clouds, tiny fruit, little animals, and rainbows. Draw them three times their final size and color with light, pale tones. This matters, because color intensifies two to three times when it shrinks. That soft pink becomes a bright bubblegum after baking. Add simple faces with a fine black marker for that adorable look. Punch a hole, bake at 325°F, and flatten while warm. Assemble with jump rings and hooks. Budget tip: one sheet of plastic makes many pairs, so a whole pastel collection costs just a few dollars. Keep the shapes rounded and friendly. Seal the front with a glossy clear coat to match the kawaii vibe. These are popular with kids and teens, and they sell well at craft fairs. Make a mismatched pair, like a cloud on one side and a raindrop on the other. Because they are light and small, they stay comfy all day. Practice the tiny faces on scrap plastic first until your hand feels steady.
6. Spooky Halloween Earrings
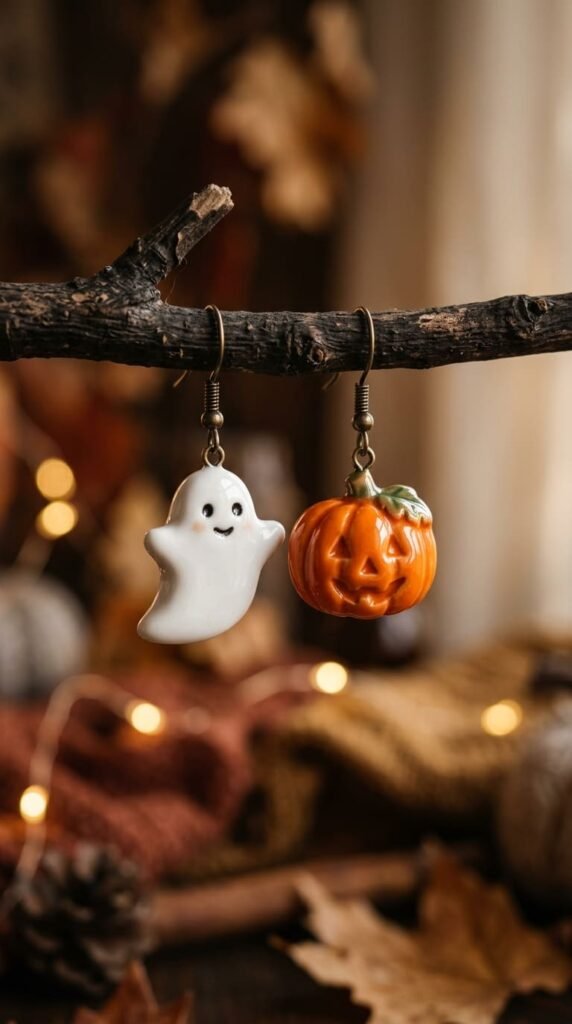
Halloween is perfect for shrink plastic jewelry. Draw ghosts, pumpkins, bats, or little skeletons. Color them in classic orange, black, white, and purple. Because these shapes are simple and bold, they hold up beautifully after shrinking. Punch a hole, bake, flatten, and assemble with hooks. Money-saver: make a whole seasonal set from one sheet instead of buying themed earrings that you only wear a few weeks a year. Keep ghosts white by leaving the plastic uncolored and just adding tiny black eyes. Use glow-in-the-dark or glittery sealant for extra spooky fun. Mismatched pairs work great here, like a ghost on one ear and a bat on the other. Seal them well so the color survives a long night of trick-or-treating or a party. Translucent plastic gives ghosts an eerie, faintly see-through look. These make quick gifts for friends who love costume jewelry. Make matching ones for a parent and child. A full Halloween set costs almost nothing, and you can store them and pull them out every October for years to come.
7. Marimekko Flower Earrings
Big, bold flowers give a clean, modern look. Draw a simple stylized blossom with a few solid petals and a round center. Keep the shapes flat and graphic rather than detailed. Color in two or three contrasting tones, like white petals with a pink center. Punch a hole, bake at 325°F, and press flat. Tip: trace the flower from a printed pattern placed under the plastic to get clean, even petals. Assemble with jump rings and hooks. Budget angle: one printed template makes many matching pairs, so you can gift a whole set cheaply. Keep the design large, since fine details blur as the plastic shrinks. These read as stylish and grown-up, not childish. Seal the front so the bold colors stay vivid. Round flower shapes sit nicely against the cheek and catch the eye without being heavy. Make a coordinated set in three color combos. Because the look depends on clean shapes rather than tiny detail, this is a forgiving project for beginners who want a polished, designer feel on a tiny budget.
8. Terrazzo Speckled Earrings
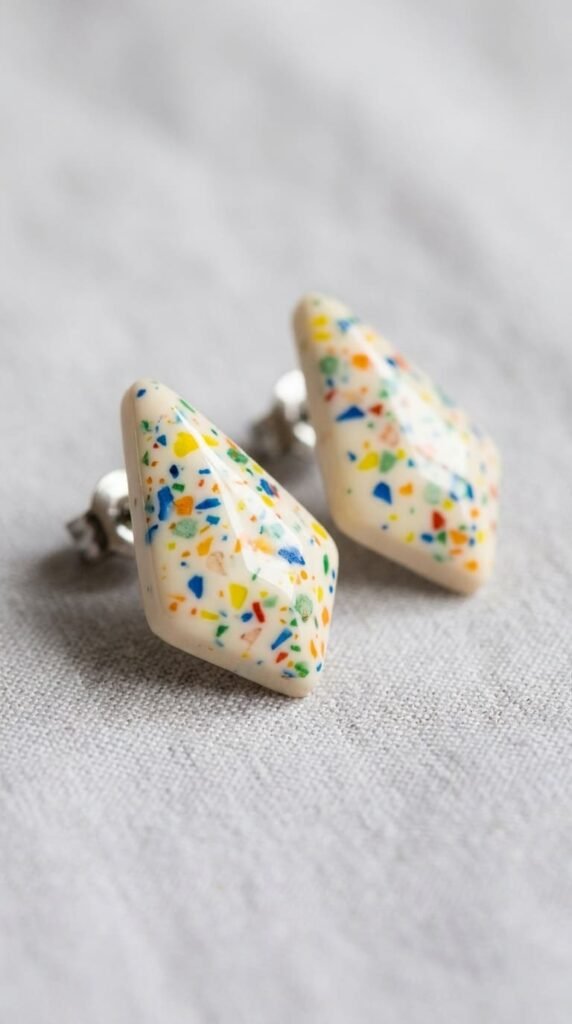
Terrazzo is that speckled, confetti-like look you see on modern decor. It is easy to copy on shrink plastic. Start with a light base color or leave the plastic clear. Then dot on small specks of color with markers in a few shades. Keep the specks scattered and uneven for that natural terrazzo feel. Punch a hole, bake, and flatten while warm. Money-saver: this design uses just the markers you already have, no special supplies. Cut the base into clean geometric shapes like circles, arches, or rounded rectangles for a modern edge. Seal the front with a glossy coat to make the specks pop. The shrinking process tightens the dots into crisp little flecks. Because the look is meant to be random, there is no wrong way to do it, which makes this beginner-friendly. Mix warm and cool speck colors for different moods. Make a matched pair or lean into mismatched shapes. A speckled set looks like something from a trendy boutique, yet costs only a few dollars and a little marker ink.
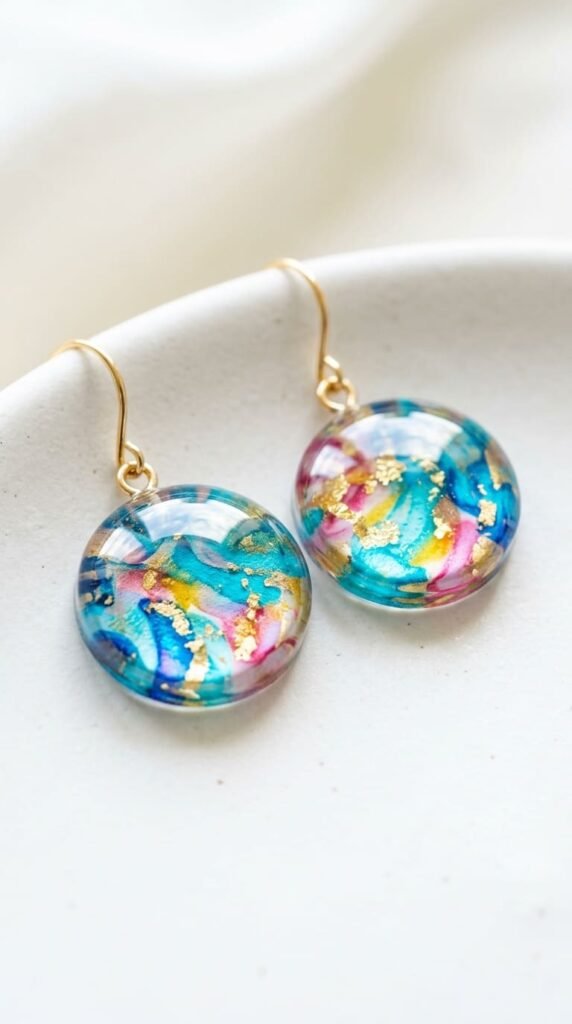
9. Alcohol Ink Earrings
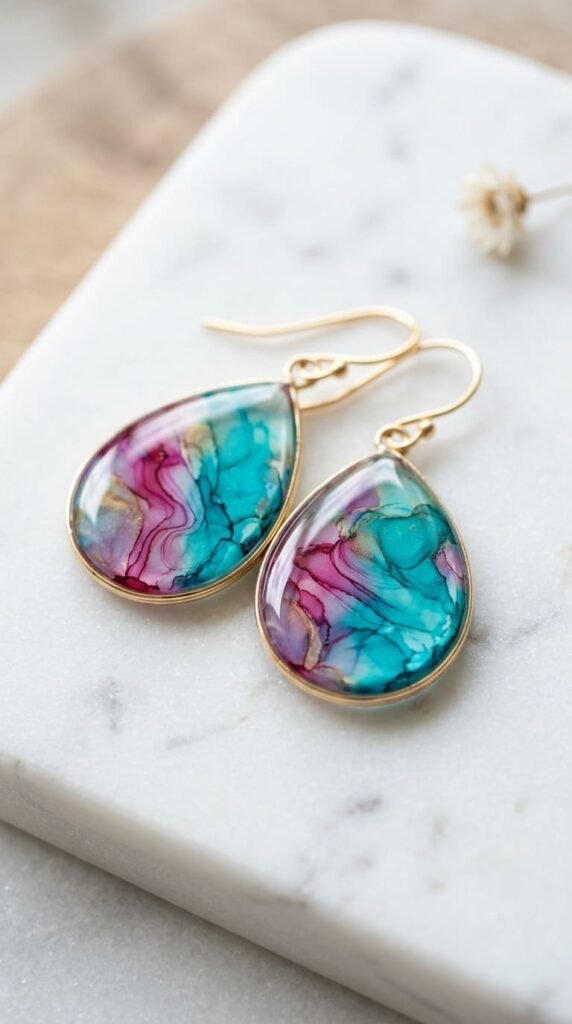
Alcohol ink gives flowing, marbled color that markers can’t match. Drop a few colors of ink onto your plastic and tilt it so they spread and swirl together. The result looks like watercolor or stone. Let it dry fully before cutting. Punch a hole, bake at 325°F, and flatten. Tip: work in thin layers so the colors mix softly instead of bleeding into mud. Use just two or three shades that go well together, like turquoise and magenta. Budget angle: a small set of alcohol inks lasts a long time, since each piece uses only a few drops. Cut the inked plastic into simple shapes so the color stays the star. Seal with clear varnish to lock the look in and add shine. Because the ink moves on its own, every piece comes out one of a kind. That makes matched pairs tricky, so lean into mismatched designs. These look high-end and artistic, perfect for gifts or craft fair tables. Practice on scrap first to learn how the ink flows before committing to your good plastic.
10. Holographic Vinyl Earrings
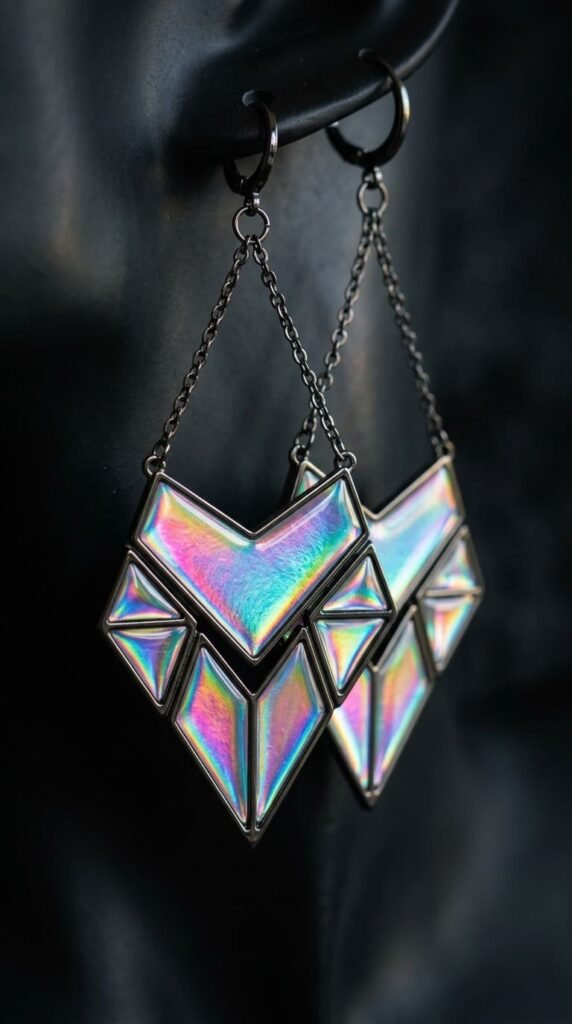
Want earrings that catch the light and shift color? Add holographic film. Cut your shrink plastic shape, then top it with a matching piece of holographic vinyl after baking. The vinyl gives that futuristic, rainbow shimmer. Punch the hole in the plastic before baking as usual. Money-saver: a single sheet of holographic vinyl covers many pairs, so the cost per earring stays tiny. Keep the shapes bold and geometric, since the shimmer does the decorating for you. You barely have to color these, which makes them quick. Smooth the vinyl down firmly so no bubbles form. Seal the edges so the vinyl stays put. These look like statement pieces from a trendy shop. They photograph beautifully, so they sell well online. Make them in classic shapes like circles, triangles, and hexagons. Because the plastic underneath is light, even large holographic earrings stay comfortable. Pair the leftover vinyl with other crafts so nothing goes to waste. A flashy, eye-catching pair like this costs a fraction of similar earrings in a boutique.
11. Retro 80s Shapes

The 80s are back, and shrink plastic nails that bold, graphic look. Draw oversized geometric shapes like triangles, squiggles, and lightning bolts. Color them in loud, clashing brights such as hot pink, electric blue, and yellow. Bigger and bolder is better here. Punch a hole, bake at 325°F, and flatten while warm. Budget tip: one sheet makes a whole retro collection, perfect for a themed party or photo shoot. Keep the shapes flat and graphic, since detail gets lost as the plastic shrinks. Layer two bold colors for extra punch. Seal the front so the bright tones stay vivid. Because the look is all about confident shapes and color, this is a forgiving, fun project for beginners. Make a set of mismatched shapes for an even more playful 80s vibe. These are great conversation starters and crowd-pleasers at vintage-themed events. The lightweight plastic means even huge statement earrings won’t drag on your ears. A complete retro set costs only a few dollars, far less than hunting down real vintage pairs.
12. Custom Pet Portrait Earrings
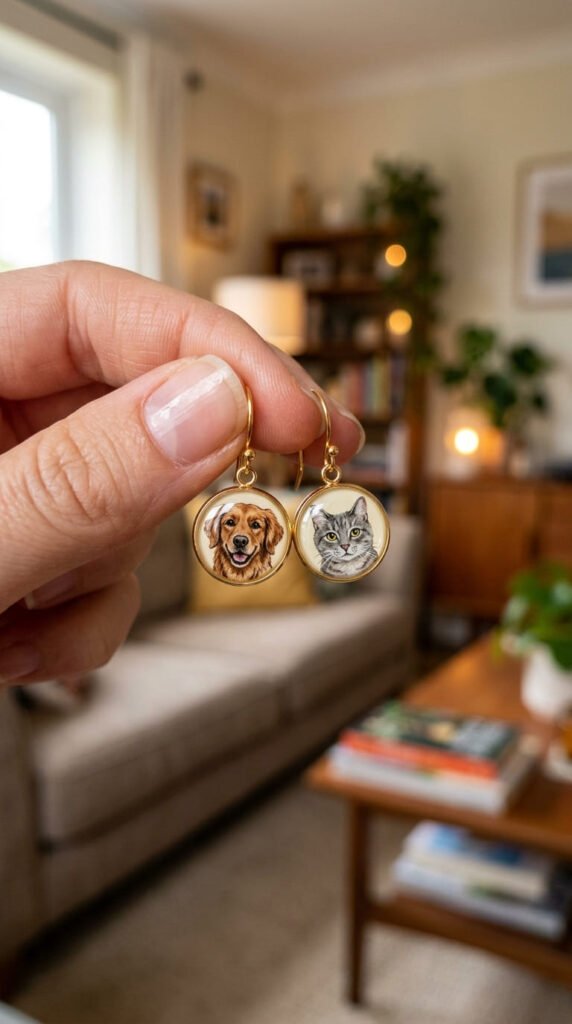
Turn a beloved pet into wearable art. Sketch the pet’s face onto the plastic, focusing on a few standout features like ear shape and coat color. Color it carefully, punch a hole, and bake. The shrinking sharpens your lines, so a slightly loose drawing tightens up nicely. Tip: trace from a printed photo placed under the plastic to get the proportions right. Keep the background simple so the pet stands out. These make deeply personal gifts that beat anything store-bought. Seal them so the portrait stays bright for years. Make a matched pair of the same pet, or feature two different pets, one on each ear. Because the finished pieces are thick and solid, they feel like real keepsakes. This is a popular niche for online sellers, since pet owners love custom pieces. Practice on scrap first if you are nervous, then commit to the good sheet once your hand feels steady. A custom pet pair costs pennies in materials but carries huge sentimental weight for the person who wears it every day.
13. Patriotic Bomb Pop Earrings
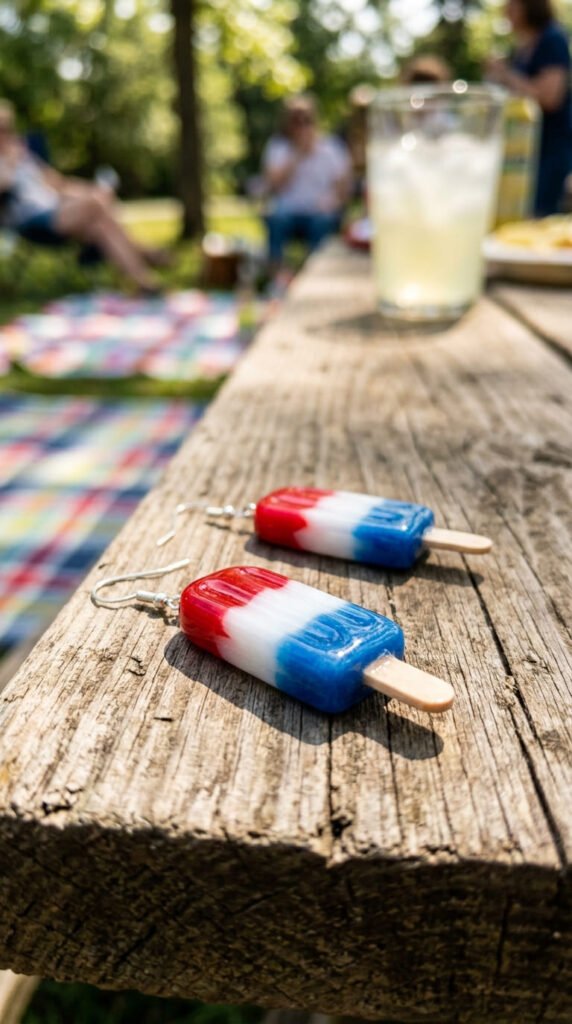
For summer holidays, red-white-and-blue jewelry hits the spot. Draw simple shapes like stars, stripes, or little Bomb Pop popsicles. Color them in classic patriotic tones. Punch a hole, bake at 325°F, and flatten while warm. Money-saver: one sheet makes enough pairs for the whole family at a barbecue, far cheaper than buying themed jewelry. Keep the designs bold and graphic so they read clearly. The popsicle shape is fun and instantly says summer. Seal the front so the colors survive an outdoor day in the sun. Make mismatched pairs, like a star on one ear and stripes on the other. These are quick to make the day before a celebration. Because they are light, they stay comfortable through hours of outdoor fun. Pair them with white outfits for a festive look. Store them and reuse them every year. A patriotic set costs almost nothing, and handmade ones feel far more personal than the mass-produced versions you find in seasonal store aisles.
14. Cactus and Succulent Earrings
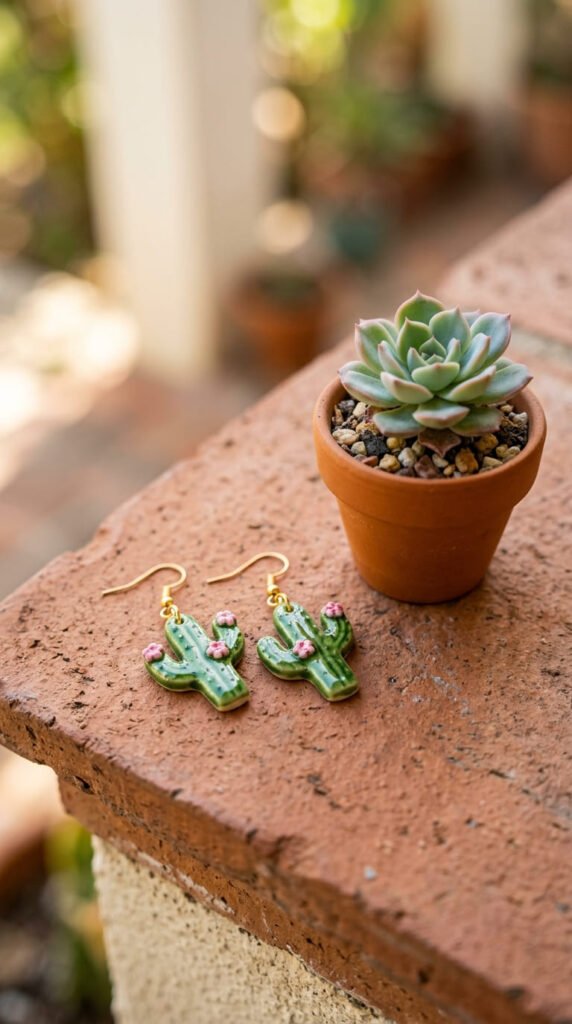
Plant lovers adore cactus and succulent jewelry. Draw a simple cactus, a potted succulent, or a leafy aloe shape. Color in cheerful greens with a tiny pink or yellow flower for a pop. Punch a hole, bake, and flatten. Budget tip: these use only green and a couple of accent markers, so they cost next to nothing. Keep the shapes rounded and friendly. A potted cactus reads especially cute, with a terracotta-colored base and a green top. Seal the front for a glossy, healthy-plant shine. Make a matched pair or do two different plant shapes for a playful set. Because the designs are simple, they suit beginners well. These are a sweet, low-cost gift for a friend who fills their home with plants. Translucent green plastic gives the leaves a nice depth. Make a small batch to sell at a plant-themed market or fair. The lightweight plastic keeps even chunky cactus shapes comfortable to wear. One afternoon yields a whole little garden of earrings for the price of a single store pair.
15. Rainbow Earrings
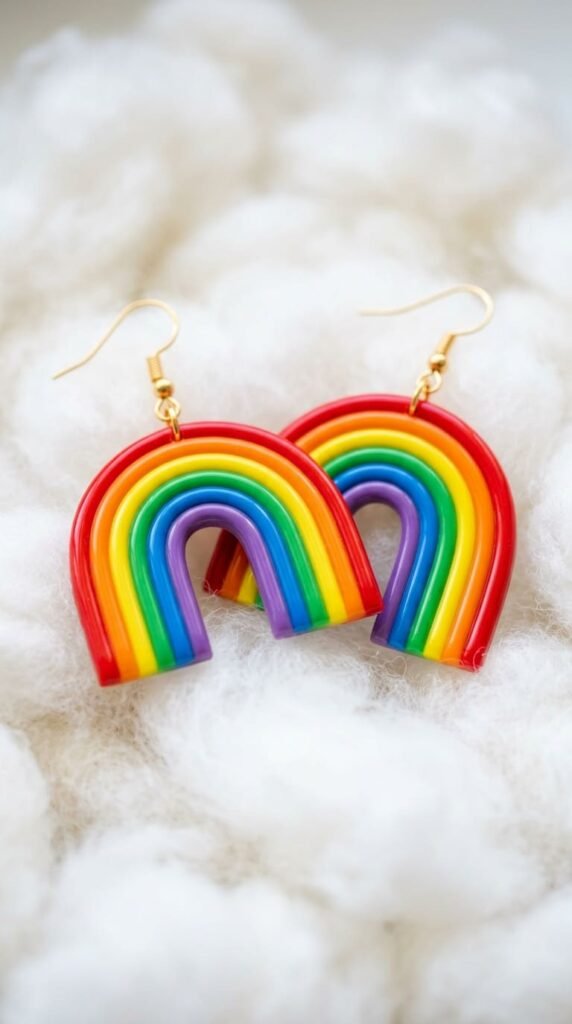
Rainbows are cheerful, simple, and always popular. Draw an arch shape and color it in bright bands. Keep the colors light, since they deepen as the plastic shrinks. Punch a hole at the top, bake at 325°F, and flatten while warm. Money-saver: a basic set of colored markers is all you need, no special supplies. Keep the arch bold and the color bands clear so they don’t blur together. Assemble with jump rings and hooks. Add a tiny cloud at each end for extra charm. Seal the front with a glossy coat to make the colors shine. These are happy, easy crowd-pleasers that suit all ages. Make a matched pair, or do a full rainbow on one ear and a single cloud on the other. Because the design is forgiving, it is perfect for a first project with kids. Translucent plastic makes the colors glow when light hits them. A bright rainbow set costs only a few dollars and brings instant cheer to any outfit, all from one quick oven session.
16. Shrink Plastic Rings
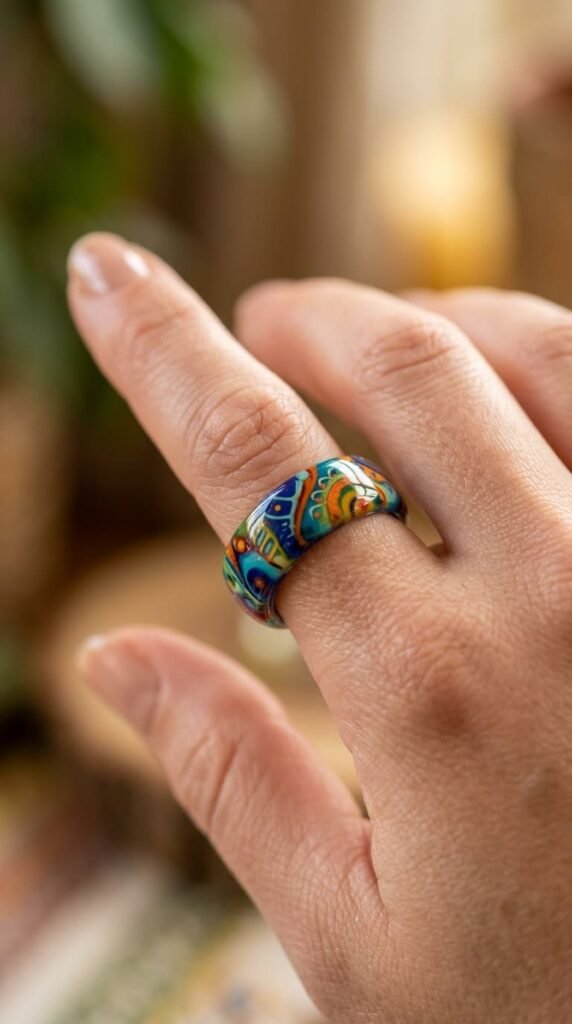
Yes, you can make rings too. Cut a long, narrow strip of #6 plastic and decorate the center section that will sit on top of the finger. As it bakes, the strip stays soft for a moment. Quickly wrap it around a metal rod or a marker barrel close to your ring size while it is still warm. Hold it until it sets. Tip: work fast, since the plastic firms up in seconds after leaving the oven. Budget angle: one sheet makes a stack of rings, so they are great party favors or stocking fillers. Keep the decorated area small and bold. Seal the design so it survives daily wear on the hands, which take a lot of contact. Make the band slightly larger than your finger, since it is hard to adjust later. These are fun, quirky, and unlike anything in a typical shop. Practice the wrapping on scrap strips first to learn the timing. A handful of colorful rings costs pennies and makes a playful, casual accessory you can match to any outfit.
17. Mini Hoop Charm Dangles

Plain hoops turn special with a tiny dangling charm. Make a small charm, punch a hole, color it, and bake. After cooling, attach it to a basic hoop earring with a jump ring so it swings freely. Money-saver: buy plain hoops in a bulk pack, far cheaper than decorated ones, and swap charms whenever you like. Keep the charm small and light so it dangles nicely without weighing the hoop down. Tiny stars, hearts, fruit, or initials all work. Seal the charm so the color stays bright. The beauty here is flexibility. Make several charms and switch them on the same hoops to match your outfit or mood. This stretches a single pair of hoops into many looks. Because the charms are so small, they are a perfect use for leftover scraps. Make a little set of seasonal charms, like snowflakes for winter and flowers for spring. A whole charm collection costs almost nothing, and the mix-and-match factor makes these feel like a smart, practical addition to any jewelry box.
18. Geometric Minimalist Studs
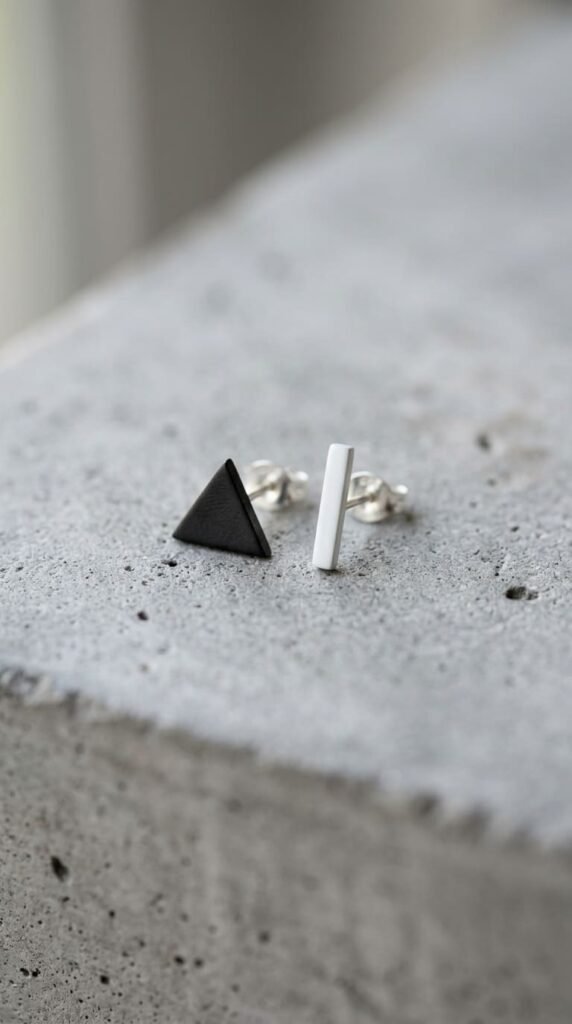
Less is more with minimalist studs. Cut tiny clean shapes like triangles, bars, or small circles. Color them in simple tones, even just black, white, or a single muted shade. Skip the hole, since these are studs. Bake, cool, then glue a flat post to the back. Budget tip: post backs and a sheet of plastic cost only a few dollars and make many pairs. Keep the shapes very small and crisp for that modern, understated look. Sand the back before gluing so the post grips well. Let the glue cure overnight before wearing. Seal the front lightly for a clean finish. These suit everyday wear and pair with any outfit. Because they are so simple, they are quick to batch in one session. Make a set in a single color family for a coordinated capsule look. Mismatched shapes, like a triangle and a bar, give a subtle modern edge. Minimalist studs prove that shrink plastic jewelry can look grown-up and refined, not just playful, all while staying very cheap to make.
19. Initial and Monogram Pendants
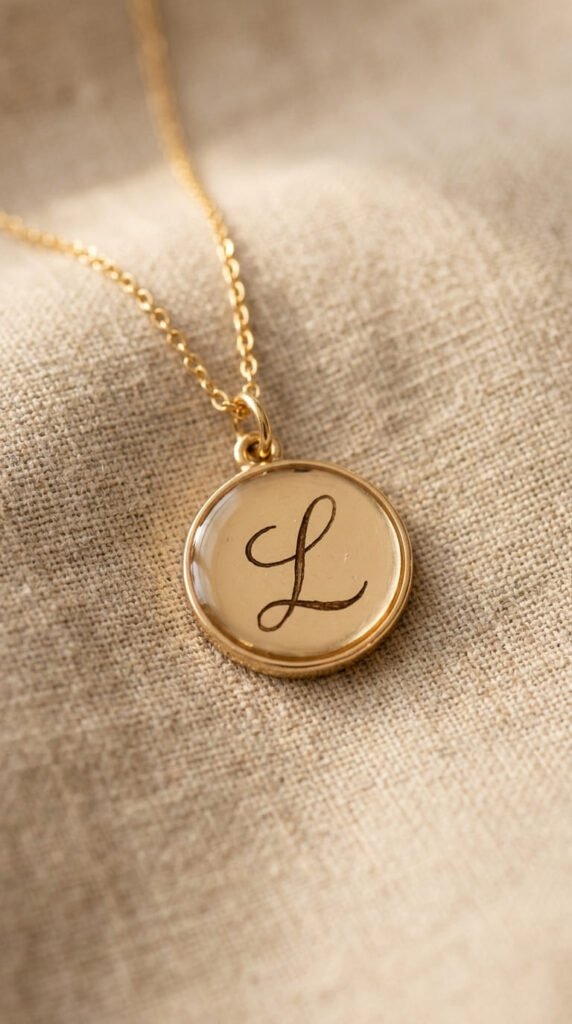
A single initial makes a sweet, personal pendant. Draw a bold letter about three times your final size. Use a clean, thick font so it stays readable after shrinking. Color it solid or outline it. Punch a hole at the top, bake at 325°F, and flatten while warm. Add a jump ring and a chain. Money-saver: one sheet makes initials for your whole family or friend group, so each gift costs pennies. Keep the letter chunky, since thin script can break or blur as the plastic shrinks. Frame it in a circle or heart shape for a finished look. Seal the front so it stays sharp and bright. These are popular, personal gifts that feel custom-made. Make a matching set for siblings or a couple. You can also turn initials into keychains or zipper pulls with the same method. Because the design is simple and meaningful, it suits beginners. Trace the letter from a printed font if drawing freehand feels tricky. A monogram pendant looks like a boutique buy yet costs almost nothing to make at home.
20. Layered Necklace Sets
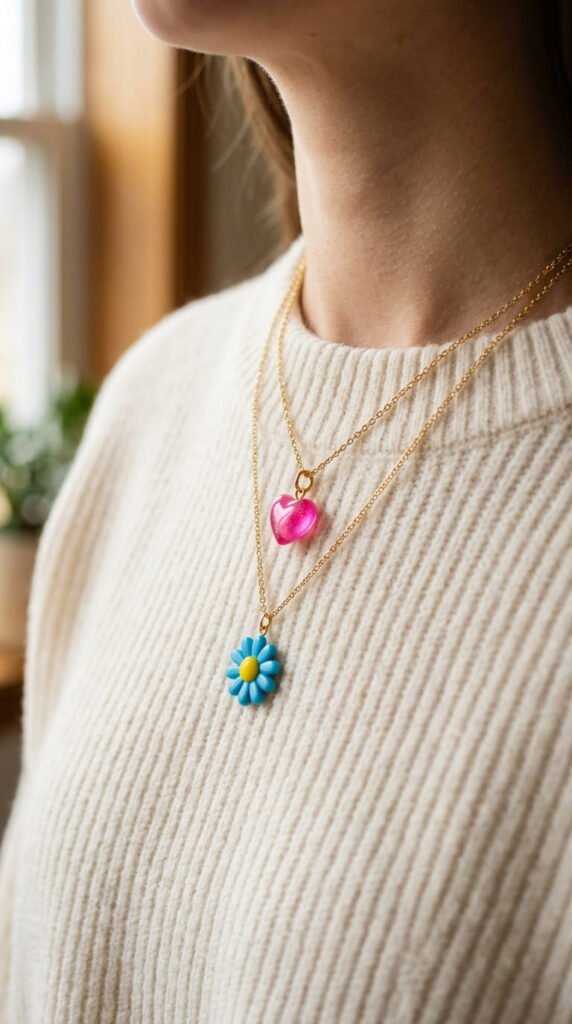
Layering is a stylish way to wear several small charms at once. Make two or three small pendants in matching colors. Punch a hole in each, color, bake, and flatten. Hang them on chains or cords cut to different lengths so they stack nicely on the chest. Budget angle: a roll of cord and one sheet of plastic make a full layered set for a few dollars. Keep the charms small and light so the layers hang well without tangling. Pick a unified theme, like three celestial shapes or three little flowers. Seal each charm so the colors stay bright. Vary the chain lengths by an inch or two so each pendant sits at its own level. This look feels curated and put-together, like something from a jewelry brand. Make the set as a gift, since layered pieces feel thoughtful and complete. Because the charms are tiny, this is a great use for scraps. A coordinated layered set costs a fraction of buying separate necklaces, and you control every color and shape to match your style exactly.
21. Mismatched Earring Pairs
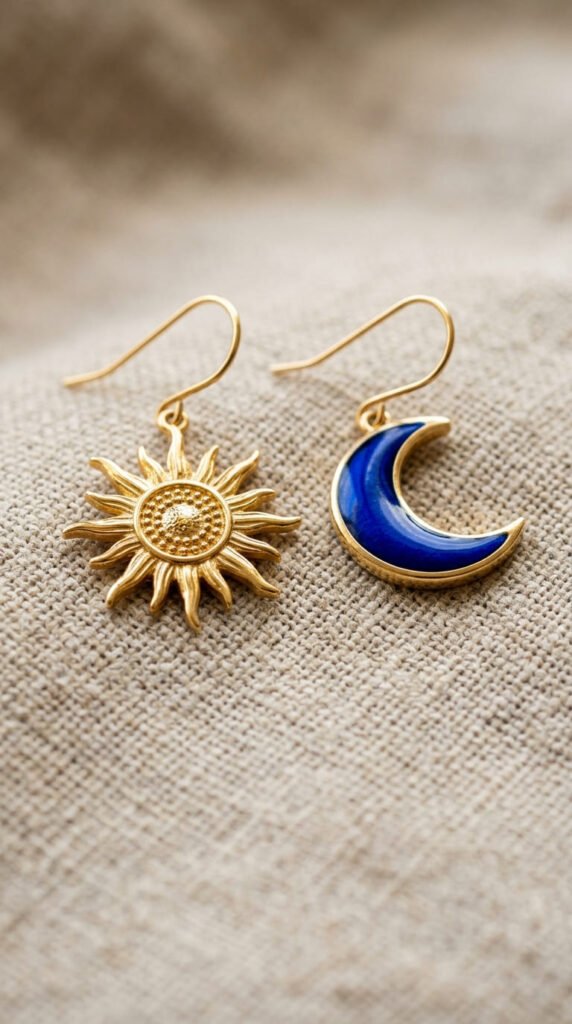
Matching is overrated. Mismatched earrings are a playful, modern trend, and they are forgiving to make. Pick two related shapes, like a sun and a moon, or a cloud and a raindrop. Color them, punch holes, bake, and flatten. Assemble each with its own hook. Money-saver: these use up odd single charms, so nothing goes to waste. The beauty here is that the two pieces only have to relate, not match exactly. That removes the pressure of making a perfect pair. Keep the shapes in the same color family so they still feel connected. Seal the fronts so the colors stay vivid. This style looks intentional and creative, not like a mistake. Make several relating shapes and mix them in different combinations. Because the look celebrates difference, slight variations between the two pieces become a feature, not a flaw. This is a confidence-friendly project for beginners who worry about making two identical earrings. A pair like this costs pennies and adds a fun, conversation-starting twist to any outfit.
22. Faux Stained-Glass Translucent Charms
Translucent #6 plastic glows like little stained-glass windows. Draw a shape with bold outlines, then color the sections in jewel tones, leaving thin clear lines between them like leaded glass. Punch a hole, bake at 325°F, and flatten while warm. Tip: use rich colors like deep blue, purple, and amber, since light shining through makes them even brighter. Budget angle: clear deli lids are a free source of translucent plastic, so this look costs nothing in materials. Keep clear gaps between the colors for that authentic stained-glass effect. Seal the surface to protect the color. These earrings catch the light beautifully as you move. Make them in shapes like flowers, hearts, or simple geometric panels. Because the glow depends on the translucent plastic, save your clear scraps just for these. They look high-end and artistic, perfect for gifts or markets. Pair them with the same idea for hanging suncatchers using leftover pieces. A jewel-toned set costs almost nothing yet looks like real handmade glass jewelry from a craft gallery.
23. Resin-Domed Glossy Earrings
For a finish that looks truly professional, add a resin dome. Make and bake your earring as usual. Once cool, brush or pour a small amount of clear doming resin over the front. The resin self-levels into a smooth, glossy bubble. Let it cure fully, usually around 24 hours. Tip: work over scrap paper and pop any bubbles with a toothpick before it sets. The resin gives a thick, glassy shine and makes simple designs look high-end. Budget angle: a small bottle of resin coats many pieces, so the cost per earring stays low. Keep the earring flat so the resin spreads evenly without dripping off the edges. Add a touch of glitter to the wet resin for sparkle. Seal the design with varnish first so the resin doesn’t smear the marker color. Because resin takes a day to cure, plan ahead. These look like boutique pieces and hold up to daily wear. This step takes a little patience, but it turns a basic charm into a polished, glossy earring worth showing off.
Conclusion
Shrink plastic proves that beautiful jewelry doesn’t have to be expensive. One cheap sheet of #6 plastic stretches into earrings, rings, pendants, and bracelets that look like boutique finds for around $5 a pair. The steps stay the same across every project. Draw three times your final size, color with light tones, punch the hole before baking, then bake at 325°F and press flat while warm. Once you have that rhythm down, the only limit is your imagination. Start with simple studs or a rainbow pair to get a feel for how the plastic shrinks. Then work up to alcohol ink, holographic vinyl, or a glossy resin dome. Most of the hardware, like jump rings, hooks, and posts, costs mere cents in bulk, and you can reuse chains and findings from broken jewelry to spend even less. Best of all, you choose every color and shape, so each piece suits you or the person you are gifting it to. Grab a sheet of shrink plastic and a few markers this weekend, pick one idea from the list, and make your first pair before the oven cools.