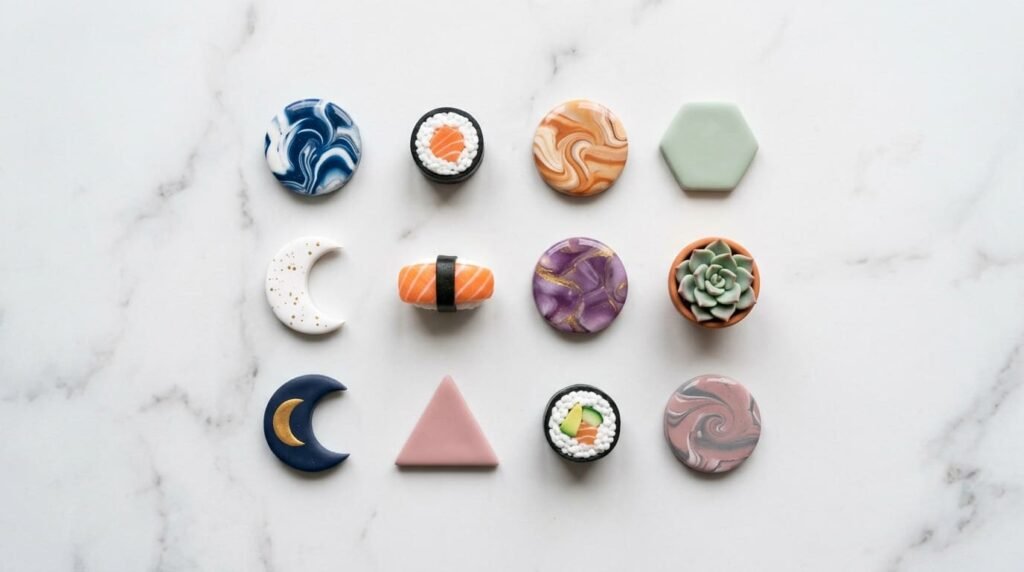
If your fridge looks like a blank wall, clay magnets are the easiest fix — and right now, Pinterest is full of them. From marbled swirl discs to tiny succulents and cozy neutral-tone tiles, aesthetic clay magnets have become one of the most-saved DIY projects online. The best part is that most of these designs cost under $5 to make and take less than an afternoon. Whether you lean toward minimalist Scandinavian vibes, dreamy moon phases, or bold geometric shapes, there’s a style here that fits your fridge perfectly. Here are 24 of the most pinned aesthetic clay magnet ideas you can actually make at home.
1. Marbled Swirl Magnets
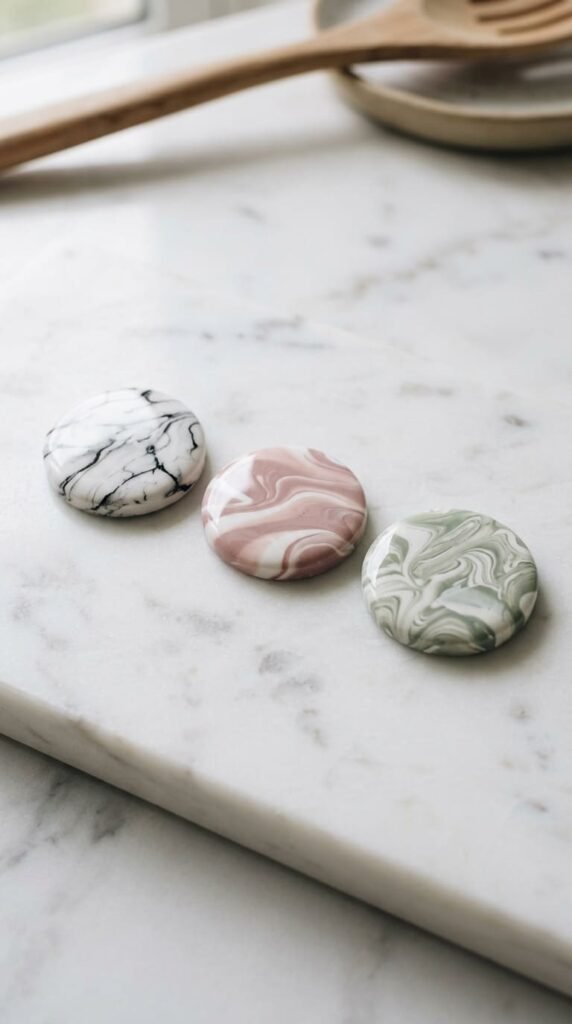
Marbled clay magnets are one of the most saved designs on Pinterest right now — and the effect is much easier to create than it looks.
You don’t need any special tools. The marble pattern comes from the clay itself.
How to get the marble effect:
- Start with 2/3 white clay and 1/3 colored clay
- Twist the two colors together loosely — do not fully mix them
- Fold the twisted log once or twice only
- Roll flat to 5mm thickness
- Cut into circles or squares and bake
Key rule: 2 folds = bold, dramatic veining. 3–4 folds = subtle, fine marble. More than that and the colors fully merge.
Classic color pairings that look expensive:
- White + black
- White + dusty rose
- White + sage green
- Cream + terracotta
After baking, seal with a gloss finish to make the marble pattern pop. Matte sealer softens the look if you prefer something quieter.
These work on any fridge but look especially good in kitchens with stone countertops or white tile.
Budget tip: A small block of black and a small block of white polymer clay are all you need — about $4 total — to make 8–10 marble magnets.
2. Neutral Tone Geometric Tiles
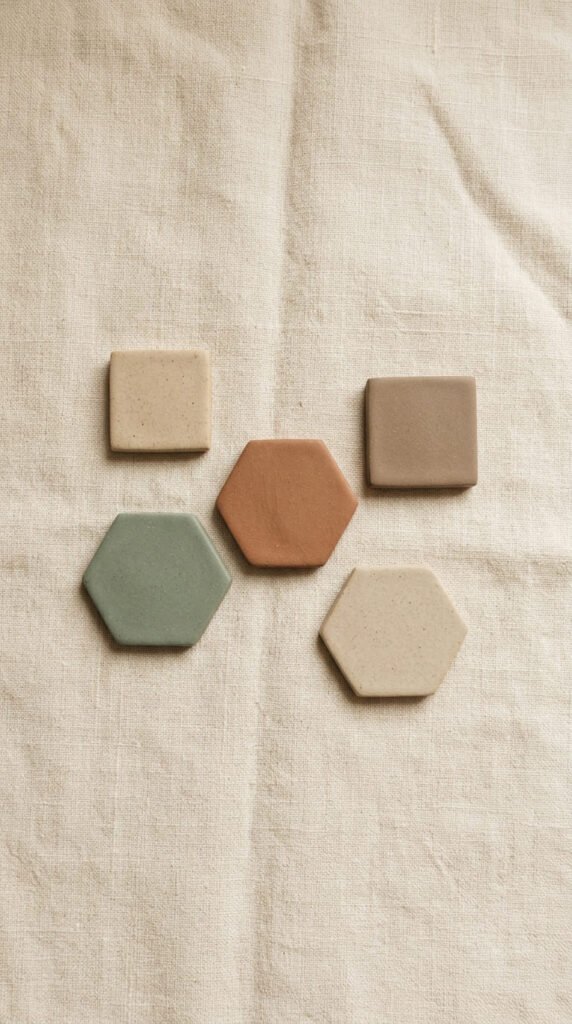
Neutral clay magnets are one of the biggest aesthetic trends heading into 2025, and geometric tile shapes are the most-pinned version of this look.
The appeal is simple: they match almost every kitchen and feel intentional without being loud.
Best neutral color palette:
- Oatmeal / warm white
- Clay brown / terracotta
- Mushroom grey
- Dusty sage green
- Warm taupe
To achieve these tones, mix a tiny bit of brown or grey into your base color. Don’t over-mix — you want soft, slightly imperfect tones, not flat paint-like color.
Shape ideas:
- Small hexagons (use a pencil cap as a cutter)
- Thin rectangles
- Irregular rounded squares
Roll clay to 1/4 inch thickness, cut shapes with small cutters or a craft knife, then bake at 275°F for 15 minutes.
The surfaces should stay smooth and matte — skip the gloss sealer and use a matte acrylic sealer instead.
Arrange a set of 6–8 different shapes in 3–4 complementary neutral tones. Displayed together on a fridge, they look like something from a boutique home store.
Budget tip: Mix your own neutral tones from white + small amounts of brown and grey — no specialty clay needed.
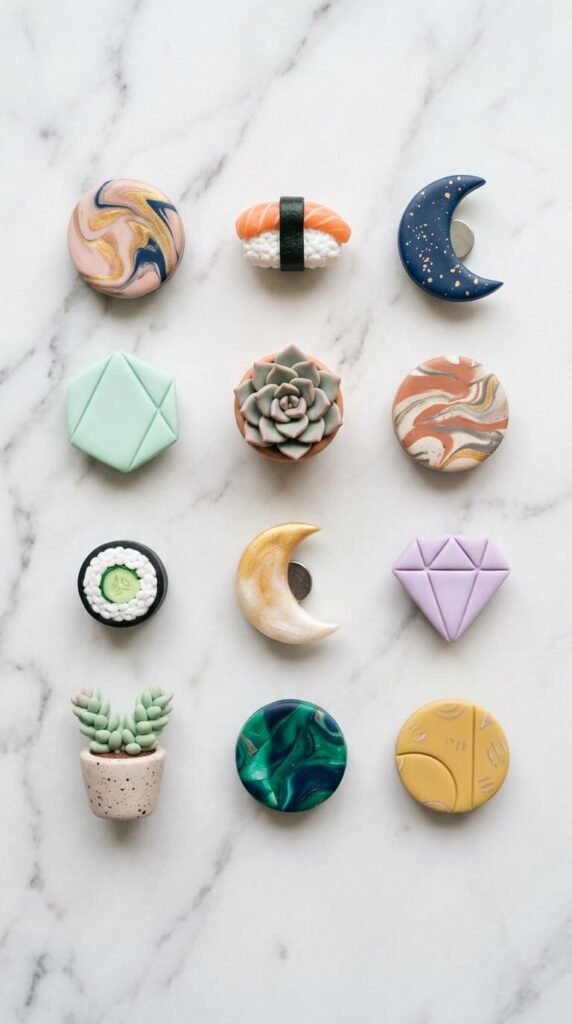
3. Minimalist Moon Phase Set

Moon phase magnets are a mystical, under-covered aesthetic that looks striking on a fridge or magnetic board.
The shapes are all just variations of a circle with sections removed — which makes them surprisingly beginner-friendly.
How to make the 8 phases:
- Roll white clay and cut 8 equal circles with a bottle cap or round cutter
- For crescent phases, press a second slightly smaller circle cutter into the edge to cut away a curve
- For gibbous phases, remove a smaller section
- Leave the full moon circle intact
- Bake all pieces together at 275°F
After baking, seal with a pearlescent white or silver paint wash — brush it on thinly and wipe back, leaving a subtle shimmer on the surface.
Display all 8 phases as a complete horizontal set, packaged in a kraft box if you’re gifting them.
You can also make a personalized version by highlighting the moon phase for someone’s birth date — add a small gold dot under that phase.
Color variations:
- Classic white
- Soft gold
- Matte black for a dramatic look
Budget tip: One block of white polymer clay makes two complete moon phase sets.
4. Pastel Floral Bouquet Magnets
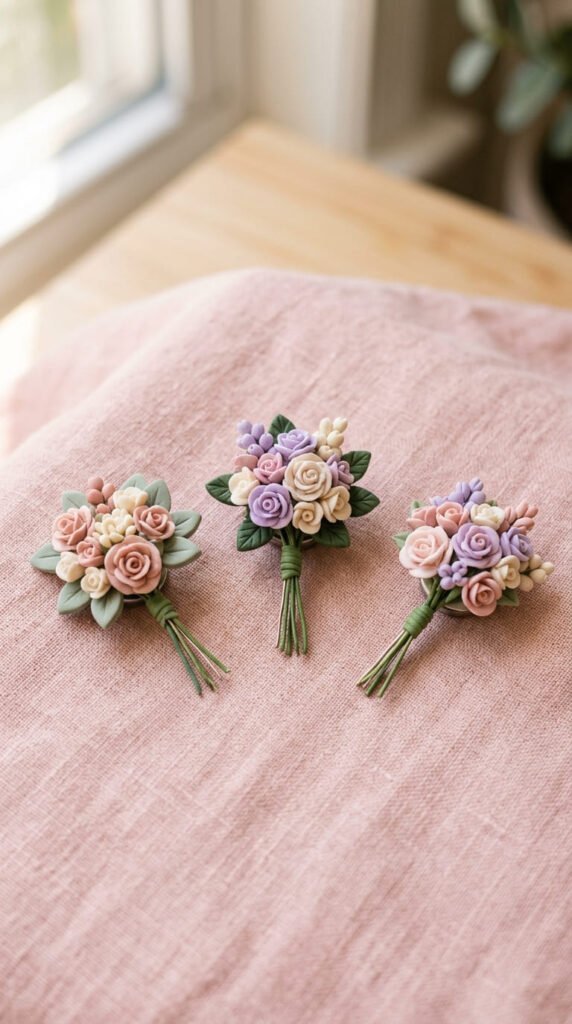
Pastel floral magnets sit right at the intersection of the girly craft aesthetic and classic Pinterest home decor — which is exactly why they save so well.
The key is grouping 3–5 small flowers together as one magnet rather than making single blooms.
Simple petal method:
- Roll small teardrop shapes in pastel clay
- Arrange 5 teardrops in a circle, thin ends pointing inward
- Press a small ball into the center
- Add 2 tiny leaf shapes at the base
- Flatten the whole piece slightly before baking
Best pastel color combinations:
- Blush pink + cream + sage
- Lavender + soft white + mint
- Dusty peach + pale yellow + soft green
After baking, add a light gloss coat to make the petals look fresh.
For a more polished result, dry-brush a slightly lighter shade of each petal color on the raised edges — this creates subtle depth without any painting skill.
These are great for gift sets: make 3 bouquets in different color families, arrange in a small white box.
Budget tip: Flower petals are small — use clay scraps left over from other projects rather than opening a new block.
5. Tiny Sushi Roll Magnets
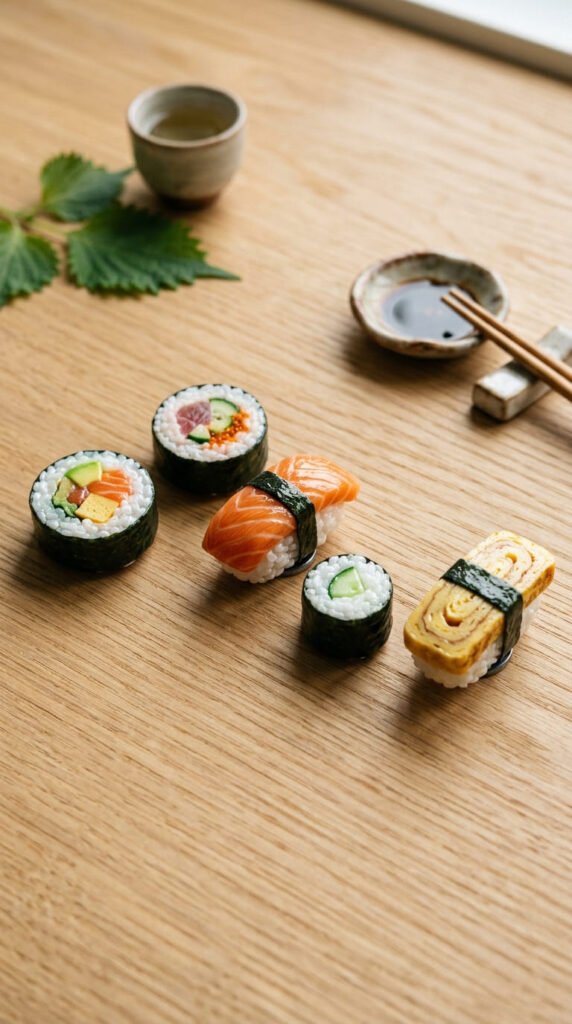
Sushi magnets are consistently one of the most searched and saved clay magnet designs online, especially for anyone who leans into the cozy Scandinavian or Japanese aesthetic.
The shapes are basic — cylinders and small rectangles — but the color contrast is what makes them look so satisfying.
Core sushi shapes:
- Maki roll — white cylinder wrapped in black clay, sliced to show cross-section
- Nigiri — white oval with a flat colored topping pressed on top
- Tamago — yellow rectangle with a thin black strip around the middle
Use true contrasting colors for realism: white for rice, black for nori, orange or pink for salmon, yellow for egg.
After baking at 275°F, seal with a high-gloss finish — the shine makes the colors look vibrant and the food look almost real.
Group 5–6 different sushi pieces and arrange them on a small dark tray or in a mini bento-style box for gifting.
These also look great displayed together on a white or steel fridge — the contrast between the dark nori and white rice pops beautifully.
Budget tip: Use scraps from earlier projects for rice and nori colors — white and black clay go a long way.
6. Faux Gemstone Magnets
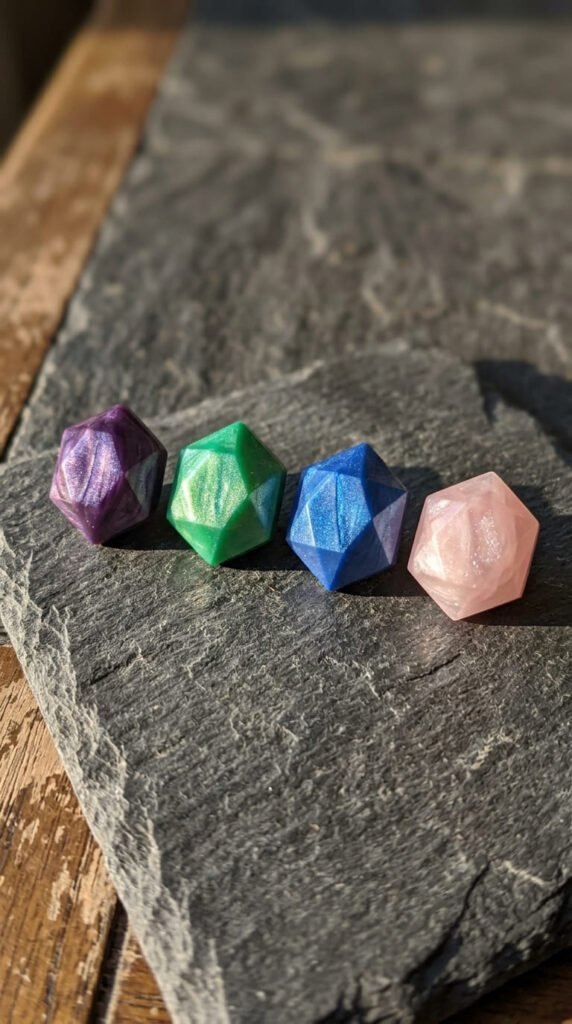
Faux gemstone magnets are one of the most under-covered aesthetic designs right now, which makes them stand out instantly on any fridge.
They look expensive and complex but require no special skill — just clever painting.
Shaping the gemstone:
- Form a rough octagon or irregular hexagon from clay by hand
- Use a flat tool or the edge of a ruler to press flat angled faces into the surface
- Each face should be a distinct flat plane meeting at a sharp edge
- Bake and cool completely before painting
Painting the gem effect:
- Apply a solid base color (purple, green, blue, deep red)
- While slightly tacky, add a touch of pearlescent or metallic paint in a lighter shade of the same color
- Dry-brush gold or silver along the raised edges to mimic light reflecting off facets
Seal with high-gloss finish to complete the illusion.
Package a set of 4–6 different “gemstones” in a small velvet pouch — they look like something from a boutique crystal shop.
Great colors: amethyst purple, emerald green, sapphire blue, rose quartz pink, deep ruby red.
Budget tip: Pearl-finish acrylic paint transforms basic clay into something that looks luxury — a $3 bottle covers dozens of magnets.
7. Cozy Mushroom Magnets
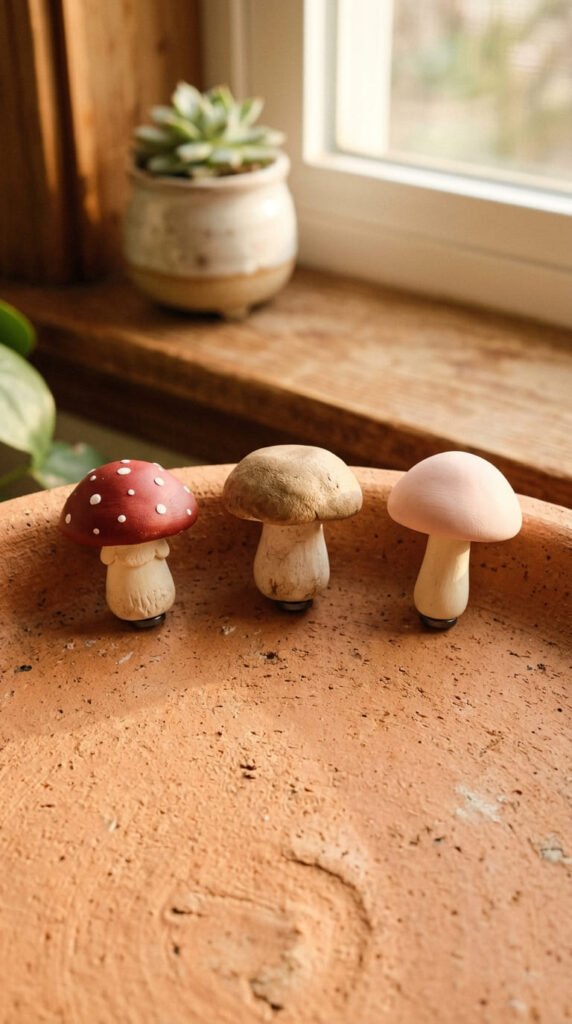
Mushroom magnets are having a real moment right now, driven by the 2025 trend toward organic shapes, earthy tones, and cozy cottagecore aesthetics.
They’re also one of the most beginner-friendly 3D clay shapes to make.
Basic mushroom construction:
- Shape a short, thick cylinder for the stem — slightly wider at the base
- Press a domed cap shape on top — a slightly flattened sphere works perfectly
- Join the two pieces and smooth the seam
- Keep the whole magnet under 3/4 inch tall so it sits flush enough for a magnet back
Classic red cap with white dot spots is always popular. But earthy tones are trending harder right now:
- Warm beige cap with a cream stem
- Deep brown with an oatmeal underside
- Blush pink for a more whimsical look
After baking, paint the underside of the cap with a slightly lighter tone to add depth.
Make a set of 3 different mushroom styles and gift them together — they pair beautifully with the succulent and leaf magnet designs.
Budget tip: Mushrooms use very little clay — a single small block makes 8–10 complete mushroom magnets.
8. Rustic Wood-Texture Magnets
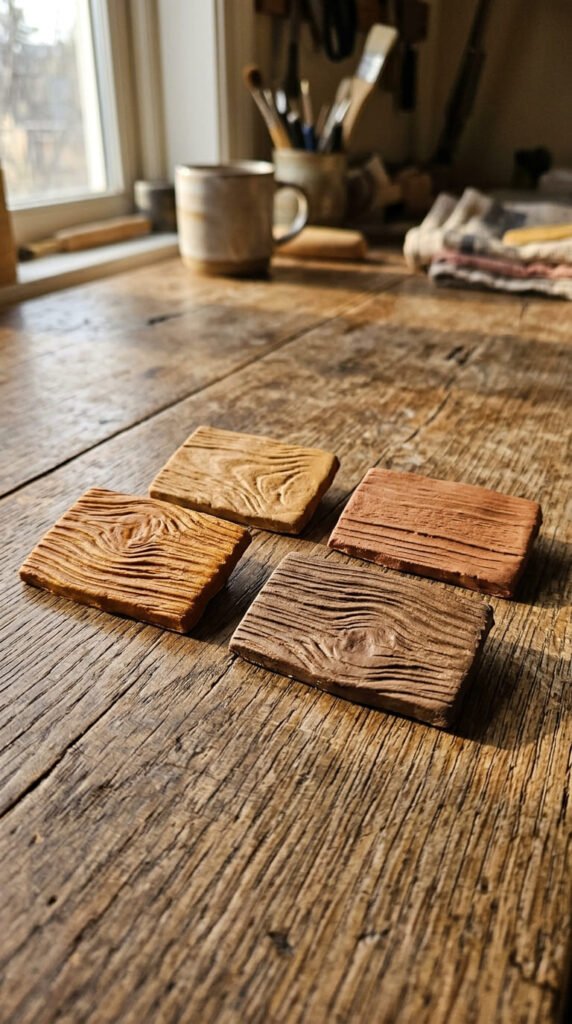
Wood-texture clay magnets have a rustic, earthy quality that fits perfectly into farmhouse, cottagecore, and cozy minimalist kitchen aesthetics.
The texture itself is the design — which means no painting skill is required.
How to get wood grain texture:
- Roll out tan or warm brown clay to 1/4 inch thickness
- Press a real piece of rough wood firmly into the surface and peel it off carefully
- Or use a stiff-bristled brush, dragging it in one direction across the surface
- Cut into rectangular tiles
The impressed grain lines create a realistic wood-like surface that bakes permanently into the clay.
After baking, use the dry-brush technique with a slightly lighter tan to highlight the raised grain lines — this makes the texture pop dramatically.
Finish with a matte sealer to keep the natural wood look. Gloss finish on this design feels out of place.
These look especially good arranged in a horizontal row of 4–5 tiles on a fridge with a farmhouse or white-shaker kitchen aesthetic.
They’re also great gift tiles for someone who loves rustic home decor — simple, handmade, and genuinely interesting to look at up close.
Budget tip: Brown polymer clay is one of the cheapest colors available — around $2 per block.
9. Black and White Minimalist Magnets
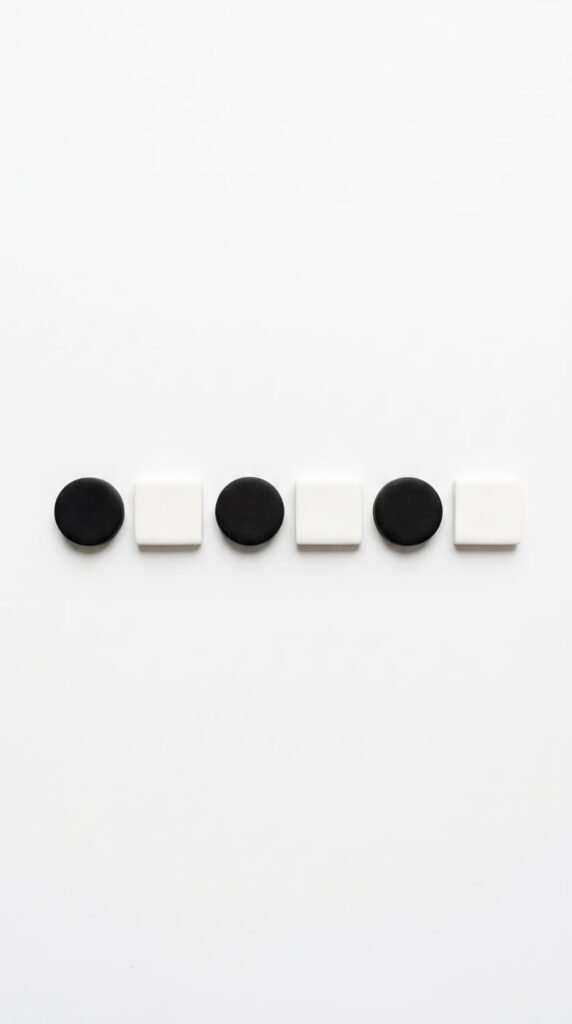
Black and white clay magnets are a classic aesthetic that never dates — and they look striking on any fridge color.
The design philosophy here is maximum simplicity. No texture, no extra colors, no painted details.
What makes these work:
- Perfectly smooth surfaces (use wet fingers to remove any fingerprints before baking)
- Clean, precise edges (use small metal cutters for consistency)
- Matching sizes across all pieces in a set
Shape ideas for a black and white set:
- Alternating circles — solid black, solid white
- Thin rectangles in both colors
- Small squares with rounded corners
- Abstract asymmetric blobs for a softer look
The impact comes from displaying them as a curated group — 6 to 8 pieces in a mix of shapes creates a gallery-wall effect on your fridge.
These are also one of the easiest designs to make because the clay color is the whole aesthetic — painting is optional.
After baking, seal with a matte finish to keep the sophisticated, gallery-art feel. Gloss on black and white looks slightly cheap.
Budget tip: Black and white polymer clay are the most widely available and affordable colors — usually $1.50–2 per block.
10. Tiny Succulent Rosette Magnets
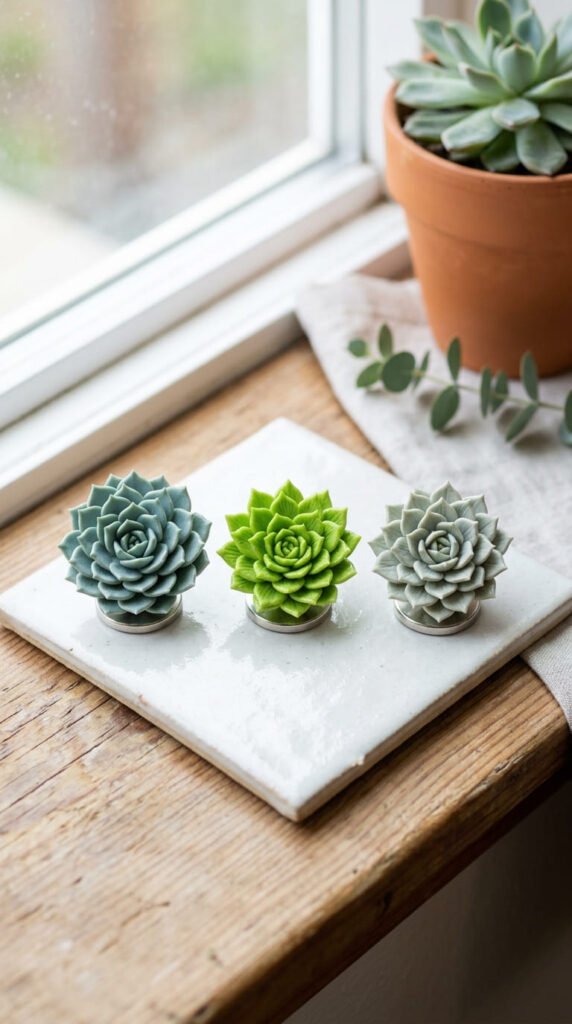
Succulent magnets combine two things people can’t stop pinning: plants and clay crafts. They look like a miniature garden that never needs watering.
The rosette shape is repetitive and structured, which makes it actually easier to get right than organic freeform shapes.
How to make a succulent rosette:
- Roll small teardrop-shaped petals — make about 12–15 per flower
- Start from the center: press 3–4 small petals together standing slightly upright
- Add a second ring of slightly larger petals around them, angled outward
- Add a third outer ring with the largest petals, lying almost flat
- Flatten the base and bake as a single unit
Color ideas:
- Dusty blue-green (echeveria style)
- Bright lime green (haworthia style)
- Pale grey-green (ghost plant style)
Use two shades of each color — lighter tips on each petal add realism.
After baking, a light gloss coat makes the succulent look alive and healthy.
Budget tip: Succulent petals are tiny — a single $2 block of green clay makes 4–5 full rosette magnets.
11. Charcuterie Board Magnets
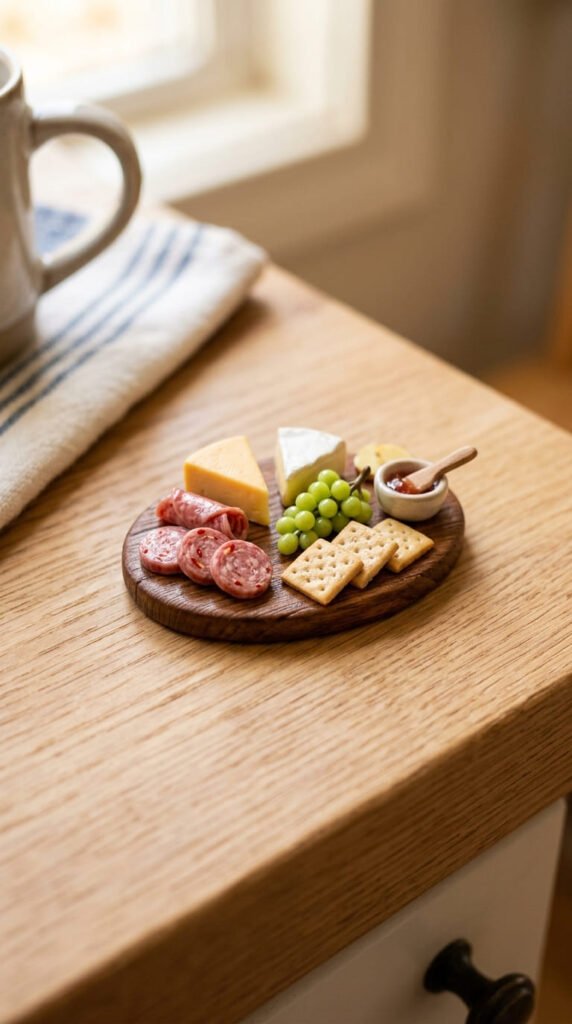
Charcuterie board magnets are a miniature food trend that’s almost entirely under-covered in the DIY clay magnet space — making them a design that genuinely surprises people.
Instead of individual food pieces, you make a tiny board with everything on it as one magnet.
What to include on a mini charcuterie board:
- Small wedge of yellow cheese
- Thin rolled salami circles
- Tiny grape cluster (small balls of purple clay bunched together)
- Small brown cracker rectangles
- A few red berry dots
The board itself is just a small oval of tan or light brown clay, textured with a toothpick to look like wood grain.
Arrange all the food elements on top of the unbaked board, press gently to attach, then bake the whole piece together as a unit.
After baking, add painted details — a slight sheen on the grapes, a darker border around the cheese — for a more realistic look.
Seal with a gloss finish to make the food look appetizing.
These are perfect gifts for food lovers, entertaining enthusiasts, or anyone who posts their charcuterie spreads online.
Budget tip: Use food-color-appropriate clay scraps from other food magnet projects — you need very little of each color.
12. Abstract Color-Block Magnets
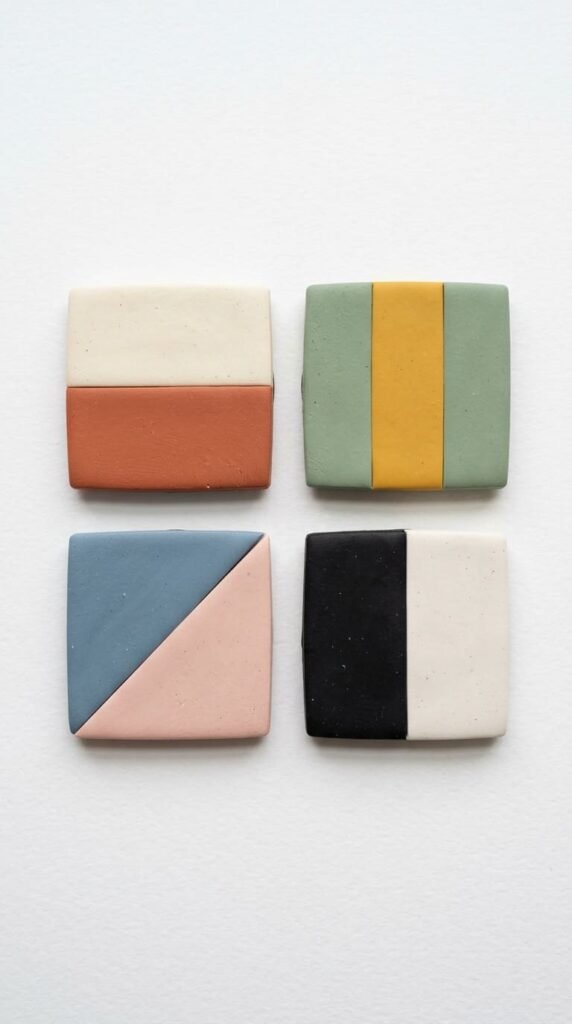
Abstract color-block magnets are a modern art-inspired design that looks much more intentional and considered than most clay magnet styles.
They’re made by pressing two or three clay colors together in clean sections without mixing.
How to make clean color blocks:
- Roll two colors of clay to the same thickness
- Cut straight edges on each piece
- Press them firmly together along the cut edge — no blending
- Roll gently once to fuse them, then cut your final shape from the joined slab
The line between colors should be clean and sharp. If it blurs, you’ve pressed too hard.
Color combinations that work:
- Terracotta + cream
- Mustard yellow + sage green
- Dusty blue + blush pink
- Black + off-white
Cut into squares, circles, or abstract organic shapes after joining the colors.
Bake, cool, and seal with matte finish — this is a design where the clean color relationship is everything, so the surface should stay flat and smooth.
These look best displayed as a curated set of 4–5 in complementary pairings.
Budget tip: Use the offcut pieces from other projects — even small pieces of two different colors are enough for one abstract block magnet.
13. Vintage Key Magnets
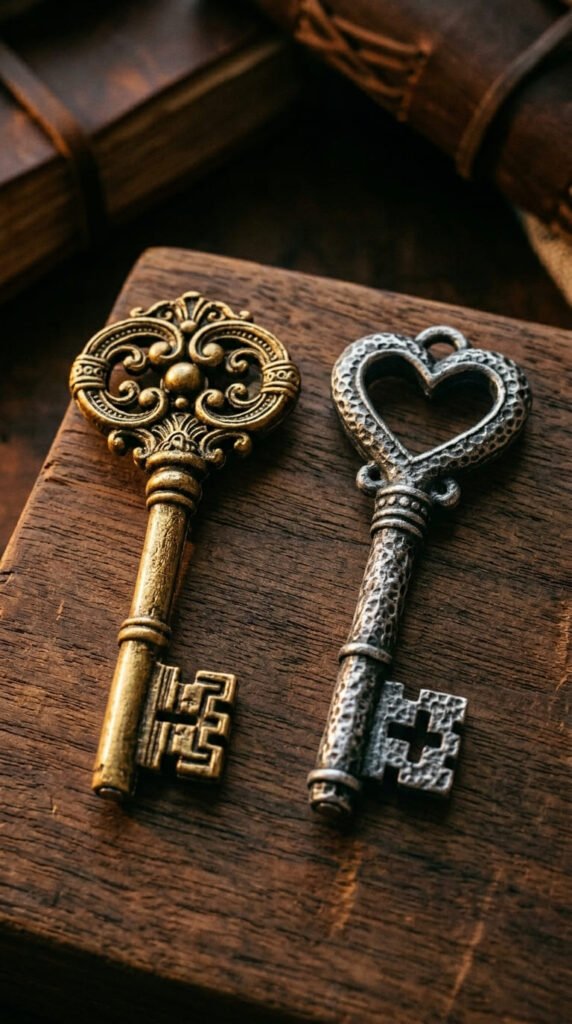
Vintage key magnets are one of the most unique clay magnet aesthetics out there — and almost nobody is making them, which makes them genuinely stand out.
The shape looks complex but breaks down into simple parts.
Key anatomy to sculpt:
- Bow (top loop) — use a round cutter or form a loop by hand
- Shaft — a straight thin log of clay
- Bit (bottom teeth) — small notched cuts at the end
Press decorative details into the bow — scrollwork, a small heart cutout, or a diamond shape — using a toothpick or the tip of a knife.
Flatten the whole key to about 3mm thick before baking so it sits flat against the fridge.
The painting step is everything:
- Base coat the whole key in dark brown or dark grey
- Dry-brush gold or antique silver over the surface — use a stiff brush with barely any paint, dragged lightly
- The raised details catch the metallic color while recessed areas stay dark
Finish with a matte sealer to keep the antique look.
Budget tip: Any neutral-colored clay works as the base — the metallic paint is doing all the work. A small tube of gold acrylic costs about $2.
14. Pastel Rainbow Arch Magnets
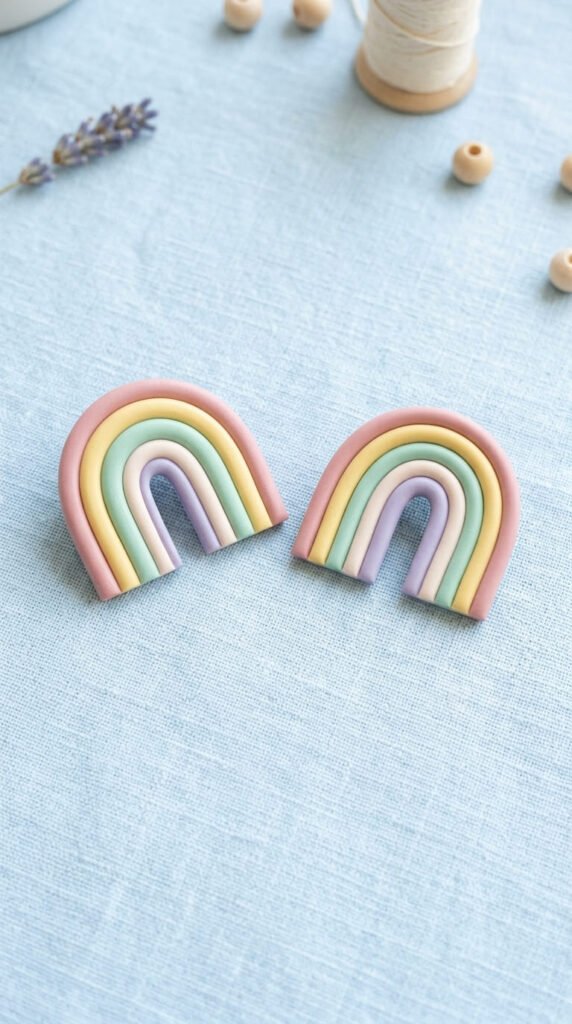
Pastel rainbow magnets are one of the most consistently saved clay magnet designs on Pinterest, and the pastel version looks far more sophisticated than bright primary colors.
The arch is built by layering thin clay logs in rainbow order.
Step by step:
- Roll thin logs of pastel clay — dusty pink, soft yellow, mint, lavender, pale blue
- Curve each log into a gentle arch shape
- Layer them from largest (outermost) to smallest (innermost), pressing each gently against the one below
- Press the whole assembly flat onto a surface and bake as a unit
Keep the arcs tight together — gaps between colors look unfinished.
The bottom two ends of the arch should be flat so the magnet sits evenly when displayed.
Use a matte sealer for a soft, dreamy finish rather than glossy.
These work as standalone magnets or paired with a matching white cloud magnet for a “rainbow and clouds” set.
Color variations:
- Classic pastel ROYGBV
- Earth tones (terracotta, tan, cream, sage)
- Monochrome gradient (5 shades of pink, lightest to darkest)
Budget tip: Pastel multi-packs of polymer clay often cost under $10 and include 10–12 colors — enough for 20+ rainbow magnets.
15. Cozy Cottagecore Mushroom and Flower Set
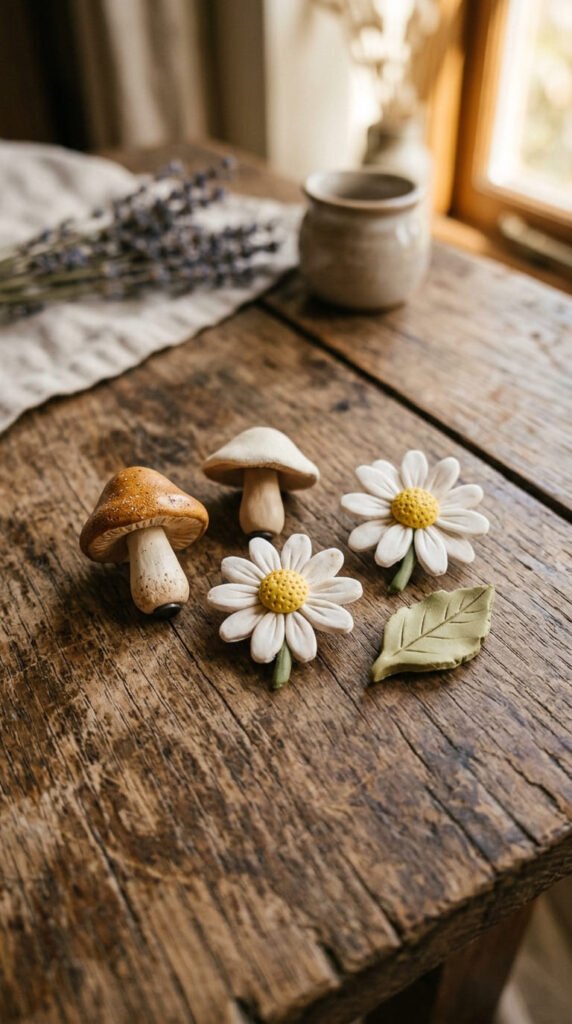
The cottagecore aesthetic is all about organic shapes, earthy tones, and a slightly imperfect handmade quality — and a mushroom-and-flower magnet set embodies all of that.
The appeal of making these as a set is that they tell a visual story together on the fridge.
What to include in the set:
- 2 mushrooms in different sizes and cap colors
- 2 small daisy or wildflower shapes
- 1–2 leaf shapes to fill gaps
Keep the shapes slightly irregular — perfect symmetry works against the cottagecore feel. Let the petals be a little uneven. Let the mushroom cap tilt slightly.
Color palette to stay on-brand:
- Warm brown, cream, dusty rose
- Soft green, blush white, tan
- Muted terracotta, sage, off-white
Use a matte sealer on everything — gloss finish breaks the earthy naturalistic mood.
These are excellent gifts for people who love nature, botanical aesthetics, or anyone who uses words like “hygge” to describe their home.
Present the complete set in a small kraft paper box with dried flowers as filler.
Budget tip: The whole set uses very little clay — one block each of brown, white, and green covers the entire collection.
16. Neutral Tone Leaf Magnets with Real Texture
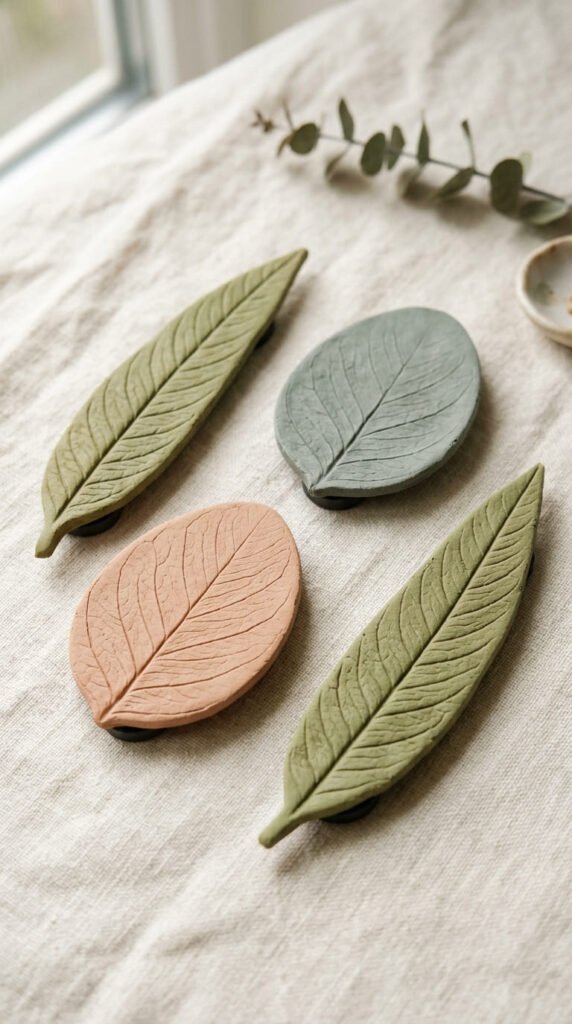
Leaf-shaped clay magnets using real leaves as texture molds are one of the most satisfying projects in this whole space — and the results look genuinely impressive.
Real leaves give a level of vein detail that no stamp can replicate.
Method:
- Roll out clay to 1/4 inch thickness
- Place a real leaf vein-side down onto the clay surface
- Press firmly all over with your fingers, then peel the leaf off slowly
- Cut around the leaf outline with a small knife
- Curl the edges very slightly upward before baking for a more natural look
Best leaves to use:
- Eucalyptus (oval, fine veins)
- Monstera (dramatic shape)
- Oak (distinctive edge)
- Herb leaves like sage or bay (small and detailed)
After baking, paint in earthy botanical tones — two shades of green, or even a terracotta or burgundy for autumn style.
Seal with matte finish.
These look beautiful in a row of 5–6 different leaf types on a white fridge.
Budget tip: Leaves are completely free. Use clay in an earthy neutral tone so even unpainted leaves look intentional.
17. Starry Night Sky Magnets
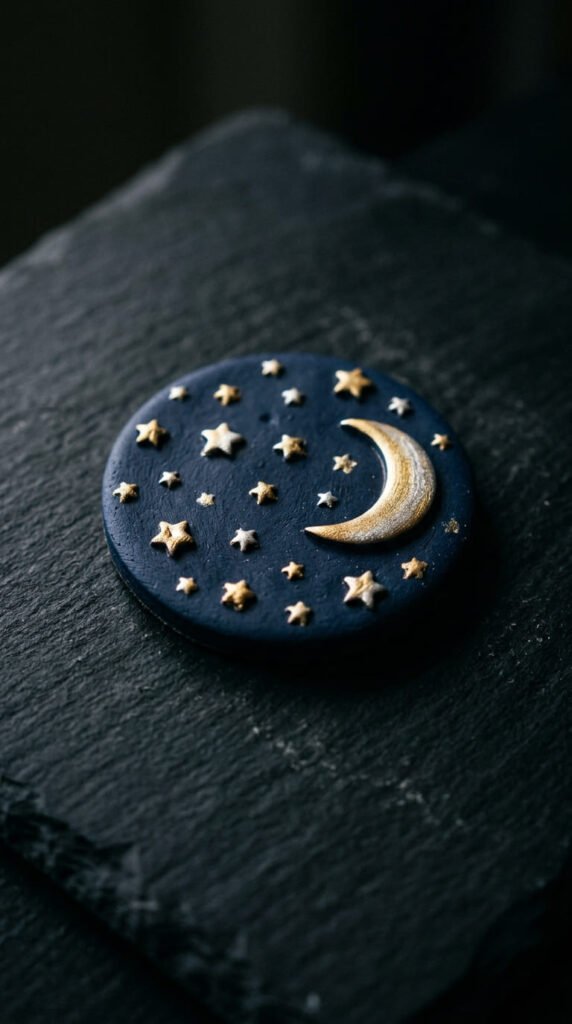
Starry night magnets bring a mystical, atmospheric quality to fridge decor — and they pair perfectly with the moon phase magnets for a complete celestial display.
The dark background + metallic stars combination is what makes these feel special.
How to make them:
- Roll out dark navy blue or black clay and cut into circles
- Use the back of a pencil or a small ball tool to press tiny star dot impressions across the surface in a scattered pattern
- Press a small crescent moon shape onto one side
- Bake and cool
Painting the stars:
Use a dry-brush of gold or silver metallic paint — barely any paint on the brush, dragged lightly so only the raised star dots catch the color.
The background stays dark. The stars glow.
Add a few extra-bright stars using a dotting tool dipped in bright metallic paint for focal points.
Seal with matte finish over the background but brush a tiny amount of gloss over just the star dots for extra sparkle.
These work as standalone magnets or as part of a full celestial set with moon phases, suns, and planets.
Budget tip: Dark blue and black clay are inexpensive basics — and gold metallic paint does all the heavy lifting aesthetically.
18. Kawaii Cat Face Magnets
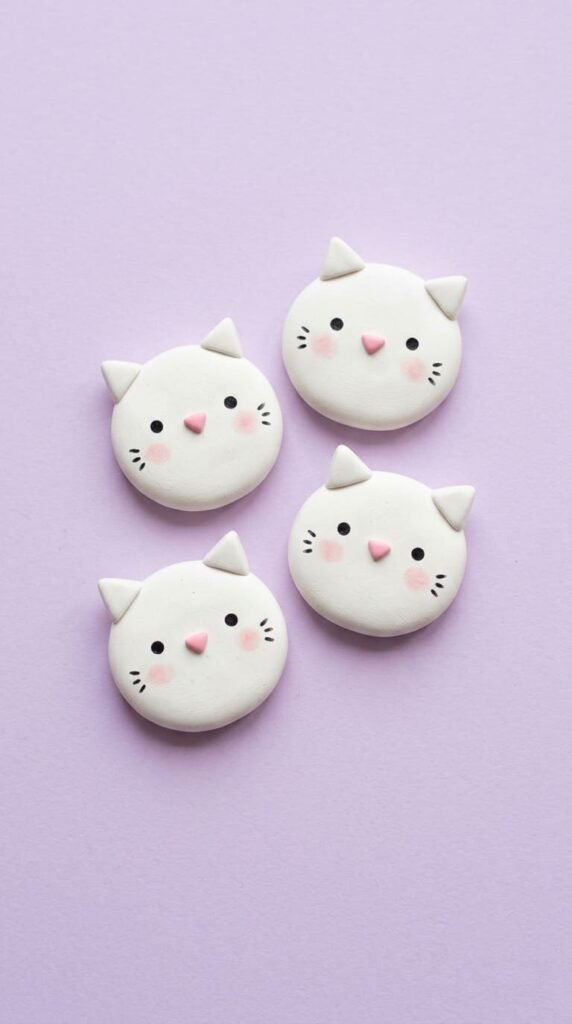
Kawaii cat face magnets are one of the most consistently engaged-with clay magnet designs across Pinterest and TikTok, and they come together in under an hour.
The kawaii style is defined by simplicity — two dots for eyes, a tiny nose, that’s it.
How to make a kawaii cat:
- Roll a round disc of white or pastel clay
- Press two small triangular ear tabs on top before baking — blend them in slightly
- Bake at 275°F for 15 minutes
- After cooling, paint a tiny black dot for each eye and a small pink or black triangle nose
- Add 3–4 tiny whisker dots on each side with a fine brush
- Dab soft pink blush circles on each cheek
Color variations:
- Classic white cat
- Grey tabby (add thin stripe lines with a fine brush)
- Black cat with green eyes
- Orange cat with copper tone clay base
Seal with matte finish — gloss on kawaii designs looks slightly plasticky.
These are popular gifts for cat lovers, teens, and anyone who keeps their aesthetic on the cuter side of life.
Budget tip: White polymer clay is the cheapest and most common color — a single block makes 10–12 cat face magnets.
19. Organic Abstract Blob Magnets

Organic blob-shaped magnets are one of the most aesthetically on-trend designs for 2025 — and they’re also the easiest shape to make because imperfection is the whole point.
No cutters needed. No symmetry required.
How to make them:
- Take a small piece of clay and press it flat with your palm
- Pinch and push the edges into an irregular organic shape — some areas rounder, some with slight indentations, no sharp corners
- Smooth the surface gently
- Bake
The shape should feel like something that could exist in nature — a smooth river stone, a soft cloud, a beach pebble.
Color palette that makes these look intentional:
- Terracotta
- Dusty mauve
- Warm cream
- Olive green
- Slate blue
Keep each magnet a solid single color — the shape is the design, and adding patterns distracts from it.
Seal with matte finish only. Gloss on organic shapes breaks the natural feel completely.
Display a set of 5–7 in complementary tones arranged loosely on a fridge — they look like a curated natural object collection.
Budget tip: These use barely any clay — small offcut pieces from other projects are perfect.
20. Iridescent Heart Magnets
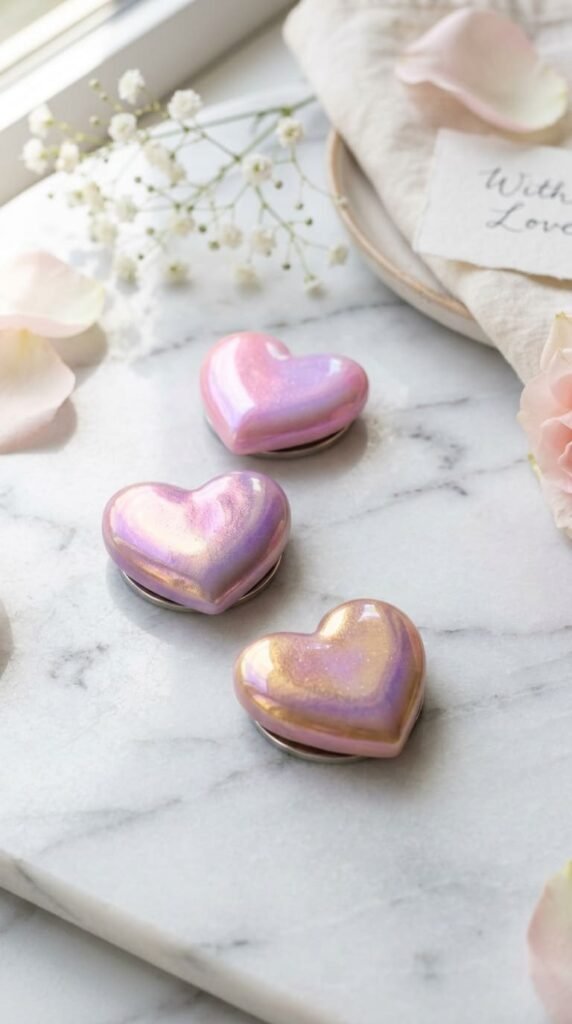
Iridescent heart magnets are a step above the standard heart magnet — the color-shifting finish is what makes them look premium and intentional.
The iridescent effect comes from mica powder, not from the clay itself.
How to get the iridescent finish:
- Make a smooth heart shape from white or pale clay
- Bake and cool completely
- Apply mica powder or chameleon pearl powder directly onto the surface with a soft dry brush — no sealer underneath
- The powder adheres to the clay surface naturally
- Seal with a gloss topcoat to lock it in
The result shifts between pink, violet, gold, or teal depending on the angle and light.
Powder color options:
- Pink-to-gold shift
- Purple-to-blue shift
- Green-to-gold shift (holographic style)
Start with a light-colored clay base — mica powder over dark clay loses most of its effect.
These look stunning packaged in a small black or white gift box where the shifting color catches attention immediately.
Budget tip: Mica powder is sold in small sample packs for about $3–5 and covers dozens of magnets.
21. Scandinavian Minimalist Food Magnets
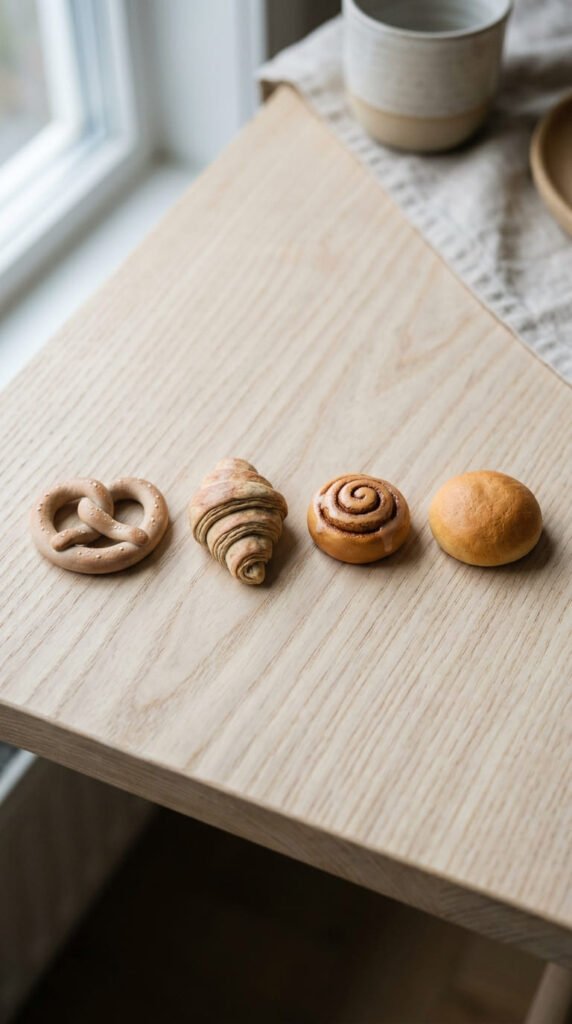
Scandi-style food magnets take the miniature food trend and strip it back to something quieter and more refined.
The difference from regular kawaii food magnets is tone and restraint — realistic colors, matte finishes, no face expressions, no bright colors.
Food items that work in Scandi style:
- Croissant (warm tan, subtle layered texture)
- Cinnamon roll (soft caramel spiral)
- Pretzel (pale brown with a slight matte shine)
- Simple round bread roll
Shape each piece with gentle, slightly simplified forms. The croissant doesn’t need to be perfectly realistic — just recognizable.
For texture, use a toothpick to drag fine lines across pastry surfaces before baking to suggest layering or scoring.
After baking, paint with earth-tone washes — waterdown acrylic in warm browns and tans — to add gentle depth without bright color.
Seal with matte finish.
These look excellent on a white fridge in a clean, Nordic-inspired kitchen. They’re also one of the most sophisticated gift options in the whole clay magnet space.
Budget tip: Warm tan and brown clay are cheap basics — both available for about $2 per block.
22. Tiny Cactus Landscape Magnets
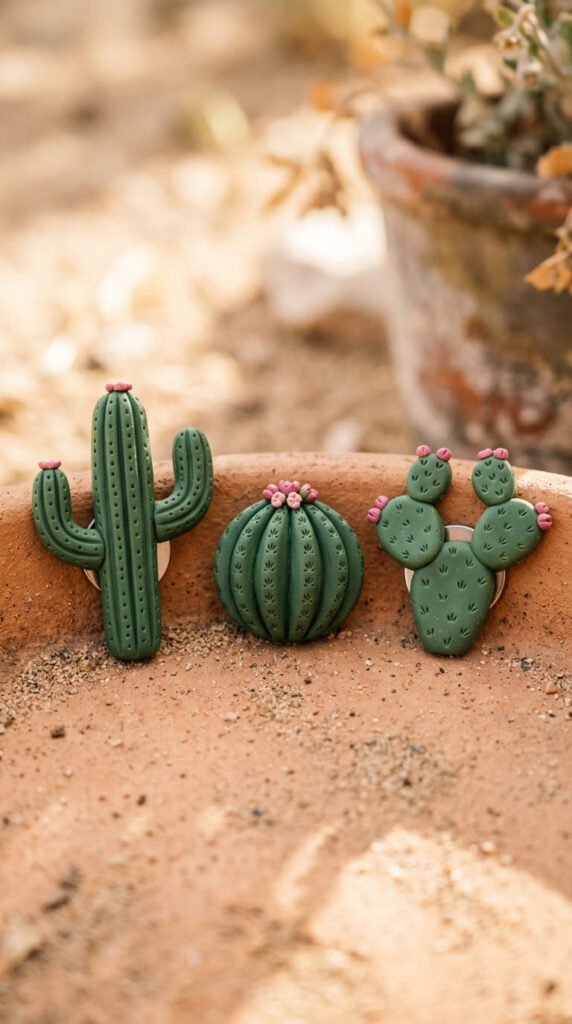
Cactus magnets lean into the desert aesthetic that’s been a Pinterest staple for years — but a landscape-style arrangement of 3 different cactus types together as one set feels more considered than a single shape.
Three cactus types to make:
- Saguaro — tall cylinder with two curved arm cylinders attached
- Barrel cactus — short round sphere with vertical rib lines scored in with a toothpick
- Prickly pear — flat oval pads stacked in clusters
For spines, press small white clay dots onto the surface before baking, or use a stiff brush to press tiny marks into the surface.
After baking, paint with two shades of green — a darker base and a lighter highlight dragged up the ribs with a dry brush.
Add tiny pink or orange clay dots before baking to suggest flowers — a small detail that makes the design feel complete.
Seal with matte finish.
These make a natural gift set for desert landscape lovers, Southwest aesthetic fans, or anyone with a succulent collection.
Budget tip: Green clay is inexpensive and goes far — a single block handles all three cactus types in one set.
23. Pressed Flower Print Magnets
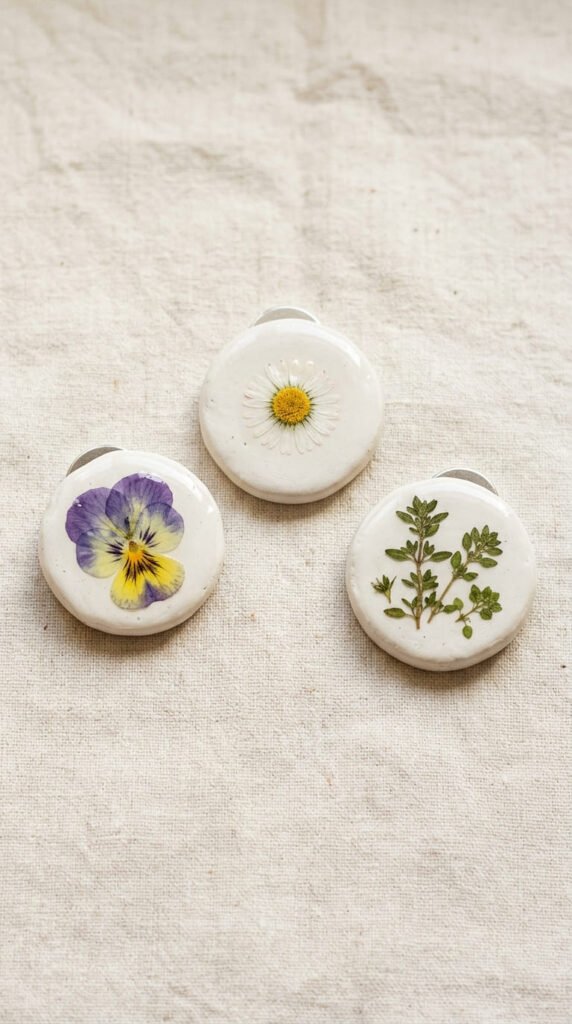
Pressed flower magnets are one of the most beautiful and completely unique designs in this list — because real flowers embedded in clay look like nothing you can buy in a store.
You need air-dry clay and real pressed flowers for this technique.
How to make them:
- Roll air-dry clay into flat circles, about 1/4 inch thick
- Press a dried, pressed flower gently into the surface — don’t push all the way through, just enough to make an impression and partially embed it
- Let the clay dry completely around the flower — 48–72 hours
- Once dry, brush a thin layer of Mod Podge gloss over the surface to seal the flower in place and give a slight preservation coat
The petals become partially translucent under the Mod Podge, which looks organic and beautiful.
Best flowers to use:
- Pansies (flat, press well)
- Small daisies
- Herb leaves (lavender, rosemary)
- Forget-me-nots
Use white or cream clay so the flower colors stay visible.
Budget tip: Collect and press flowers yourself — place them in a heavy book for 2–3 weeks before using.
24. Gradient Ombre Tile Magnets
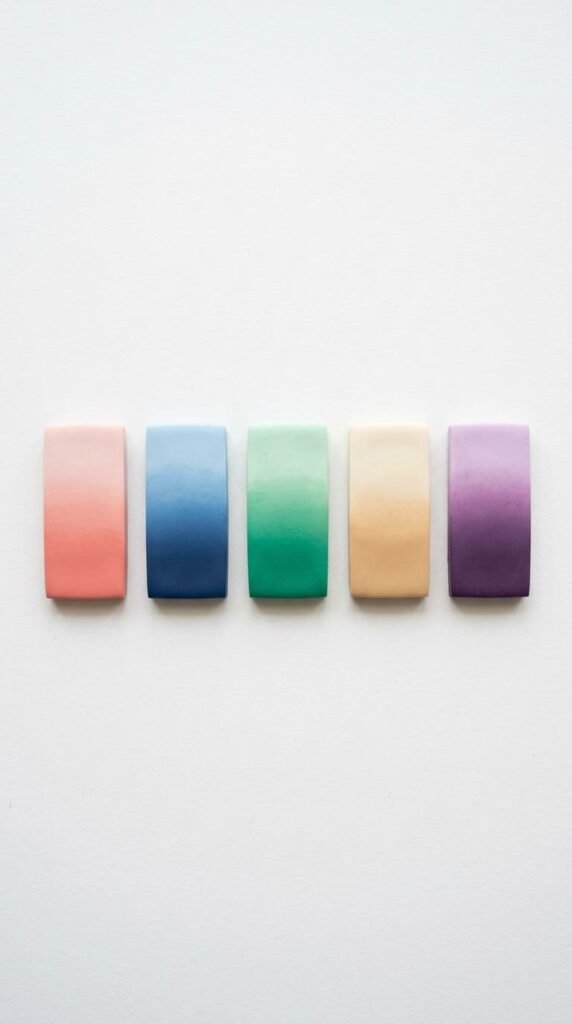
Gradient ombre magnets look like they require real skill, but the technique is just careful color mixing at the seam between two clay shades.
The result is a smooth, professional-looking color transition on a small tile.
How to make a gradient tile:
- Roll two different shades of the same color family to equal thickness — light and dark versions
- Cut both into rectangles and place them side by side on your work surface
- At the seam where they meet, blend the clay gently with your fingertip — work in small circles to smooth the transition zone
- The center should show a mixed mid-tone while the ends stay pure
- Cut the final tile shape and bake
Color pairs that work:
- Blush pink to coral
- Sky blue to navy
- Mint to deep emerald
- Ivory to warm tan
Keep the transition zone narrow — the gradient should be obvious and intentional, not a muddy mess across the whole tile.
Seal with matte finish to keep the color looking clean and paint-like.
Display a set of 5 tiles in a horizontal row of different color families — they look like a color-swatch collection on your fridge.
Budget tip: You only need two similar shades — buy a light and dark version of the same color family rather than a full multi-pack.
Conclusion
Aesthetic clay magnets are proof that the most beautiful home decor doesn’t have to come from a shop.
Every idea in this list costs just a few dollars in materials, and most can be completed in a single afternoon. Whether you’re drawn to the quiet sophistication of neutral geometric tiles, the dreamy quality of moon phase sets, or the playful detail of miniature sushi rolls, there’s a style here that fits both your fridge and your aesthetic.
The best place to start is with one design that genuinely excites you. Pick the color palette you already love in your home, grab a small pack of clay, and make a test set of 3–4 magnets before committing to a larger batch.
Once you see how good handmade clay magnets look in person — and how satisfying they are to make — you’ll wonder why your fridge ever looked any other way. Save this list and come back to it every time you want to try something new.


