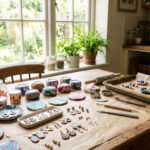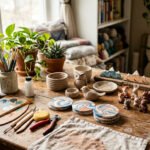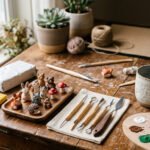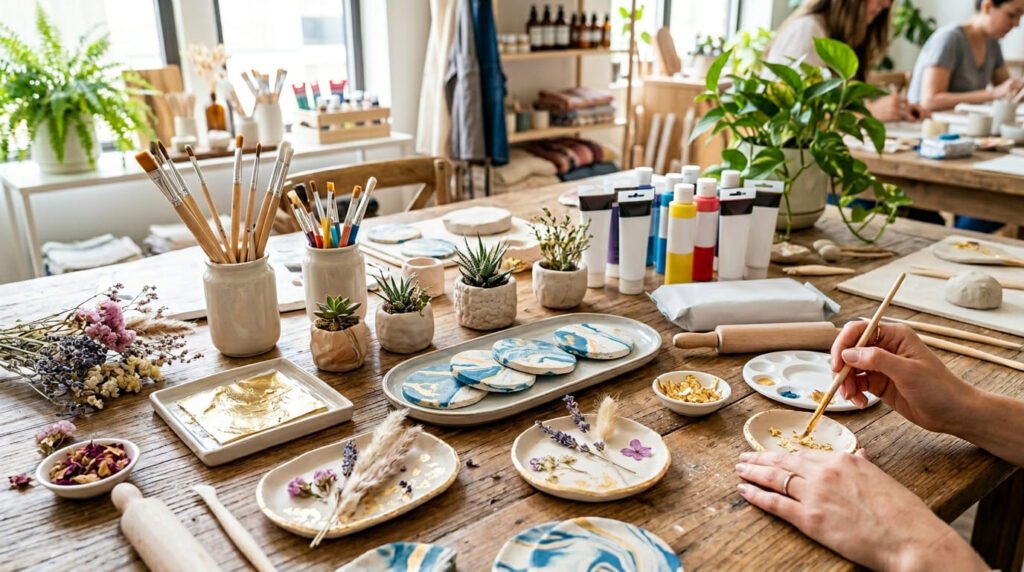
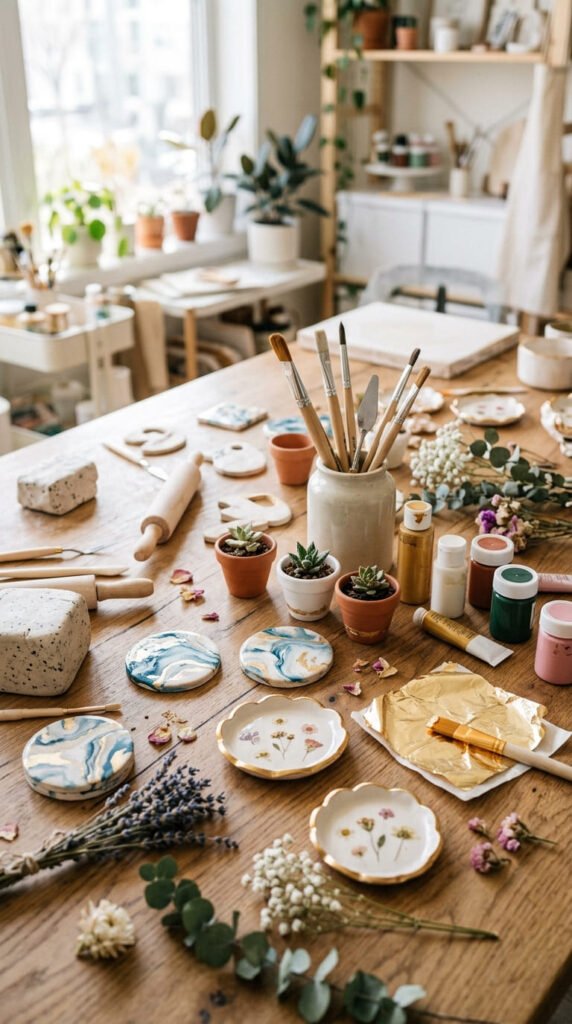
Budget clay art can look expensive when you focus on clean shapes, soft colors, smooth edges, and small finishing details. You do not have to buy a kiln, fancy tools, or costly supplies. Air dry clay, acrylic paint, sandpaper, cookie cutters, and clear sealer can create decor, gifts, jewelry, and home pieces that look store-bought. These clay art projects are simple enough for beginners but polished enough for shelves, gift boxes, Pinterest pins, or even small handmade shop ideas.
1. Marbled Clay Coasters
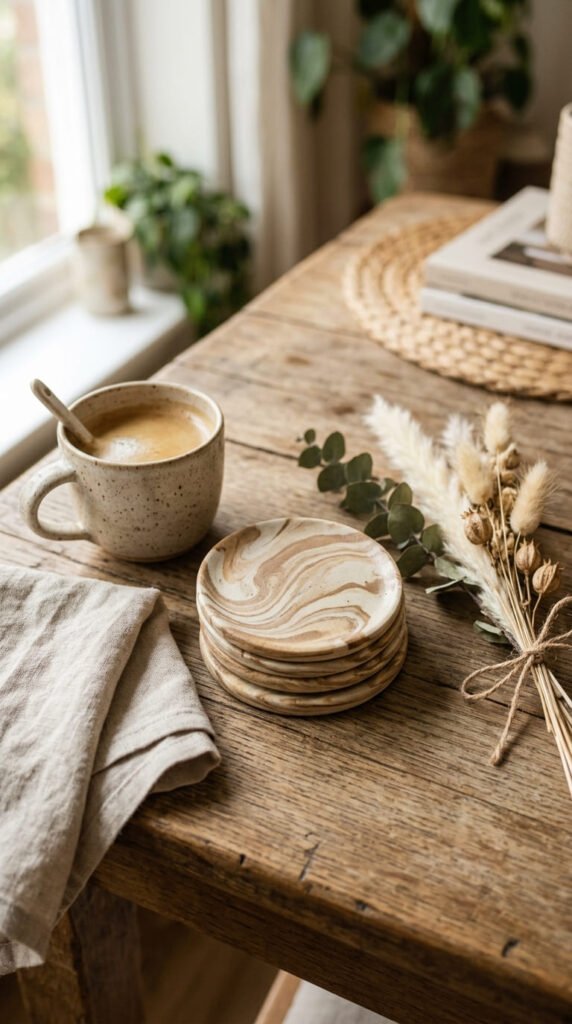
Marbled clay coasters are one of the easiest ways to get a luxury look without spending much. Use white air dry clay as the base, then roll thin ropes of tan, black, brown, or blush clay.
Twist the ropes together. Fold them once or twice. Roll the clay flat, but stop before the colors mix too much. The uneven swirls make each coaster look handmade in a good way.
Cut circles with a glass or bowl. Smooth the edges with a damp finger. Let them dry flat so they do not curl.
Once dry, sand the edges lightly. Paint the rim with gold, copper, or black acrylic paint. Seal the top so coffee cups will not stain the surface.
Make a set of four and tie them with cotton cord. This project works as a housewarming gift, desk decor, or coffee table accent.
Budget tip: use clay scraps for the marbled lines instead of buying many colors. Small pieces create a rich pattern fast.
2. Terrazzo Clay Pot
A terrazzo clay pot looks like something from a designer home store. Start with a small plastic cup, jar, or old plant pot as your shape guide.
Roll out a sheet of air dry clay and wrap it around the outside. Press the seam together and smooth it with a little water. Keep the base thick enough to stand well.
For the terrazzo effect, cut tiny bits of colored clay. Press them into the outer surface. Roll gently so the chips sit inside the clay instead of sitting on top.
After drying, sand the surface just a little. This softens the chips and makes the pattern look cleaner.
Paint the inside one solid color. White, beige, sage, black, or terracotta all work well. Add a faux succulent or a tiny nursery plant inside.
Budget tip: make the chips from leftover clay. You can also paint tiny shapes onto plain clay if you only have one color.
This project is perfect for window ledges, desks, shelves, and gift baskets.
3. Mini Bear Planter
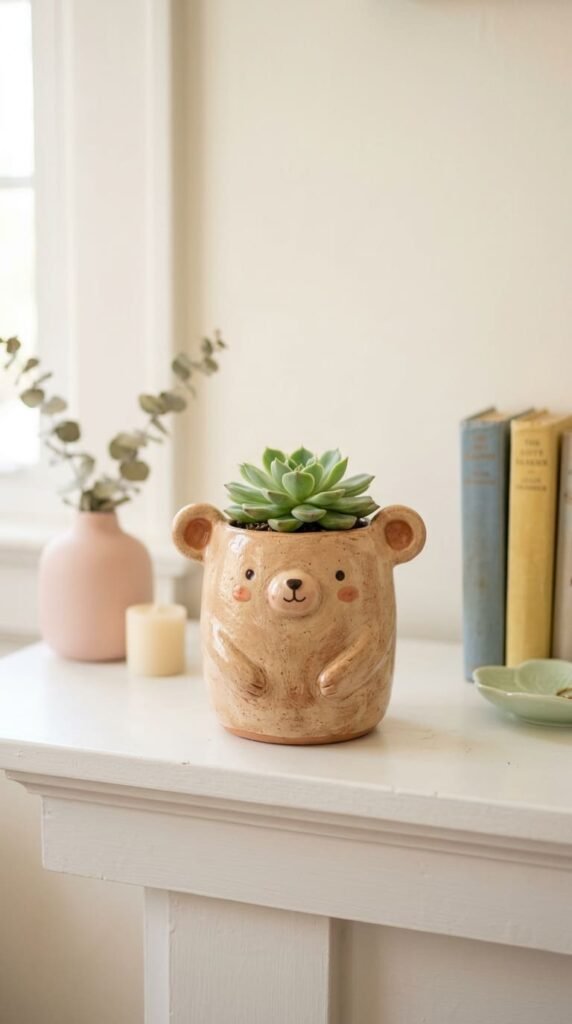
A mini bear planter brings cute style to any shelf. Shape a small pot with air dry clay, then add two round ears at the top. Smooth the joins well so the ears stay attached.
The face can be very simple. Add two black dots for eyes, a small oval nose, and tiny cheeks. A simple face often looks more expensive than too much detail.
Use a small plastic cup as a guide while shaping the planter. Let the clay firm up before removing the cup.
Paint the outside in cream, beige, brown, or pastel pink. Add a matte sealer for a soft ceramic-style finish.
This is a great gift for kids, plant lovers, coworkers, or anyone who likes cute desk decor. You can make a panda, cat, rabbit, frog, or bear using the same method.
Budget tip: use faux plants if you do not want to worry about water touching the clay. Faux succulents look neat and last long.
Add felt to the bottom so it sits nicely on a desk or shelf.
4. Scalloped Jewelry Bowl
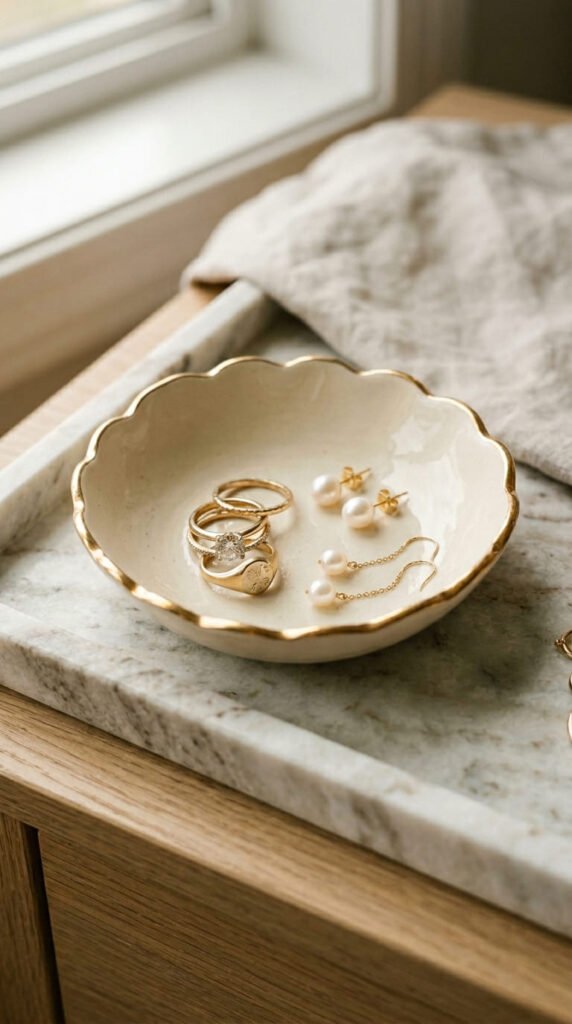
A scalloped jewelry bowl looks delicate, but it is very easy to make. Roll out air dry clay into a circle. Use your fingers to gently pinch around the edge and create a wavy border.
Place the clay over a small bowl so it dries with a curved shape. Do not press too hard. A soft dip is enough for rings, earrings, coins, or hair pins.
Let it dry all the way. Then sand the rim so it feels smooth.
Paint the bowl in one calm color. Ivory, clay pink, stone gray, or soft blue all look classy. Add a thin gold rim with a small brush for that expensive touch.
This project works for bedroom vanities, bathroom shelves, or dresser trays. It also makes a lovely bridesmaid gift.
Budget tip: use a thrifted bowl as your drying mold. You do not have to buy any special tools.
For a custom version, press lace into the clay before shaping. The texture gives the bowl a pretty handmade look.
5. Clay Phone Holder
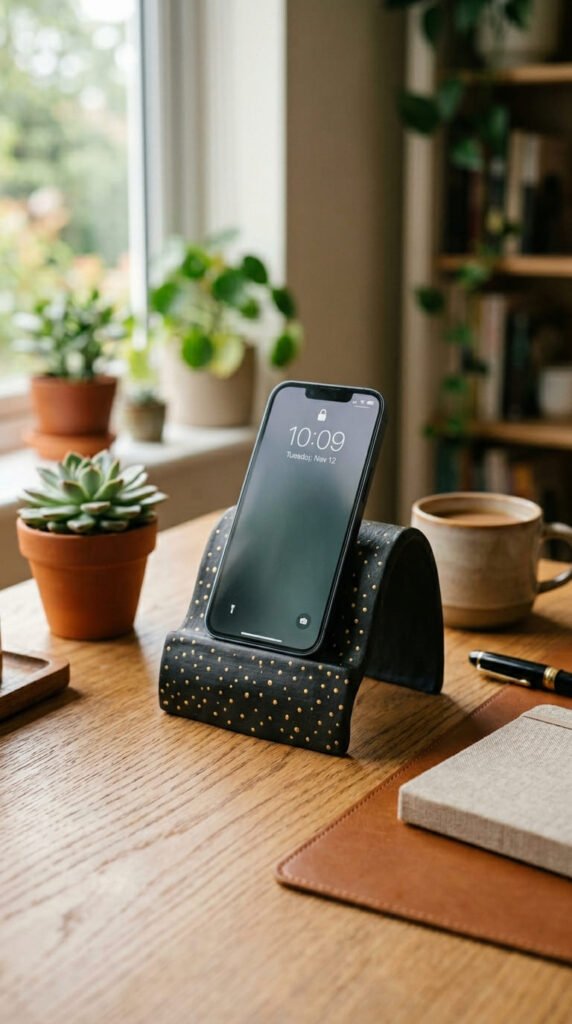
A clay phone holder is useful, giftable, and easy to style. Roll a thick slab of clay and form it into a tilted stand. Add a small raised lip at the bottom so the phone does not slide.
Keep the back wide and strong. The stand should support the phone without bending. Let it dry for a few days if it is thick.
Once dry, sand any rough parts. Paint it in a bold shade like black, navy, olive, or terracotta. Add tiny dots, a bee design, stars, or a simple stripe.
Seal it well, since it may be handled often.
This project is great for students, office desks, kitchen counters, or bedside tables. It can hold a phone while watching videos, following recipes, or charging.
Budget tip: test the angle with a cardboard mockup before using clay. That way, you waste less material.
For a more premium look, glue felt under the base. It keeps the stand from sliding and protects the table.
6. Clay Handprint Frame
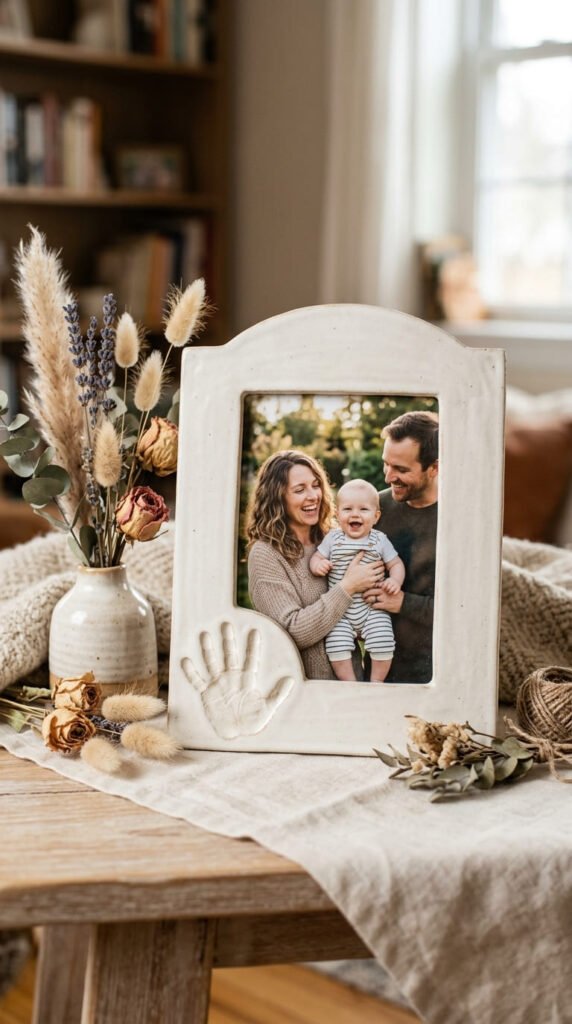
A clay handprint frame is sentimental but still stylish. Start with a cheap wooden or cardboard frame. Cover the front border with rolled clay strips.
Smooth the corners with a little water. If you are making this with a child, press a small handprint into one side of the clay border before it dries.
Use alphabet stamps to add a name or date on the bottom edge. Keep the rest of the frame clean so it does not look crowded.
After drying, paint the frame in white, cream, taupe, or soft gray. These shades make it easy to match home decor.
Add a photo inside before wrapping. A baby picture, family portrait, pet photo, or wedding image turns the frame into a keepsake.
Budget tip: buy simple frames from a discount shop. Clay covers the plain base and makes it look custom.
For extra polish, seal the clay border with matte varnish. It helps protect fingerprints and stamped details.
7. Fun Clay Trinket Trays
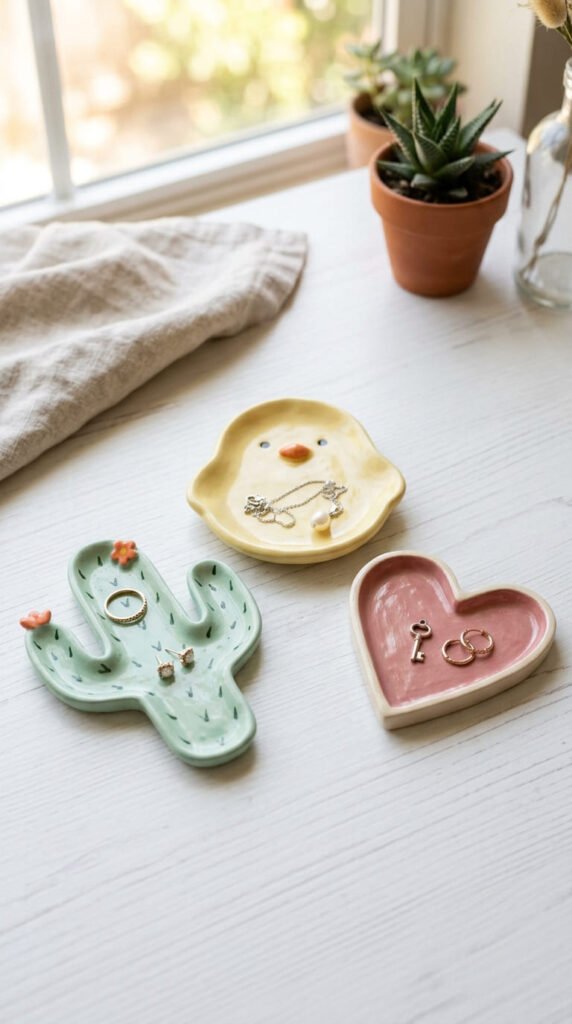
Trinket trays are small, useful, and perfect for playful shapes. You can make a cactus, chick, heart, moon, cloud, playing card shape, or simple oval.
Roll clay flat and cut the shape with a paper template. Lift the edges slightly so small items stay inside.
Let the tray dry on parchment paper. If the edges sag, support them with rolled paper towels until the clay firms up.
Paint the tray with one main color, then add tiny details. For a cactus tray, paint green and add white dash marks. For a playing card tray, use black, cream, and red.
These trays can hold rings, keys, coins, paper clips, or hair clips. They look great on desks, dressers, and entry tables.
Budget tip: use kitchen items as cutters. Bottle caps, cups, and butter knives work well.
Make a few at once and group them as a gift set. Small matching trays look more high-end when styled together.
8. Cute Clay Snail Sculpture
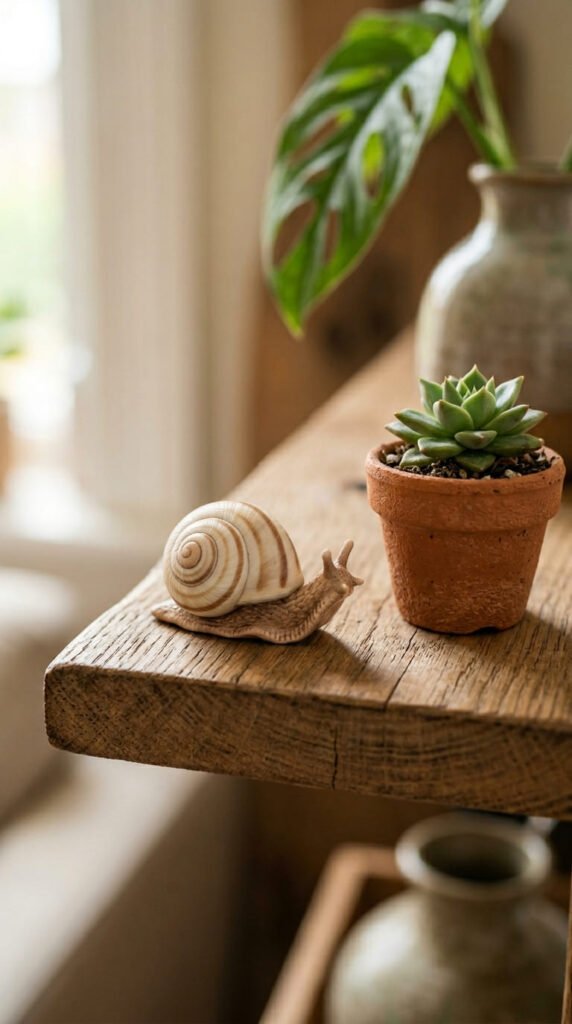
A clay snail sculpture is tiny, quick, and full of charm. Roll a small oval for the body. Then roll a long rope and curl it into a spiral for the shell.
Attach the shell to the body with a little water. Add two tiny eye stalks using thin clay pieces or short wire wrapped in clay.
Let the snail dry fully before painting. Use natural shades for a soft home decor look, or pastel colors for a cute desk style.
Paint the body beige or gray. Paint the shell with rings of cream, brown, pink, or green. Add a thin clear coat to protect the color.
This project is great for shelves, plant pots, fairy gardens, kids’ rooms, or gift boxes.
Budget tip: make snails from leftover clay after larger projects. They use very little material.
For a fancier look, glue the snail onto a small wood slice or flat pebble. Add dried moss around it for a tiny nature scene that looks gift-ready.
9. Split Heart Friendship Necklaces
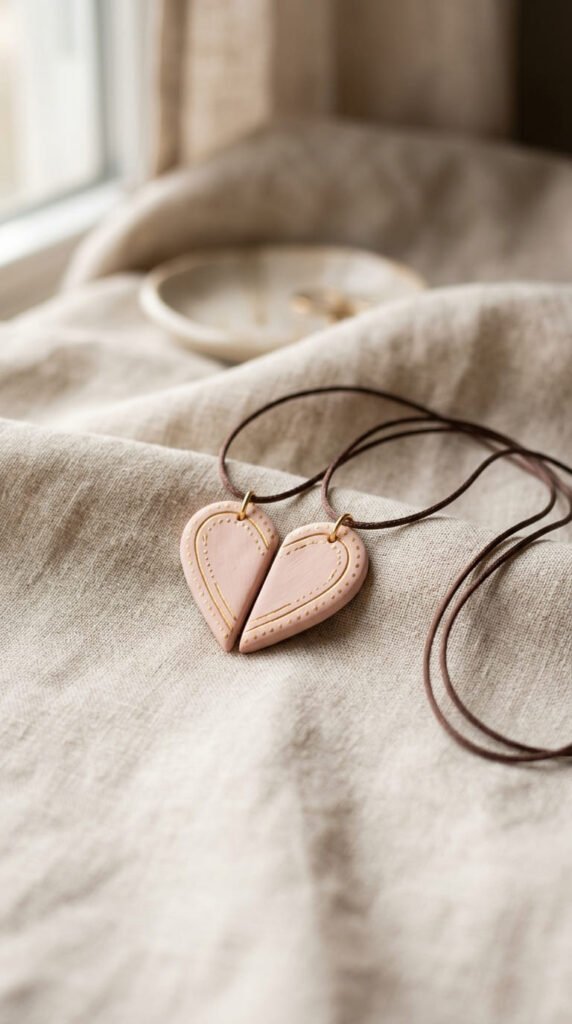
Split heart necklaces are sweet, cheap, and easy to personalize. Roll clay flat and cut one heart shape. Use a craft knife to cut it into two matching halves.
Make a small hole at the top of each half before drying. This hole will hold the cord or jump ring.
Paint the halves in matching colors. Try blush and gold, black and white, lavender and silver, or red and cream. Add tiny dots, initials, or a small pattern.
This project works for best friends, sisters, cousins, party favors, or Valentine gifts. It feels personal without costing much.
Budget tip: use embroidery thread or waxed cord instead of metal chains. It keeps the cost low and still looks cute.
Seal both pieces so the paint does not rub off during wear. For comfort, keep the clay thin and lightweight.
Pack both necklaces on a small card or inside a tiny envelope. Handmade jewelry feels more polished when the packaging looks neat.
10. Clay Hair Clip Makeover
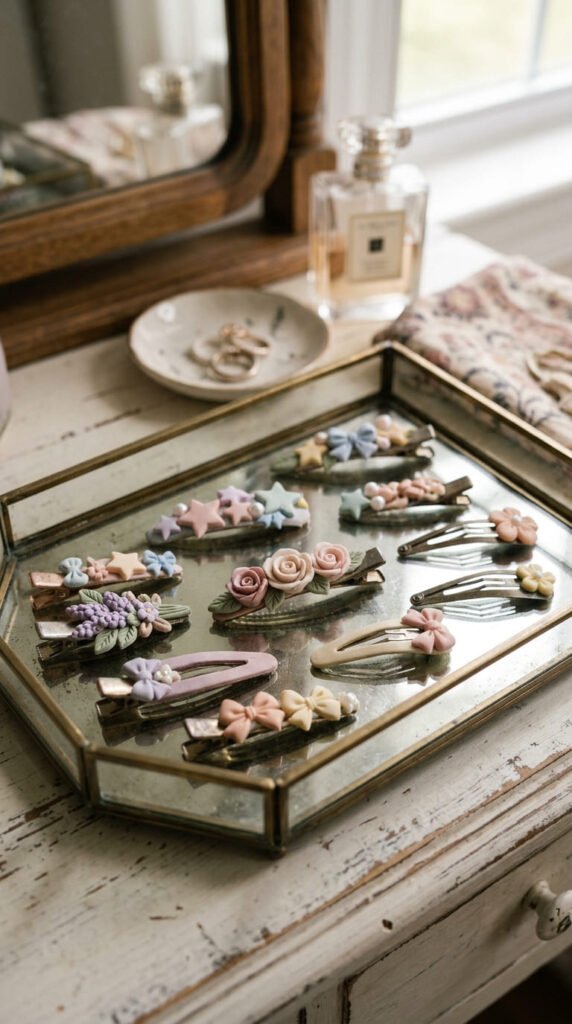
Turn plain hair clips into statement accessories with tiny clay shapes. Use old clips, plain barrettes, or low-cost metal clips from a craft shop.
Make small clay flowers, bows, stars, hearts, fruit slices, or pearls. Keep each piece thin so the clip does not feel heavy.
Let the clay pieces dry or bake them if using polymer clay. Paint them in colors that match your wardrobe. Cream, soft pink, cherry red, and pearl white always look pretty.
Use strong glue to attach the clay shapes to the clips. Let the glue set overnight before wearing.
This project is perfect for gifts, party favors, school accessories, or product photos.
Budget tip: repaint the metal clip with nail polish if it looks scratched. Then add clay decorations on top.
For a boutique look, make three clips in one color theme. Put them on a small backing card or wrap them in tissue paper. A simple upcycle can turn into a stylish handmade accessory set.
11. Color-Dipped Planter
A color-dipped planter looks clean, modern, and much more costly than it is. Shape a small clay pot around a cup, jar, or old plant container.
Let it dry fully, then sand the sides until smooth. Paint the whole pot in a base color like white, cream, or pale gray.
Once dry, paint the bottom half in a second color. Terracotta, black, sage, mustard, or dusty pink all work well. Use painter’s tape if you want a sharp line.
Seal the outside with matte or satin varnish. If using a real plant, place a plastic liner inside to protect the clay.
Budget tip: use an old plastic nursery pot as the inner liner. The clay shell makes it look handmade and stylish.
This project works for kitchen windows, desks, shelves, bathrooms, or gift baskets.
Add a faux plant for a no-care gift. The clean painted split makes even a small planter look like designer home decor.
12. Ice Cream Clay Bunting
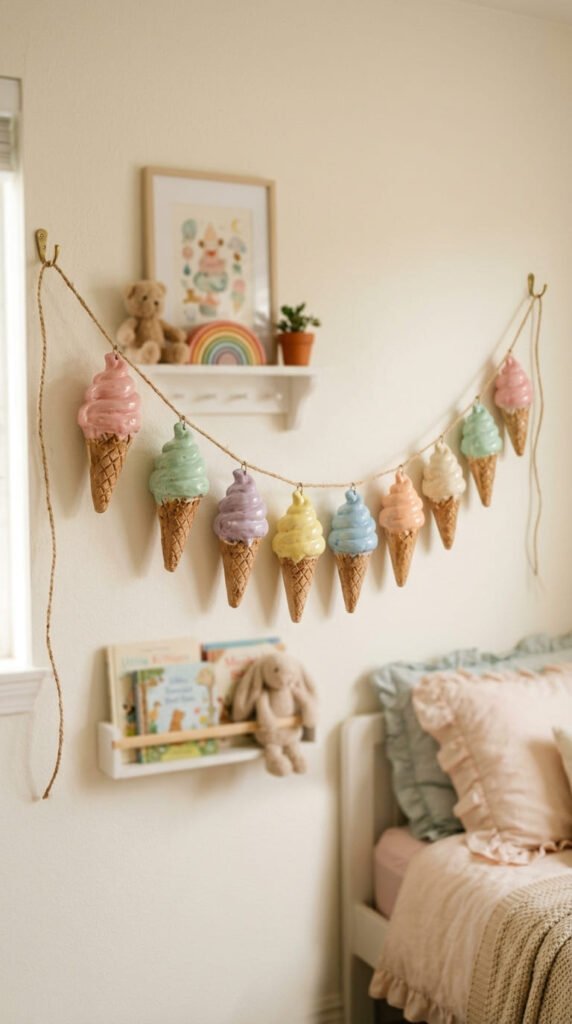
Ice cream clay bunting is a fun party or bedroom decor project. Roll out clay and cut triangle shapes for cones. Add small circles or scoops for the top.
Press light crisscross lines into the cone part with a toothpick. Make two holes near the top of each piece so you can string them later.
Let the pieces dry flat. Paint cones tan and scoops in pastel shades. Add small dots for sprinkles if you like a playful look.
Thread twine or ribbon through the holes. Space the pieces evenly before hanging.
This project is great for birthday parties, playrooms, summer decor, or handmade gifts for kids.
Budget tip: make the bunting from one pack of air dry clay and leftover paint. A long garland costs very little when the pieces are small.
For a cleaner finish, keep the color palette limited. Three scoop colors and one cone color will look more polished than too many shades.
Store flat between uses so the clay pieces do not chip.
13. Nature Imprint Wall Tiles
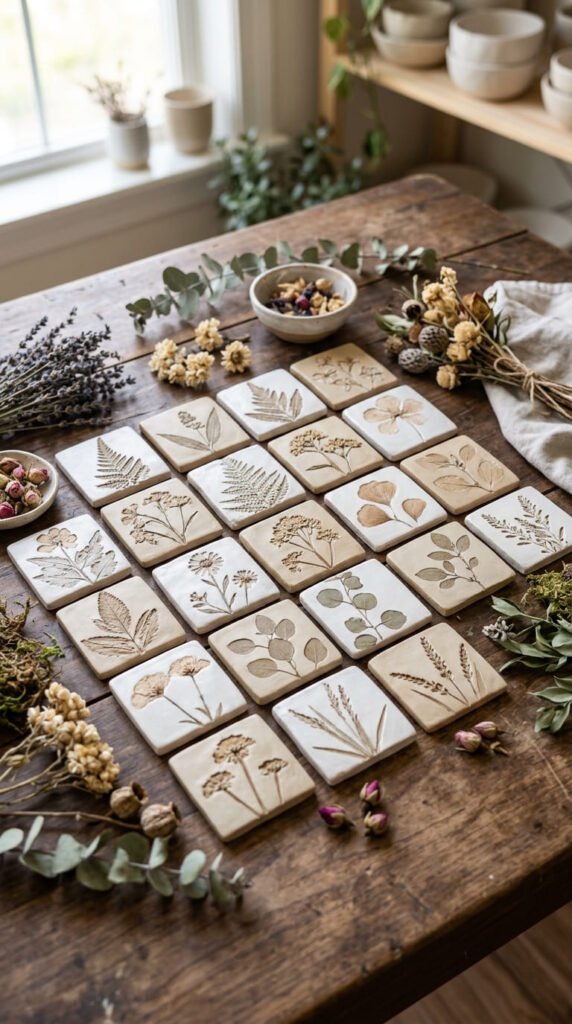
Nature imprint wall tiles look calm, earthy, and expensive. Collect small leaves, flowers, herbs, or grasses from your garden or a walk.
Roll clay into small squares, circles, or arch shapes. Press the plant pieces into the clay, then peel them away slowly. The veins and stems leave beautiful texture.
Make a hole at the top before drying if you want to hang the tiles. Let them dry flat.
Paint with a thin layer of white, beige, or clay-colored acrylic. For more depth, brush a darker shade over the texture and wipe the raised surface gently.
These tiles look lovely in sets of three. Hang them with twine or place them in a shadow box.
Budget tip: use found leaves and flowers instead of buying stamps. Nature gives you patterns for free.
This project is great for adult craft nights, kids’ nature lessons, or handmade home decor gifts.
Keep the shapes simple so the pressed texture becomes the main feature. That is what gives the pieces their art-gallery feel.
14. Cookie Cutter Clay Lantern
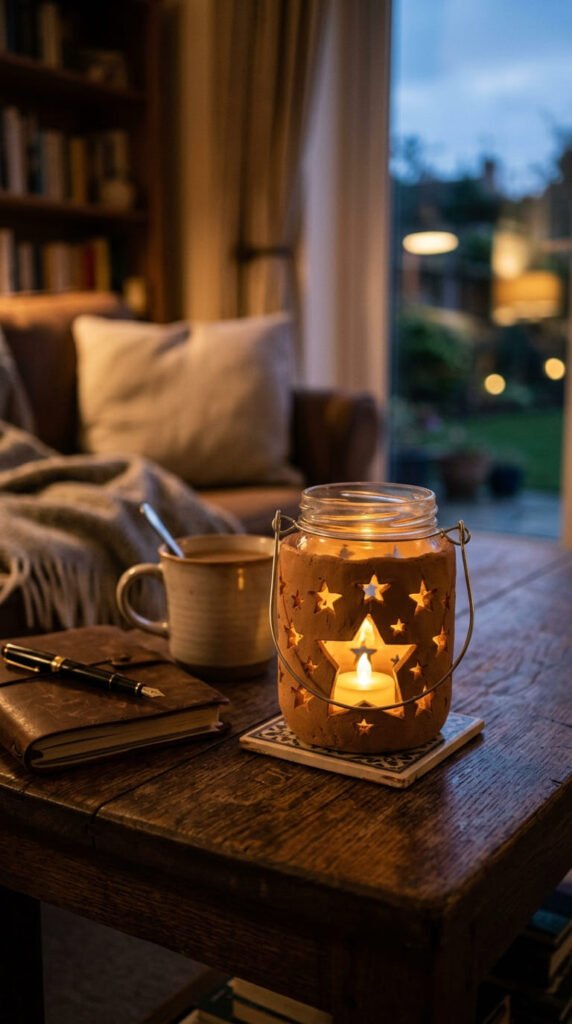
A clay lantern can look like a gallery piece when you keep the shape simple. Use a clean glass jar as the base. Roll clay into a thin sheet and wrap it around the jar.
Cut small shapes with mini cookie cutters before placing the clay on the jar. Stars, moons, hearts, and leaves work well.
Smooth the seam at the back. Let the clay dry around the jar if you want a permanent sleeve, or remove it carefully once it firms up.
Use a battery tealight inside. Avoid real flame near exposed clay.
Paint the outside white, stone gray, black, or terracotta. The cutouts create a soft glow when lit.
Budget tip: reuse jam jars, sauce jars, or small candle jars. The clay cover hides labels and turns them into decor.
This project is great for cozy rooms, holiday tables, outdoor dinners, or handmade gifts.
Make two or three lanterns in different heights for a more expensive-looking display.
15. Mini Koi Pond Scene
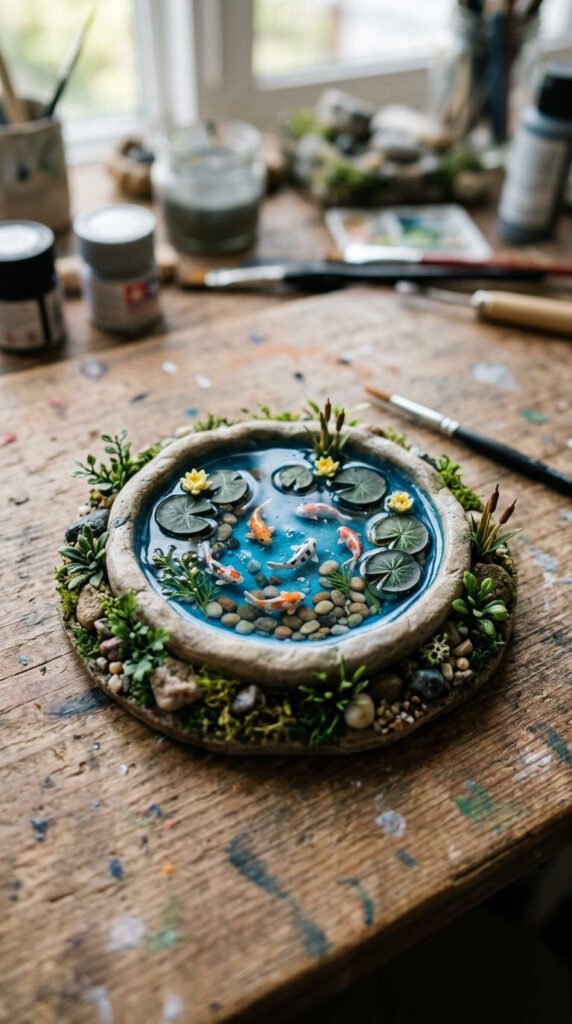
A mini koi pond scene is a small clay art project with a big visual payoff. Start with a shallow round or oval base. Raise the edges slightly to form a tiny pond.
Paint the inside blue, teal, or deep green once dry. Add small clay koi fish, pebbles, lily pads, and flowers.
For the fish, roll tiny orange shapes and add white and black marks with a small brush. Keep them simple. A few tiny strokes can suggest movement.
Seal the pond with gloss varnish for a water-like finish. If you have clear resin, you can add a thin layer, but varnish is cheaper and easier.
Budget tip: use real tiny pebbles from outside. Wash and dry them before gluing.
This project looks lovely on a desk, shelf, or windowsill. It also makes a cute gift for someone who likes Japanese garden style.
Make the pond no larger than your palm. Smaller scenes are easier to finish and often look more polished.
16. Clay Wall Hooks
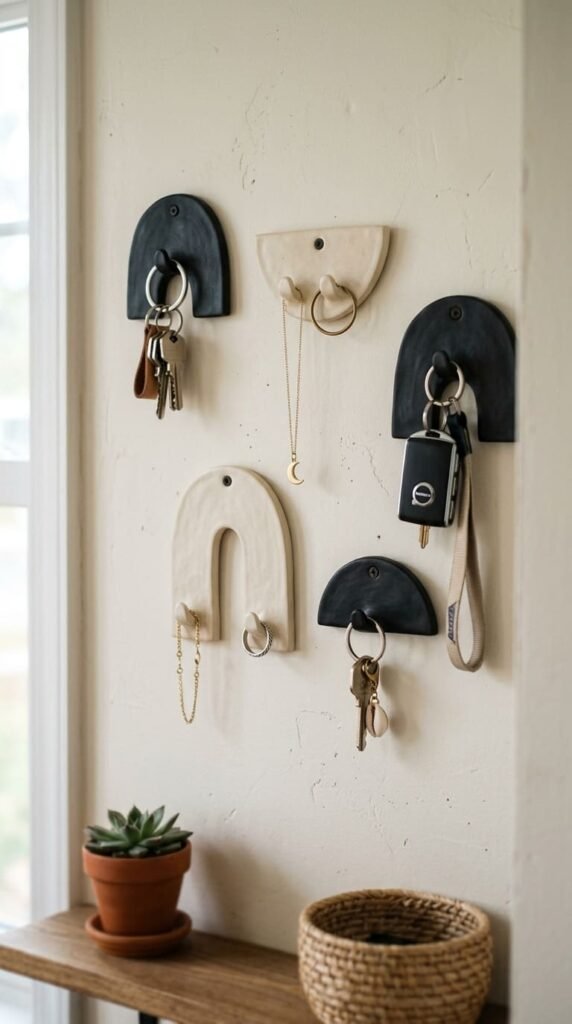
Clay wall hooks can turn a plain entryway or bedroom corner into a stylish spot. Make thick half-moon, arch, or oval shapes from air dry clay.
Add a small raised hook shape at the bottom, or glue the clay design onto a simple wooden peg. Clay alone can break under heavy weight, so use it for light items only.
These hooks are great for keys, necklaces, light scarves, or small decor pieces.
Paint them in modern colors like black, cream, sage, rust, or clay brown. Seal well so they can handle touch.
Budget tip: buy basic wooden pegs or hooks and cover the front with clay shapes. This gives strength while keeping the handmade look.
Make a set of three for more impact. Use matching shapes or mix arches, circles, and moons.
Mount them with removable strips if they are light, or use screws for stronger support.
They look expensive because the shapes are simple, smooth, and color-coordinated.
17. Clay Holiday Ornaments
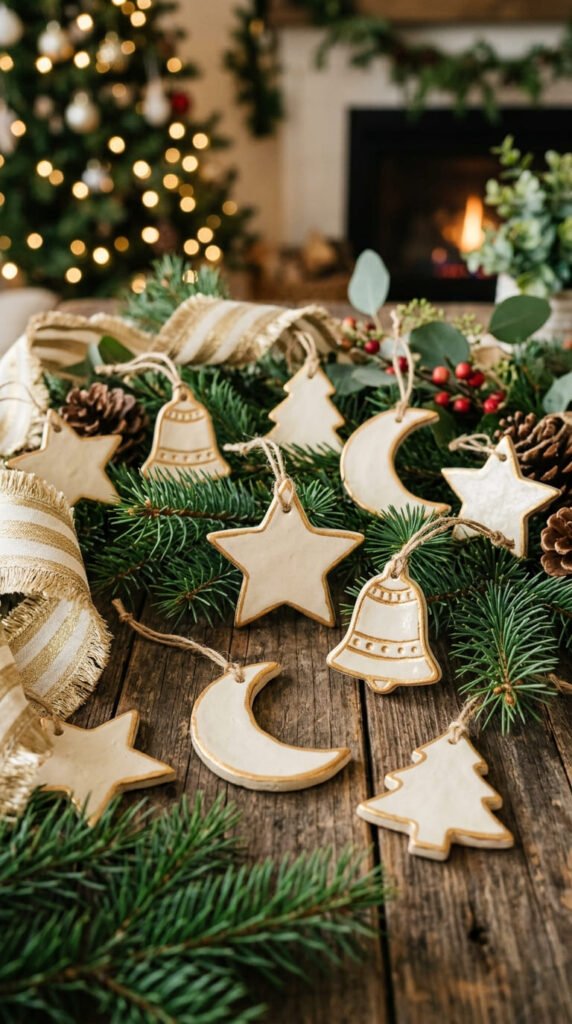
Clay ornaments are classic, affordable, and easy to make in large batches. Roll air dry clay flat and cut shapes with cookie cutters.
Stars, moons, bells, houses, trees, hearts, and arches all work well. Add a hole at the top with a straw before drying.
Press lace, leaves, stamps, or simple dots into the clay for texture. Keep the design light so it still looks elegant.
After drying, paint the ornaments white, ivory, red, green, black, or clay brown. Add gold or silver edges for a high-end look.
Budget tip: make ornaments as gift tags. Tie them to wrapped presents, then the person can hang them later.
This project is great for Christmas, winter weddings, party favors, teacher gifts, or handmade shop stock.
Use ribbon, twine, or velvet cord for hanging. The cord choice changes the whole mood.
Make a set of six in matching colors and place them in a small box. It becomes a beautiful low-cost gift.
18. Clay Plant Stakes
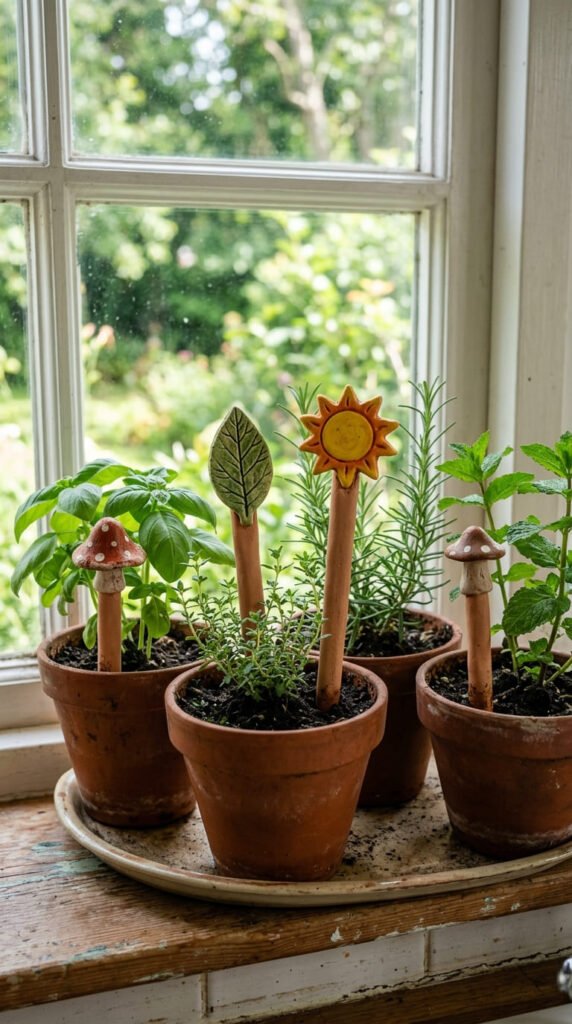
Clay plant stakes are small, useful, and perfect for plant lovers. Roll thin clay rectangles for the stake part, then add a small shape at the top.
Try mushrooms, suns, moons, leaves, flowers, bees, cats, or tiny houses. Keep the stake long enough to sit inside soil without tipping.
Let the pieces dry flat. Paint them in earthy colors or bright garden shades. Seal them well before placing them near soil.
If you want to label herbs, you can write the names after sealing with a waterproof marker. For a no-word design, use shape clues instead, like basil leaves or chili peppers.
Budget tip: use skewers as the stake base and add clay toppers. This saves clay and makes the stakes stronger.
These look cute in herb pots, indoor plants, seedling trays, or gift plants.
Bundle three stakes with a small plant for a thoughtful present. They use very little clay, so you can make a full set from scraps.
19. Faux Ceramic Clay Vase
A faux ceramic vase can be made with air dry clay and an old bottle. Choose a small glass jar, plastic bottle, or thrifted vase as your base.
Cover the outside with a thin layer of clay. Smooth it with damp fingers. Add handles, raised dots, waves, or simple ridges if you want texture.
Let it dry slowly. Thick clay can crack if dried too fast, so keep it away from strong heat.
Paint the vase in matte white, stone beige, black, or terracotta. A matte finish makes it look more like ceramic.
Use it for dried stems or faux flowers. Do not fill air dry clay with water unless there is a waterproof inner container.
Budget tip: use bottles from your recycling bin. The shape underneath gives structure, and the clay gives the handmade finish.
This project looks high-end because the silhouette feels sculptural. Keep the colors simple and the surface smooth for the best result.
Place it on a shelf with books and candles for a styled home decor look.
20. Clay Drawer Pulls
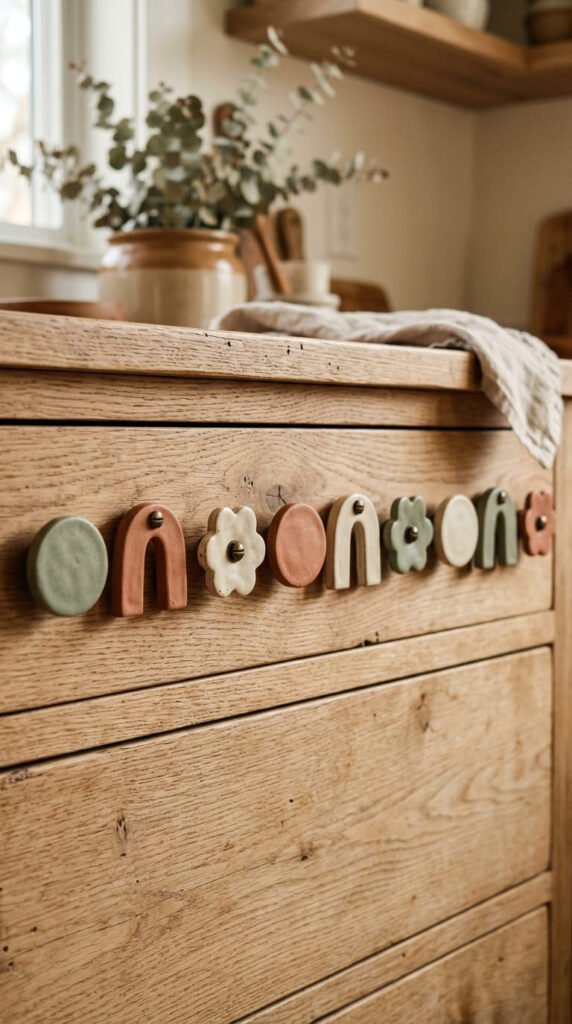
Clay drawer pulls are a smart way to update old furniture. Start with simple wooden knobs or plain metal pulls from a hardware store.
Cover the front with clay shapes. Round disks, flowers, arches, shells, and half-moons all work well. Keep the back hardware strong so the drawer still opens easily.
Let the clay dry or bake it, depending on the type you use. Paint the front in colors that match the furniture.
For a soft handmade look, use matte cream, rust, olive, blush, or black. Seal the pieces because hands will touch them often.
Budget tip: only update the visible knob front. You do not have to replace every part of the hardware.
This is great for bedside tables, craft drawers, kids’ dressers, or small cabinets.
Make all pulls the same shape for a clean look. Or make a set of mixed shapes for a playful room.
The result can make cheap furniture feel custom, especially when the colors match the rest of the room.
21. Moon Phase Wall Garland
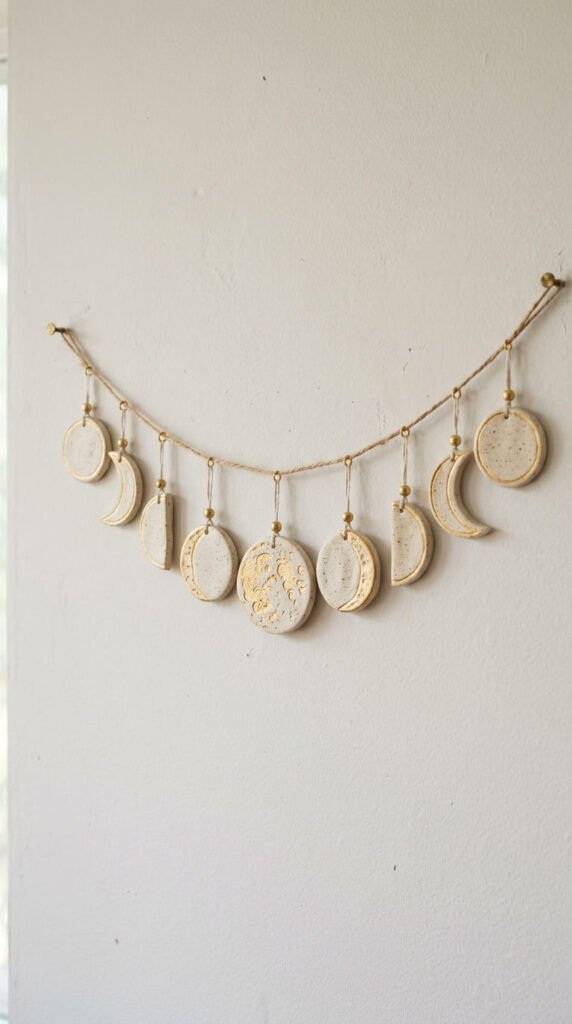
A moon phase wall garland is simple but dramatic. Roll clay flat and cut several circles. Use a smaller cutter to trim some into crescent shapes.
Make holes at the top of each piece before drying. Once dry, sand the edges and paint them ivory, black, silver, or gold.
Arrange the pieces from crescent to full moon and back again. Tie them onto twine, fishing line, or thin cord.
This project looks beautiful over a bed, desk, shelf, or gallery wall. It also makes a sweet gift for teens, astrology fans, or anyone who likes calm bedroom decor.
Budget tip: use a bottle cap as your circle cutter. For crescents, press the cap again over the circle to remove one side.
For a more polished finish, keep every moon the same size. Neat spacing makes the garland feel more expensive.
Seal each piece lightly so the paint does not chip while hanging. Pack flat if giving as a gift.
22. Clay Napkin Rings
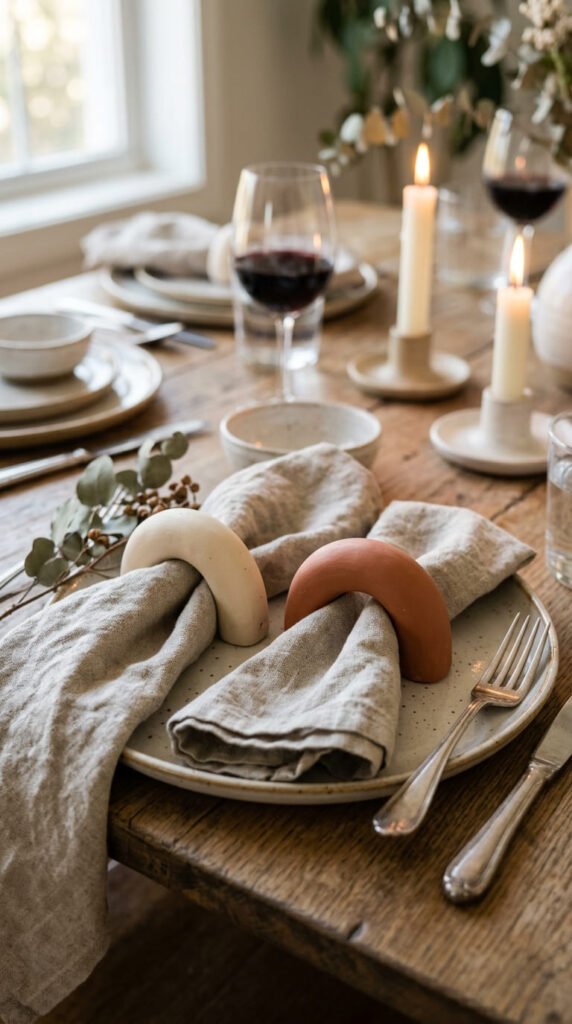
Clay napkin rings can make a simple table setting look styled. Roll clay into thick strips, then wrap each strip around a cardboard tube or small bottle to form a ring.
Smooth the join carefully. Let the rings dry on the tube if possible so they keep their shape.
Paint them in colors that match your table decor. Terracotta, cream, olive, black, and soft gray all look elegant.
You can add texture with a fork, lace, leaf, or stamp. Keep the design subtle so the rings work for many meals.
Budget tip: use a toilet paper tube as the drying form. Cover it with parchment paper first so the clay does not stick.
Make a set of four or six. Tie them together with ribbon for a housewarming or holiday gift.
These napkin rings are also great for weddings, dinner parties, and seasonal table settings.
Seal them well so they can handle light use. Wipe gently with a dry cloth after meals.
23. Mini Clay Donut Magnets
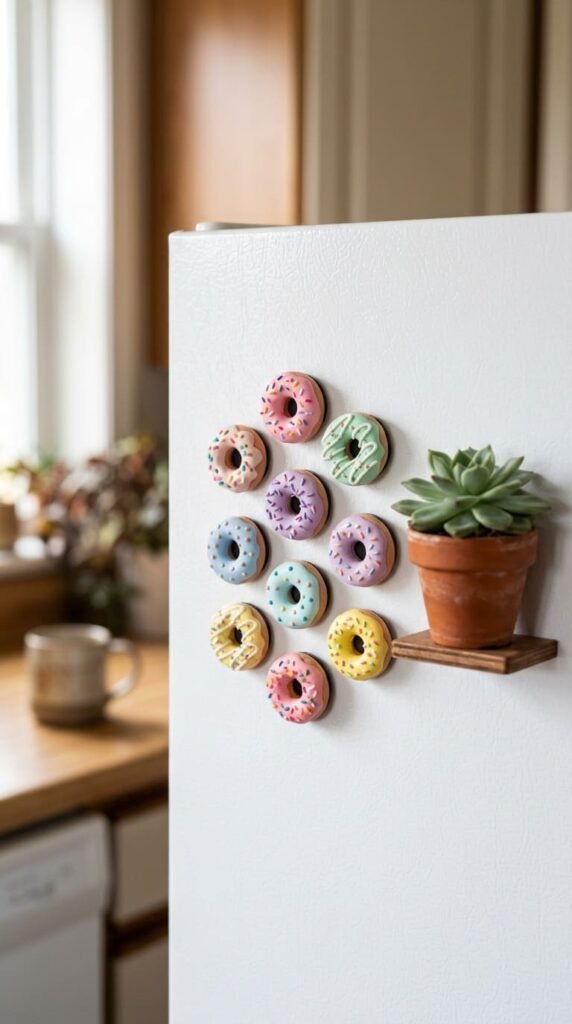
Mini clay donut magnets are cute, quick, and perfect for small gifts. Roll tiny balls of clay, flatten them slightly, and poke a hole in the center with a straw or tool.
Let them dry, then paint the base tan. Add icing in pink, chocolate brown, mint, white, or lavender. Use tiny paint dots for sprinkles.
Glue small magnets to the back once the paint and sealer are dry. Keep the donuts light so the magnets hold well.
This project is great for lockers, fridges, craft fairs, party favors, or teacher gifts.
Budget tip: make a dozen donuts from one small lump of clay. Tiny projects stretch your supplies much further.
For a high-end look, make a matching set in one color palette. For example, all pink and white, all chocolate tones, or all pastel shades.
Package them in a tiny paper box or on a small metal tin lid. That little display makes the magnets feel like a mini bakery gift set.
24. Minimal Clay Ring Cones
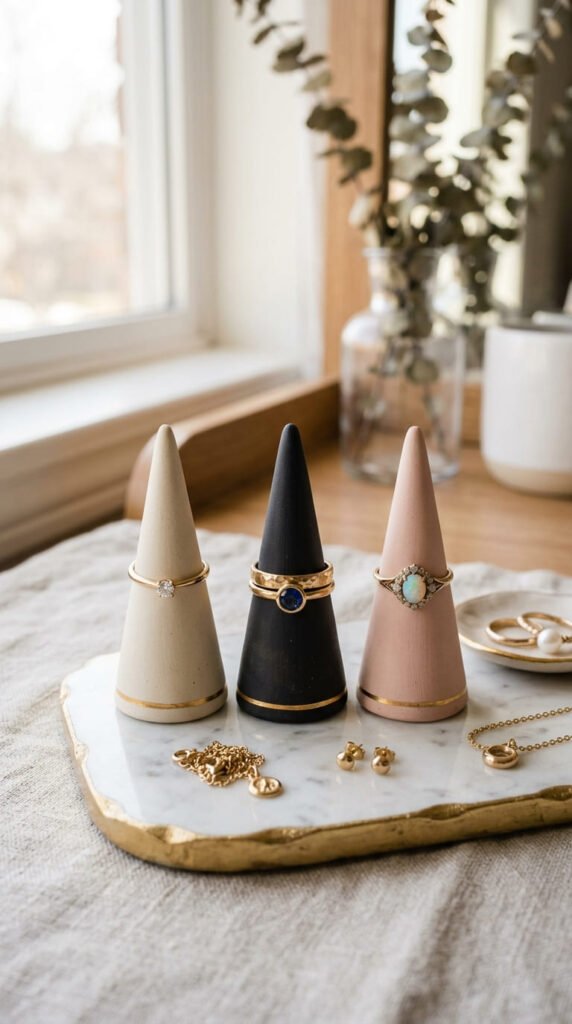
Ring cones are quick to sculpt and always useful. Roll clay into a cone shape, keeping the base flat so it stands. Smooth the sides with water and your fingertips.
Make the cone tall enough to hold a few rings, but not too thin at the tip. A wider shape feels more stable and less likely to break.
Let the cones dry standing upright. Sand the base if it wobbles.
Paint them in solid colors. Black, white, blush, sage, and terracotta look especially nice. Add a thin gold band around the bottom for a jewelry-store feel.
Budget tip: make several from one pack of clay and give them as a set. Different heights look good together on a vanity.
This project works for birthdays, bridesmaids, Mother’s Day, or simple self-care decor.
Seal the cones with satin varnish for a soft shine. They are small, practical, and easy to finish in a weekend.
Pair one with a budget ring or earrings for a complete handmade gift.
25. Clay Incense Holder
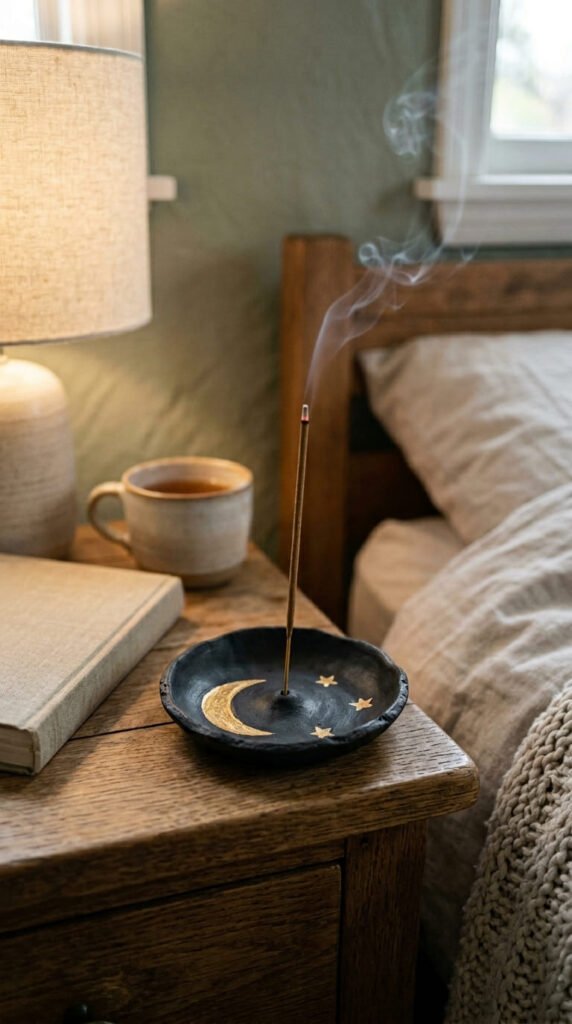
A clay incense holder feels calm, stylish, and easy to make. Start with a small oval dish shape. Lift the edges slightly to catch ash.
Make a small raised piece at one end and poke a hole at an angle. Test the hole size with an incense stick before the clay dries.
Add moon, star, leaf, flower, or wave details if you want a more decorative look. Keep the middle smooth so ash can land neatly.
After drying, paint the holder in black, cream, clay brown, or deep green. Gold details can make it feel more expensive.
Seal the surface well. Incense ash can mark unsealed paint.
Budget tip: make this from leftover clay after making trays or bowls. It uses very little material.
This project works as a self-care gift, bedroom decor piece, or small handmade shop item.
Pair it with a few incense sticks and wrap it in tissue paper. It feels thoughtful, useful, and far more special than a plain store-bought holder.
Conclusion
Clay art does not have to cost much to look beautiful. With air dry clay, acrylic paint, simple household tools, and careful finishing, you can create decor, gifts, jewelry, and small home pieces that look polished. Start with one easy project like coasters, a trinket tray, or a ring cone. Then reuse scraps for magnets, charms, plant stakes, and mini sculptures. Save these ideas for your next craft day and turn simple clay into pieces that look seriously high-end.