Messy bathroom drawers waste minutes every single morning. You dig past tangled hair ties to find one lip balm, or hunt for nail clippers buried under sample sachets. The fix is simpler than you think. With a few smart dividers, the right liners, and a clear plan for what goes where, your drawers can run like a well-stocked apothecary. The 22 ideas below mix budget hacks with designer tricks so you can build a system that works for tiny apartment bathrooms or family-sized vanities. Most projects cost under $20 and take less than an hour. Pick the ones that match your daily routine and watch your mornings get easier almost overnight.
1. Empty Everything Out First
Before buying a single divider, empty the entire drawer. Dump it all on a towel spread across the counter. This step shows you what you actually own versus what you think you own.
You will find expired sunscreen from three summers ago. Tangled charging cables that do not belong here. Five half-used lip balms. Toss anything past its expiration date or things you forgot existed.
Group what stays into piles by use. Hair stuff in one pile. Dental care in another. Skincare, makeup, first aid, and so on. This sorting takes maybe fifteen minutes but saves hours later.
Budget tip: skip fancy sorting bins. Use cereal bowls, takeout containers, or shoebox lids during this phase. Once you know your true categories and quantities, you can shop for the right size organizers. Buying first leads to wrong-sized bins gathering dust in the closet. Always sort before you shop, even if it means a messy counter for an afternoon.
2. Measure Your Drawer Before Shopping
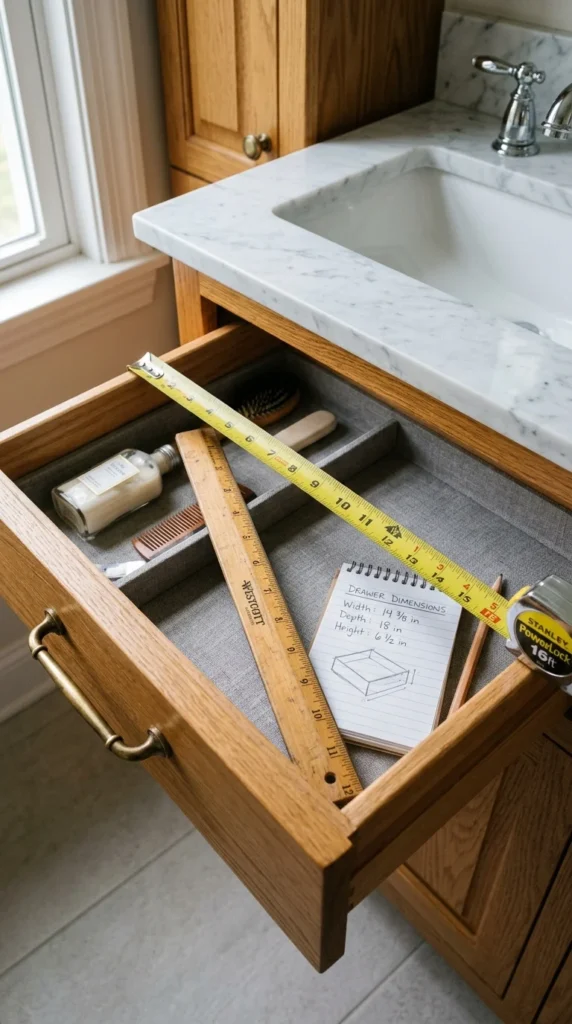
Buying organizers without measuring is the top mistake people make. You return home with bins that hang an inch over the edge or leave huge gaps. Measure first to skip the headaches.
Grab a tape measure and write down three numbers. Width from left wall to right wall. Depth from front to back. Height from drawer bottom to where it slides under the counter. The height matters more than people think.
Sketch a quick top-down view on paper. Mark the dimensions clearly. Take a photo of the sketch and the drawer interior. Bring both to the store or pull them up while shopping online.
Money saver: most organizer brands list exact dimensions on their listings. Filter your search by inches that fit your drawer. This avoids buying three sets before finding the right one. Adjustable dividers are a good first buy if your drawer has odd measurements. They expand to fit a range of widths and let you customize compartments without exact-fit math.
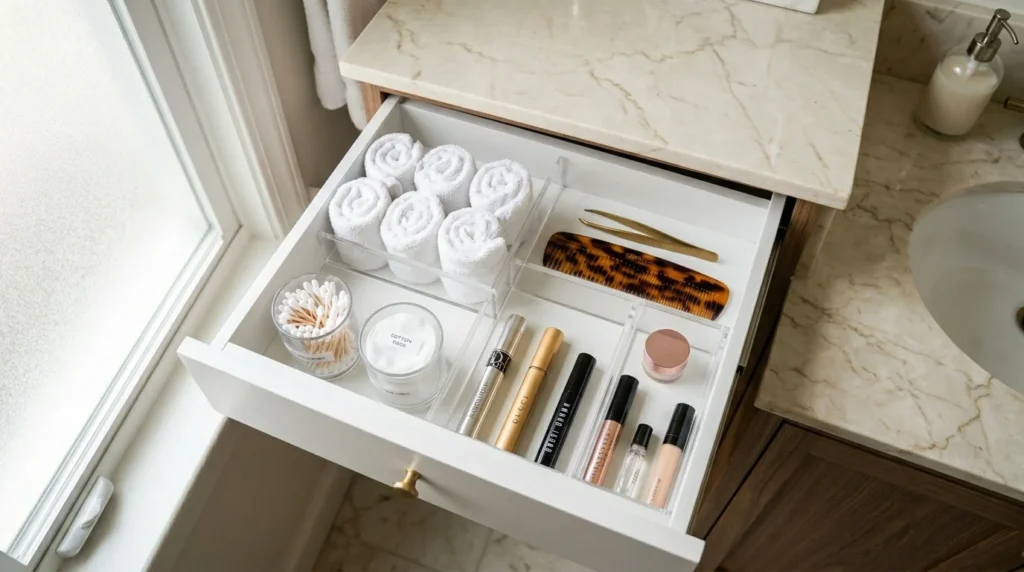
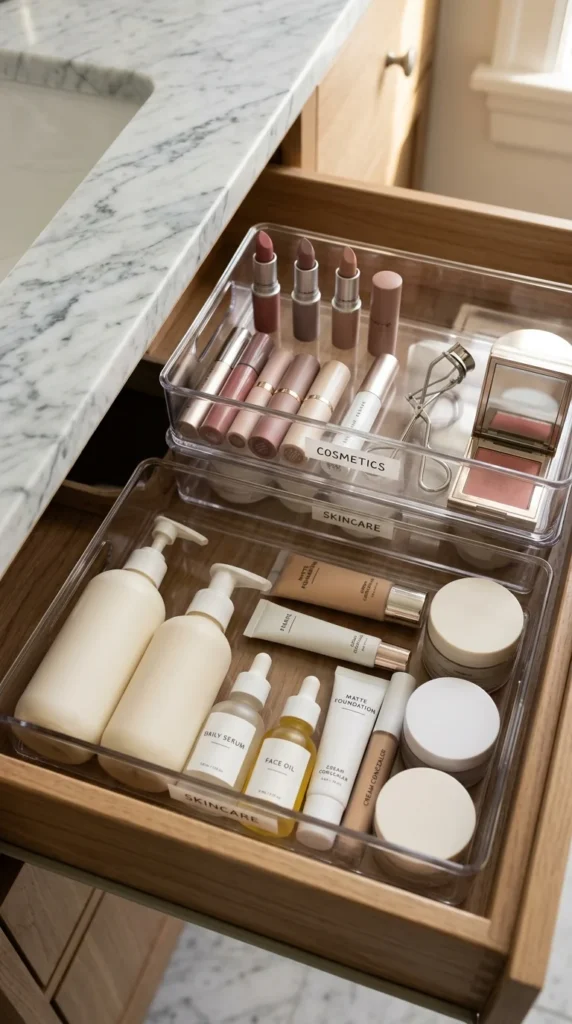
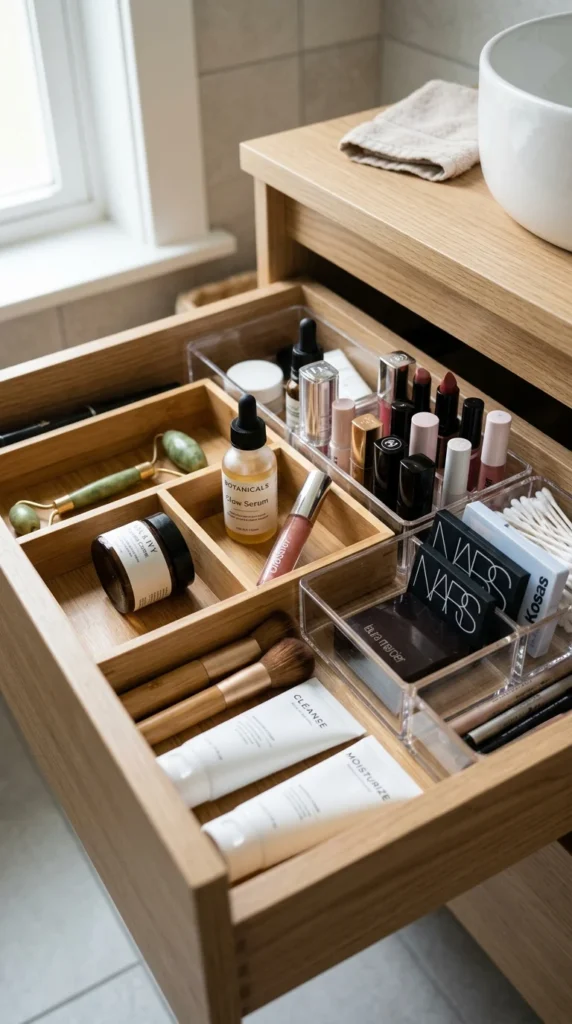
3. Clear Acrylic Trays for See-Through Storage
Clear acrylic trays change how you use a drawer. You spot what you want without rummaging. No more dumping out half the drawer to find one mascara.
Acrylic resists water and wipes clean in seconds. It also looks like glass without breaking when you drop it. Sets of four to six trays cost between $15 and $30 at home stores and online.
Look for sets with mixed compartment sizes. Long narrow slots hold brushes and pencils. Square ones suit small jars and bottles. The mix lets you sort everything in one go.
Cheap version: clear plastic deli containers from the grocery store work almost as well. They cost about $1 each and stack inside drawers. Trim the rims with scissors if they sit too tall. The look is less polished, but the function is identical. This works great for kid bathrooms or rentals where you do not want to spend much. Visibility wins every time over decorative opaque storage.
4. Adjustable Dividers That Grow With You
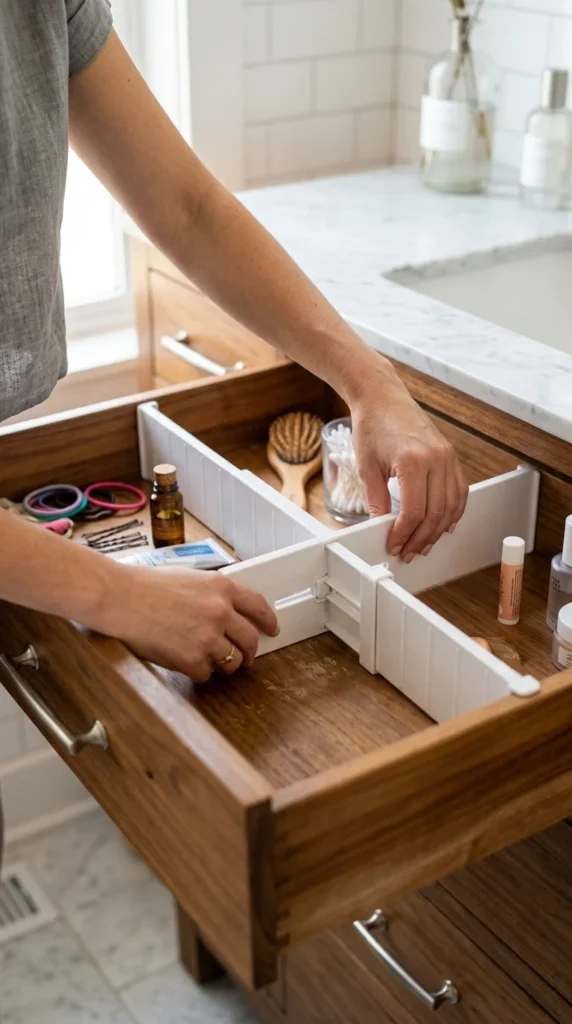
Adjustable dividers stretch to fit any drawer width. They have spring tension or sliding mechanisms that hold them in place without tools. This makes them perfect when you are not sure what you want yet.
Most sets come with two or four dividers for $15 to $25. Look for ones with foam or rubber tips so they grip without scratching the drawer interior.
Start with two dividers and create three sections. Try different layouts over a few days. Move things around until your daily routine feels easy. Then add more dividers if you want smaller zones.
DIY route: cut foam board or thick cardboard to your drawer height. Wrap it in adhesive contact paper for a finished look. Wedge it between drawer walls for a free divider that holds shape. Replace it when it gets damp. This works for testing layouts before buying real dividers. Flexibility matters because your routine changes with seasons and life stages. Adjustable systems adapt without forcing you to start over.
5. Non-Slip Drawer Liners
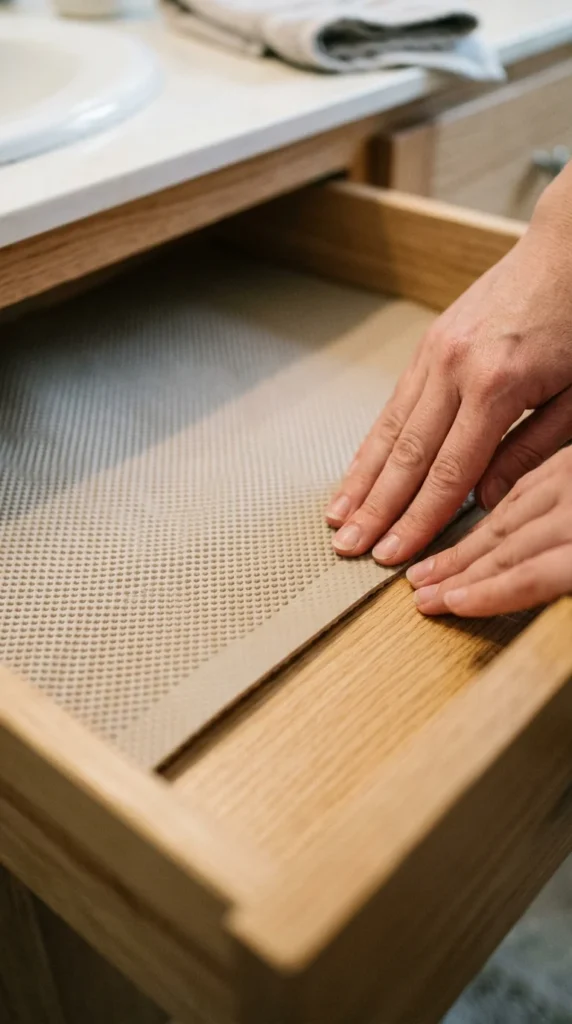
Smooth drawer bottoms let everything slide around when you open and close. Items end up jumbled by lunch. Non-slip liners fix this in minutes.
Buy a roll of rubbery shelf liner for $5 to $10 at any home store. Cut it to fit your drawer bottom with regular scissors. No glue or tape required. The grip holds it in place naturally.
The liner also protects the drawer from scratches and water rings. Soap drips and toothpaste spills wipe right off the rubber surface. Replace the liner when it gets gross instead of refinishing your drawer.
Budget hack: yoga mats cut to size work just as well. A worn-out mat from your closet costs nothing and provides thick cushion plus grip. Cut with sharp kitchen scissors and trim to shape. The slight cushion keeps glass bottles from tipping and breaking when you slam the drawer. Liners earn their keep by stopping noise, preventing slides, and protecting the drawer surface all at once. Pick patterned versions if you want a subtle decor pop.
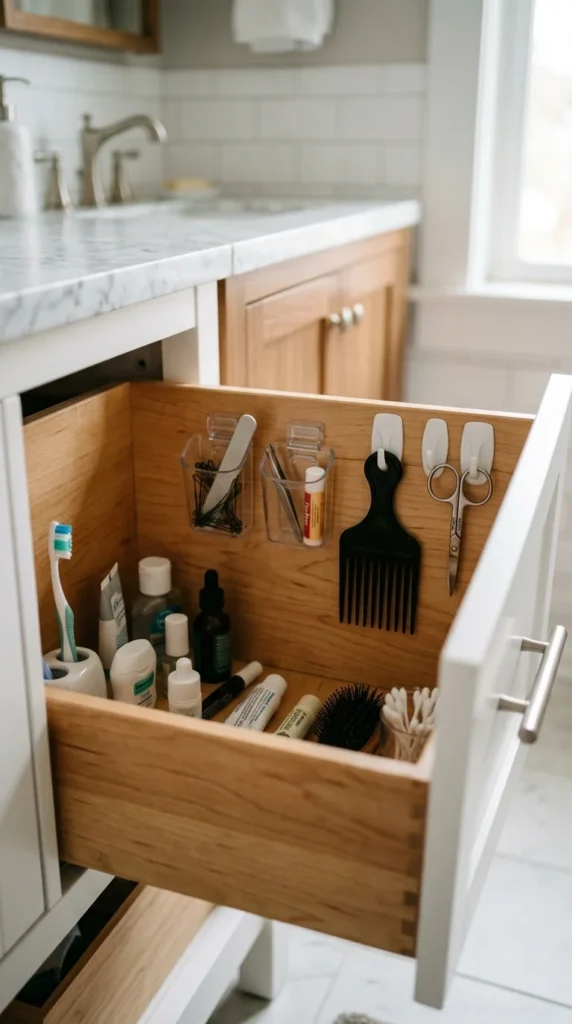
6. Magnetic Strip for Metal Tools
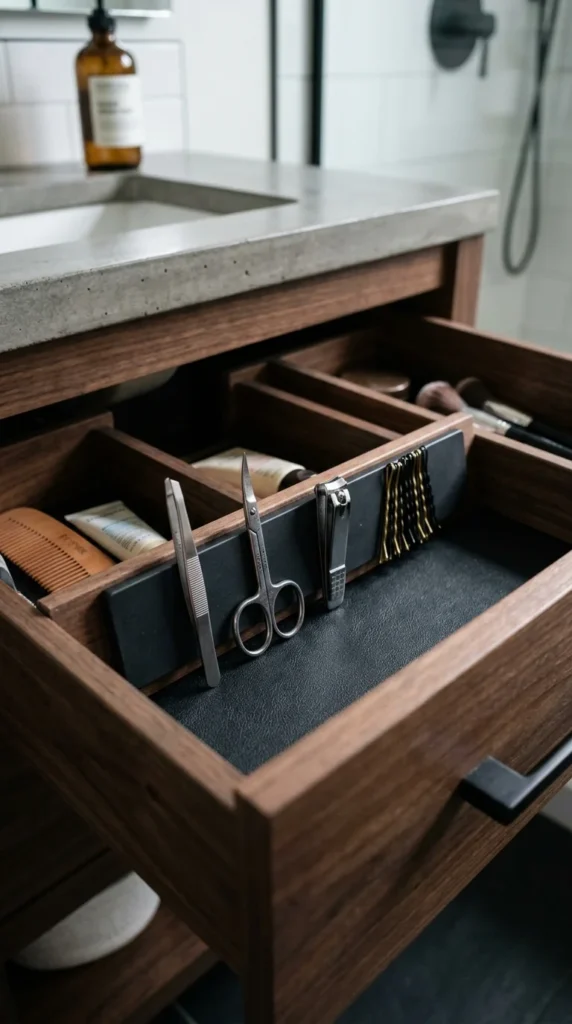
Tiny metal items are drawer chaos champions. Tweezers vanish. Bobby pins migrate to corners. Nail clippers hide under everything. A magnetic strip solves all of it instantly.
Buy a magnetic strip with adhesive backing for $5 to $10 at hardware or craft stores. Stick it to the inside front wall of your drawer. Press metal tools against it and they stay put.
This works for tweezers, nail scissors, clippers, bobby pins, hair clips with metal bases, and small grooming tools. Everything stays visible and grabbable. Open the drawer and your items hang in neat rows like a tiny tool shop.
DIY version: glue several refrigerator magnets in a row using strong adhesive. Cover the front with a strip of leather or fabric for a finished look. This costs about $3 and works on the same principle. Metal tools belong on magnets, not loose in compartments where they tangle with other items. The system also dries metal tools faster since they hang in open air instead of sitting damp inside a tray.
7. Stack Trays for Deep Drawers
Deep drawers waste half their space if you stack items flat. A two-tier tray system doubles your storage in the same footprint. The top tray slides to reveal the bottom layer.
Look for stackable acrylic or plastic trays for $20 to $40 per set. The top tray usually sits on built-in tabs or a track inside the bottom tray. Slide it forward, back, or remove it completely.
Use the top tier for daily items you grab every morning. Reserve the bottom for backup supplies or weekly-use products. This keeps high-traffic items at fingertip level while still using the full drawer depth.
Cheap alternative: place a smaller tray on top of an upside-down loaf pan inside the drawer. The pan creates a shelf and the tray sits on top. Total cost under $10 if you already own the pan. The bottom layer stays accessible by lifting the tray briefly. Layered storage turns one drawer into the equivalent of two, which matters most in apartments with limited vanity space.
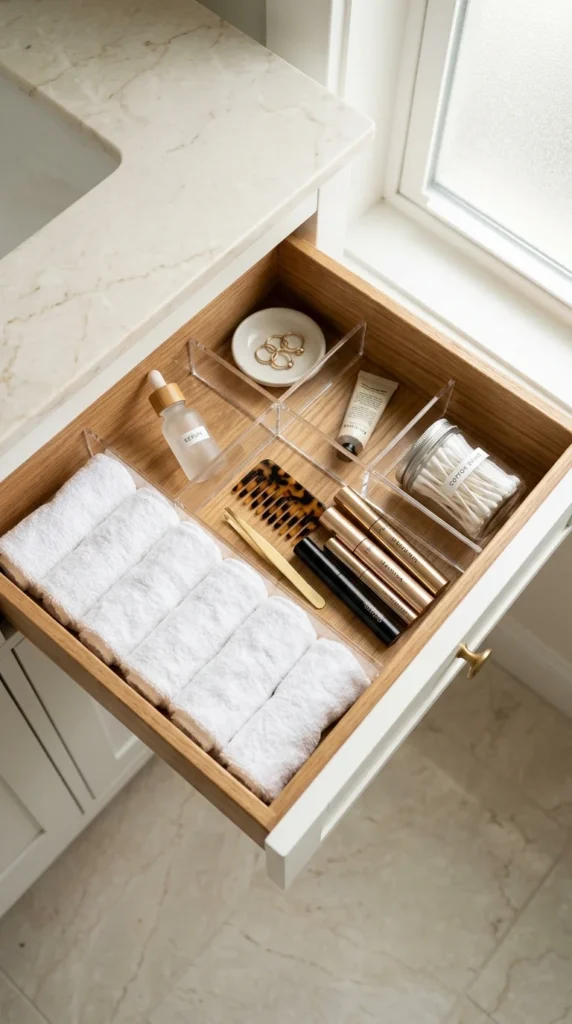
8. Roll Towels Instead of Folding
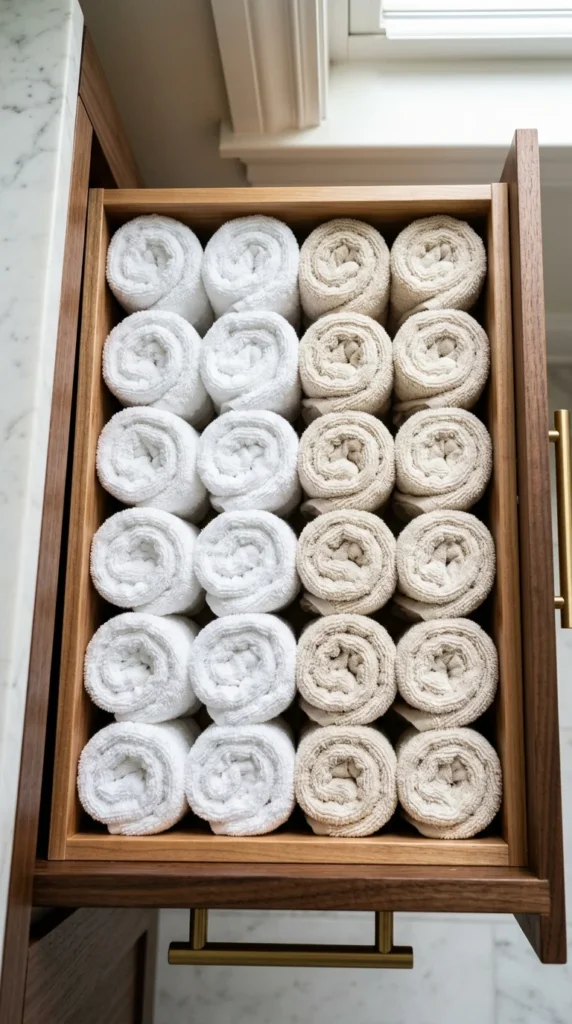
Folded washcloths stack flat and bury anything beneath them. Rolling them on their sides changes the math. You see every color and pattern at a glance, and they take up less linear space.
Roll each washcloth from the short end as tight as possible. Stand them upright in rows inside the drawer. They look like a hotel spa shelf and grab one at a time without disturbing the others.
This trick works for hand towels too if your drawer is deep enough. Six or seven rolled towels fit where two folded stacks lived before. The drawer also looks intentional instead of like a linen closet explosion.
Free tip: practice rolling once and you will never go back. Tight rolls hold their shape through multiple uses. Loose rolls collapse and ruin the look. Hotel-style rolling also makes towel rotation easy since you can see at a glance which colors you have not used in a while. This rotation extends the life of your linens since none get over-washed while others sit ignored.
9. Label Everything for Shared Bathrooms
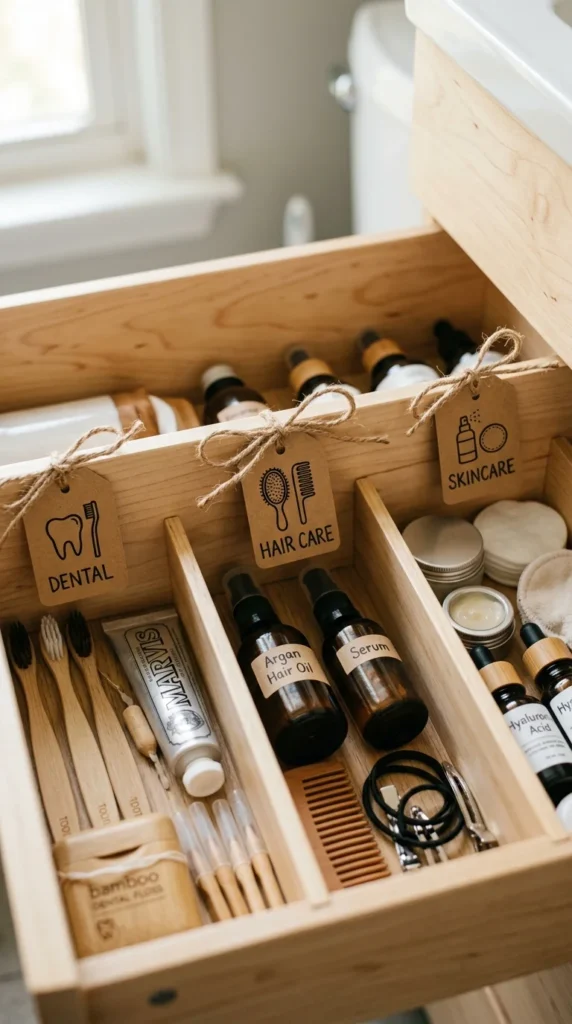
Shared bathrooms turn into battlegrounds without labels. Kids dig through your skincare. Partners borrow your razor. Labels make the system stick because everyone knows where things go.
Use kraft paper tags tied with twine, chalk labels you can rewrite, or printed waterproof stickers. A pack of 50 small labels costs under $10 at craft stores. Stick or tie one to each divider or container.
Keep label text short. Single words like “razors” or “dental” beat long descriptions. Add a small drawing for kids who do not read yet. A toothbrush sketch on the dental section works for any age.
Free option: cut tags from cereal boxes and write with a permanent marker. Punch a hole and tie with kitchen string. They look intentional and cost nothing. Labeled zones stop the daily question of “where does this go” because everyone in the household knows the answer. This single change cuts bathroom clutter in shared spaces by half within a week.
10. Daily Use Drawer at Top
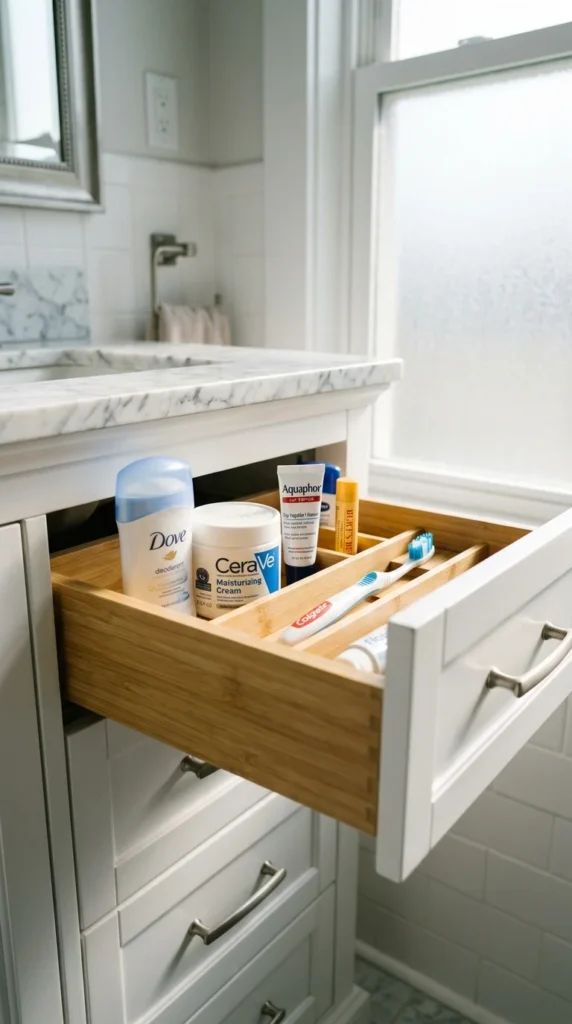
Not every item gets touched every day. Sort your drawers by frequency to save time. The top drawer holds only daily essentials. Lower drawers hold backup and occasional items.
Top drawer items include your daily moisturizer, deodorant, toothbrush, and morning makeup basics. Things you reach for between waking up and walking out the door. Limit this drawer to twelve to fifteen items max.
Middle drawers hold weekly products. Face masks, hair treatments, beard trimmer, manicure kit. Bottom drawers store backup supplies and travel kits. Things you grab once a month or less.
Budget bonus: this system requires zero new purchases. Just reshuffle what you already own. The top drawer becomes a fast morning routine. Frequency-based zones match the natural way your hand moves during a busy morning. You stop reaching for the wrong drawer and pulling out items you do not actually need. The whole routine speeds up by minutes, which adds real time to your morning before work or school.
11. Travel Kit Drawer Always Ready
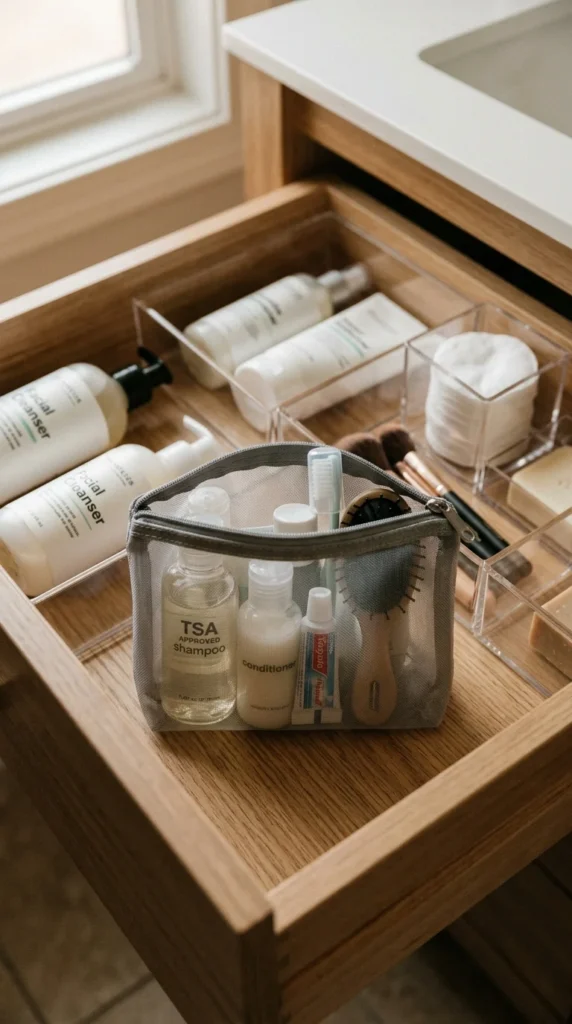
Keep one drawer section permanently stocked with travel sizes. Open it, grab the pouch, throw it in your bag. Pre-trip stress drops to zero when this drawer stays ready.
Buy a clear zippered pouch for $5 to $10. Fill it with TSA-friendly bottles of shampoo, conditioner, body wash, and lotion. Add a travel toothbrush, mini toothpaste, deodorant, and razor. Refill bottles after each trip from your full-size products.
Keep the pouch in its own drawer compartment. Do not raid it for daily use or you will pack on trip day and find it empty. The whole point is having a kit that stays packed.
Cheap alternative: save those tiny shampoo bottles from hotel stays. Wash them out and refill with your usual brands. Free travel containers in unlimited quantity. Pre-packed kits save twenty minutes the night before any trip. They also stop the panic of realizing at the airport you forgot deodorant. Keep a small written list of refill items inside the pouch so you know what to top off after each return home.
12. Drawer for Hair Tool Outlets
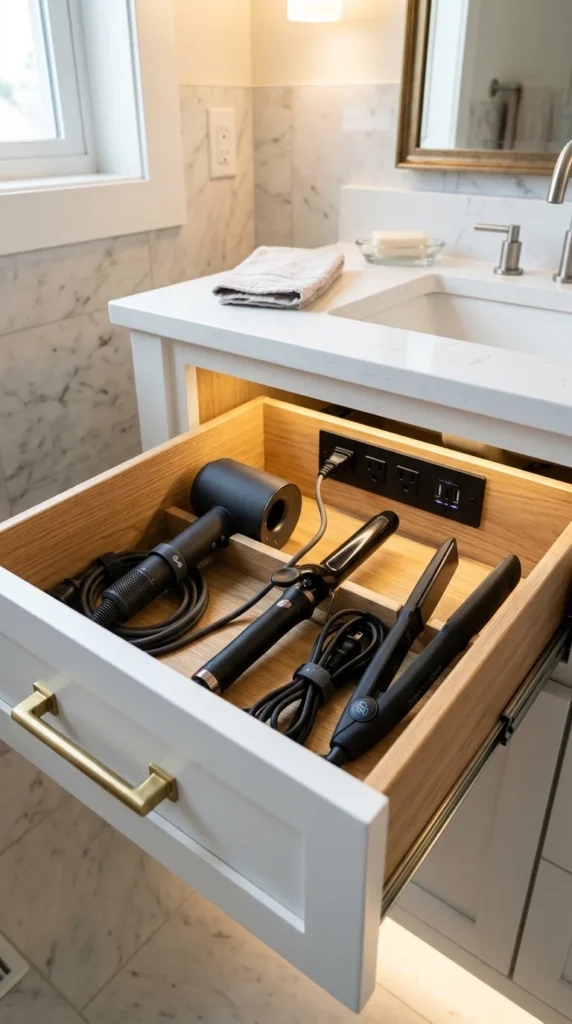
Hair tools usually live on the counter, cluttering everything. A drawer with an outlet inside lets you store them plugged in and ready. Open the drawer, use the tool, close it when done.
This idea works during a remodel or new install. An electrician adds an outlet inside the drawer for around $200 to $400. Counter clutter vanishes and the tools live exactly where you use them.
If a built-in outlet is not possible, use a heat-safe mat inside the drawer. Wind cords neatly with velcro ties. Tools cool before you close the drawer to avoid damage.
Renter option: a hair tool holder mounted on the inside of a cabinet door works similarly without rewiring. They cost $15 to $30 and hold a blow dryer with curling and flat irons. Cords drop down inside the cabinet out of sight. Hidden hair tool storage clears counters fast and makes the bathroom photo ready in seconds. Great for small bathrooms where every inch of counter space matters during morning routines.
13. Tiny Tray for Tiny Items
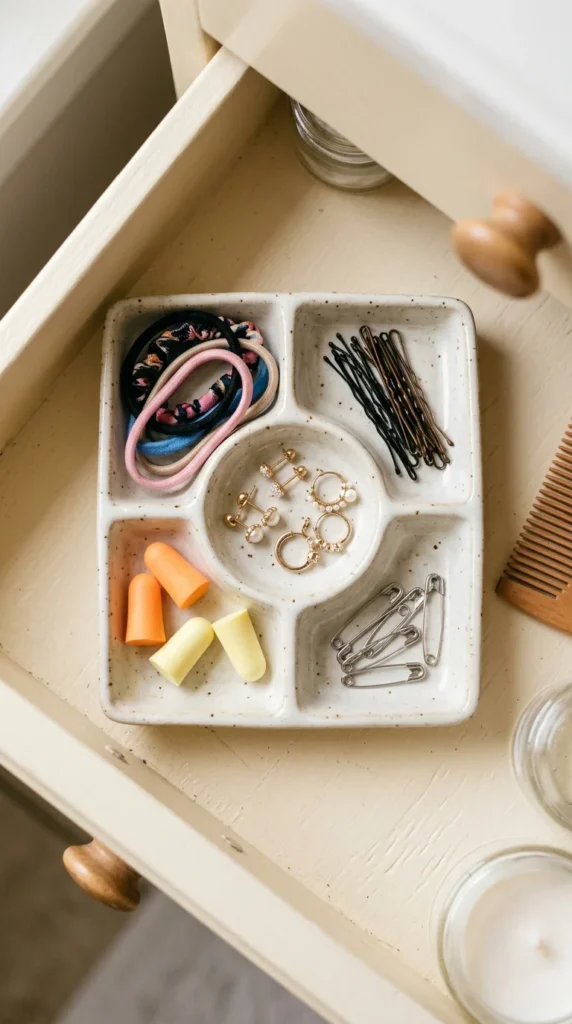
Small items disappear in big drawers. They hide under bigger products and roll into corners. A tiny segmented tray gives each one a home.
Look for divided trays with compartments under two inches square. Ceramic, silicone, or plastic all work. Sets cost $8 to $15. Some have lids if you want extra dust protection.
Use one section for hair ties. Another for bobby pins. A third for small earrings you take off before showering. A fourth for ear plugs, safety pins, or contact case backups.
Free DIY: an old ice cube tray works perfectly as a tiny item organizer. The square slots hold small items without rolling. Silicone trays bend so you can pop them out for cleaning. Compartmentalized chaos is the only way to keep tiny items findable. Without these dedicated spots, small things end up loose at the bottom of every drawer and never get used. The tray system takes ten seconds to set up and changes how you find things forever.
14. Vertical Storage for Tall Bottles
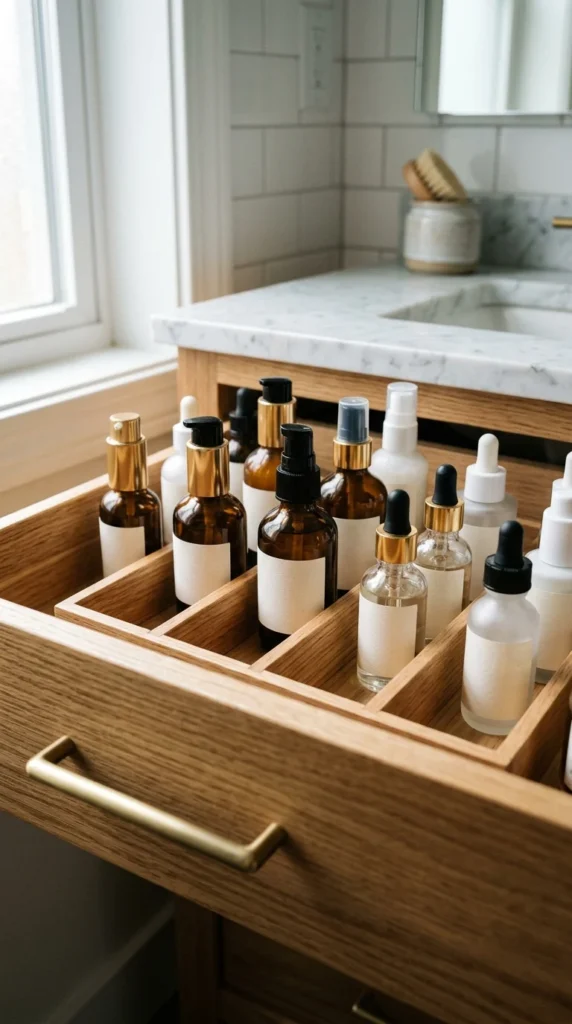
Tall bottles lying flat waste space and roll when you open the drawer. Stand them upright in narrow slots instead. Vertical storage uses drawer height that usually sits empty.
Buy a divided organizer with tall narrow compartments. Or use sturdy juice glasses, mason jars, or tin cans inside the drawer to corral upright bottles. The compartment height should match your tallest bottle.
This works perfectly for serums, toners, perfume samples, and tall lotions. You see each label by looking down into the drawer. Grab the one you want without disturbing the others.
Budget bonus: paint coffee cans or old jars in coordinating colors. Free containers that hold bottles perfectly. Group similar products in each can. Standing bottles up also lets pumps and droppers stay functional. Bottles laid flat can leak through their caps over time, especially if the seal weakens. Vertical storage prevents this and makes inventory checks easier. You see at a glance which products are running low without picking up each one.
15. Drawer Inserts Made From Cardboard
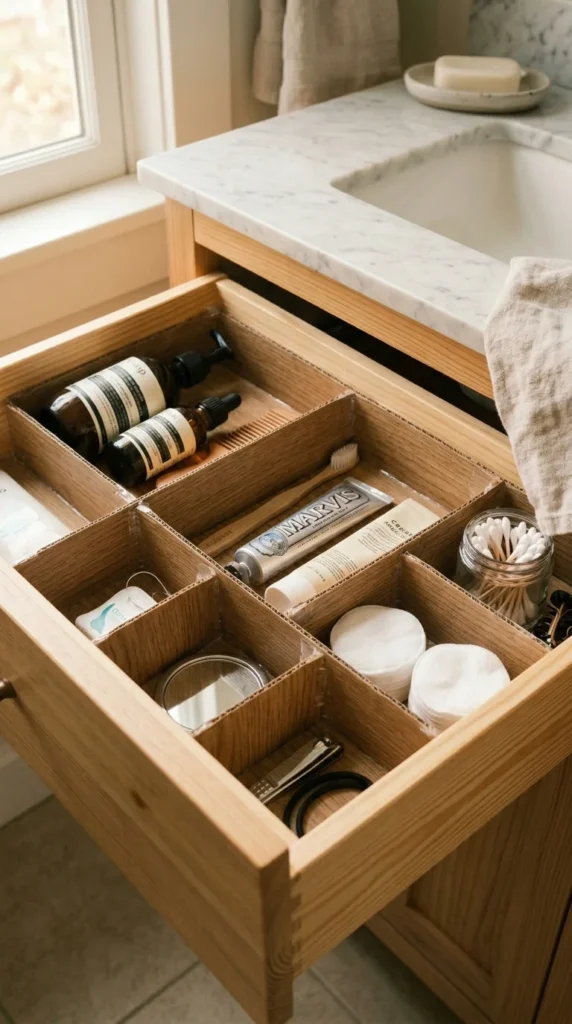
Store-bought dividers cost real money. Cardboard ones cost nothing and work just as well. Pull out a few shipping boxes and you have free organizers.
Cut sturdy cardboard to your drawer height. Use a craft knife and metal ruler for clean edges. Cover each piece with adhesive contact paper for a finished look and moisture resistance. Wood-grain or marble patterns hide the cardboard core.
Make slits halfway up two pieces and slot them together at right angles to create cross dividers. This builds a custom grid sized exactly to your drawer. No spring tension or adhesives required.
Estimated cost: under $5 if you buy a roll of contact paper. Free if you already have some. Total time about thirty minutes for a full drawer system. DIY dividers let you customize compartment sizes for your exact items. Store-bought systems force you to fit your stuff into their grids. Cardboard systems adapt to your stuff. Replace them every year or two when they wear out, since you can make new ones whenever you want.
16. Use Small Glass Jars for Cotton Items
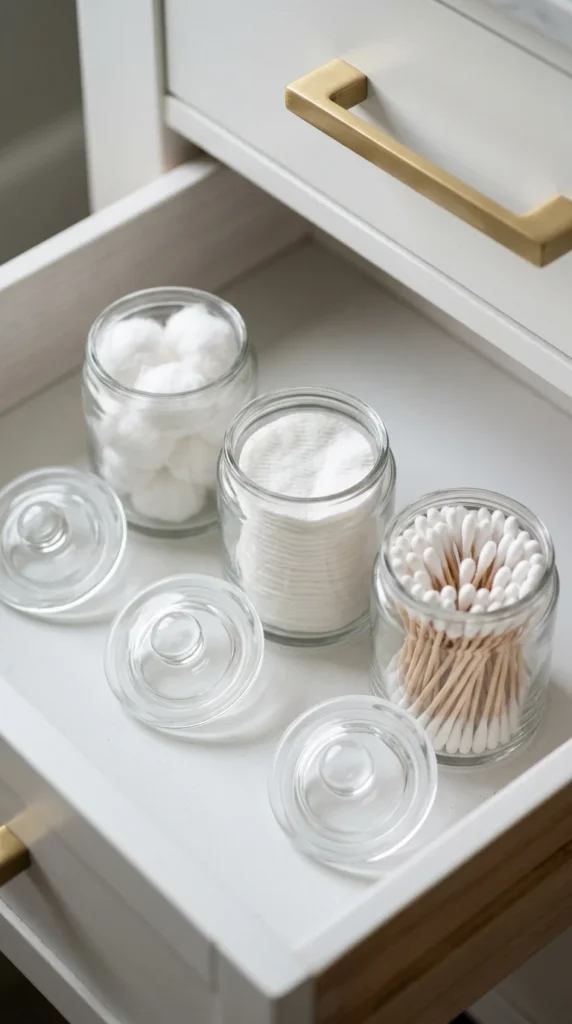
Cotton balls and rounds usually come in unsightly plastic bags. Transfer them to small clear glass jars for a spa look right in the drawer. Open the lid, grab one, close it.
Use leftover jam jars, baby food jars, or buy small spice jars from a discount store for under $2 each. Wash them well and remove labels. The glass keeps cotton items clean and shows when you are running low.
Group all cotton-based items in one drawer section. Cotton balls in one jar. Cotton rounds in another. Q-tips standing up in a third. The matching jars look intentional like a high-end skincare counter.
Free version: clean and reuse small condiment jars from delivery food. They stack inside drawers and hold the same small items. Wrap the outside with twine if you want a more polished look. Decanting cotton items also stops bags from tearing and spilling. Loose cotton balls rolling around a drawer get dusty and need throwing out. Jarred ones stay clean and last until the last piece.
17. Back of Drawer Hidden Storage
The back wall of a drawer is forgotten real estate. Adhesive hooks or small clip-on containers turn that wasted vertical space into bonus storage. Items you rarely use can hang there.
Buy adhesive mini hooks or clip-on cups for $5 to $10 at any home store. Stick them to the inside back wall of the drawer. Make sure the height clears anything sitting in the drawer below.
Hang folding scissors, a hair pick, small measuring tape, or a folded note with skincare routines. Light items only since adhesive holds limited weight. Test before loading anything important.
DIY: glue plastic shower caddy hooks or even spring clothespins to the back wall using strong adhesive. They hold light items for free. Back wall storage is the kind of trick organizers use that homeowners never think of. Most drawers have empty air between the contents and the back wall. Filling that space adds capacity without making the drawer feel crowded since the items hang above the main contents instead of competing for floor space.
18. Color Code Family Members
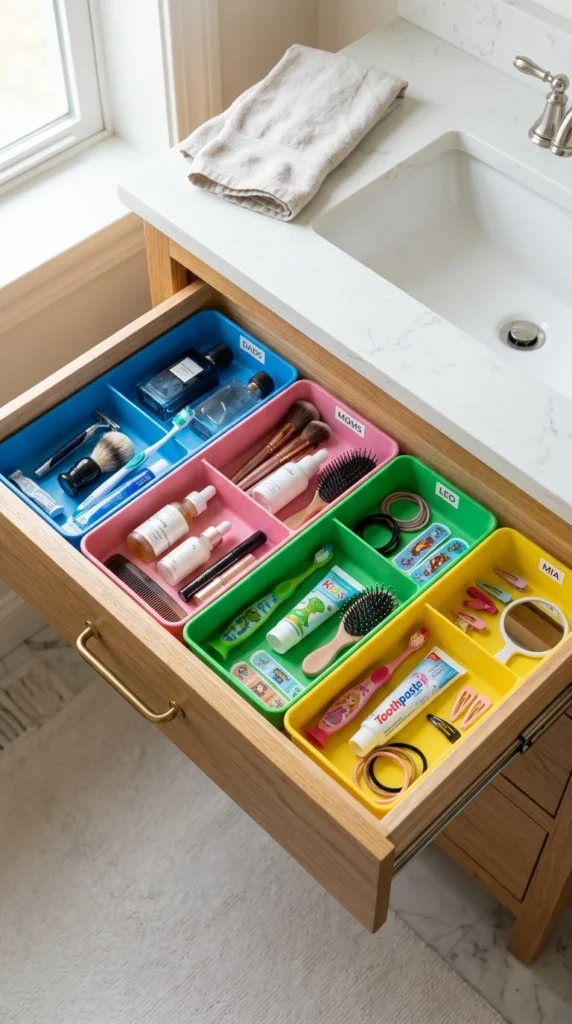
Family bathrooms get crowded fast. Each person has different products and tools. Color coding gives everyone their own zone without arguments about whose stuff is whose.
Assign each family member a color. Buy small bins or place colored stickers on dividers in that color. Blue for dad, pink for mom, green for one kid, yellow for another. Everyone knows their section instantly.
Stock each zone with that person’s essentials. Toothbrush, deodorant, hair products, personal care items. Communal items like first aid stay in a separate uncolored section.
Budget bonus: use colored washi tape or paint chip samples for free coding. Even small ribbon strips work. The colors stop disputes over borrowed razors and missing supplies. Color zones also help kids learn to put their stuff back. Visual cues work better than written labels for younger family members. The whole family stops mixing up products within a week of starting this system, and your daily routine speeds up since you skip the search for your own items.
19. Drawer Just for Backup Supplies
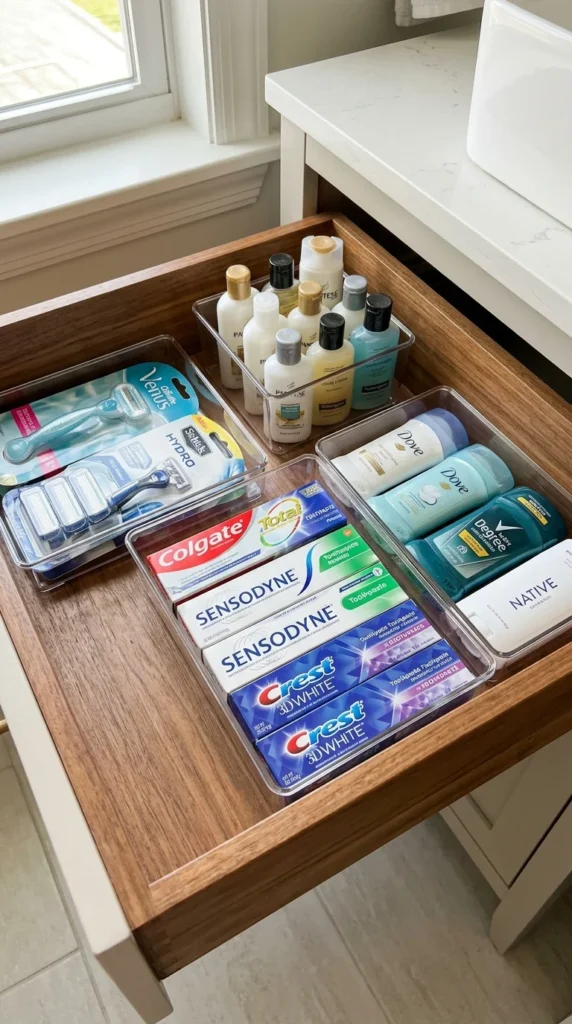
Running out of toothpaste at 7 AM ruins mornings. A dedicated backup drawer prevents this. Unopened supplies live here until current ones run out.
Use the lowest drawer in your vanity for backups. Group by category in clear bins. One bin for dental backups. One for skincare refills. One for personal care. Buy duplicates only of items you actually use up.
Check this drawer once a month to track inventory. Anything running low gets added to your shopping list. Anything expired gets tossed. The drawer keeps a running supply system without thinking about it.
Cost-saving tip: stock backups when items go on sale. Buying toothpaste on sale and storing in the backup drawer saves real money over a year. Inventory drawers also help you skip late-night runs to the store. Open the drawer, grab a backup, keep going. The peace of mind alone is worth the drawer space. This system works especially well for households with kids or anyone who hates last-minute errands when supplies run out.
20. Quick Weekly Reset Routine
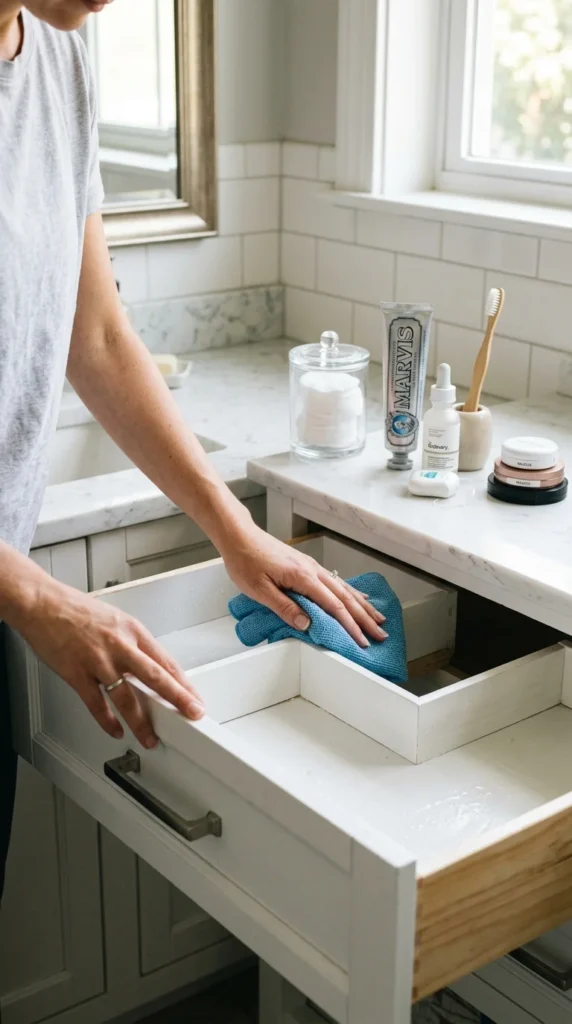
Organized drawers slowly slip back into chaos without maintenance. A weekly five-minute reset keeps the system running. Pick a day and time that works for your schedule.
Sunday mornings work for most people. Open each drawer. Put back anything that wandered to the wrong spot. Wipe down spilled powder or sticky bottle bottoms. Toss anything expired or fully empty.
Restock items that are running low from the backup drawer. Add anything to the shopping list that you have used up. Close the drawer and move on. The whole reset takes five minutes per drawer at most.
Free hack: pair the reset with another Sunday habit. Do it while coffee brews or laundry runs. The activity stack means you remember to do it without setting a separate reminder. Weekly resets prevent the slow drift toward clutter. Without them, even the best organizing system falls apart in two months. With them, the same system runs cleanly for years with no rework or rebuying organizers because nothing gets damaged from neglect.
21. Mix Wood and Acrylic for Style
Matching all-acrylic drawers look sterile. All-wood looks heavy. Mixing both materials gives texture and warmth while keeping things functional. The contrast feels designed.
Use clear acrylic trays for small items where visibility matters. Use bamboo or wooden dividers for larger sections that hold rolled towels or grouped products. The acrylic disappears visually while the wood adds warmth.
Look for bamboo drawer dividers for $10 to $20 and clear trays for $5 to $15 each. Buy one bamboo set and a few clear trays. The total cost stays under $40 for a polished mixed look.
Budget approach: thrift stores often have wooden silverware trays for $3 to $5. They work as bathroom drawer dividers with no modifications. Pair with clear plastic deli containers for the acrylic look. Mixed materials turn a drawer into something photo-worthy without spending designer prices. The visual interest also makes opening the drawer enjoyable, which surprisingly helps you keep up with maintenance. People take better care of spaces that look nice.
22. Build a Permanent Layout Map
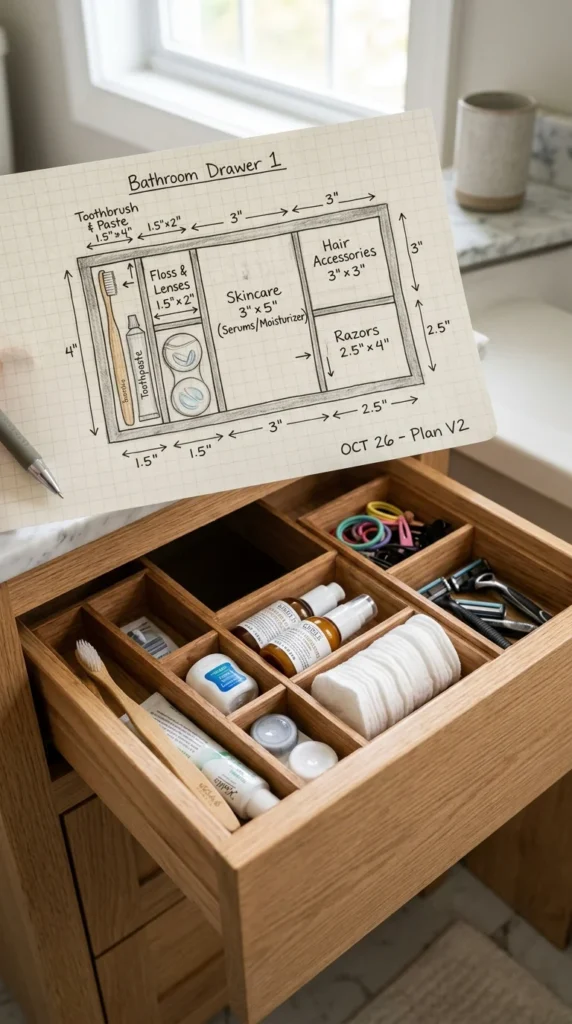
Once your drawer system works, draw a quick map of what goes where. Save it inside the drawer or take a photo for your phone. The map preserves the system through busy weeks and household helpers.
Sketch the drawer from above on graph paper. Mark each compartment with what belongs there. Note size, position, and any special details. This takes ten minutes and saves hours of rebuilding later.
Share the map with anyone who uses the bathroom. Guests, family, cleaners can put things back correctly. The system survives even when you are not the one closing up the drawer.
Free idea: laminate the sketch with clear packing tape if you want a wipeable version. Stick it inside the drawer with mounting putty so it stays in place. Documented systems outlast memory and habits. Most people abandon organizing because the layout fades from memory after busy weeks. A visible map keeps the system running automatically. This single step turns a one-time project into a permanent setup that works for years without re-planning.
Conclusion
Bathroom drawers do not have to be daily frustration zones. With dividers, liners, magnetic strips, and a frequency-based layout, the chaos turns into a routine that flows. Most of these ideas cost under $20 each, and several cost nothing beyond what you already have at home. Pick two or three to try this weekend. Start with the top drawer where you spend the most morning minutes. Build out slowly to other drawers as the system clicks. The payoff arrives fast. Mornings shorten. Stress drops. The bathroom finally feels like a space that helps your day instead of slowing it down.


