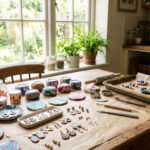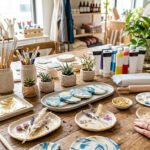
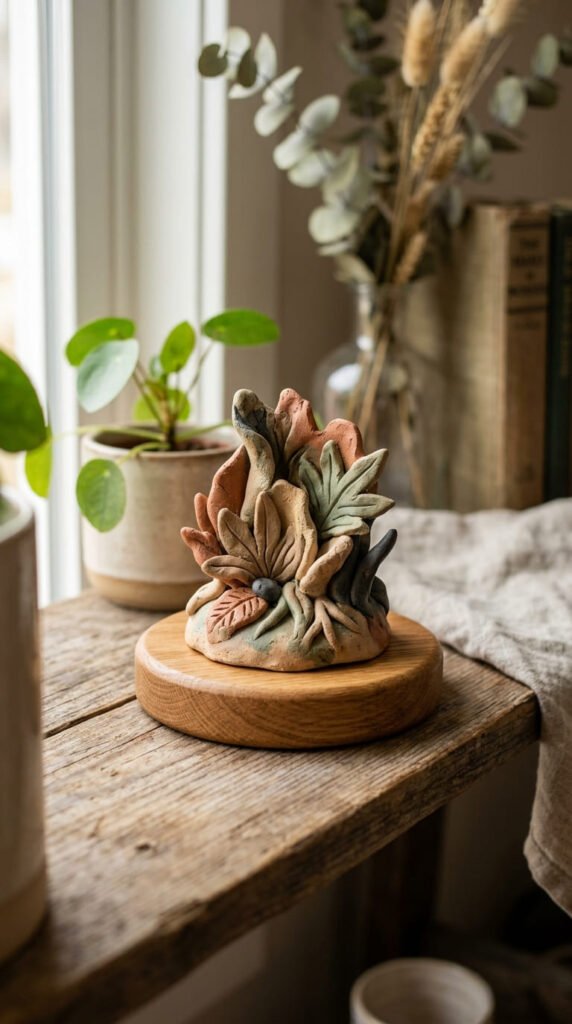
Clay has quietly taken over home decor feeds, and it is easy to see why. A lump of air-dry clay, a few cheap tools, and an afternoon can turn into a planter, a pair of earrings, or a little dish that looks like it came from a boutique. No kiln, no oven, no fancy studio. The 2026 look leans into earthy tones, organic shapes, and that lovely hand-formed feel where perfect symmetry takes a back seat. This list rounds up 22 trendy aesthetic clay art ideas filling Pinterest right now. Each comes with simple steps and budget tips so you can make them at home. Grab some clay and let’s get crafting.
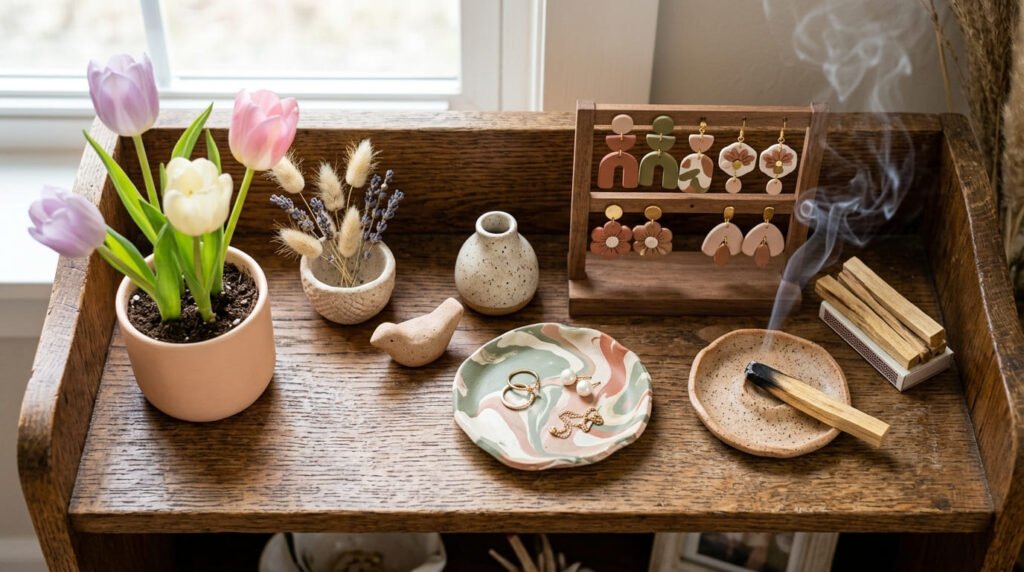
1. Pastel Tulip Flower Pot

This little pot is everywhere on Pinterest, and it is sweeter than it looks to make.
Start with a simple pinch pot. Roll a ball, push in your thumb, and pinch the walls out.
Now the magic. Shape small 3D petals from soft clay and press them around the rim like tulip flowers.
Use pastel pink, soft green, or cream for that dreamy look.
Budget tip: no pastel clay? Paint a plain white pot with watered-down acrylic for the same soft finish.
Let the pot dry fully, then plant a tiny succulent inside. Air-dry clay does not love water, so skip thirsty plants.
Smooth the petal edges with a wet finger so they merge into the pot.
Keep the walls even so it dries without cracking.
A bit of sanding on the rim neatens any rough bits.
Group two or three pots in different pastels for a styled shelf.
These look gorgeous on a desk or windowsill.
A small, cheap project with big charm. The perfect place to start.
2. Beaded Trinket Dish
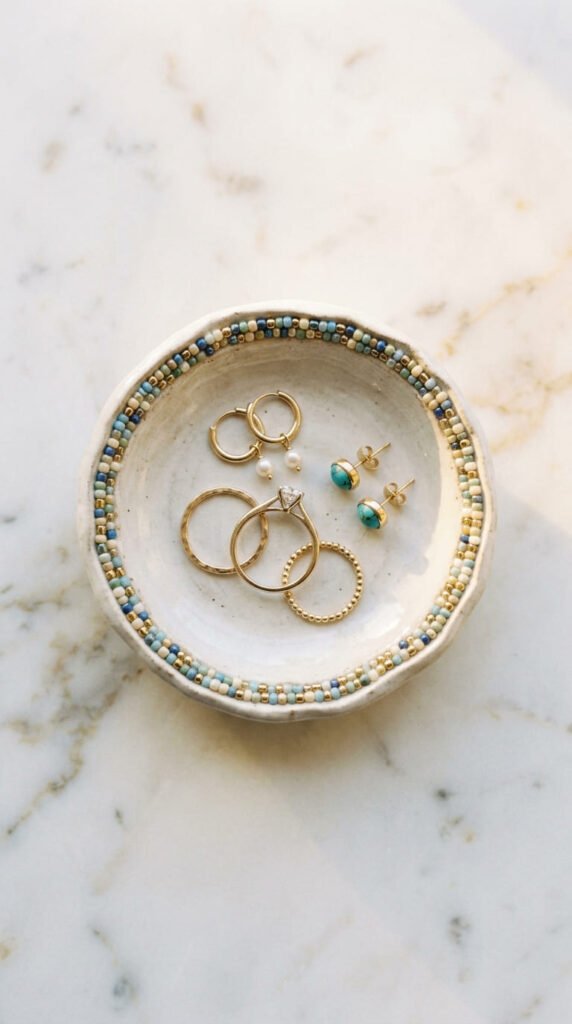
A trinket dish is one of the most soothing things to make. It holds rings, earrings, and little bits.
Roll a flat clay circle. Then gently curve the edges up to form a shallow dish.
While the clay is soft, press tiny beads around the rim for texture.
Or press in a leaf, a doily, or lace for a pattern.
Budget tip: raid an old broken necklace for free beads. Buttons and small stones work too.
Let it dry on a curved surface, like inside a small bowl, so it keeps its shape.
Paint it a soft earthy tone or leave it natural and chalky.
A dab of gold paint on the rim gives it a boutique feel.
These make lovely gifts. Make a few in one sitting.
Keep the dish small and the walls even so it dries flat.
Set one by the sink for rings or on a nightstand for jewelry.
Calming to make, useful to keep. A true aesthetic win.
3. Statement Clay Earrings
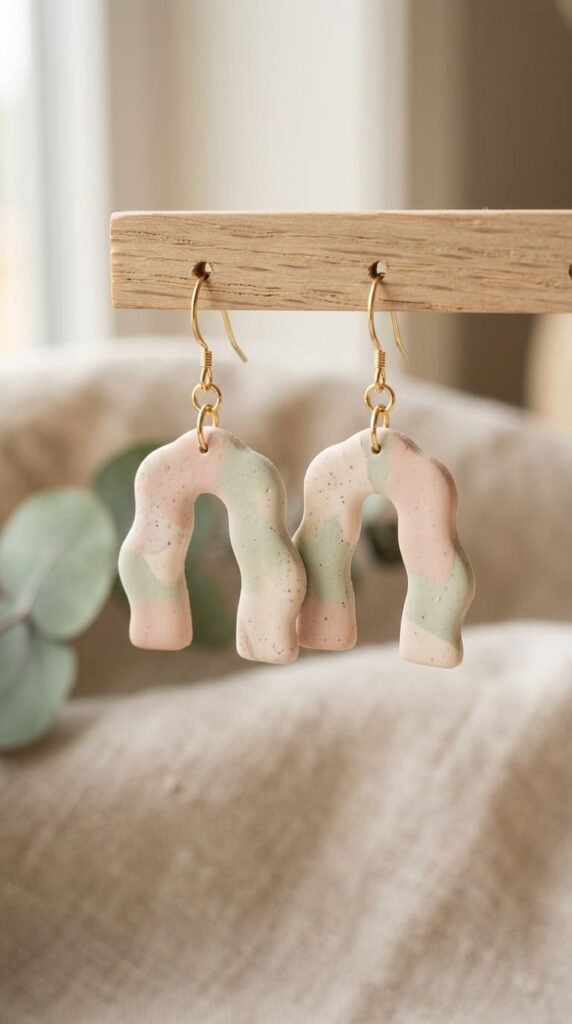
Clay earrings are light, cheap, and look like designer pieces. They are a Pinterest favorite.
Roll the clay thin and flat. Then cut shapes with a cookie cutter or a knife.
Arches, circles, and organic blobs all work. The wonky hand-formed look is the trend.
Poke a small hole at the top with a toothpick before drying.
Budget tip: a pack of earring hooks costs very little online. One pack makes dozens of pairs.
Once dry, thread a jump ring and an earring hook through the hole.
Paint them in pastels or earthy tones. Add a tiny dot pattern for detail.
Seal them with a clear coat so the color stays put.
Keep them thin so they stay lightweight on your ears.
Make matching sets or mismatched pairs for fun.
These sell well at markets too if you make extras.
Wearable art you can finish in an afternoon. A stylish, low-cost project.
4. Ceramic-Look Incense Holder
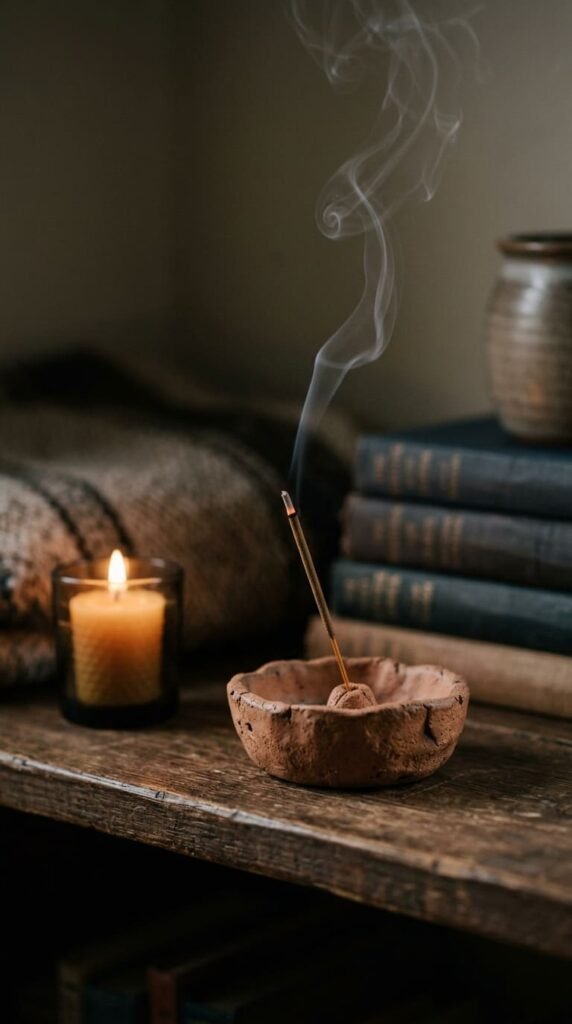
Incense holders are big in the wellness-decor world. They make a calm little corner feel intentional.
The simplest version is a small flat clay disc. Poke one hole in the center for the stick.
Curve the edges up slightly so ash falls inside.
Press a texture into the surface. Lace, a leaf, or a soft swirl pattern.
Budget tip: the back of a fork or a button makes a pretty texture for free.
Go for earthy, muted tones to match the mindful vibe.
Let it dry fully and check the hole still fits an incense stick.
Seal the inside with a heat-safe coat for safety.
Make a matching set with a small dish and a candle holder.
These add a sensory, grounding feel to a shelf or meditation nook.
Keep the base flat and stable so it sits level.
A tiny, calming project that fits the slow-living aesthetic perfectly.
Quick to make, lovely to use.
5. Minimalist Pen Holder
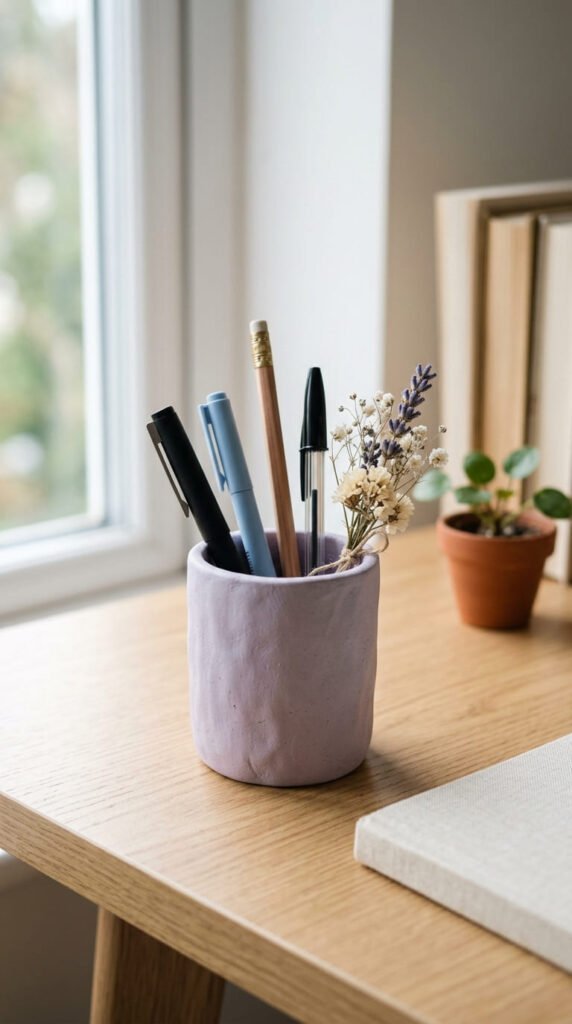
A clay pen holder turns a messy desk into a styled one. Clean lines are the whole look here.
Make a simple cylinder. Roll a slab, wrap it into a tube, and join the seam.
Press it onto a flat clay base and smooth the join.
Keep it plain and minimalist, or add a single line of texture.
Budget tip: wrap the clay around a cardboard tube or a glass to get an even shape. Remove it before drying.
Use a soft pastel or a natural clay tone for the trendy look.
Let it dry, then sand the top rim smooth.
Score and wet the seam well so it does not split.
A small dried flower tucked in adds a sweet touch.
Make a matching set for pens, brushes, and scissors.
These look great on a desk or vanity.
Keep the walls even so it dries without warping.
Simple, useful, and very Pinterest. A great beginner build with a clean result.
6. Hanging Clay Suncatchers
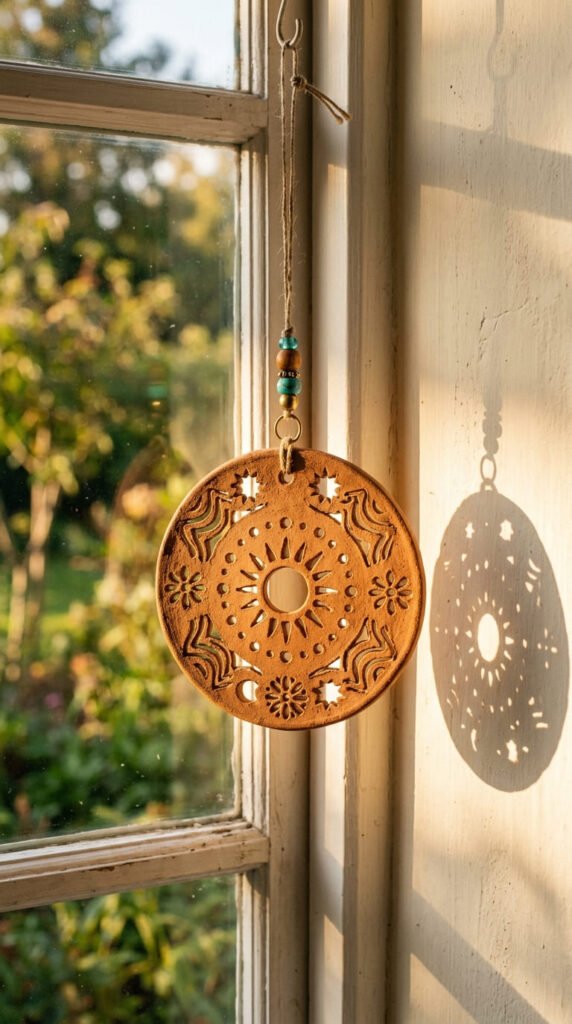
Suncatchers play with light and look gorgeous in a window. They are easier than they seem.
Roll the clay flat. Cut a shape with a cookie cutter. A circle, a moon, or a flower.
Cut smaller shapes out of the middle so light passes through.
Poke a hole at the top to hang it.
Budget tip: a drinking straw punches clean small holes. A bottle cap cuts neat circles.
Let it dry flat so it does not warp.
Paint it in soft tones or leave it natural.
Thread a cord through the top and add a few beads above it.
Hang it where the sun hits for pretty shadows on the wall.
Make a set on one long string for a hanging garland.
Keep the clay an even thickness so it dries flat.
Add a tiny pressed leaf print for extra detail.
These bring soft light play into any room.
A calming window piece that costs almost nothing.
7. Pressed Flower Coasters
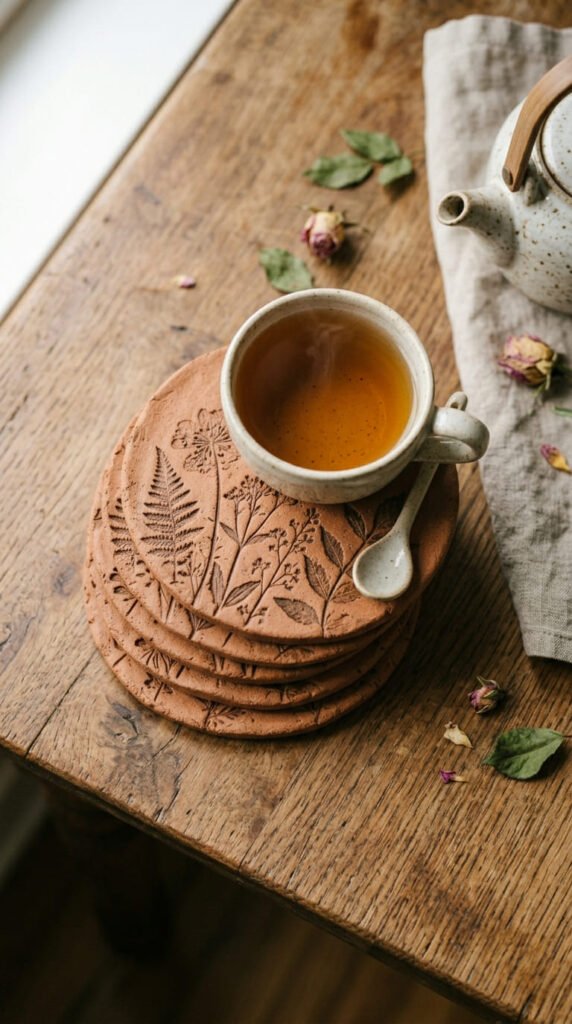
Coasters are useful and make great gifts. Pressed patterns make them look high-end.
Roll the clay to an even thickness. Cut circles or squares.
Press real leaves or flowers firmly into the surface. Peel them back to leave a print.
Budget tip: flowers from the garden cost nothing and leave the prettiest prints.
Let them dry flat so they do not curl.
Seal the top with a waterproof coat so they handle a wet cup.
Paint the pressed pattern a soft color, or leave it natural and chalky.
Make a matching set of four for a real gift.
Keep them thick enough not to crack but thin enough to sit flat.
Sand the edges smooth once dry.
Stack them with a ribbon for an easy present.
A felt pad glued on the bottom protects your table.
These pair perfectly with the earthy, natural look that is everywhere right now.
Pretty, practical, and cheap to make in batches.
8. Alphabet Ornaments
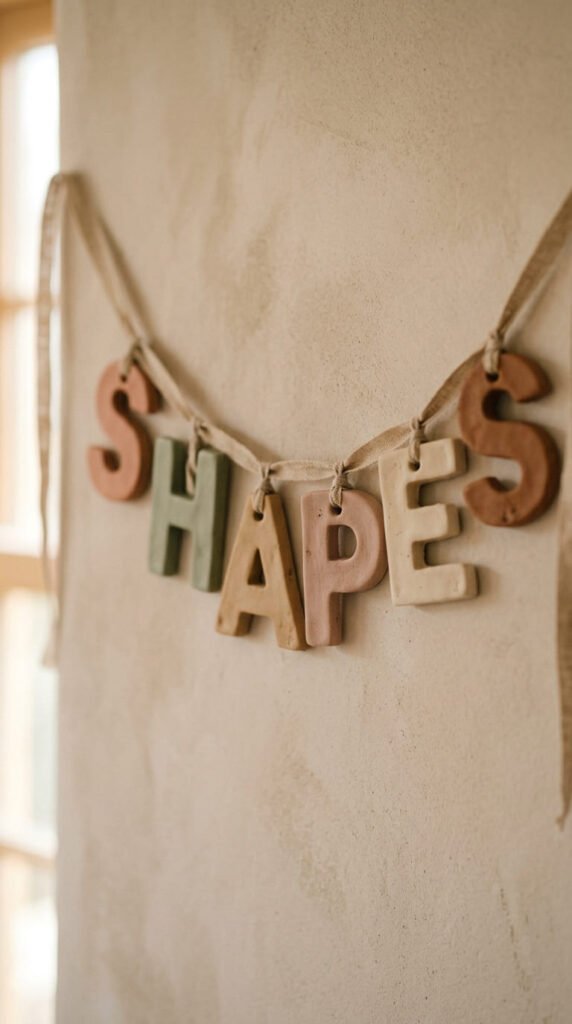
Letter ornaments make sweet, personal gifts. Spell out names or initials.
Roll the clay flat. Cut letters with alphabet cookie cutters, or shape them by hand.
Poke a hole at the top of each one to hang it.
Budget tip: print a letter, cut it out, lay it on the clay, and trace around it with a toothpick. No cutters needed.
Let the letters dry flat.
Paint them in pastels or natural tones to match your decor.
Thread thin ribbon or twine through the holes.
Make a whole name to hang on a wall or a door.
These work as gift tags, place cards, or tree ornaments too.
Keep the letters thick enough so thin parts do not snap.
Sand any rough edges once dry.
Make a bulk set for friends and family at once.
A personal touch that costs very little.
Simple to make and endlessly customizable for any occasion.
9. Clay Flower Frog for Vases
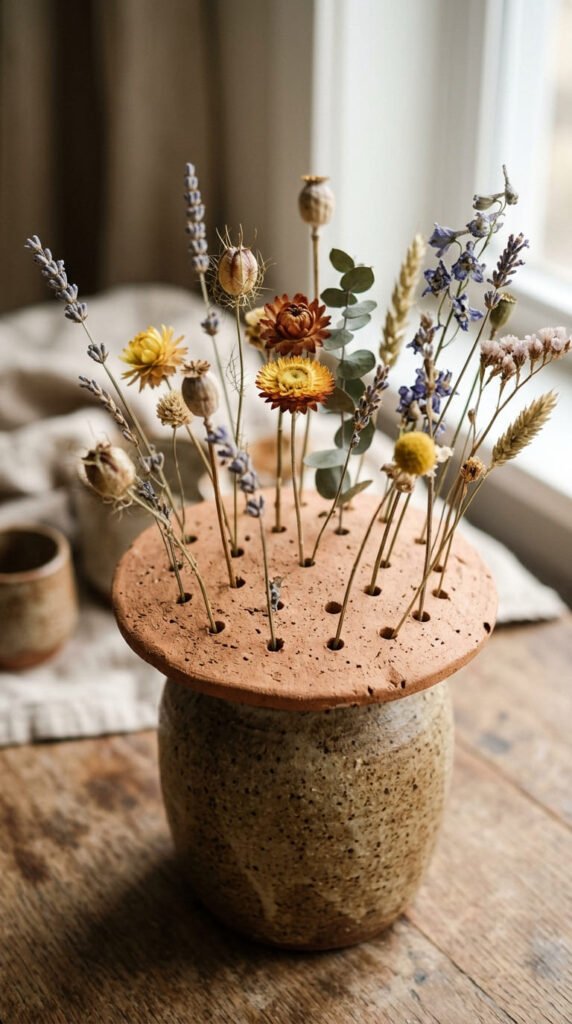
A flower frog is a clever little disc that holds stems upright in a vase. It looks effortless and chic.
Roll a clay circle to fit over the mouth of a vase or jar.
Poke several holes through it with a pencil or a thick straw.
Let it dry flat so it sits level.
Budget tip: size it to a jar you already own. An old jam jar works perfectly.
Each stem slides through a hole and stands on its own.
Use dried flowers since air-dry clay does not love water, or seal it well for fresh stems in a waterproof vase below.
Paint it to match the vase or leave it natural.
Keep the holes a good size so stems fit easily.
This gives even a few flowers a styled, spaced-out look.
Make a few sizes for different jars.
A tiny project that makes your flowers look like a florist arranged them.
Smart, simple, and very on-trend.
10. Clay Wall Hanging Landscape
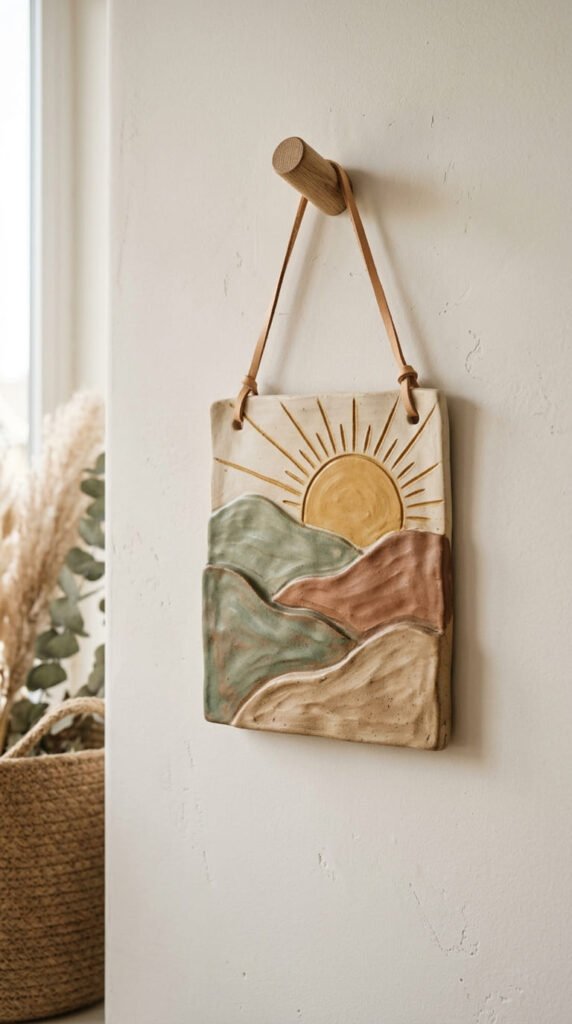
Clay wall art is a big home-decor trend. A simple landscape looks modern and calming.
Roll a flat base shape. A circle or an arch works well.
Build up layers of clay for hills, a sun, and waves. Press them on in soft, rounded shapes.
Budget tip: polymer or air-dry clay both work. Start with whatever you already have.
Use earthy tones like terracotta, sand, cream, and sage.
Add texture with a toothpick for grass or sun rays.
Poke a hole at the top or glue a hanger on the back.
Let it dry flat so it does not warp.
Keep the layers thin so they dry evenly.
The organic, hand-formed look is exactly the 2026 vibe.
Hang it solo or in a small cluster of shapes.
Seal it with a matte coat for a soft finish.
A piece of art for your wall that costs a few dollars.
Calming to make and lovely to look at every day.
11. Clay Dream Catcher
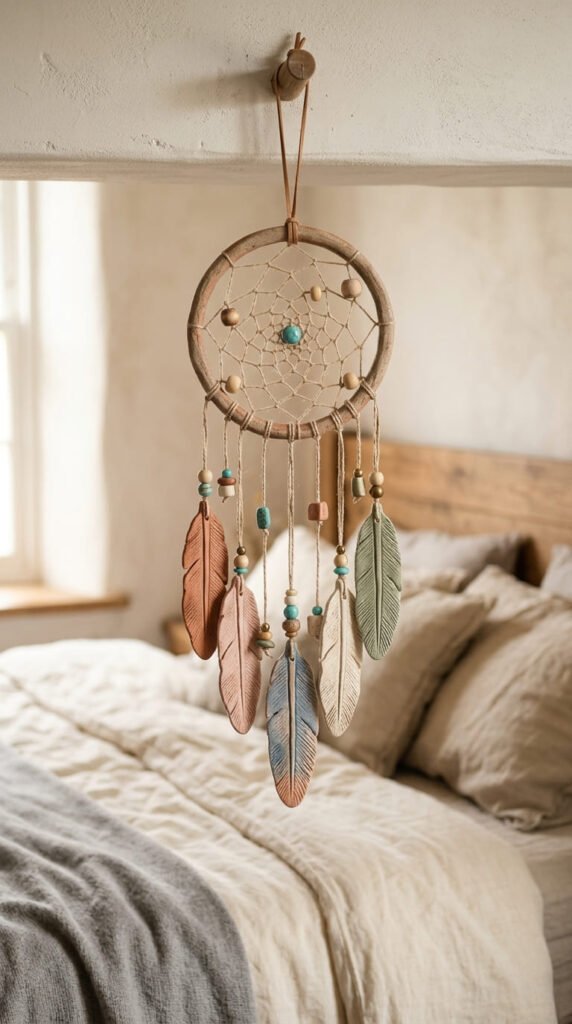
A clay dream catcher mixes craft with a soft spiritual feel. It looks beautiful above a bed.
Shape a clay ring for the base. Let it dry hard.
Make small clay feathers and shapes to hang from the bottom.
Poke holes so you can string them on with cord and beads.
Budget tip: use leftover yarn or string from around the house to web the center and hang the pieces.
Paint everything in pastels or natural tones.
Wrap thread across the ring for the classic web look.
Hang the feathers and beads from the bottom on different lengths.
Let all the clay parts dry flat before assembling.
Keep the feathers thin so they hang nicely.
Add a few real beads for sparkle.
This makes a heartfelt gift or a soft bedroom accent.
The hand-formed shapes fit the boho aesthetic perfectly.
A calming project with a dreamy, personal result.
12. Pastel Octopus Keychain
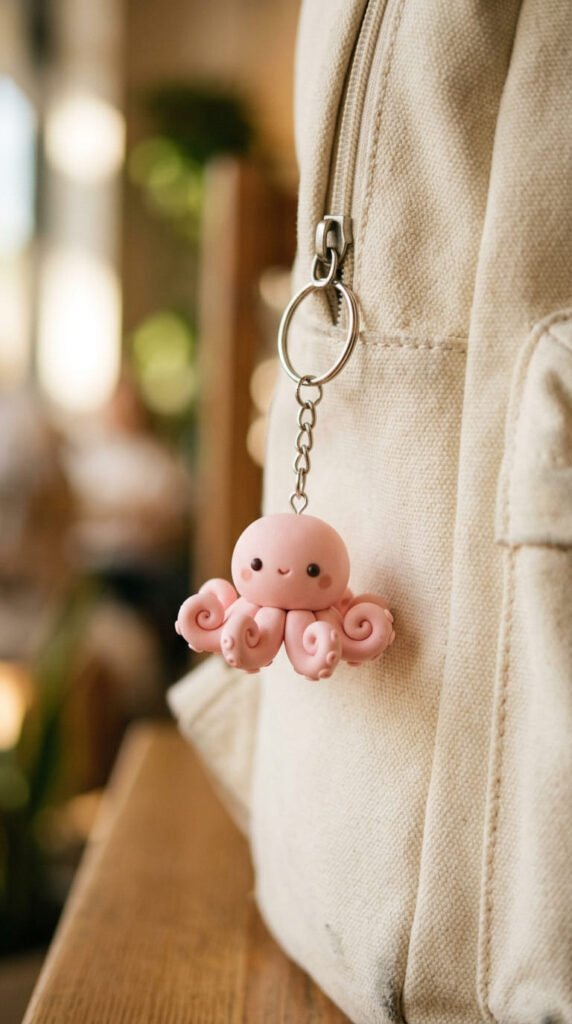
A tiny octopus keychain is cute, pastel, and very Pinterest. It dangles sweetly from a bag.
Roll a small ball for the head. Then roll eight thin arms.
Press the arms onto the bottom and curl the tips up.
Add two tiny dot eyes.
Push an eye pin into the top before drying so you can attach it.
Budget tip: eye pins come cheap in bulk. One pack makes loads of charms.
Use soft pastel colors for the trendy look.
Let it dry, then add a keyring through the pin.
Seal it with a clear coat so it survives daily use.
Press tiny dots along the arms for suction cups.
Keep the arms a bit chunky so they do not snap.
Make a few in different colors.
These work as bag charms, keychains, or zipper pulls.
A small, cheerful project that always gets compliments.
Quick to make and impossibly cute.
13. Earthy Organic Bud Vase
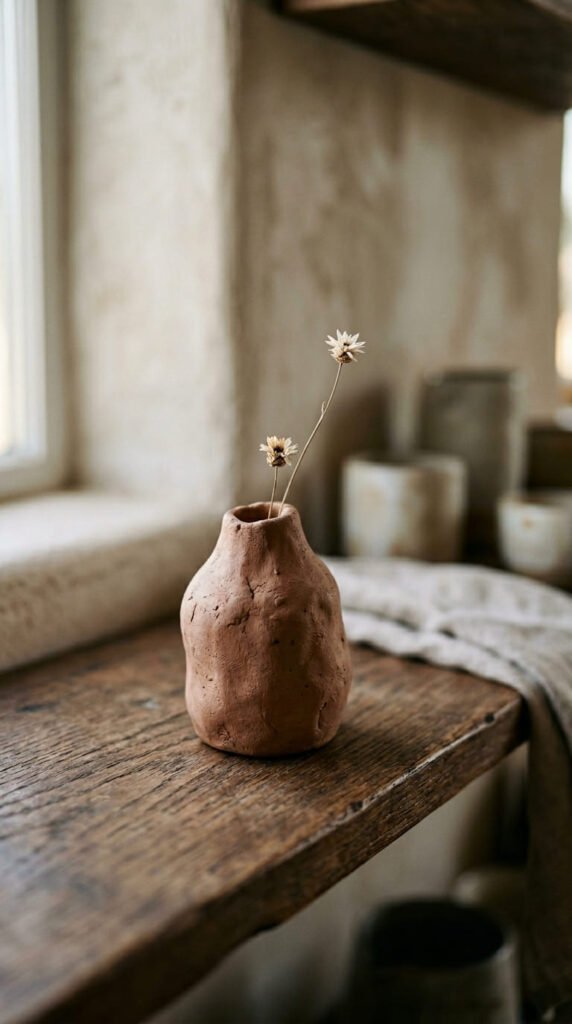
The 2026 look loves shapes that are fluid and a little uneven. A bud vase shows this off.
Build a small vase with the pinch or coil method.
Let the shape lean and curve. Perfect symmetry is not the goal here.
Keep the opening small to hold a single stem.
Budget tip: any small jar inside the clay can act as a waterproof liner for fresh stems.
Use earthy tones like terracotta, clay-brown, or sand.
Add a rough texture for that natural, organic finish.
Seal the inside if you want to use water, or stick to dried stems.
Let it dry slowly so it does not crack.
Group a few in different heights for a styled shelf.
Smooth the rim with a wet finger.
The hand-formed wobble is what makes it look artisan.
This is the heart of the natural clay aesthetic right now.
One stem in a handmade vase looks effortlessly stylish.
A calming, grounding little piece.
14. Marbled Clay Tray
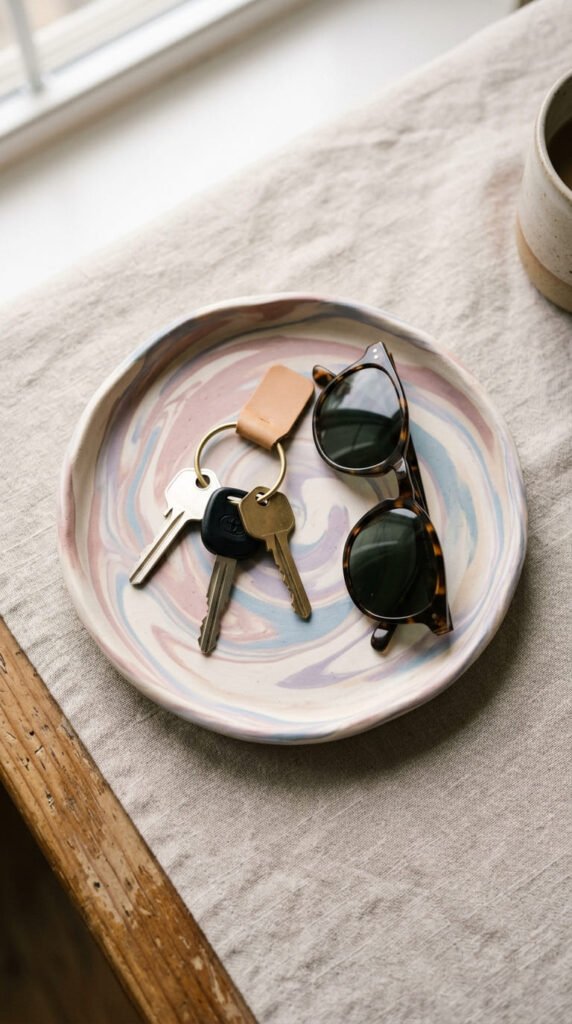
A marbled tray looks fancy but uses a simple color trick. The swirls do all the work.
Take two or three clay colors. Roll them into ropes and twist them together loosely.
Roll the twisted clay flat. Do not over-mix, so the colors stay swirled like marble.
Cut a tray shape and curve up the edges.
Budget tip: use up leftover scraps of different colors. Nothing goes to waste.
Let it dry flat so the tray sits level.
Seal it with a clear coat to protect the surface.
This catch-all tray holds keys, jewelry, or sunglasses.
Keep the swirls soft for a true marble look.
Sand the edges smooth once dry.
Pastel and white swirls look especially pretty.
Make a few sizes for different spots in the house.
The marbled finish looks high-end with almost no effort.
A stylish, useful piece from clay you already had.
A satisfying project with a designer result.
15. Clay Wall Clock
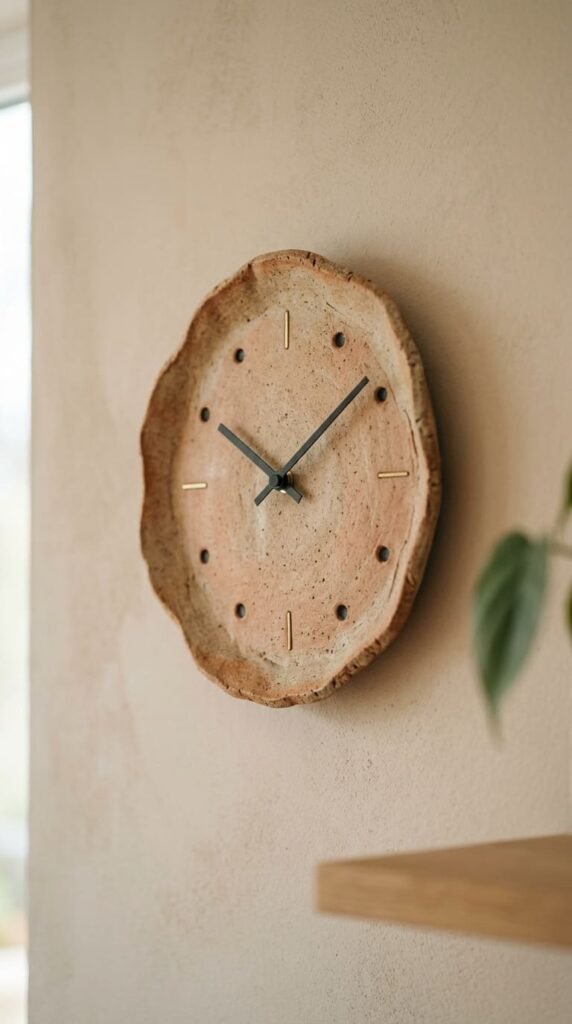
A clay clock is a standout piece that looks far harder than it is. The trick is a cheap clock kit.
Roll a flat clay slab. Cut a circle or an organic shape for the clock face.
Poke a hole in the center for the clock mechanism.
Press in simple markers for the hours, or keep it minimalist with just four dots.
Budget tip: a basic clock movement kit costs only a few dollars online. It does all the timekeeping work.
Let the clay dry fully and flat so it stays straight.
Paint it in earthy or pastel tones.
Fit the clock hands and battery unit through the center hole after drying.
Keep the slab even so it does not warp.
Add a pressed texture around the edge for detail.
Seal it with a matte coat.
This makes a striking wall piece that actually works.
The hand-formed shape fits the modern look perfectly.
A functional art piece that wows guests.
16. Textured Tealight Holder
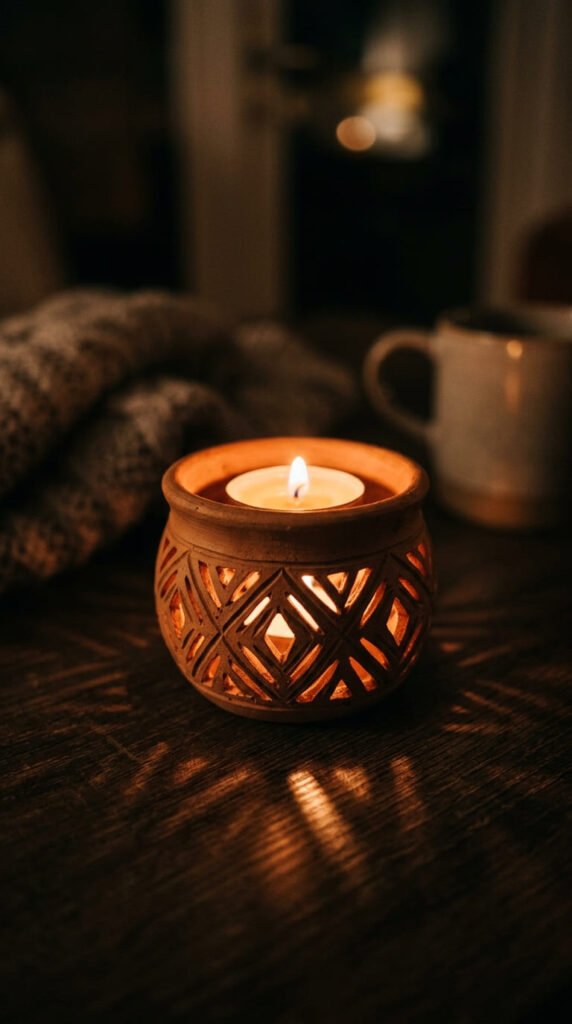
A tealight holder glows beautifully when the texture catches the light. Cozy and quick to make.
Make a small pinch pot or a short cylinder.
Carve or poke a pattern into the walls. Dots, lines, or little cut-out shapes.
The light shines through the holes for a warm glow.
Budget tip: a pencil tip and a toothpick carve all the texture you need. No special tools.
Use a heat-safe tealight, ideally a battery one for air-dry clay, to stay safe.
Let it dry fully.
Paint it an earthy tone or leave it natural and chalky.
Keep the walls even so it dries without cracking.
Make a set in different patterns for a styled cluster.
Group them at different heights for a layered look.
These add instant warmth to a shelf or table.
A small, cozy project with a lovely glowing payoff.
Perfect for the slow-living, sensory decor trend.
17. Jewelry Ring Cone Dish
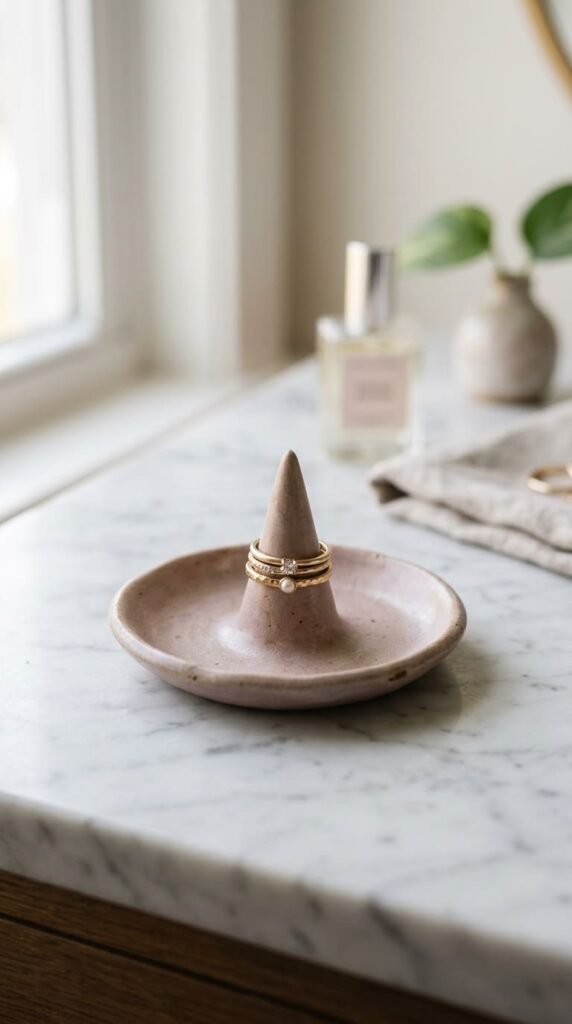
A ring cone dish is a smart little piece. The center cone holds rings while the dish catches small bits.
Make a small shallow dish from a flattened clay circle with curved edges.
Roll a small cone and stand it in the center.
Smooth the cone onto the base so it holds firm.
Budget tip: this uses a tiny amount of clay. Make one from leftover scraps.
Let it dry on a flat surface.
Paint it a soft pastel or natural tone.
A touch of gold on the cone tip looks elegant.
Stack rings on the cone and drop earrings in the dish.
Keep the cone short and stable so rings slide on easily.
Seal it for a smooth finish.
This sits perfectly on a nightstand or vanity.
Makes a thoughtful little gift too.
A clever, pretty piece that keeps jewelry tidy.
Small, useful, and very giftable.
18. Mini Bud Vase Trio
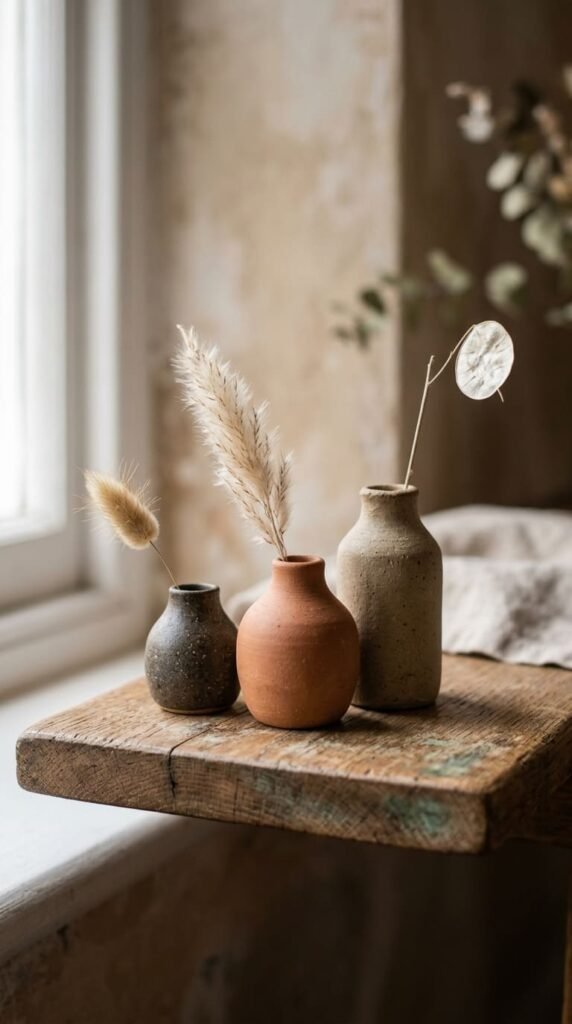
A trio of tiny vases looks styled the moment you set them down. Grouping is the trick.
Make three small vases in different heights. Pinch or coil each one.
Keep the shapes simple and a little organic.
Budget tip: small glass test tubes slipped inside act as waterproof liners for fresh stems. Cheap online.
Use a matching earthy palette so they look like a set.
Let them dry slowly to avoid cracks.
Pop a single stem in each one.
Smooth the rims with a wet finger.
Vary the heights for that curated, layered look.
Seal the insides if using water.
Group them on a shelf, a windowsill, or a dinner table.
Keep walls even so they dry without warping.
Three little vases together look far better than one alone.
This layered styling is exactly what is trending.
A simple set that turns a few stems into a display.
19. Clay Wall Hooks
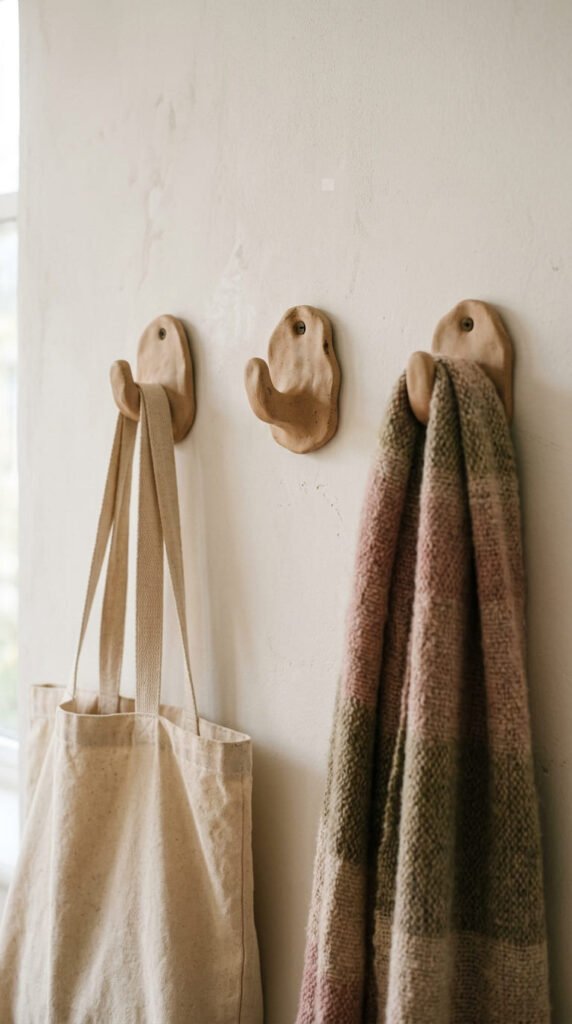
Clay wall hooks are useful and look like art on the wall. A fun, practical project.
Shape small organic blobs or arches from sturdy clay.
Press a hardware hook or a sturdy wire into the back before drying.
Budget tip: small screw hooks from a hardware store are cheap and do the holding work.
Keep the clay thick so the hook stays strong.
Let it dry fully and hard.
Paint them in earthy or pastel tones to match your space.
Seal them well for durability.
Mount them in a row for keys, bags, or scarves.
Use them for light items, not heavy coats.
The hand-formed shapes look modern and intentional.
Make a matching set of three or four.
These turn a bare wall into a styled, useful spot.
Keep the back flat so they sit against the wall.
A practical piece that doubles as decor.
Simple to make, handy every day.
20. Wood and Clay Hybrid Piece
Mixing clay with wood or metal is a rising trend. The contrast looks rich and natural.
Pick a simple wood base, like a small disc or a block.
Sculpt a clay shape to sit on top. A small vase, a bowl, or an organic form.
Budget tip: use a wooden coaster, an offcut, or a thrifted wood piece as your base.
Let the clay dry separately, then glue it to the wood with strong craft glue.
Keep the clay tones earthy to match the wood.
Seal the clay for a smooth finish.
The mix of textures gives a biophilic, nature-meets-craft feel.
Try clay plus a metal ring or a glass insert too.
Keep the clay part light so the glue holds well.
This hybrid look feels modern and intentional.
Make a small set for a styled shelf.
The two materials together look high-end.
A creative project that stands out from plain clay pieces.
On-trend and full of character.
21. Embossed Mirror Frame
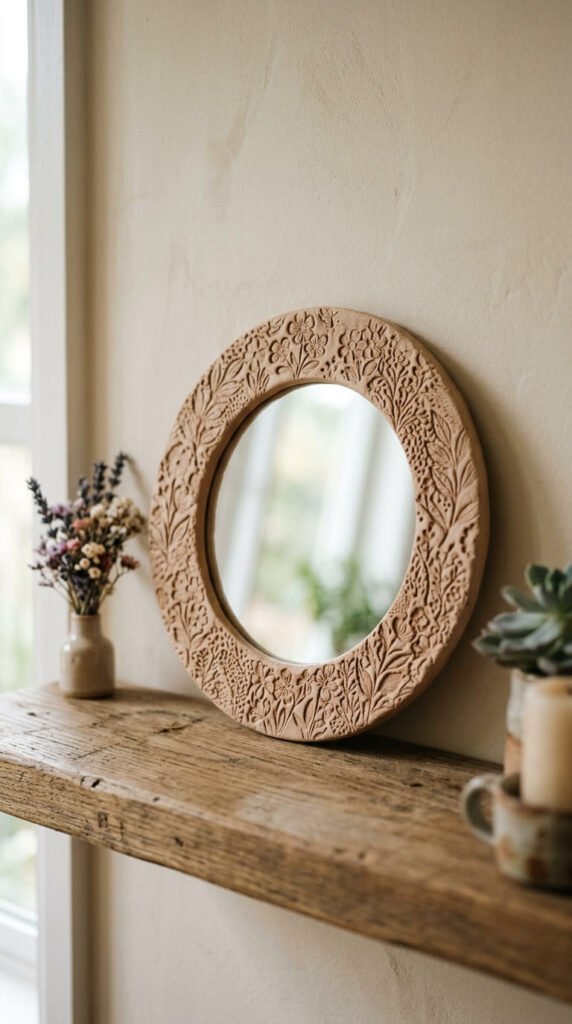
A clay mirror frame turns a plain mirror into a styled piece. The pressed texture makes it special.
Get a small cheap mirror. Roll a clay frame to fit around it.
Press a pattern into the clay. Flowers, lace, or a leaf print.
Budget tip: a thrift-store mirror or a small craft mirror keeps the cost tiny.
Let the frame dry flat.
Glue the mirror into the frame once both are ready.
Paint the frame in earthy or pastel tones.
Add a hanger on the back or lean it on a shelf.
Keep the frame even so it dries flat.
Seal it with a matte coat.
A scalloped or wavy edge looks especially trendy.
The embossed texture catches the light beautifully.
Make a small one for a vanity or a larger one for a wall.
This is a boutique-style piece for a few dollars.
Pretty, personal, and very Pinterest.
A satisfying upgrade from a plain mirror.
22. Glowing New Year Clay Numbers
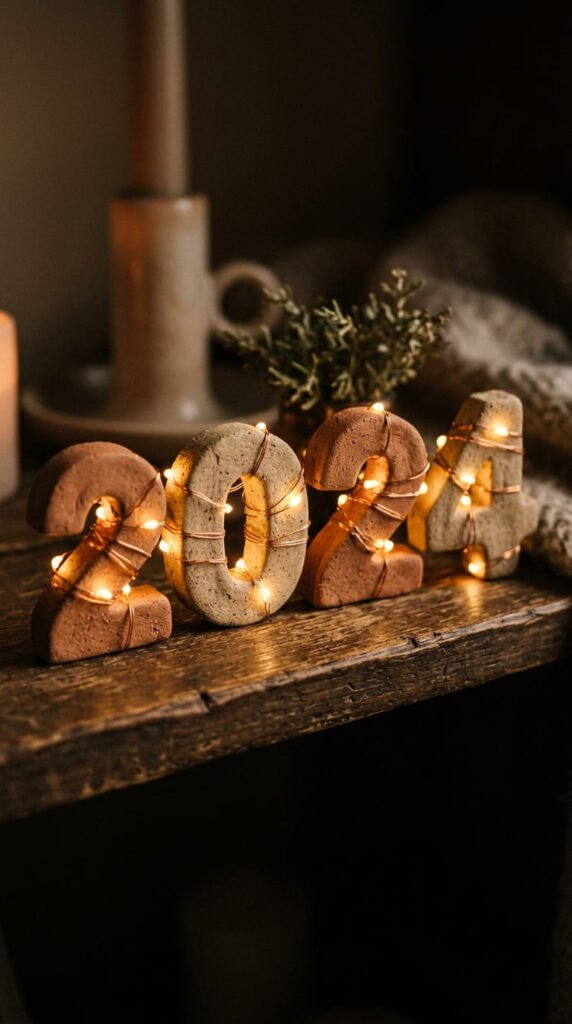
Handmade clay numbers with lights are a seasonal hit. They make sweet celebration decor.
Roll the clay flat and cut out the numbers you want, like a new year.
Make them chunky so they stand or lean well.
Poke small holes or grooves where fairy lights can tuck in.
Budget tip: a cheap string of battery fairy lights adds the glow without any wiring.
Let the numbers dry hard and flat.
Paint them in soft metallics or earthy tones.
Wrap the fairy lights around or through them.
Seal them for a smooth finish.
Keep thin parts of numbers thick enough not to snap.
Stand them on a shelf or mantel for a party.
These work for birthdays and anniversaries too, not just new year.
The warm glow makes them feel festive and cozy.
Make a set for the next celebration.
A seasonal piece that brings light and charm.
Simple, cheap, and full of holiday spirit.
Conclusion
Aesthetic clay art proves you do not need a kiln or a big budget to make pieces that look like they came from a boutique. With a block of air-dry clay, a few cheap tools, and some pastel or earthy paint, you can craft planters, earrings, trays, wall art, and glowing decor in an afternoon. The 2026 look rewards organic shapes, natural tones, and that lovely hand-formed wobble, which means your pieces do not have to be perfect to be beautiful. Most of these projects use scraps, found textures, and things already in your home. Pick two or three that match your style, clear a little table space, and start shaping. Grab your clay this week and make something for your shelf that is truly your own.