Some crafts just make you smile, and cute clay magnets are one of them. They’re tiny, they’re cheap, and they turn a boring fridge into something happy. You shape a little blob of clay, let it dry or bake it, paint a face on, and stick a magnet to the back. That’s the whole thing. A few dollars of air dry clay or polymer clay makes a dozen. No skills required, just a fun afternoon. Here are 23 adorable ideas you’ll want to make right now.
1. Smiley Lemon Slice Magnets
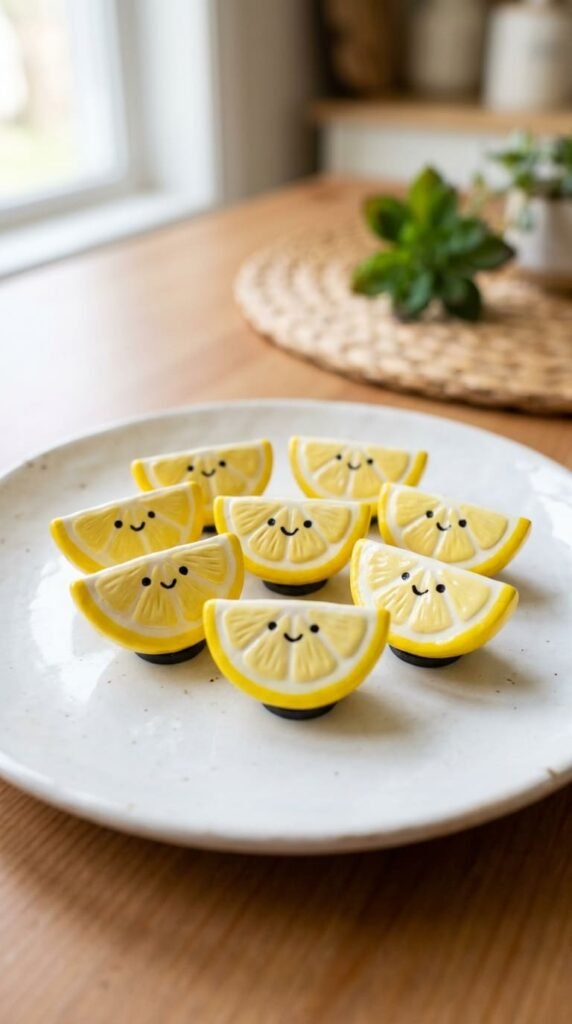
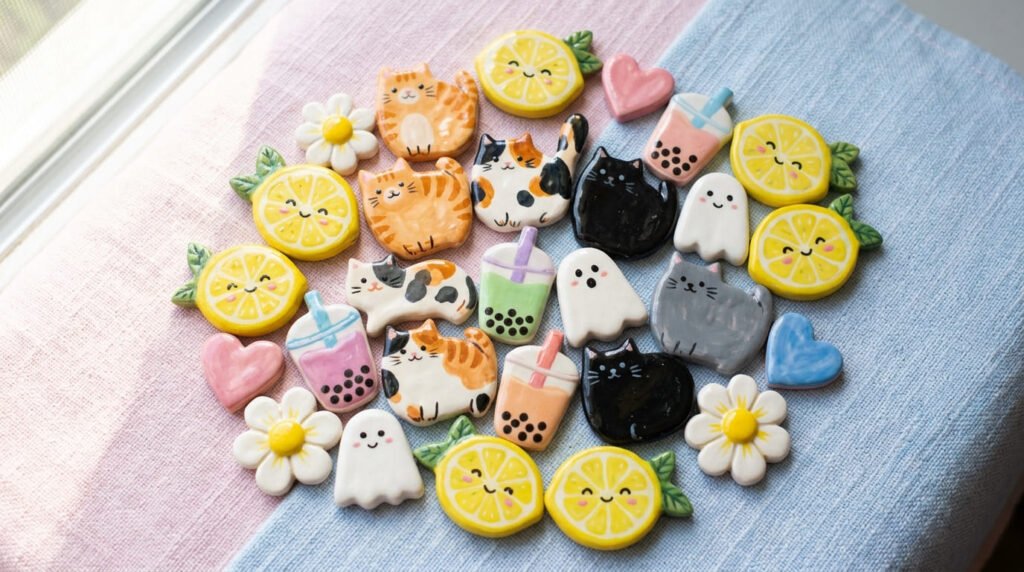
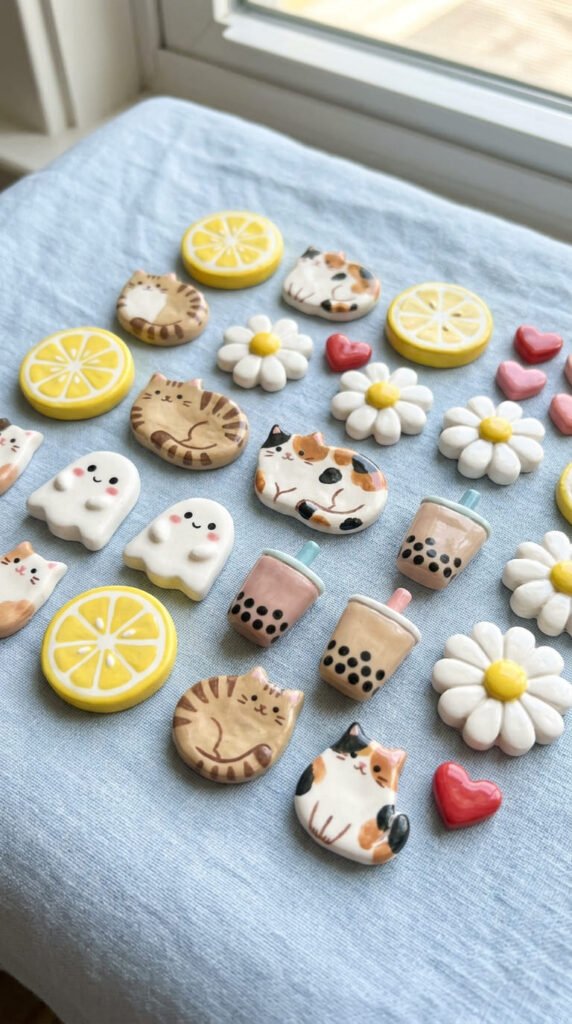
Smiley fruit slices win the cuteness contest every time. Roll a flat disk of clay, about a quarter inch thick. Cut a circle with a cookie cutter or a glass rim. Press shallow lines from the center out for the citrus segments. A toothpick works great. Let it dry fully (24 to 48 hours for air dry clay), flipping halfway so it stays flat. Sand the edges smooth. Paint it yellow, then add a tiny smiley face with a paint pen. That little grin is what makes it adorable. Seal it, glue a magnet on, and wait a full day before sticking it up. Budget tip: one clay block makes a whole fruit bowl. Three paint colors cover lemons, limes, and oranges. Keep the disk a quarter inch thick so the thin segment lines don’t crack. These make a cheerful gift set tucked in a little jar. Want variety? Give each fruit a different expression, one winking, one sleepy, one surprised. A smiling lemon on the fridge is impossible to frown at. They’re quick, cheap, and pure happiness in clay form. Perfect as a first project too.
2. Pizza Slice Magnets

Pizza slices are the viral favorite, and they’re so simple. Roll a small triangle of tan clay for the base. Add a thin red layer for sauce. Press a cream layer with a toothbrush to get that melty cheese look. Tiny pepperoni dots finish it. If you use polymer clay, bake at 275°F for about 30 minutes. Air dry clay just sits out for a day or two. Once hard, brush a gloss coat over the cheese and sauce so it looks good enough to eat. Glue a magnet on the back and let it cure a full 24 hours. Don’t rush the glue. It’ll fall off if it’s still soft. Budget tip: one clay block makes a dozen slices, so the cost per magnet is pennies. Keep the crust about a quarter inch thick so it doesn’t snap. Want a fun set? Make a few with different toppings, mushrooms, peppers, olives, all just little painted dots. A mini pizza magnet makes a great gift for any food lover. It’s cute, recognizable, and beginner-proof. Start here if you’ve never made a clay magnet before. You’ll be hooked.
3. Chubby Cat Face Magnets
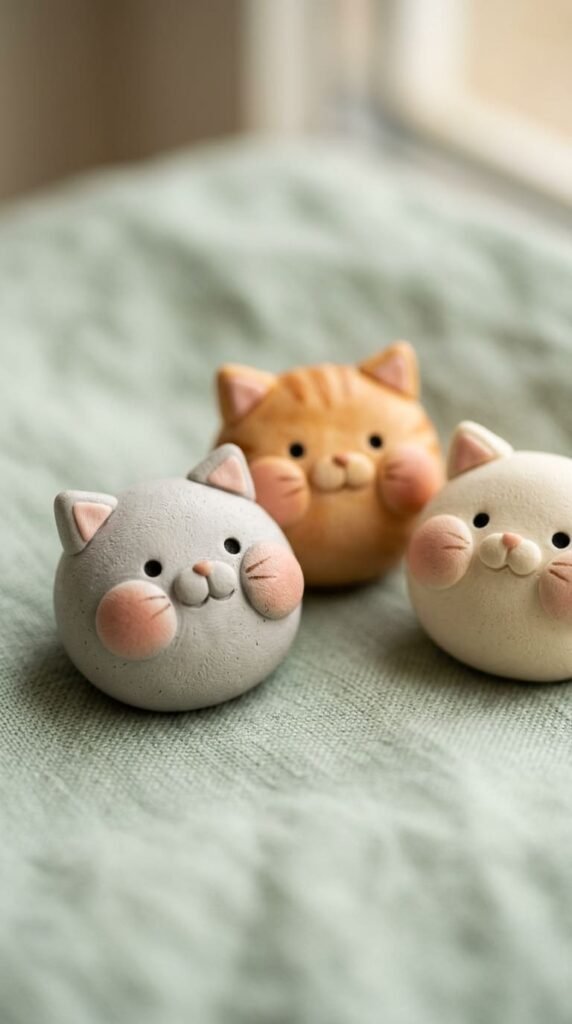
Chubby cat faces melt everyone’s heart. The secret to cute is simple: big round face, tiny features. Roll a flat circle for the head. Add two small triangle ears on top while the clay is soft so they stick. Let it dry or bake it. Sand the edges. Then paint, gray, orange, white, or black. Add the face with a paint pen after the base dries: two dot eyes, a tiny nose, a few whisker lines. Less detail looks cuter, not lazier. Try three cats with different moods, sleepy, surprised, content. Seal, glue a magnet, cure overnight. Budget tip: each cat is small, so one block makes a whole litter. Paint handles the colors and faces, so you skip buying colored clay. Keep the ears small and chunky. Thin pointy ears snap off, so press them short. A trio of cat magnets makes a sweet gift for any animal lover. They look adorable lined up on a fridge door. Want them extra cute? Give one a tiny blush with a dot of pink. A little cat face brings a smile every time the fridge opens. Hard to make just one.
4. Glazed Donut Magnets
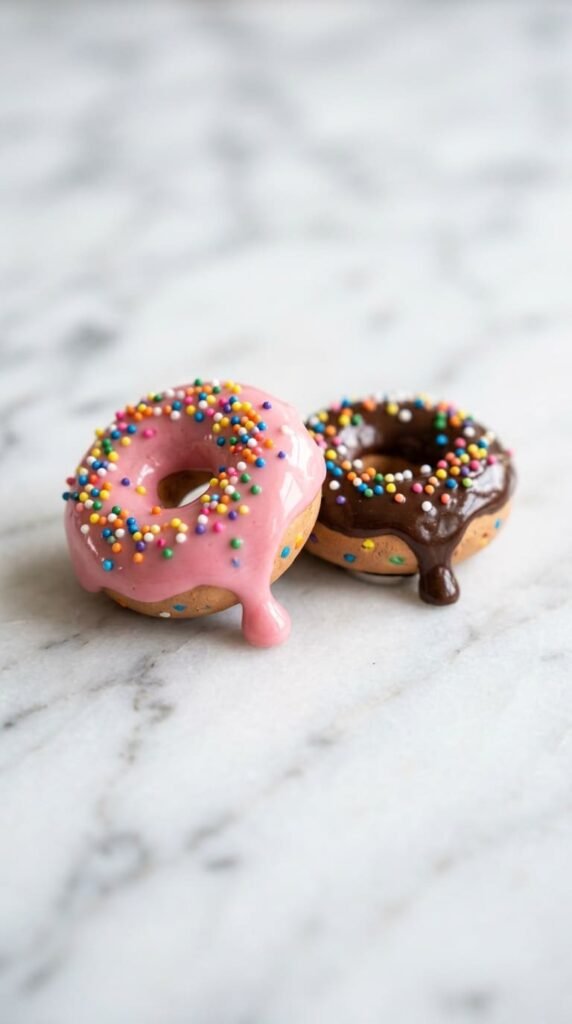
Donuts are tiny, adorable, and very forgiving. Roll a ball of clay, flatten it a little, then poke a hole in the middle with a pencil. Let it dry or bake it. Sand the edges once hard. Now the fun part: the glaze. Paint the top in pink, brown, or white, letting it drip a little down the side. That drip makes it look real. Add tiny sprinkles by dotting paint colors with a toothpick. Seal the glaze with a gloss coat for that sugary shine, and leave the donut body matte. Glue a magnet, cure 24 hours. Budget tip: this is all paint, no colored clay, so it’s very cheap. One small bottle of each color makes dozens. Keep the donut small, around coin size. Smaller magnets are lighter, so cheap magnets hold them fine. A set of three donuts in different glazes makes a sweet gift. Tie them in a little box and they look bakery-bought. Donuts are a great first project because the shape is easy and the painting is where all the cuteness lives. Make a whole dozen and your fridge becomes a tiny bakery.
5. Kawaii Sushi Friend Magnets
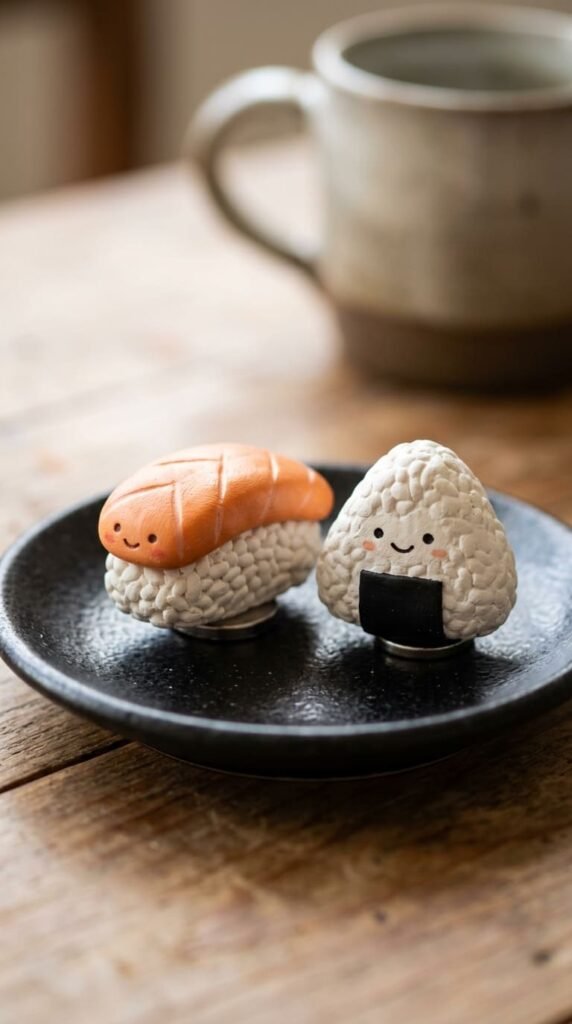
Sushi with little faces is peak kawaii. Start with onigiri, a rice ball. Shape a rounded triangle of white clay. Press it with a toothbrush for that bumpy rice texture. Add a small dark strip for the seaweed wrap. For nigiri, make a white rice base with a colored topping, orange for salmon, pink for tuna. The detail that makes it adorable is the tiny face. Add dot eyes and a small smile with a paint pen after sealing. Let it dry or bake, then sand and seal. A light gloss on the fish topping makes it look juicy while the rice stays matte. Glue a magnet, cure 24 hours. Budget tip: you need only small dabs of topping color, so a little clay goes far. Keep each piece small and chunky. Thin sushi cracks. A short, fat shape holds up better. A set of sushi friends makes a clever gift for anime fans or sushi lovers. Group three on the fridge for a happy little crew. Want them cuter? Give one rosy cheeks. These tiny rice buddies are some of the most charming magnets you can make.
6. Penguin Magnets
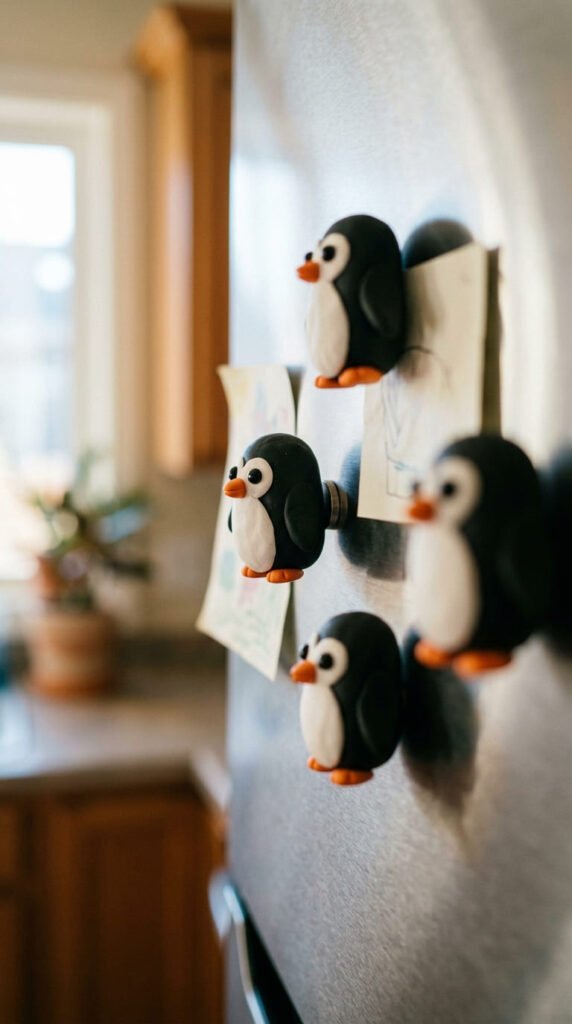
Penguins are round, simple, and instantly cute. Shape a fat oval body. Keep it chunky and rounded, since that’s what makes a penguin adorable. Let it dry or bake it. Sand the edges. Paint the back and head black and the belly white. Add a tiny orange beak and little orange feet at the bottom. Two dot eyes with a paint pen finish the face. Seal, glue a magnet, cure overnight. Budget tip: penguins use little clay, so one block makes a whole colony. Paint covers all the colors, so no need for colored clay. Keep the shape simple and fat. Skip thin wings or feet that could snap off, just paint them flat instead. A penguin trio makes a sweet winter or holiday gift. They look adorable waddling across a fridge door. Want extra charm? Add a tiny clay scarf in a bright color, or give one a little blush. Penguins work great as a beginner shape because there’s no tricky sculpting. Just a round body and some paint. A few little penguins bring instant cozy vibes to any kitchen, all for a couple of dollars and an hour of fun.
7. Daisy Flower Magnets
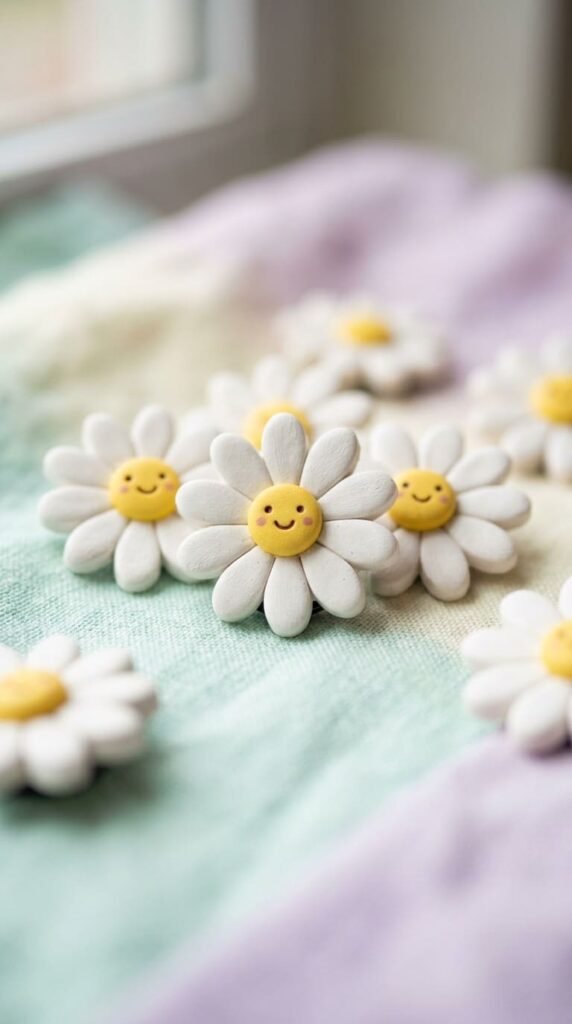
Daisies are cheerful and easy, especially with a little face. Roll small teardrop shapes for the petals. Arrange them in a circle, slightly overlapping, pressing the ends together. Add a yellow ball in the center and press it down. Let it dry or bake it. Sand any rough spots gently. Paint the petals white and the center yellow. For extra cuteness, add a tiny smiley face on the yellow center with a paint pen. Seal, glue a magnet, cure overnight. Budget tip: petals use tiny clay scraps, so this is a great leftover project. A couple of paint colors cover a whole bunch. Keep the petals a little thick. Thin petal tips break off easily, so make them stubby. A set of daisies makes a lovely spring gift. Smiling daisies are popular on Etsy, so they make sweet handmade presents. Want a meadow? Make a few in different petal colors, pink, purple, white. Group them on the fridge for a happy little garden. The face is what takes a daisy from pretty to adorable. These flowers never wilt and never need water, just clay, paint, and a smile.
8. Avocado Toast Magnets
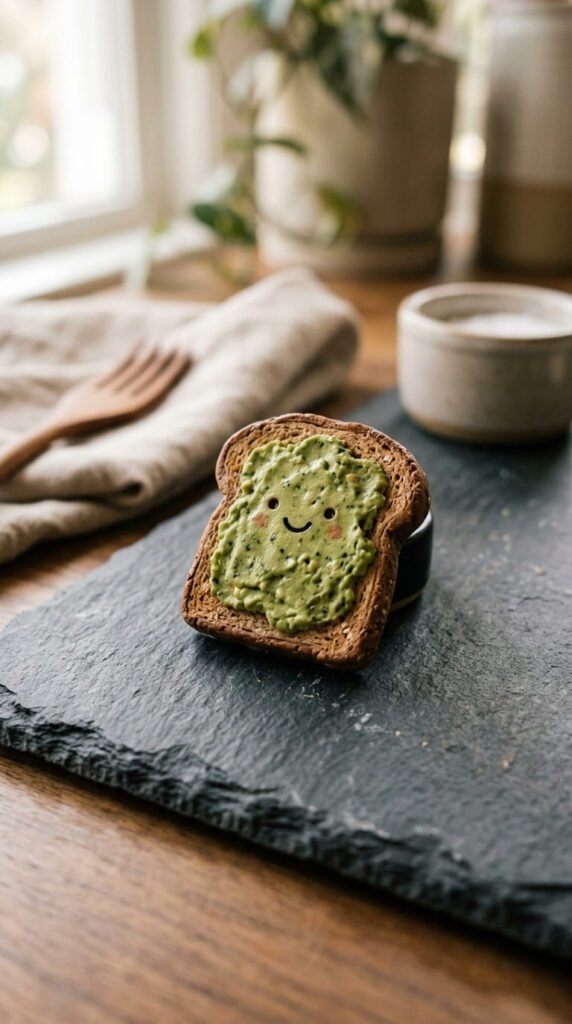
Avocado toast is the trendy brunch magnet, and it’s easy. Roll a small square of tan clay and round the corners. Press it with a toothbrush for bread texture, and add a darker edge for crust. Smash some pale green clay flat and lay it on top for the mashed avocado. Add texture lines with a toothpick. Let it dry or bake, then sand and paint. Tan for the bread, soft green for the avocado, with a darker green swirl for depth. Want it cuter? Add a tiny smiley face on the avocado. Seal, glue a magnet, cure overnight. Budget tip: this uses two clay colors and a little paint, so it’s cheap. Keep the toast a quarter inch thick. Thin toast snaps. Want to dress it up? Add a tiny fried egg on top, a white blob with a yellow yolk. That makes it a full brunch magnet. These are a fun gift for the avocado lover in your life. They look modern and foodie without much effort. A smiling slice of avocado toast is weirdly charming on a fridge. Cheap, cute, and right on trend.
9. Fried Egg Magnets
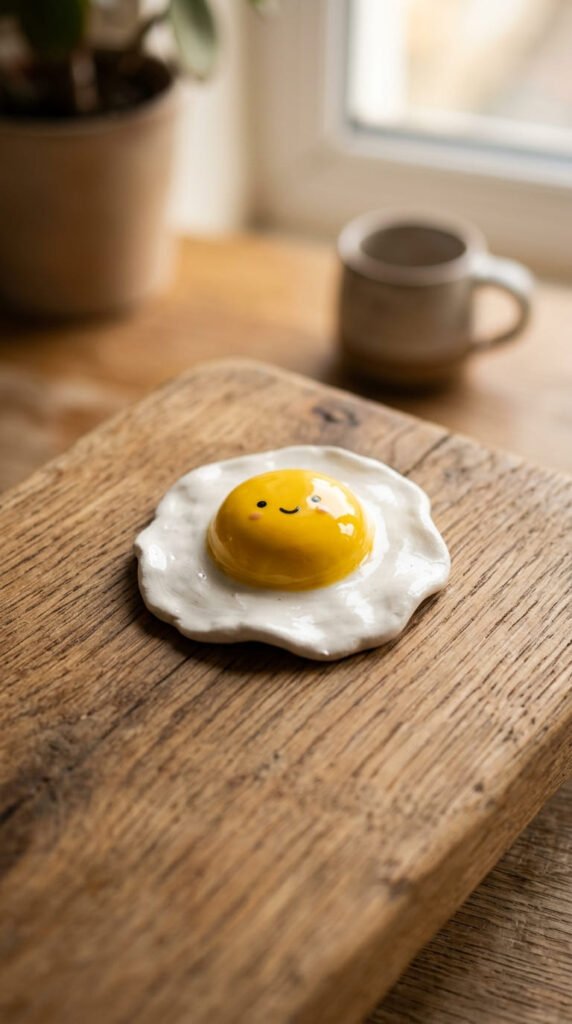
Fried eggs look harder than they are. Flatten a blob of white clay into a wobbly, uneven circle. Messy is good here. Press a small ball of yellow clay in the center for the yolk, or paint it on after drying. Let it dry or bake, flipping halfway so it stays flat. Sand the edges. Paint a glossy coat over the yolk only and leave the white matte. That shine makes it look hot off the pan. For cuteness, add a tiny smiley face on the yolk. Seal the rest, glue a magnet, cure overnight. Budget tip: this is one of the cheapest magnets here. White clay plus a dot of yellow, that’s it. Keep the egg flat but not paper-thin. A quarter inch keeps it strong. If the white spreads too thin, it cracks at the edges. Want a twist? Smash green clay flat and lay the egg on top for an avocado toast magnet. A smiling fried egg is a quirky, happy gift for any breakfast fan. It’s a great beginner project since the shape is so forgiving. Make a couple and pair them with toast for a cute breakfast set.
10. Teddy Bear Magnets
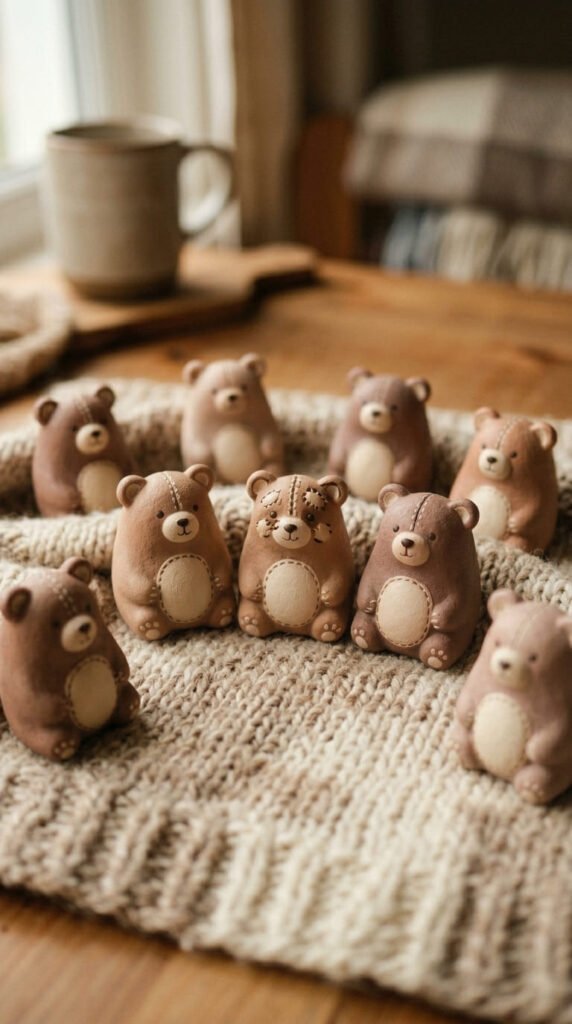
Teddy bears are nostalgic and sweet, perfect for baby gifts. Make a round head and a small round body. Add tiny ears, little arms, and legs by pressing small clay balls on while soft. Keep it chunky and rounded. Let it dry or bake. Sand any rough spots. Paint a soft brown or cream base. Add a tiny face with a paint pen, dot eyes and a little nose. For extra charm, paint small stitch lines to look like a sewn teddy. Seal, glue a magnet, cure overnight. Budget tip: teddies use little clay, so one block makes a few. Paint covers the color, so skip buying brown clay. Keep all the parts chunky. Thin arms and ears snap off, so press them short and stubby. A teddy bear magnet makes a heartfelt gift for a new baby or a child’s room. Make a couple in different colors for a little bear family. They look cuddly even in clay form. The stitched detail makes them feel handmade and special. A sweet, affordable gift that brings instant warmth. Group a few on the fridge and they look like a tiny toy box.
11. Bunny Magnets
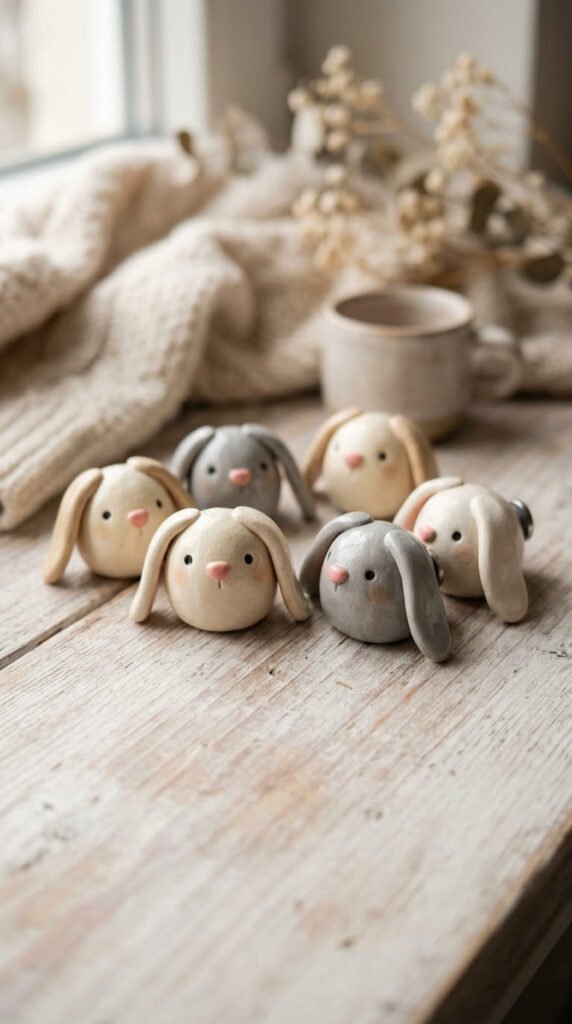
Bunnies are gentle and cute, great for spring. Make a round head and add two long ears on top. Lay the ears back a little rather than straight up so they don’t snap. Keep the shapes rounded. Let it dry or bake. Sand the edges. Paint the bunny cream, white, or soft gray, with a touch of pink inside the ears. Add a tiny face with a paint pen, dot eyes and a little pink nose. Seal, glue a magnet, cure overnight. Budget tip: bunnies use tiny clay amounts, so this is a great scrap project. A little paint covers the whole thing. Keep the ears thick enough that they hold up. Long thin ears are the weak spot, so give them body. A bunny magnet makes an adorable Easter or spring gift. Make a few in different colors for a little bunny family. Want extra charm? Add tiny paw shapes to go with it as a set. Group them on a fridge and they look soft and sweet. A smiling bunny is hard to resist. These work for any skill level since the shape is simple and rounded. Pure cuteness in clay.
12. Strawberry Magnets
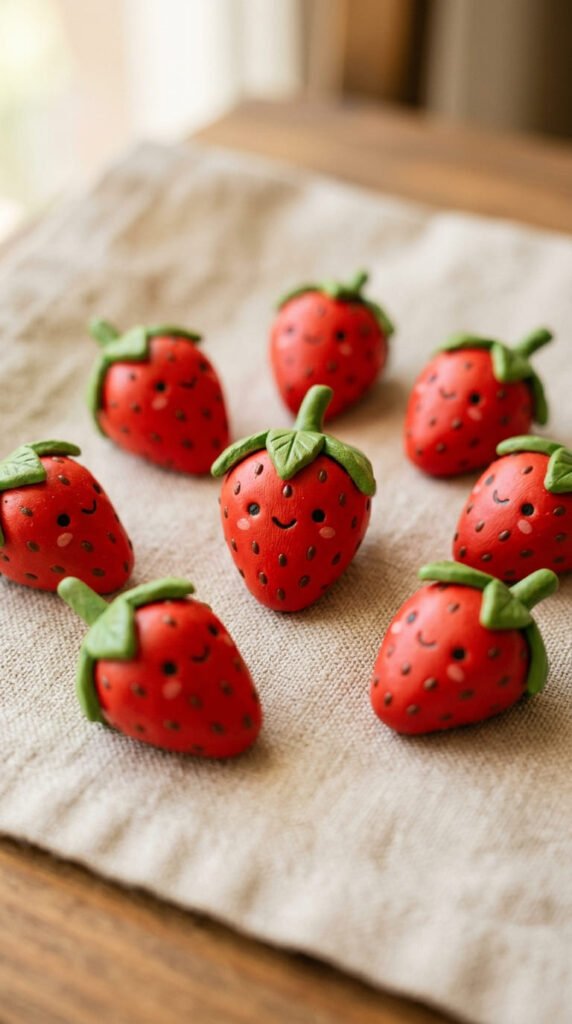
Strawberries are small, sweet, and quick. Shape a little cone of clay for the body. Add a small green star shape on top for the leafy cap. Press it on while soft. Let it dry or bake. Sand any rough edges. Paint the body bright red and the cap green. Then add the detail that makes it pop: tiny seeds. Dot little yellow specks across the red with a toothpick. Scatter them randomly, not in neat rows. For cuteness, add a tiny smiley face. Seal with a light gloss for a juicy look, glue a magnet, cure overnight. Budget tip: strawberries use barely any clay, so make a whole basket from one block. Red and green paint cover them all. Keep the body a quarter inch thick so it doesn’t crack. The pointed tip is the weak spot, so don’t make it too thin. A cluster of strawberry magnets makes a cheerful summer gift. They look great grouped on a fridge. Want variety? Make some bigger and some tiny. A handful of little smiling berries brightens any kitchen for just a few dollars. Sweet, simple, and adorable.
13. Sleepy Cloud Magnets
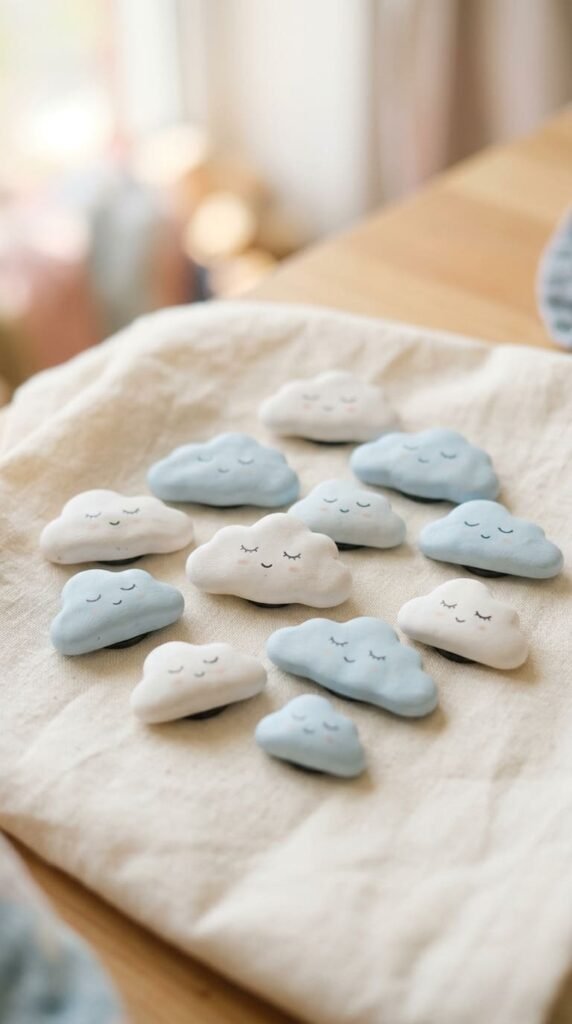
Sleepy clouds are the coziest magnets around. The shape is super simple: a soft, bumpy blob. Roll out flat clay, a quarter inch thick, and shape a little cloud. Let it dry or bake. Sand the edges. Paint it white or pale blue. Then add the magic touch: sleepy “^^” eyes with a paint pen after sealing. Maybe a tiny smile too. That sleepy face is what makes it adorable. Seal again lightly, glue a magnet, cure overnight. Budget tip: clouds use a flat sheet of clay and one paint color, so they’re very cheap. One block makes a whole sky. Keep them a quarter inch thick so they don’t crack. A set of sleepy clouds makes a sweet gift for a nursery or a kid’s room. They look calming on a fridge. Want a dreamy set? Add a few stars and a crescent moon with the same sleepy eyes. Soft pastels keep them gentle and cute. These are one of the easiest magnets to make, so they’re perfect for kids or total beginners. A little sleeping cloud brings a cozy, peaceful vibe to any space. Simple, soft, and impossibly sweet.
14. Mushroom Magnets
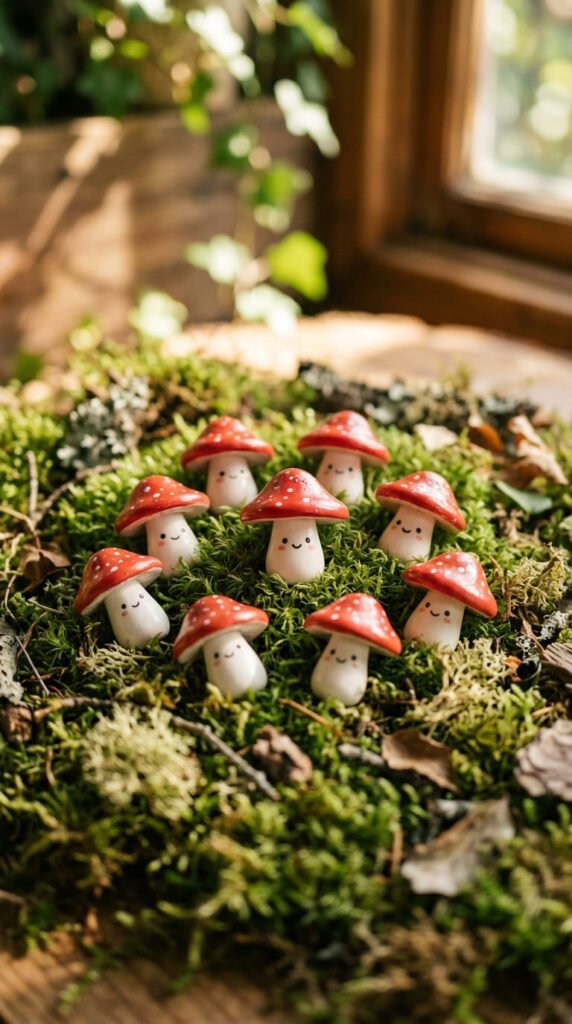
Mushrooms are trending and so cozy. Shape a small dome for the cap and a short fat stem. Press them together while soft. Let it dry or bake. Paint the cap red and the stem white. Add white polka dots on the cap with a paint pen or brush. For extra cuteness, give your mushroom a tiny face with two dots for eyes. Seal, glue a magnet, cure overnight. Budget tip: each mushroom is tiny, so one block makes a whole forest cluster. Paint covers the colors, so no colored clay needed. Keep the stem thick and short. A long skinny stem snaps off easily. A stubby little mushroom is sturdier and cuter. Vary the cap sizes so your cluster looks natural. These make adorable gifts for anyone who loves nature or cottagecore decor. Group a few on the fridge and they look like a tiny woodland scene. Want variety? Try different cap colors, brown, orange, even pastel pink. A smiling toadstool is charming and right on trend this year. Mushrooms are a fun step up from basic shapes once you’ve made a few flat magnets. Cute, cozy, and very giftable.
15. Heart Magnets
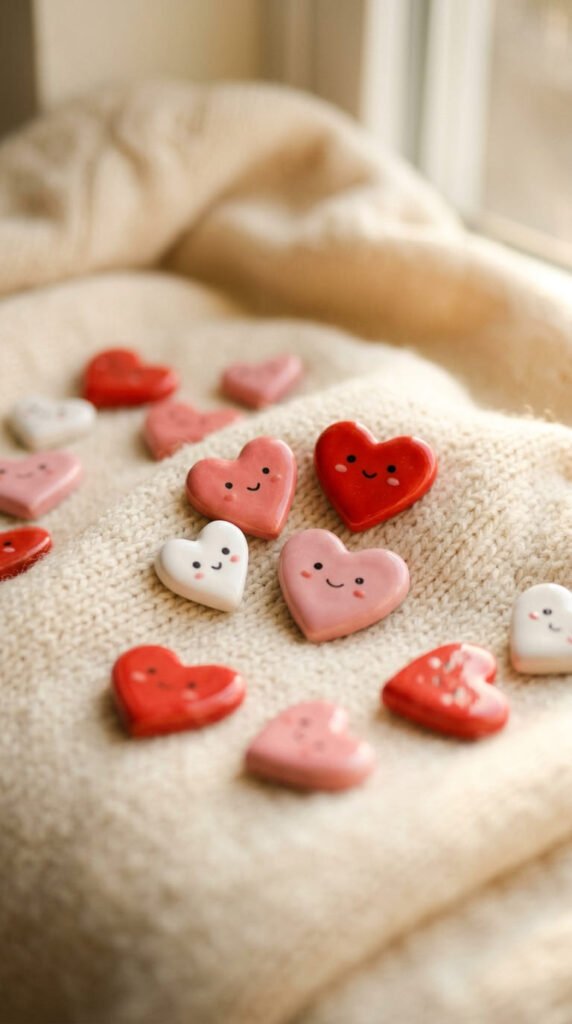
Hearts are timeless and beginner-proof. Roll out flat clay, a quarter inch thick. Press a heart cookie cutter and lift the shape. Clean and quick. Let it dry or bake. Sand the edges. Paint red, pink, or white. For cuteness, add a tiny face, dot eyes and a little smile. Seal with a glossy coat for a candy-like finish, glue a magnet, cure a full 24 hours. Budget tip: one heart cutter and one clay block make a dozen hearts for a few dollars. Cheaper than a single store card. Keep them a quarter inch thick so the points don’t crack. The bottom tip is the weak spot, so give it extra body. Want a personal touch? Press a tiny initial into one heart while it’s soft. Or stack a small heart on a bigger one for a layered look. A set of smiling hearts makes a thoughtful gift for Valentine’s, anniversaries, or just because. They look sweet grouped on a fridge. Try a gradient set, dark red to soft pink. Hearts are the easiest cute shape to make, so they’re perfect if you’re just starting out. Tiny, charming, and full of love.
16. Smiley Sun Magnets
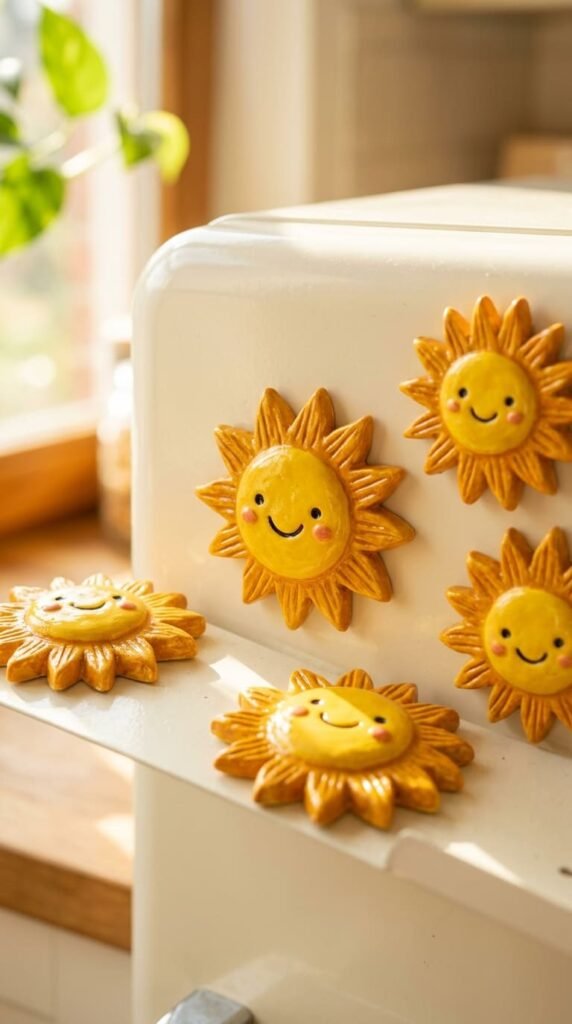
A little smiling sun brings instant cheer. Roll a flat circle for the face. Add small triangle rays around the edge, or just cut them from a sheet of clay. Press them on while soft. Let it dry or bake. Sand the edges. Paint the whole thing golden yellow, with a slightly deeper orange on the rays for depth. Then add a smiley face in the center with a paint pen. Rosy cheeks make it extra cute. Seal, glue a magnet, cure overnight. Budget tip: a sun uses one paint color and a flat sheet of clay, so it’s cheap. One block makes several. Keep the rays short and chunky so they don’t snap off. If thin rays worry you, skip the 3D rays and just paint them on a round disk instead. A smiling sun makes a happy gift for anyone who needs a little brightness. It looks cheerful on a fridge, especially on gray days. Want a sky set? Pair it with sleepy clouds and a smiling moon. The sun is an easy, joyful shape that beginners love. A little ray of sunshine you can stick anywhere. Hard not to smile back at it.
17. Rainbow Magnets
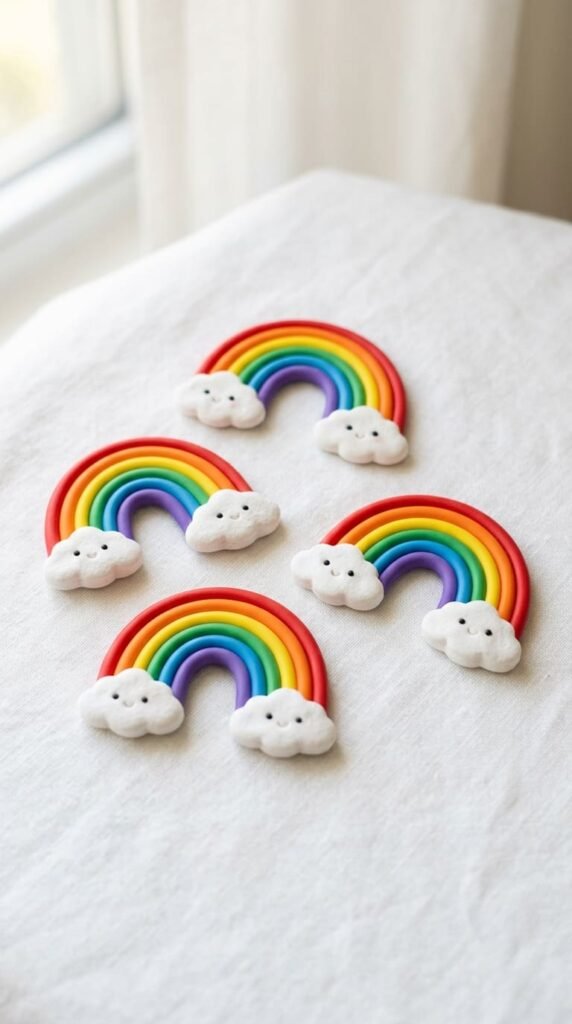
Rainbows are colorful, cheerful, and easy. Roll thin ropes of clay in different colors and stack them in arcs, smallest on the inside. Press them together gently so they hold. Add little white cloud puffs at each end. Let it dry or bake. If you want, skip colored clay and just paint the arcs on a plain clay rainbow shape after drying. Seal, glue a magnet, cure overnight. Budget tip: thin ropes use tiny amounts of clay, so this is a great scrap project. Or paint it all on one shape to save on colored clay entirely. Keep the arc a quarter inch thick so it doesn’t crack. A rainbow magnet makes a happy gift for kids or anyone who loves color. It looks bright and playful on a fridge. Want it extra cute? Add tiny faces to the cloud ends. Rainbows are a fun way to use up leftover clay bits in lots of colors. Make a few in different sizes for a cheerful set. They’re a simple shape with big visual impact. A little rainbow brings instant joy to a kitchen, all for a couple of dollars. Colorful, cute, and beginner-friendly.
18. Cupcake Magnets
Cupcakes are sweet and fun to decorate. Shape a small trapezoid for the cup base. Press lines into it for the wrapper texture. Add a swirl of clay on top for the frosting, twisting it into a soft peak. Let it dry or bake. Sand any rough edges. Paint the wrapper a fun color and the frosting pink, white, or pastel. Add tiny sprinkles with paint dots and a little cherry on top. Seal the frosting with gloss for a glossy icing look, glue a magnet, cure overnight. Budget tip: cupcakes use small amounts of clay, so one block makes several. Paint covers all the colors. Keep the base a quarter inch thick so it holds up. The frosting peak should be chunky, not thin, so it doesn’t break. A cupcake magnet makes a sweet gift for anyone with a sweet tooth. Make a few with different frosting colors for a bakery set. They look adorable lined up on a fridge. Want extra charm? Add a tiny smiley face on the wrapper. Cupcakes are a fun step up once you’ve made flat magnets, since the frosting swirl adds a little 3D practice. Cute and delicious-looking.
19. Message Bubble Magnets
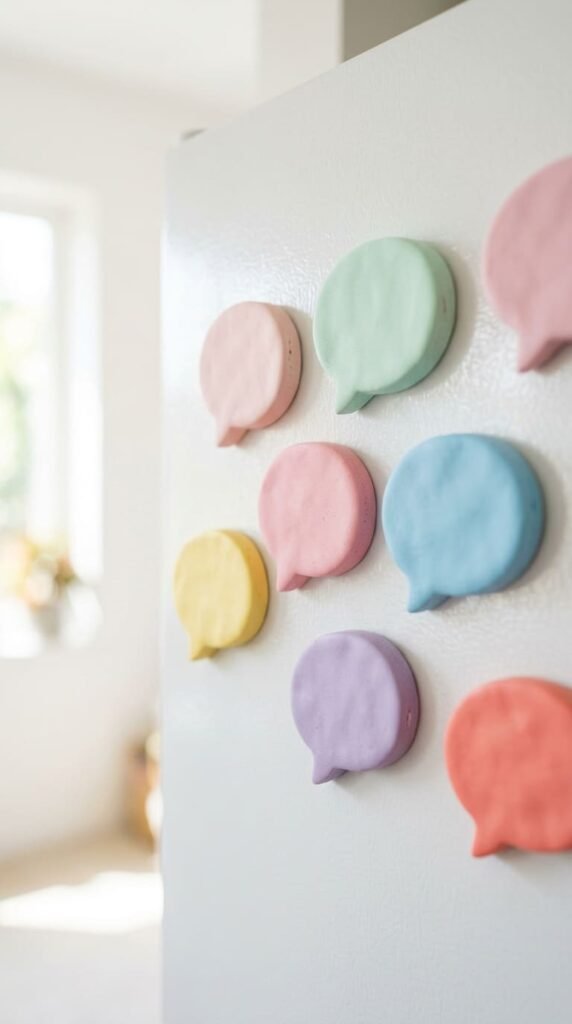
Chat bubble magnets are cute and practical. Roll out flat clay and cut a speech bubble shape, a rounded rectangle with a little tail at the bottom. Let it dry or bake. Sand the edges. Paint it a soft pastel color. You can leave it plain as a cute shape, or paint a tiny heart or smiley inside. For a useful twist, coat the front in chalkboard paint so you can write little messages and wipe them off. Seal the rest, glue a magnet, cure overnight. Budget tip: one flat sheet of clay makes several bubbles, and a little paint covers them. Cheap and quick. Keep the bubble a quarter inch thick so it doesn’t crack. A message bubble magnet makes a fun gift for someone who loves leaving notes. It looks playful on a fridge and actually does something. Make a few in different colors for a cute set. Want them extra charming? Add a tiny face so the bubble looks alive. These are a clever mix of cute and useful, perfect for a busy kitchen or a shared fridge. Simple shape, big personality. A talking little bubble that brightens your day.
20. Boba Tea Magnets
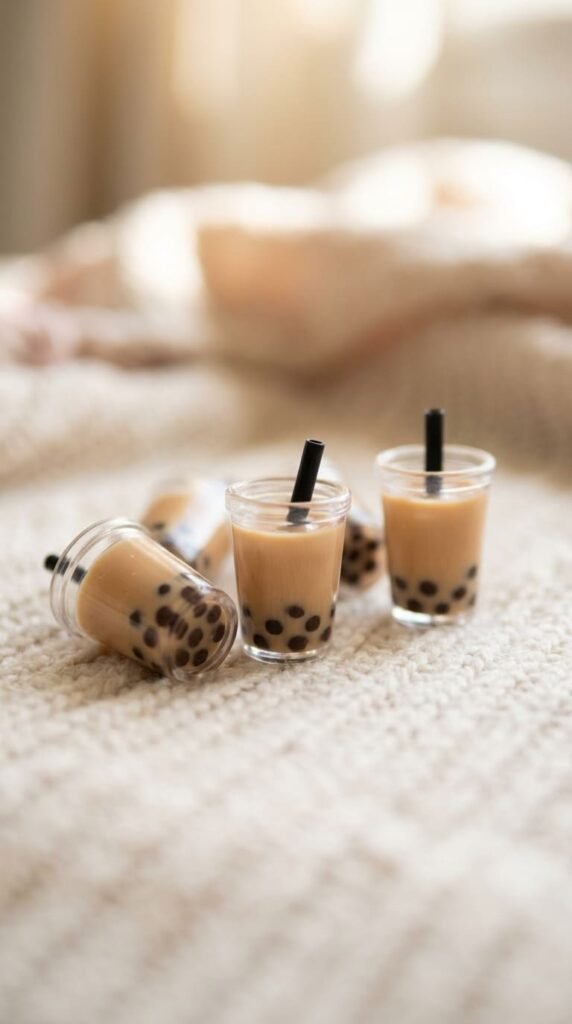
Boba tea magnets are trendy and adorable. Shape a small cup, slightly wider at the top. Add a tiny clay straw poking out the top. For the pearls, press little brown clay balls at the bottom, or paint dots after drying. Let it dry or bake. Sand the edges. Paint the tea a soft tan or pastel color and the pearls dark brown. Add a tiny smiley face on the cup for cuteness. Seal with a light gloss so it looks like a drink, glue a magnet, cure overnight. Budget tip: boba cups use little clay, so one block makes several. Paint covers the colors. Keep the cup a quarter inch thick so it holds up. The straw should be short and chunky so it doesn’t snap, or just paint it flat on the cup. A boba tea magnet makes a fun gift for any boba lover. Make a few in different tea colors, taro purple, matcha green, classic milk tea, for a cute set. They look adorable on a fridge. Boba is a trendy shape that’s still simple to make. A little smiling cup of bubble tea is hard to beat for cuteness.
21. Cute Ghost Magnets
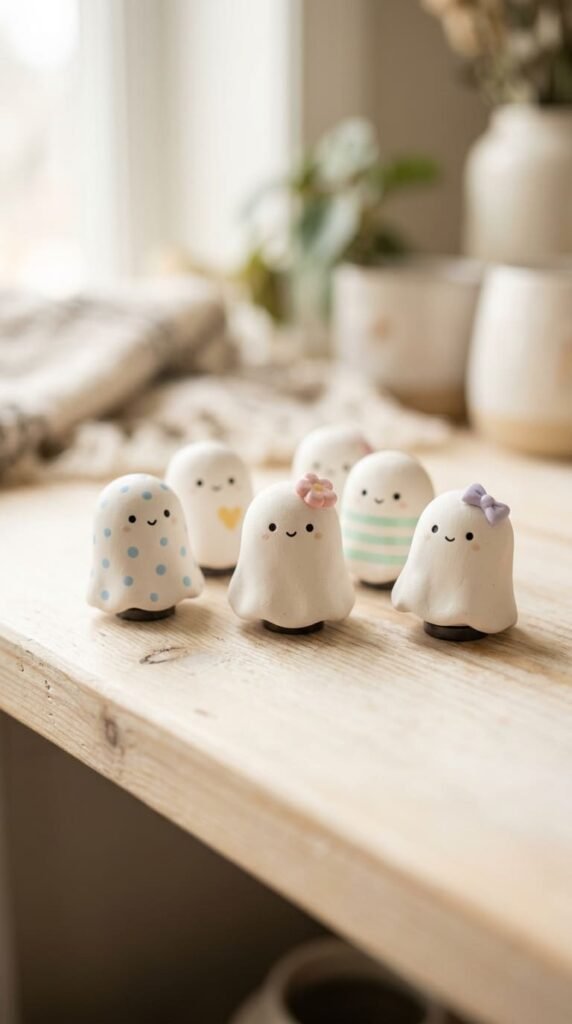
Cute ghosts are friendly, not spooky, and super easy. Roll a blob of clay and shape a soft rounded ghost with a wavy bottom edge. Let it dry or bake. Sand the edges. Paint it white. Then add the face with a paint pen: two dot eyes and a little smile or surprised “o” mouth. That friendly face keeps it cute, not scary. Seal, glue a magnet, cure overnight. Budget tip: ghosts use one paint color and a small blob of clay, so they’re very cheap. One block makes a whole crew. Keep the shape a quarter inch thick so it doesn’t crack. A cute ghost magnet makes a fun gift, especially around Halloween, but they’re sweet year-round. They look playful on a fridge. Want variety? Give each ghost a different expression, winking, sleepy, surprised. Add a tiny pastel blush for extra charm. Ghosts are one of the easiest shapes to make since they’re just a rounded blob with a face. Perfect for kids or beginners. A little smiling ghost brings a playful touch to any kitchen. Friendly, simple, and adorable, no tricks, just treats.
22. Hedgehog Magnets
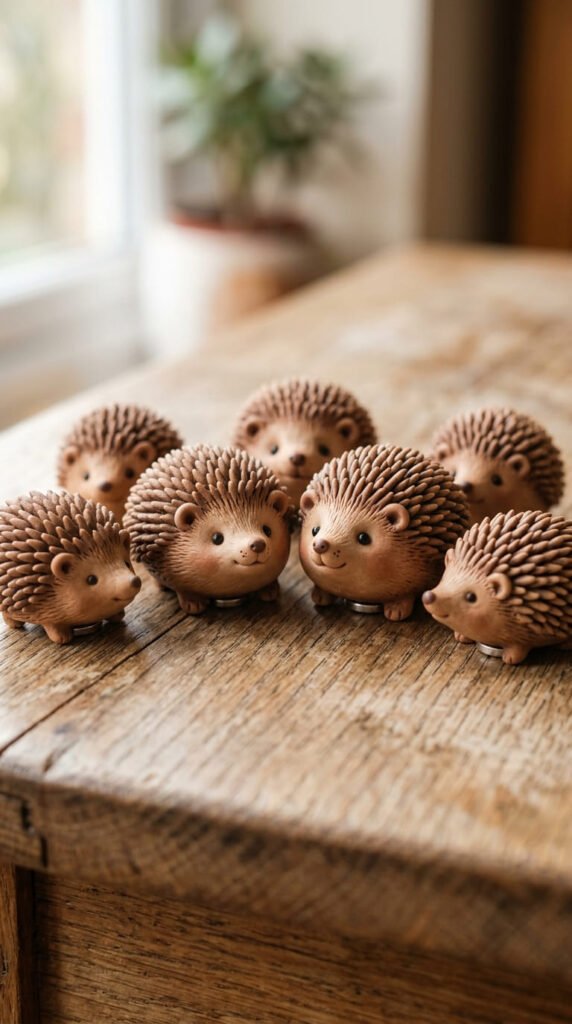
Hedgehogs are cute and a fun texture project. Shape a small rounded body with a little pointed face at one end. Then add the spikes. Snip tiny cuts all over the back with scissors or press lines with a toothpick to make a spiky texture. Let it dry or bake. Sand the smooth face area. Paint the spiky back brown and the face a lighter tan. Add dot eyes and a tiny black nose. Seal, glue a magnet, cure overnight. Budget tip: hedgehogs use little clay, so one block makes a few. Paint covers the colors. Keep the body chunky so the spikes don’t break off. Snip the spikes while the clay is soft. A hedgehog magnet makes an adorable gift for any animal lover. They look sweet on a fridge. Want a family? Make a big one and a couple of tiny babies. The spiky texture is a fun technique to practice and adds great character. Hedgehogs are a nice step up once you’ve made simple shapes, since the texturing takes a little patience. A little prickly friend that’s all charm. Cute, cozy, and full of personality.
23. Ice Cream Cone Magnets
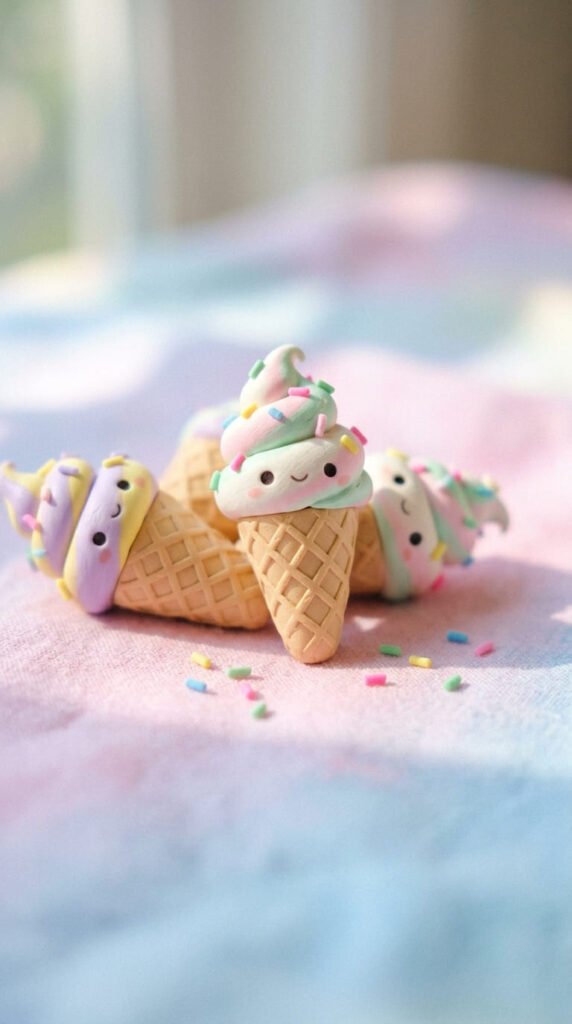
Ice cream cones are a sweet way to end your magnet collection. Shape a small triangle cone of tan clay. Press a waffle grid into it with a knife. Add a rounded scoop on top, or a soft swirl for soft-serve. Let it dry or bake. Sand the edges. Paint the cone golden tan and the scoop any flavor, pink for strawberry, brown for chocolate, white for vanilla. Add tiny sprinkles with paint dots and a little smiley face for cuteness. Seal the scoop with gloss for a creamy look, glue a magnet, cure overnight. Budget tip: cones use little clay, so one block makes several. Paint covers all the flavors. Keep the cone a quarter inch thick so the tip doesn’t snap. A chunky scoop holds up better than a thin one. An ice cream magnet makes a fun summer gift. Make a few in different flavors for a sweet set. They look adorable on a fridge. Want a double scoop? Stack two for extra cuteness. Ice cream cones combine a couple of simple skills, texture and stacking, so they’re a fun way to finish strong. Sweet, cheerful, and impossible not to love.
Conclusion
Cute clay magnets prove that the best little gifts cost almost nothing. With one cheap block of air dry clay or polymer clay, a few paint colors, and an afternoon, you can make a whole crew of adorable magnets. Pick a few favorites from this list, smiley fruit if you want cheerful, chubby cats if you want kawaii, ghosts and rainbows if you want playful. Remember the basics that make them last: keep your clay a quarter inch thick, let air dry clay dry a full 24 to 48 hours while flipping it halfway (or bake polymer clay and let it cool completely), sand the edges, and use strong glue with a 24-hour cure before sticking anything up. Start with easy shapes like hearts or smiley lemons, then try animals and 3D treats as you get the hang of it. Add a tiny face to almost anything and it instantly turns adorable. Each little magnet costs pennies but feels handmade and personal, which is what makes it a great gift. Grab some clay this weekend and start making. Your fridge, and everyone you give them to, will absolutely love them.


