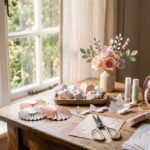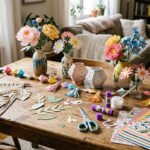
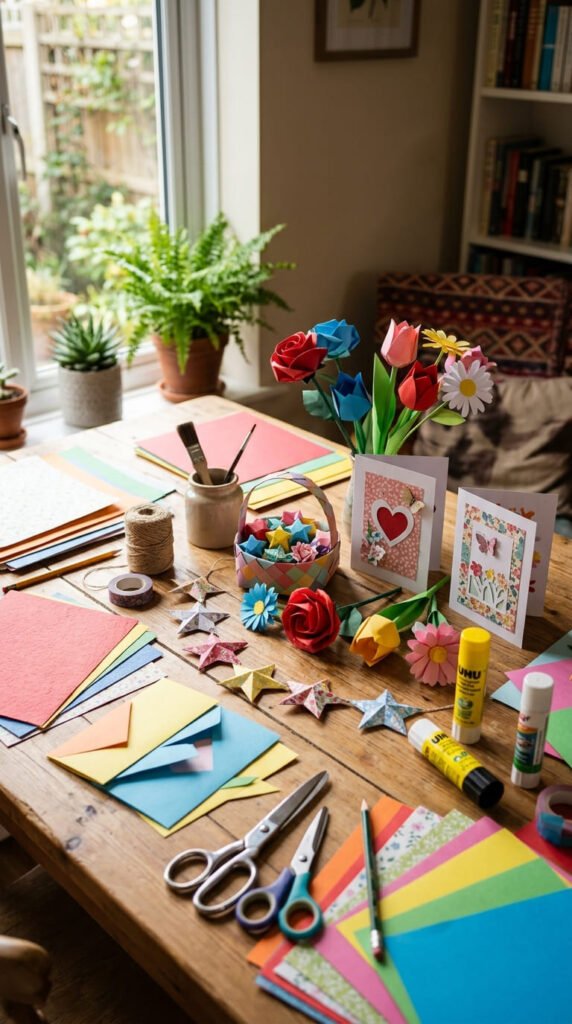
Easy paper crafts are perfect for relaxed weekends because they turn plain sheets, scrap paper, old magazines, and cardstock into cute DIY projects without costly supplies. These simple ideas work for kids, adults, family craft time, party prep, school projects, handmade gifts, and low-cost home decor. The best part is that most projects use items already at home, like paper, glue, scissors, tape, markers, and string. Easy paper crafts also match popular search intent around beginner-friendly paper flowers, wall decor, party decorations, gift crafts, and kid-safe weekend activities.
1. Folded Paper Flowers
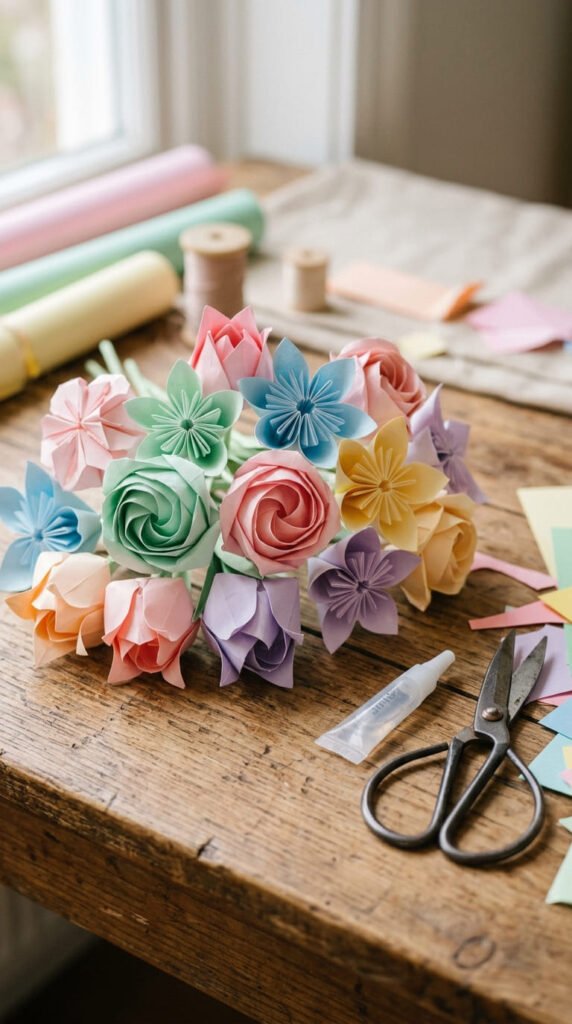
Folded paper flowers are one of the easiest weekend paper crafts because they look pretty and cost very little. Use colored copy paper, origami paper, or old wrapping paper cut into squares. Start by folding each square into small triangle layers, then trim the top into a rounded petal shape. Open it slowly and you will see a flower form.
For a fuller flower, make three or four layers in different sizes. Glue the layers in the center and add a small paper circle as the middle. Kids can make bright flowers for bedroom walls, while adults can use softer paper shades for gift wrapping or party tables.
This craft works well with scrap paper, so do not throw away small leftover pieces. Make a bunch in one sitting and store them in a box. Later, glue them onto cards, photo frames, banners, or plain notebooks. A simple stack of paper can turn into cheerful handmade decor in one quiet afternoon.
2. Colorful Paper Chain Garland
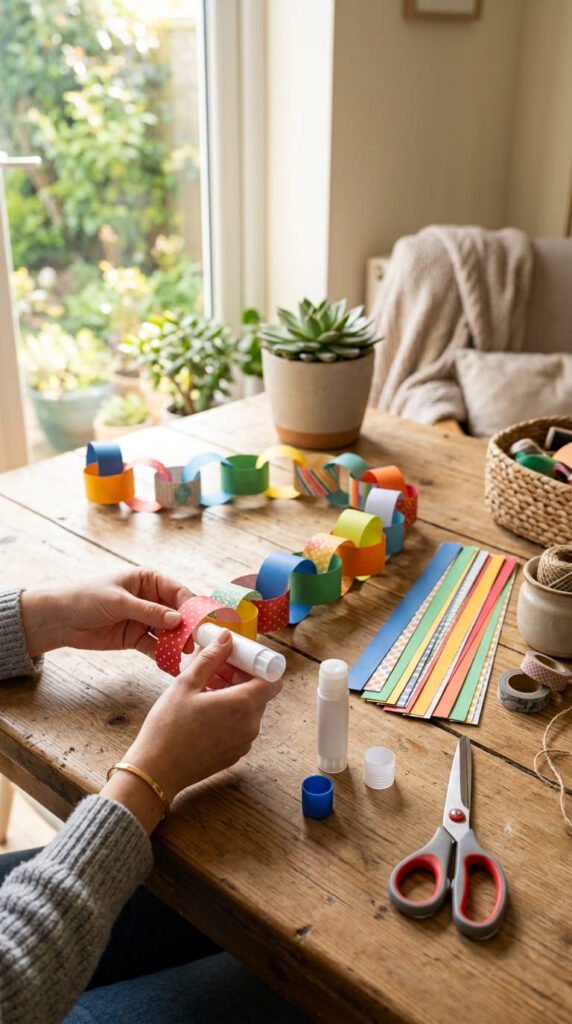
A paper chain garland is a classic craft that still works because it is fast, cheap, and fun for all ages. Cut paper into even strips. Wrap one strip into a loop and glue or tape the ends. Thread the next strip through the first loop, close it, and keep going until the chain is long enough.
Use construction paper for a bold party look or old magazine pages for a patterned style. For a birthday, choose two or three matching colors. For a bedroom, use soft tones that match the wall or bedding.
This project is great for kids because it builds cutting and pattern skills without a difficult setup. It also works for adults who want quick party decor without buying plastic banners. Hang the chain across a shelf, window, doorway, or dessert table.
A budget tip is to use leftover printer paper and color it with markers before cutting. Even plain paper can look cute when the loops repeat in a clean pattern.
3. DIY Paper Bookmarks
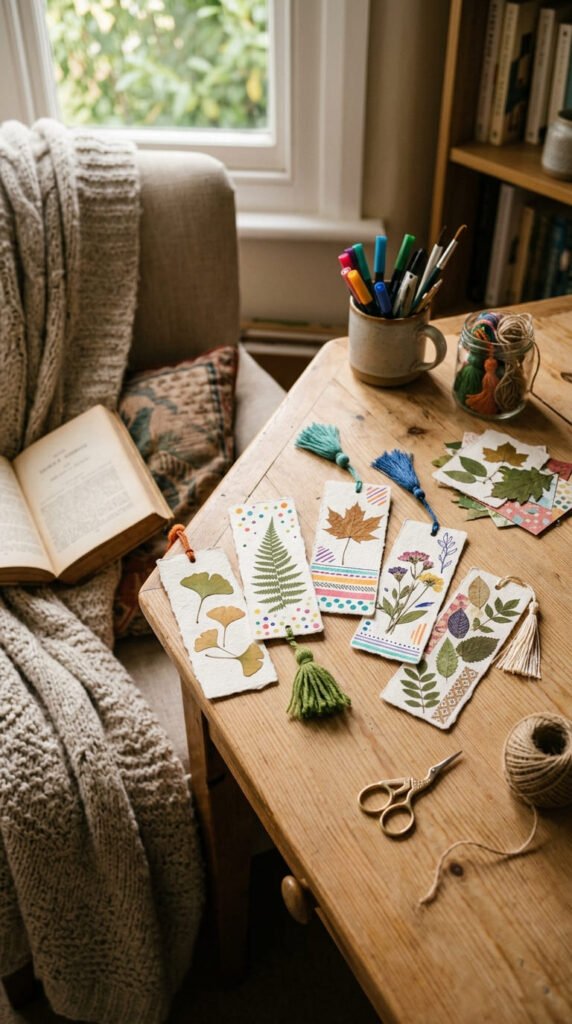
DIY paper bookmarks are small, useful, and perfect for a slow weekend craft. Cut cardstock or thick paper into rectangles. Round the corners with scissors, then decorate each bookmark with markers, stickers, paper scraps, pressed leaves, or small punched shapes.
For a cleaner finish, glue a second paper layer on the back. This hides any messy marker marks and makes the bookmark stronger. Punch a hole at the top and tie on yarn, ribbon, or embroidery thread for a simple tassel.
This is a great project for book lovers, students, teachers, and kids. You can make a set as a low-cost gift or keep a few near your favorite books. Try themes like flowers, cats, rainbows, stars, or simple color blocks.
Old greeting cards also work well for this craft. Cut out pretty sections, add a backing, and turn them into bookmarks instead of throwing them away. It is a simple way to reuse paper while making something you will actually use.
4. Paper Plate Sun Craft
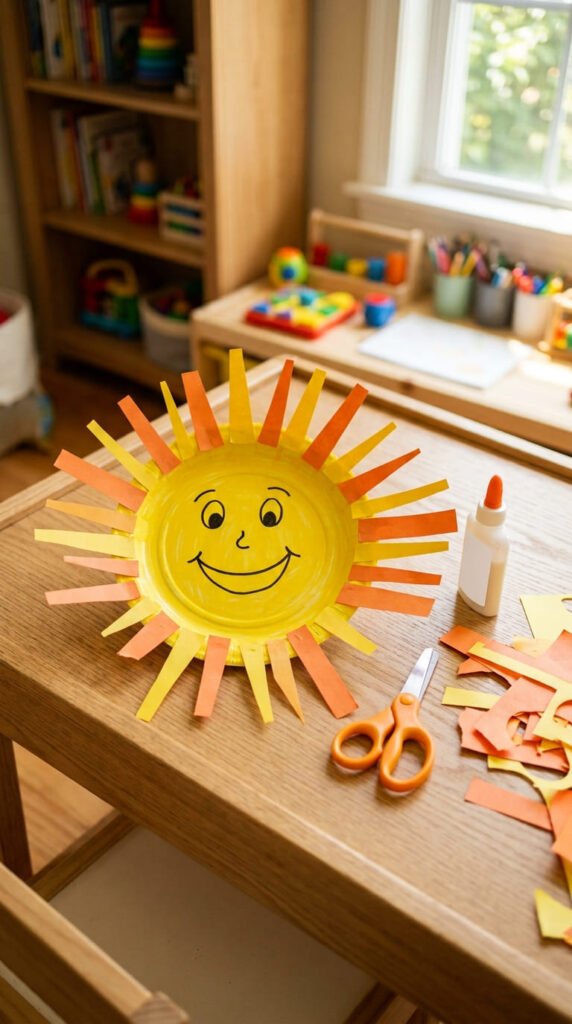
A paper plate sun craft is a happy weekend project for kids and a nice decoration for a playroom or classroom. Paint or color the center of a paper plate yellow. Then cut strips or triangles from yellow, orange, and gold paper to make sun rays.
Glue the rays around the back edge of the plate. Let them overlap a little so the sun looks full. Add a simple face with markers or keep it plain for a cleaner wall display. Younger kids can tear the paper rays instead of cutting them, which gives the sun a fun handmade texture.
This craft is very low-cost because it uses basic supplies. Paper plates, glue, and construction paper are enough. You can also use cereal box cardboard as the base if paper plates are not available.
Hang the finished sun on a wall, fridge, door, or bulletin board. It also works as part of a weather lesson, summer craft day, or weekend family art session.
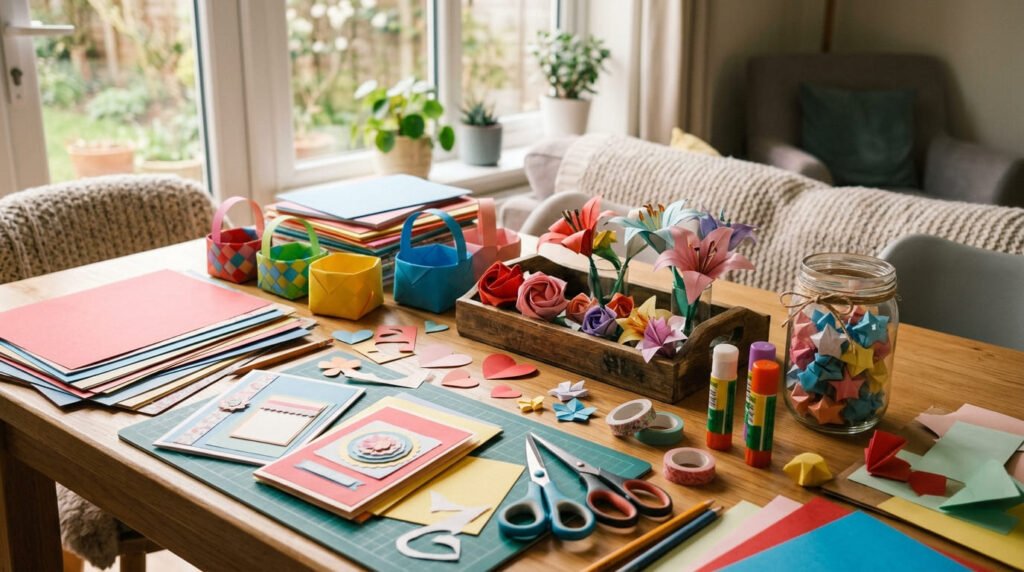
5. Origami Paper Hearts
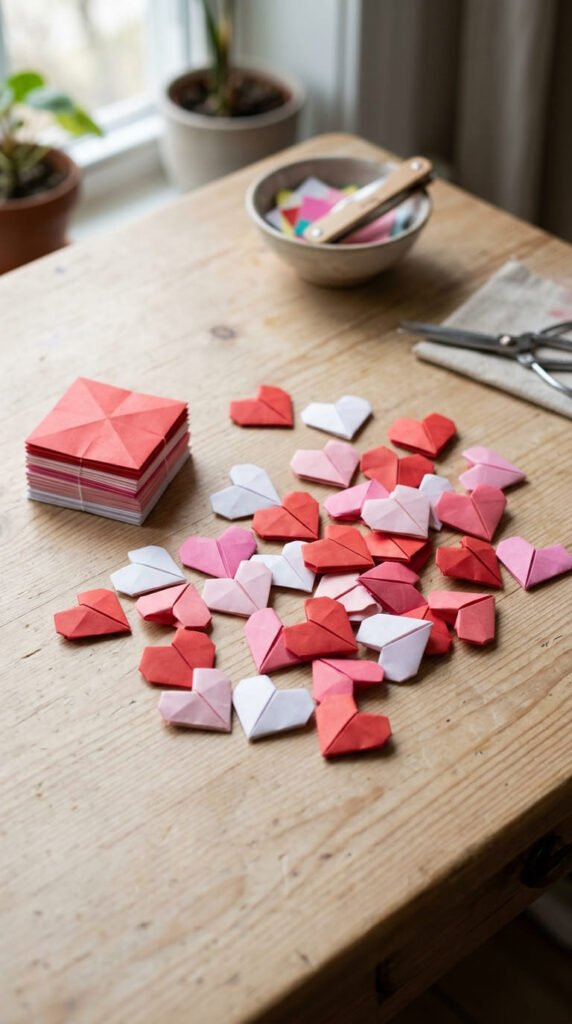
Origami paper hearts are quick, sweet, and useful for many DIY projects. Start with a square sheet of paper. Fold it in half, open it, then fold the edges toward the middle. Shape the top corners into soft heart curves and press the folds flat.
Use red and pink paper for Valentine crafts, or try book pages, magazine paper, or pastel notes for a softer handmade look. Once you learn the fold, you can make several hearts in a short time.
These hearts are great for cards, garlands, lunchbox notes, scrapbook pages, gift tags, and wall art. Glue them onto a blank card or string them together with thread. You can also place tiny hearts inside a handmade envelope as a cute surprise.
A budget-friendly idea is to use leftover wrapping paper from gifts. The patterns already look decorative, so the finished hearts feel polished with almost no extra work. Keep a small bowl of folded hearts on your desk for quick decorating whenever a gift or card feels too plain.
6. Mini Paper Gift Boxes
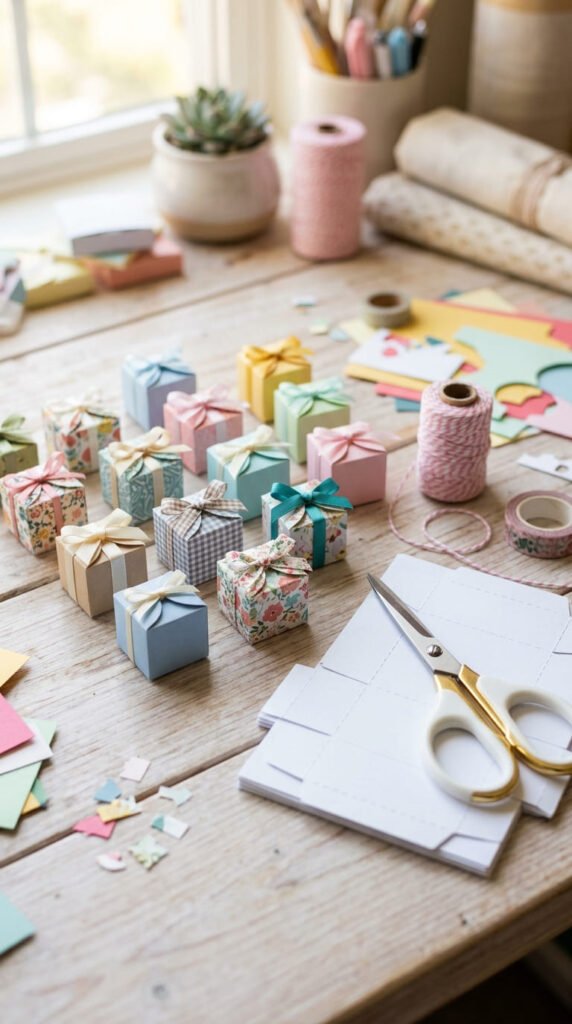
Mini paper gift boxes are perfect for tiny presents, candy, stickers, jewelry, or party favors. Use cardstock because it holds its shape better than thin paper. Draw a simple box template with a ruler, cut it out, fold along the lines, and glue the tabs.
Start with a small square base and four side panels. Once you understand the shape, it becomes easy to change the size. Use patterned paper for birthdays, kraft paper for a rustic look, or bright paper for kids’ party favors.
This craft is useful because the finished box has a real purpose. You can make several in one weekend and save them for gifts. Add ribbon, a paper flower, or a small tag on top.
For an affordable option, reuse cereal boxes. Cover the printed side with colored paper or paint. The cardboard is sturdy and works well for small boxes. Handmade packaging makes even a simple treat feel special, and it keeps gift wrapping personal without spending much.
7. Paper Butterfly Wall Decor
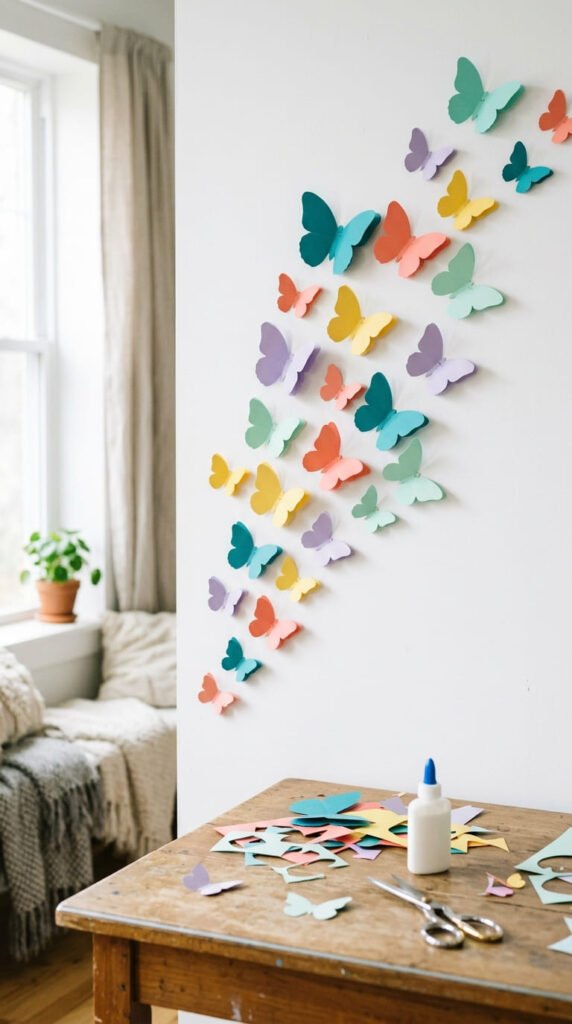
Paper butterfly wall decor is easy to make and gives a plain wall a playful look. Fold colored paper in half, draw half of a butterfly shape along the fold, and cut it out. Open the paper to reveal a matching butterfly shape.
Fold the wings slightly upward so each butterfly has a soft 3D effect. Make different sizes for a natural flying pattern. Use tape, removable wall dots, or poster putty to attach them to a bedroom wall, craft corner, or party backdrop.
This project works well with colored paper scraps, magazine pages, or old scrapbook paper. Patterned paper adds detail without extra drawing. For a calm look, choose one color family. For a kids’ room, use rainbow shades.
A simple DIY example is to place butterflies rising from a desk, mirror, or headboard. Start with larger butterflies near the bottom and smaller ones near the top. This creates movement without complicated steps. It is a low-cost way to decorate a space for a weekend room refresh.
8. Rolled Paper Beads
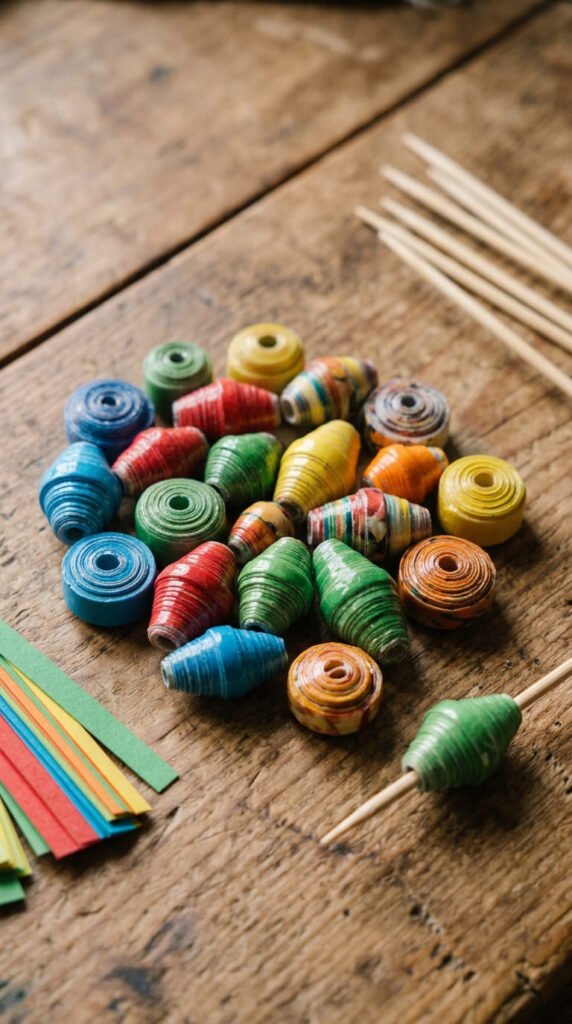
Rolled paper beads are a smart way to turn old magazines, catalogs, and scrap paper into jewelry or decor. Cut long triangle strips from paper. Place a toothpick or skewer at the wide end, roll tightly toward the point, and glue the tip down.
Once dry, slide the bead off the skewer. Make many beads in different colors and sizes. You can brush on a thin layer of clear glue for strength, but plain paper beads also work for light crafts.
String them onto yarn, elastic, or thread to make bracelets, necklaces, keychains, or garlands. Kids can practice patterns, while adults can use magazine pages for a more artistic look. The colors from printed paper create unique beads every time.
This project costs almost nothing if you use recycled paper. Keep a small container for interesting paper scraps, then cut them into strips during craft time. Paper beads are relaxing to make, and the finished pieces look much more detailed than the simple steps behind them.
9. Paper Pinwheels
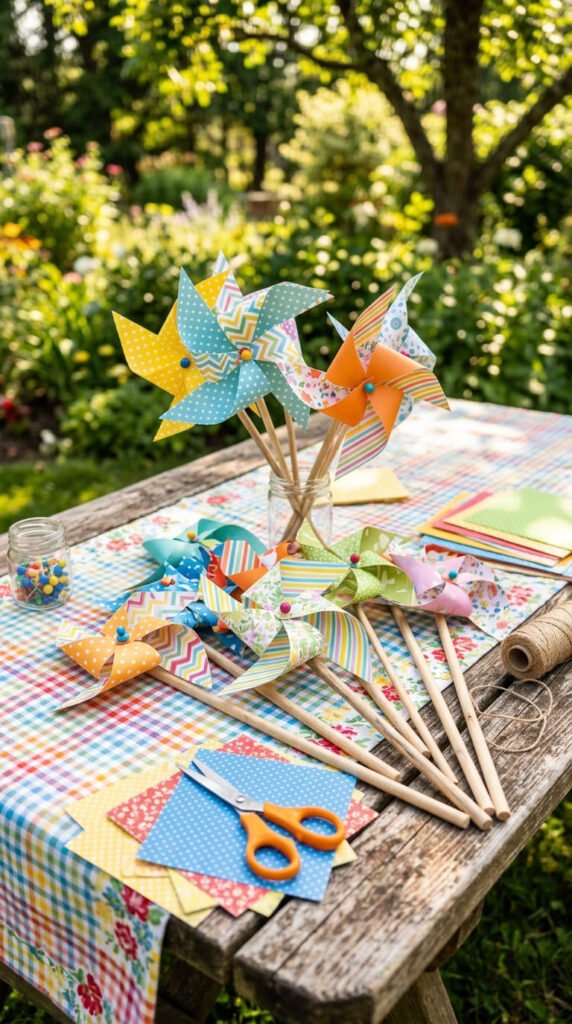
Paper pinwheels are fun for outdoor play, party decorations, and kids’ craft afternoons. Cut a square from lightweight paper. Draw lines from each corner toward the center, stopping before the middle. Cut along the lines, then fold every other corner into the center.
Secure the folded corners with a brad, pushpin, or small button and glue. Attach the pinwheel to a straw, wooden skewer, or paper straw. For safety with young kids, skip sharp pins and use glue to make a decorative pinwheel instead of a spinning one.
Use double-sided paper for a brighter look. If you only have plain paper, decorate both sides before folding. Stripes, dots, and marker doodles all look cute when the pinwheel turns.
This craft is great for birthday tables, garden parties, classroom boards, and weekend playdates. Make a group of pinwheels in matching colors and place them in a jar as table decor. It gives a handmade party feel without buying expensive decorations.
10. Accordion Paper Fans
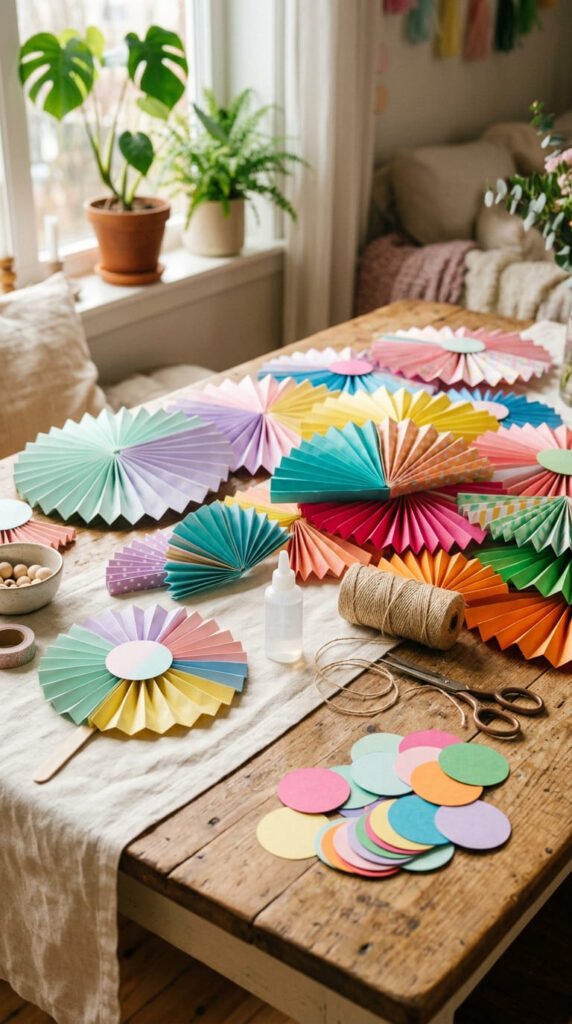
Accordion paper fans are simple, bold, and great for wall decor or party backdrops. Start with a rectangular sheet of paper. Fold it back and forth in even pleats, like a paper fan. Press each fold firmly so the shape holds.
For a round fan, fold two or three pleated sheets and glue them together end to end. Pull the ends around into a circle and glue the center. Add a small paper circle over the middle to hide the join.
Use cardstock for large fans and copy paper for smaller ones. Mix sizes to make a fuller wall display. These fans look great behind a cake table, above a desk, or on a bedroom wall.
A budget tip is to use wrapping paper left from parties. It already has color and pattern, so the fans look decorated without extra work. You can also make mini fans as gift toppers. They take only a few folds, yet they make plain wrapping feel handmade and fun.
11. Paper Bag Puppets
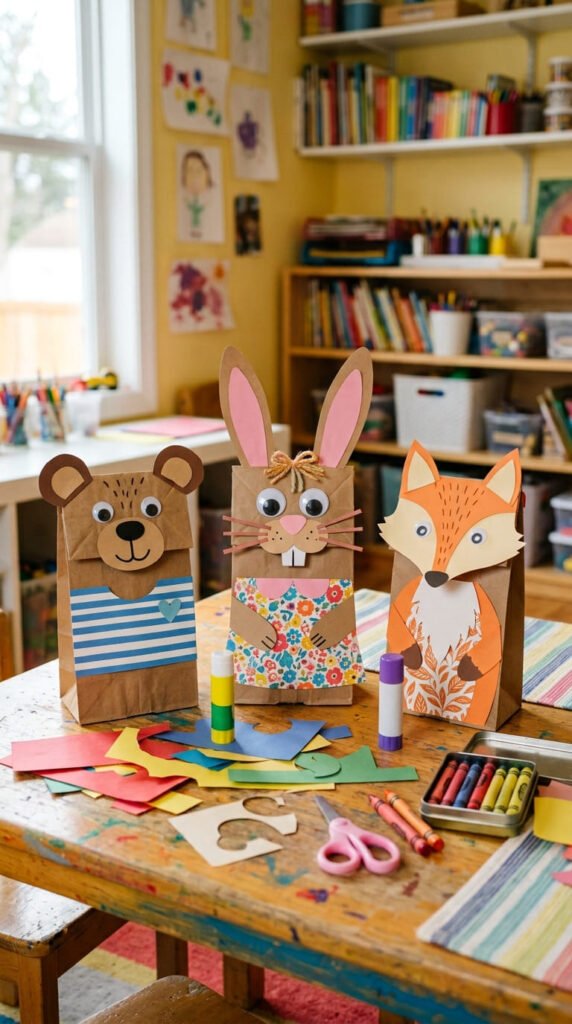
Paper bag puppets are easy, silly, and perfect for a family craft weekend. Use lunch bags as the puppet base. The folded bottom becomes the face, and the bag opening becomes the hand pocket. Add paper eyes, ears, hair, clothes, wings, or animal noses.
Kids can make dogs, cats, rabbits, monsters, birds, or storybook characters. Cut simple shapes from construction paper and glue them in layers. Markers work well for small details like whiskers, freckles, or buttons.
This craft is affordable because paper lunch bags come in large packs. You can also reuse clean shopping bags by cutting them into smaller puppet shapes. Add yarn hair or fabric scraps if you have them, but paper alone is enough.
After crafting, turn the puppets into a weekend show. Set up a couch or table as a stage and let kids make short stories. This makes the project last longer than the crafting time. It also helps children practice speaking, storytelling, and play through art.
12. Handmade Greeting Cards
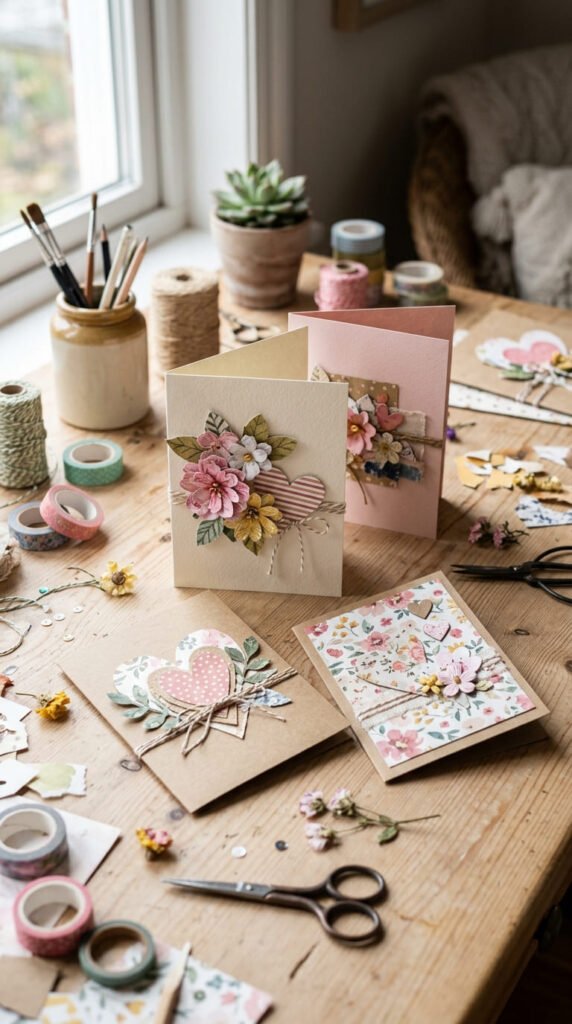
Handmade greeting cards are a useful paper craft for birthdays, thank-you notes, holidays, and kind little messages. Fold cardstock in half to make the card base. Then decorate the front with cut paper shapes, paper flowers, layered hearts, stars, or simple torn paper designs.
Keep the design clean by choosing two or three colors. Add texture with folded paper, small strips, or punched circles. You can also use old wrapping paper, magazine pages, or leftover scrapbook paper to save money.
This craft is great because it can be as simple or detailed as you want. Kids can glue big shapes. Adults can make neat layered designs. A blank card pack from a craft store can turn into many handmade cards for less than buying individual cards.
Make a small card box on the weekend. Create several cards at once and keep them ready for the month ahead. When a birthday or thank-you moment comes up, you will already have a personal handmade card ready to use.
13. Paper Lanterns
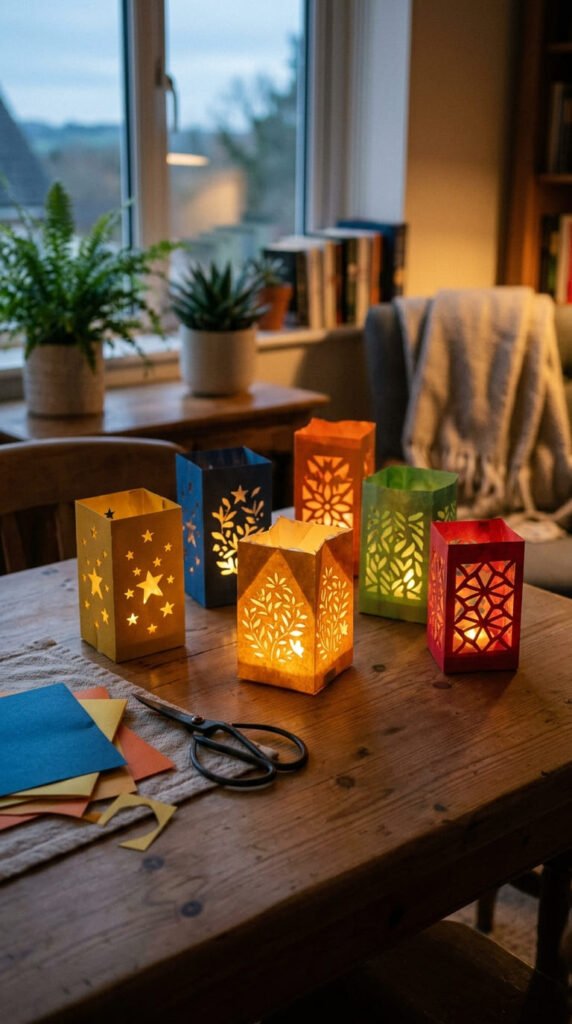
Paper lanterns are simple decorations for cozy rooms, parties, and holiday corners. Fold a sheet of paper in half lengthwise. Cut short lines from the folded edge toward the open edge, leaving space at the top. Open the sheet, roll it into a cylinder, and glue or tape the sides.
Add a paper handle at the top if you want to hang it. Use bright paper for parties or soft colors for bedroom decor. Never place real candles inside paper lanterns. Use battery tealights only, or leave them as decorative pieces without light.
This craft works well for kids because the cuts are easy to repeat. Adults can make larger sets for dinner tables, patios, or festive shelves. Patterned paper makes each lantern look more detailed.
For a budget project, use colored printer paper or leftover gift wrap glued onto plain paper. Make several lanterns in matching colors and place them along a shelf. The repeated shapes create a warm handmade look with very little spending.
14. Torn Paper Collage Art
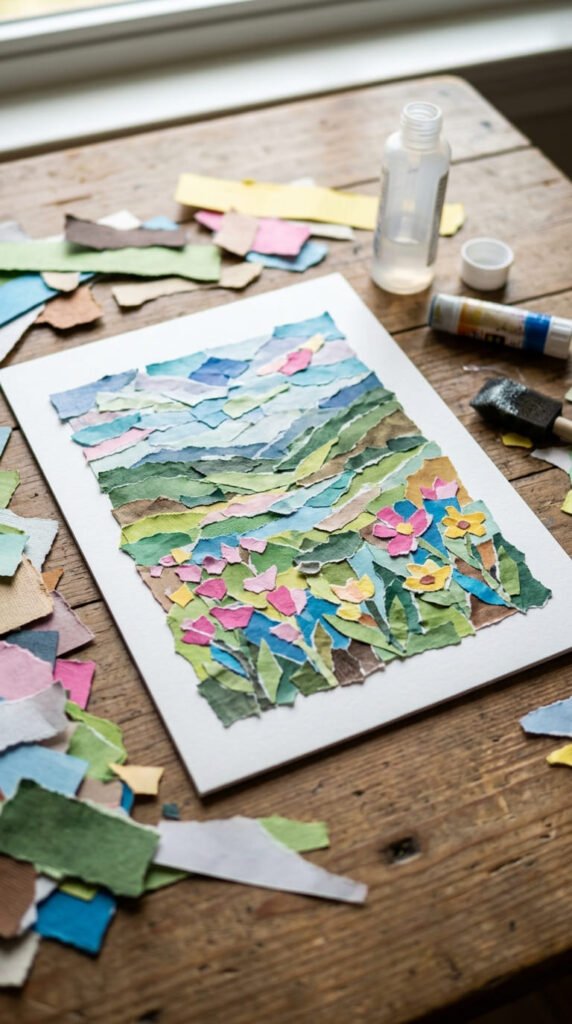
Torn paper collage art is perfect when you want a no-stress craft with no perfect cutting. Gather colored paper, old magazines, tissue paper, or scrap wrapping paper. Tear the paper into small pieces by hand. Arrange the pieces on a blank sheet to form flowers, houses, trees, animals, or abstract patterns.
Glue one section at a time. Overlap the pieces slightly so the finished art has texture. Kids enjoy the tearing part, and adults can use color planning to make the project look more polished.
This craft is also great for using tiny scraps that are too small for other projects. Sort scraps by color in small bowls, then pick from each bowl while making the collage. It feels organized but still relaxed.
Try a weekend example like a paper garden scene. Use green scraps for grass, blue scraps for sky, and bright pieces for flowers. Frame the finished page or glue it onto cardstock. The handmade texture makes even a simple design feel warm and personal.
15. Paper Snowflakes
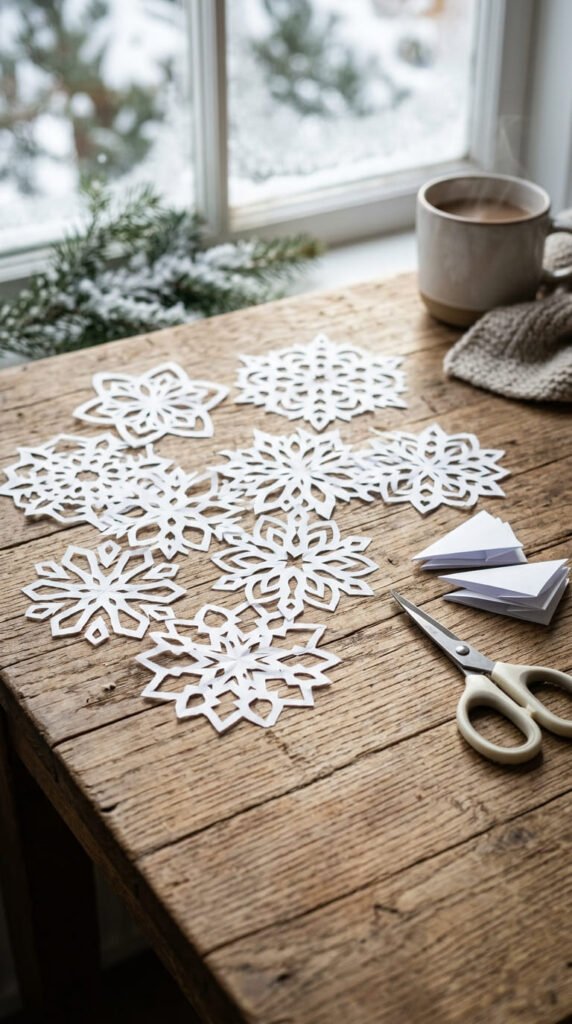
Paper snowflakes are a fun cutting craft for winter weekends, holiday decor, or classroom art. Fold a square sheet of paper into a triangle, then fold it again into a smaller triangle. Cut small shapes from the edges, then open the paper slowly to reveal the snowflake.
Every cut changes the final design, which makes this craft exciting. Use white paper for a classic look, or try silver, blue, or pastel paper for a softer display. Thin paper is easier to cut, so printer paper works better than heavy cardstock.
Tape snowflakes to windows, string them into garlands, or glue them onto cards. Kids can make simple shapes, while adults can try smaller detailed cuts.
A budget tip is to use plain office paper. One sheet can make several small snowflakes if cut into squares. Keep a tray for paper clippings so cleanup is simple. Paper snowflakes are quick to make, easy to repeat, and pretty enough to decorate a whole room.
16. Paper Cupcake Toppers
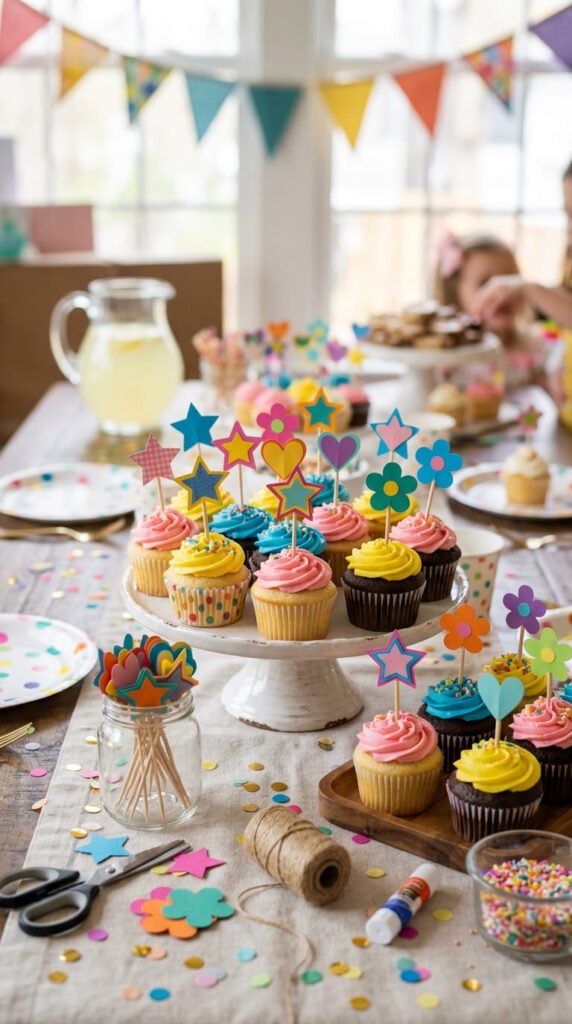
Paper cupcake toppers are tiny crafts that make homemade treats look party-ready. Cut small shapes from cardstock, such as stars, hearts, circles, flowers, flags, or animals. Glue each shape onto a toothpick, paper straw, or wooden food pick.
Use two matching paper shapes back to back so the topper looks good from both sides. Let the glue dry fully before placing the topper near food. Keep glitter away from the part that touches cupcakes, and use clean food-safe picks.
This project is great for birthdays, baby showers, school parties, and weekend baking. You can match the topper colors to balloons, plates, or napkins. Kids can help punch out circles or glue shapes, while adults handle small picks.
For a low-cost version, use leftover cardstock from other crafts. Even tiny scraps are large enough for cupcake toppers. Make a set of twelve in one sitting and store them in a jar. They add handmade charm to simple cupcakes, muffins, or treat boxes.
17. Magazine Paper Bowls
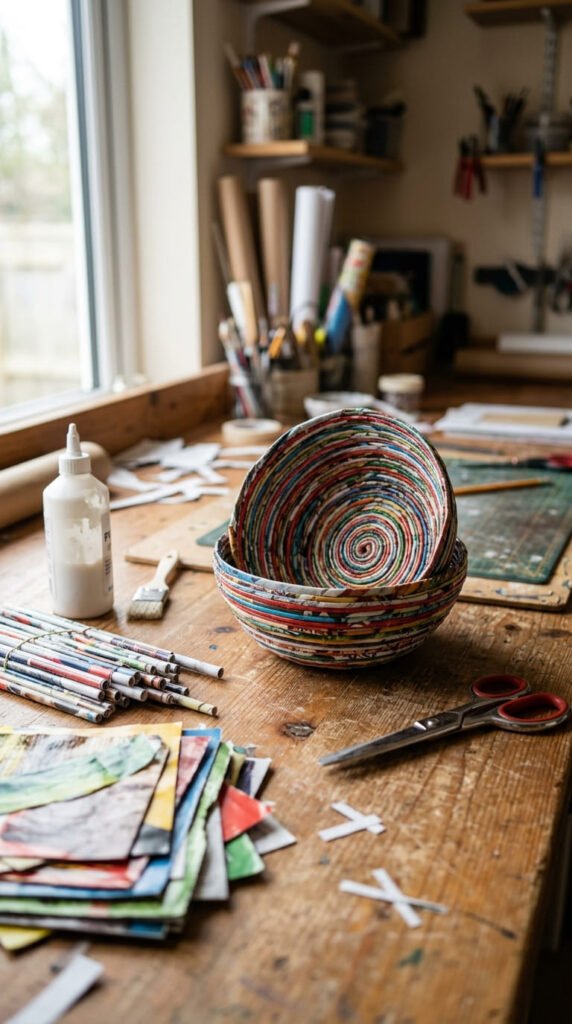
Magazine paper bowls are a great recycled craft for older kids, teens, and adults. Tear or cut magazine pages into long strips. Roll each strip tightly into a paper coil and glue the end. Keep adding strips around the coil until the base is wide enough.
Once the base is ready, build the sides by gluing more coils slightly upward around the edge. Shape slowly and let sections dry as you go. The finished bowl is best for light items like keys, hair ties, paper clips, or wrapped candy.
The colors from magazine pages create a patterned look without paint. Choose pages with similar colors if you want a cleaner style, or mix everything for a bold handmade look.
This craft takes more time than quick projects, so it is good for a slow weekend afternoon. Work while listening to music or watching a movie. It is also a smart way to reuse old magazines instead of throwing them away. The final piece feels useful and personal.
18. Paper Animal Masks
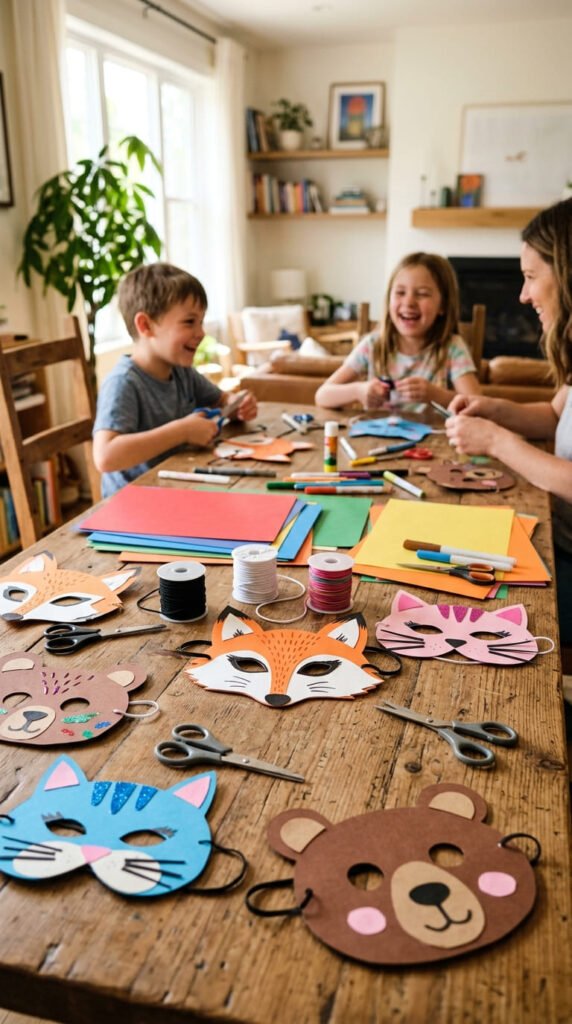
Paper animal masks are fun for dress-up, parties, school activities, and weekend play. Start with cardstock or a paper plate as the base. Cut out eye holes, then add ears, noses, whiskers, feathers, or spots with colored paper.
Make simple animals like cats, bears, foxes, lions, rabbits, owls, or dogs. Use glue for paper pieces and markers for smaller details. Punch holes on each side and tie elastic string or ribbon so the mask can be worn.
For young kids, adults can cut the eye holes first. Kids can handle coloring, gluing, and choosing animal features. This keeps the project safe and still gives children room to design.
A budget idea is to use cereal box cardboard covered with colored paper. It makes a stronger mask than thin paper. You can also make masks for a themed birthday party instead of buying costume pieces. After crafting, kids can act out animal stories, take photos, or use the masks for pretend play.
19. Paper Flower Crown
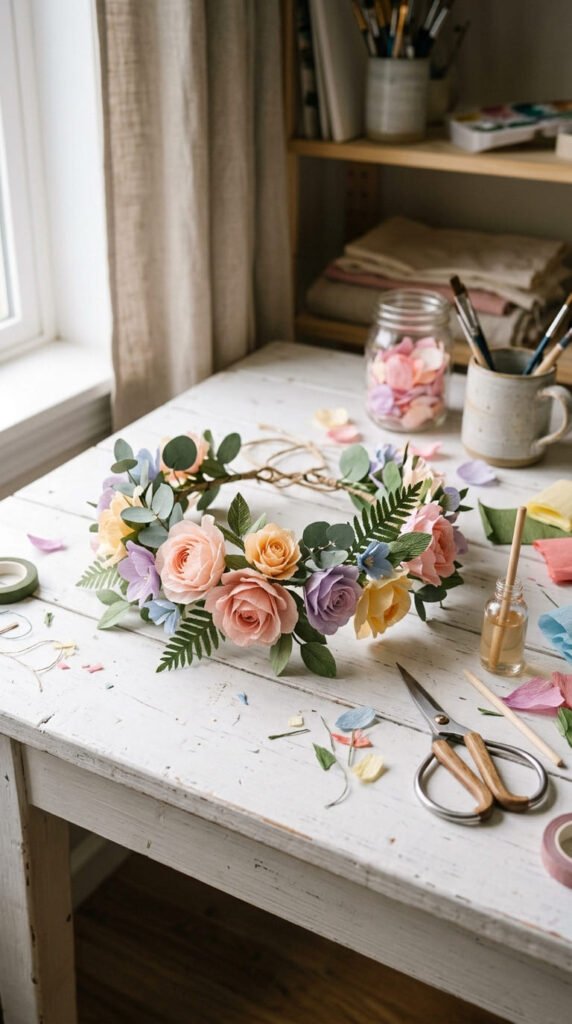
A paper flower crown is a pretty weekend craft for birthdays, dress-up, spring parties, photo props, or kids’ play. Cut a long strip of cardstock to fit around the head. Tape or glue the ends only after checking the size.
Make small paper flowers by cutting circles, spirals, or petal shapes. Add green paper leaves between the flowers. Glue everything along the front of the crown. Keep the back lighter so it sits comfortably.
Use pastel paper for a soft look or bright colors for a playful party style. Tissue paper also works if you want fluffy flowers. For stronger flowers, use cardstock or construction paper.
This craft is very affordable because each crown uses only a few sheets. It is also easy to personalize. One child might want a rainbow crown, while another might choose only pink flowers. Adults can make matching crowns for party favors or photo booths. Let the crown dry flat before wearing it so the flowers stay in place.
20. Paper Envelope Set
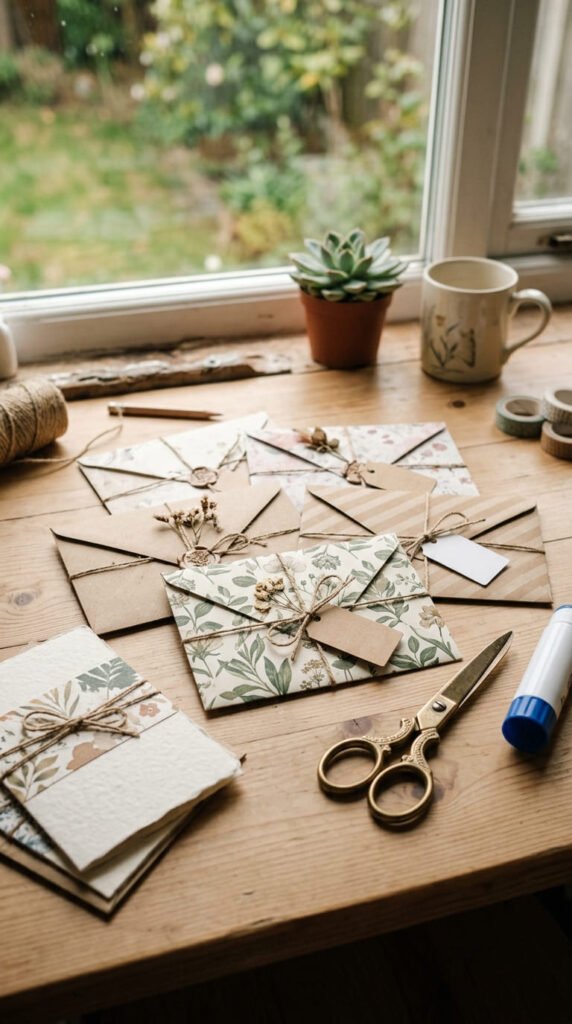
A paper envelope set is useful for cards, notes, gift tags, stickers, and tiny keepsakes. Use any square or rectangular paper. Fold the sides toward the center, fold the bottom upward, and glue only the side edges. Fold the top down to make the flap.
Patterned paper makes beautiful envelopes, but plain paper works too. Decorate plain envelopes with stamps, markers, washi tape, or small paper shapes. Try old maps, book pages, gift wrap, or magazine pages for a recycled version.
This project is great for using paper that feels too pretty to throw away. It also pairs well with handmade greeting cards. Make cards and envelopes together so the sizes match.
A simple weekend idea is to make a set of five envelopes in different patterns. Keep them in a drawer for birthdays, thank-you notes, or small gifts. You can also make mini envelopes for lunchbox notes or scrapbook pockets. Handmade envelopes make any note feel more thoughtful without costing much.
21. Paper Star Garland

A paper star garland is a simple decoration for bedrooms, parties, holidays, or reading corners. Cut star shapes from cardstock or fold small lucky stars from paper strips. Make enough stars to fill a piece of string, yarn, or twine.
If you cut flat stars, punch a small hole near the top of each one and thread them onto string. If you make folded stars, glue them onto the string or tie them between knots. Mix sizes to make the garland look more playful.
Gold, white, and navy paper gives a night-sky feel. Rainbow paper works well for kids’ rooms. Kraft paper gives a cozy handmade style.
This craft is budget-friendly because one sheet of cardstock can make many stars. Use scraps from other projects for small stars. Hang the finished garland over a desk, mirror, window, shelf, or party table. It is light, easy to store, and quick to remake in new colors whenever you want different decor.
22. Paper Rainbow Craft
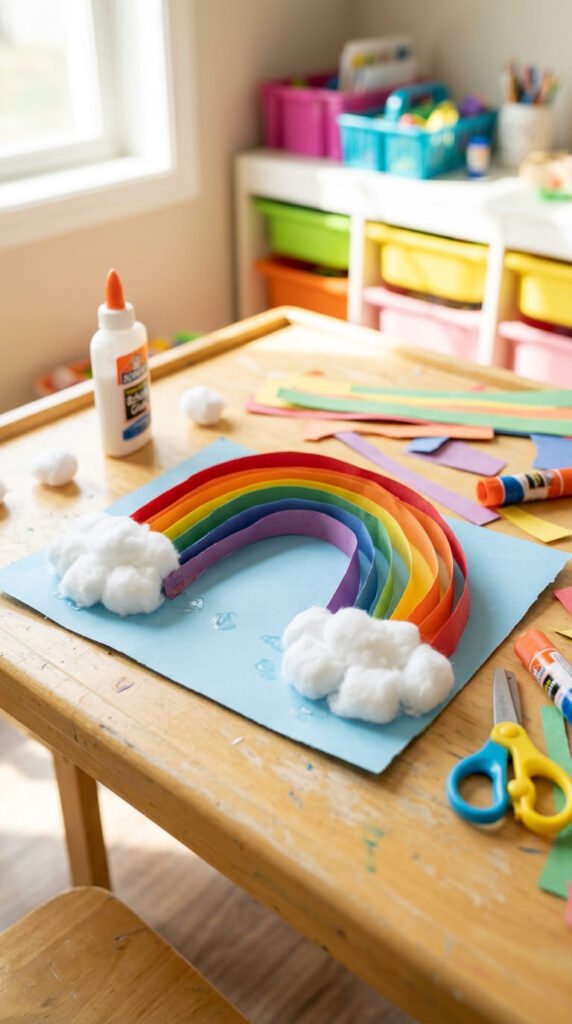
A paper rainbow craft is bright, easy, and perfect for kids’ weekend art. Cut strips from red, orange, yellow, green, blue, and purple paper. Glue the strips in an arch on a background sheet, or staple the ends together to make a 3D rainbow.
Add paper clouds or cotton balls at the bottom. You can also glue the rainbow onto cardstock and turn it into wall art. Younger kids can use wide strips, while older kids can cut thinner strips and arrange the colors neatly.
This craft works well with construction paper, cardstock, or painted printer paper. If you do not have every rainbow color, use what is available. The finished piece can still look cheerful.
A low-cost DIY example is a rainbow door hanger. Make a 3D rainbow, add clouds, and tape a loop of string behind it. Hang it on a bedroom door or craft wall. It is simple, colorful, and easy to finish in one short craft session.
23. Paper Desk Organizer
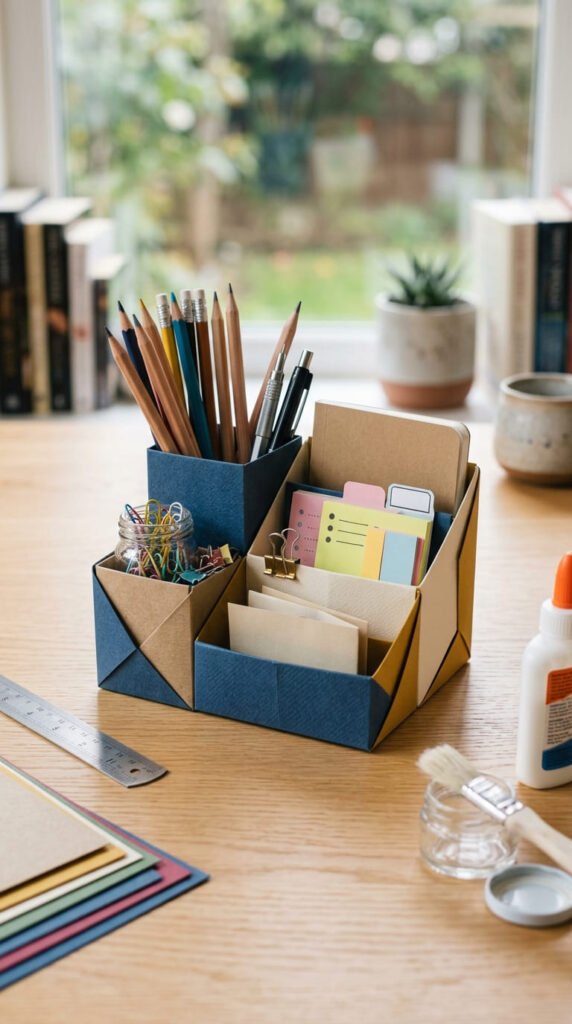
A paper desk organizer is a useful craft for pencils, sticky notes, clips, stickers, or small supplies. Use thick cardstock or light cardboard for strength. Create small boxes, tubes, or folded pockets, then glue them together on a cardboard base.
For pencil cups, roll cardstock into cylinders and tape the seam. For note pockets, fold paper into shallow envelope shapes. Cover the base with colored paper so everything matches. Let the glue dry well before filling the organizer.
This project is great for students, home offices, craft rooms, and kids’ homework spaces. It helps clean up small items while giving the desk a handmade touch. You can make it bright and fun or calm and simple.
A budget tip is to reuse toilet paper rolls, cereal boxes, and delivery box cardboard. Cover them with paper scraps and they will look like a matching set. This craft teaches organization while also using recycled materials. It is practical, low-cost, and satisfying to use after the weekend is over.
24. Paper Treat Cones
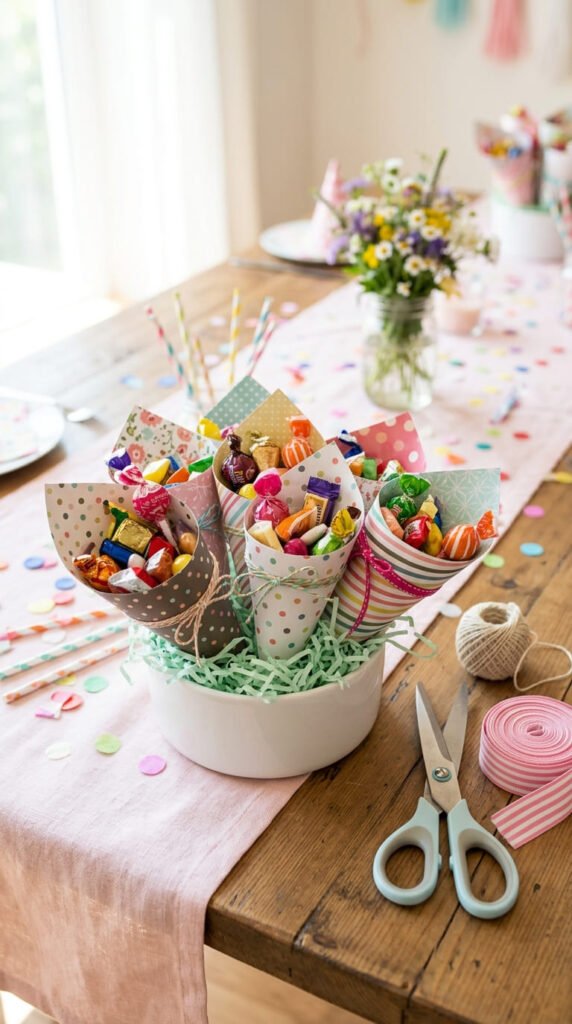
Paper treat cones are easy party crafts for popcorn, wrapped candy, small toys, stickers, or favor mixes. Cut a square of paper, roll it into a cone, and secure the side with tape or glue. Trim the top edge if you want it even.
Use cardstock for stronger cones and patterned paper for a more decorative style. Punch two holes near the top and add ribbon if you want to hang them or carry them. Always use wrapped treats or add a food-safe liner if snacks will touch the paper.
This craft is perfect for birthdays, movie nights, school parties, and weekend family events. Make cones in matching colors and place them in a basket or stand them inside cups.
For a cheap option, use wrapping paper glued onto plain printer paper. It gives the cone structure and style. Kids can help roll cones, choose ribbons, and fill them with treats. These little paper cones make simple snacks feel special without buying fancy packaging.
25. Paper Wreath Decor
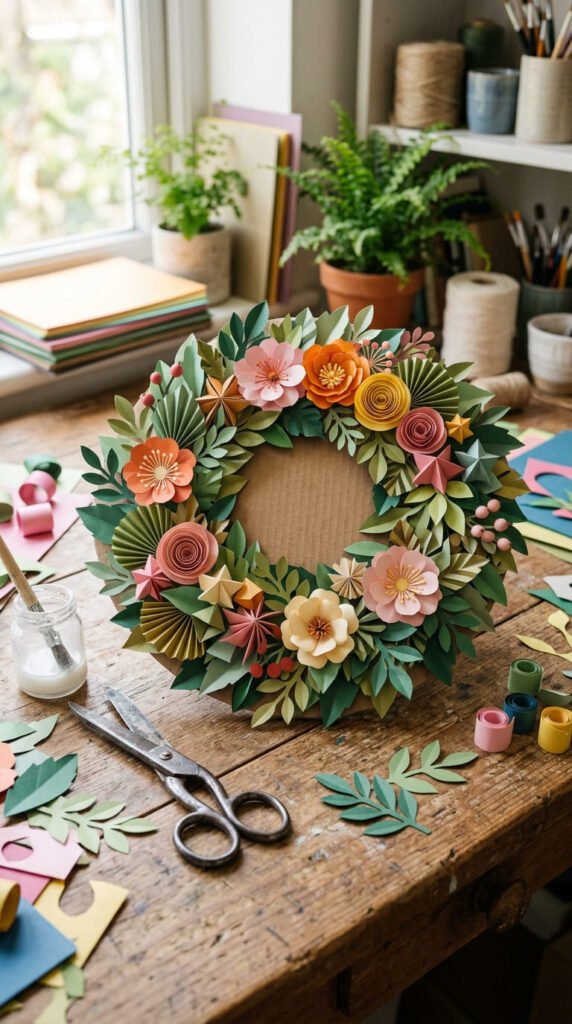
A paper wreath is a lovely weekend craft for doors, walls, shelves, or seasonal displays. Cut a ring from cardboard as the base. Then cut paper leaves, flowers, stars, hearts, or circles and glue them around the ring until the base is covered.
Choose colors based on the season or room. Green leaves and white flowers work for spring. Orange, brown, and gold paper works for fall. Red and white paper works for holidays. You can also make a rainbow wreath for a child’s room.
This craft is flexible without being hard. The base shape stays the same, but the paper pieces can change for any occasion. Use scraps to save money and add depth by layering larger pieces under smaller ones.
A simple DIY example is a leaf wreath made from old book pages and kraft paper. Cut leaf shapes, fold each leaf slightly down the center, and glue them in circles. Add string on the back for hanging. It looks handmade, warm, and easy to display.
Conclusion
Easy paper crafts are a relaxing way to spend a weekend, use simple supplies, and make something useful or decorative without a big craft budget. From flowers and garlands to bookmarks, masks, boxes, and wall decor, each project can be made with paper, glue, scissors, and a little time. Pick one idea, gather the paper you already have, and turn your next quiet weekend into a fun DIY craft session.