Air dry clay is the easiest way to make something pretty without a kiln, a fancy studio, or hours of waiting. You shape it, you let it dry, you paint it. That’s the whole game. Most of these projects take under an hour of hands-on time, and the supplies cost less than a coffee run. Whether you want a gift, a little home decor piece, or a fun afternoon with the kids, there’s a project here for you. Grab a block of clay and let’s make 22 simple things you’ll actually want to keep.
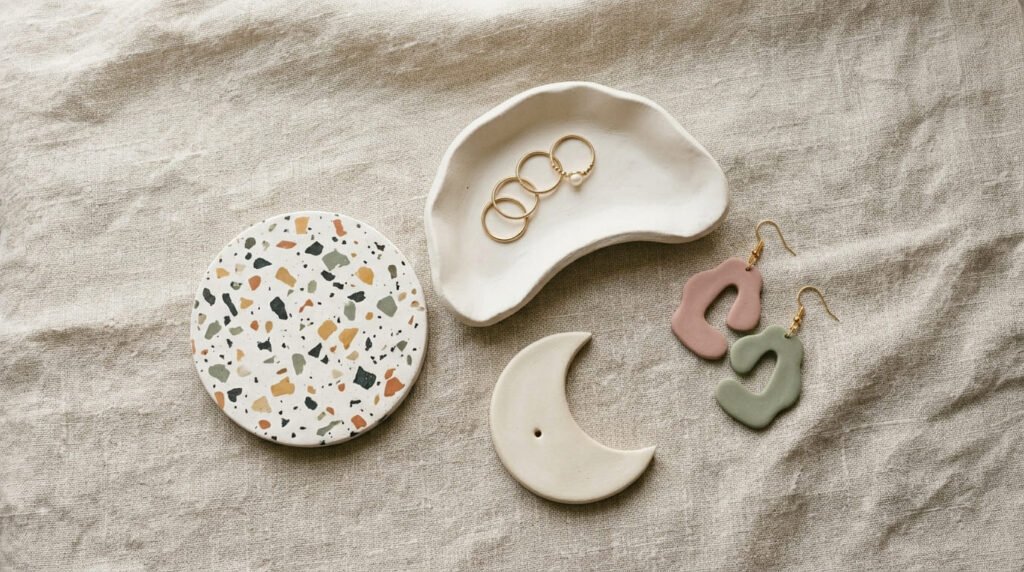
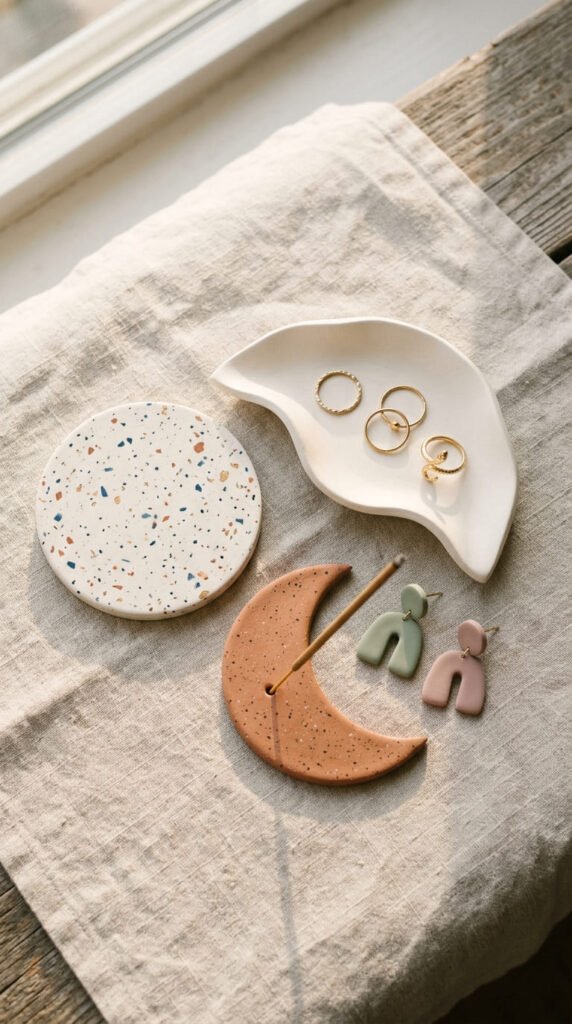
1. Minimalist Trinket Dish
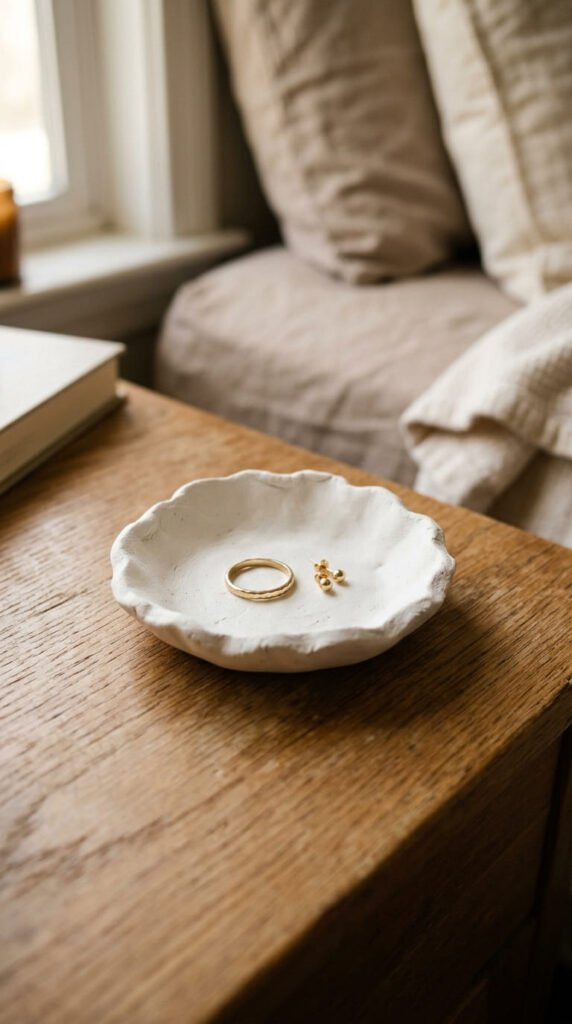
A trinket dish is the perfect first project. It’s quick, useful, and almost impossible to mess up.
Roll a ball of clay. Flatten it into a circle about a quarter inch thick. Then gently push the edges up to form a shallow bowl.
Want a clean rim? Press the clay into a real bowl lined with parchment paper and let it dry in shape.
Budget tip: Use a smooth glass or jar bottom as your mold. No need to buy anything.
Once dry, paint it with cheap acrylics. A swipe of gold around the rim looks expensive but costs pennies.
These dishes hold rings, earrings, keys, or paperclips. Make a few in different sizes and you’ve got a matching set.
They also make lovely little gifts. Wrap one in tissue paper and you’re done.
2. Speckled Terrazzo Coasters
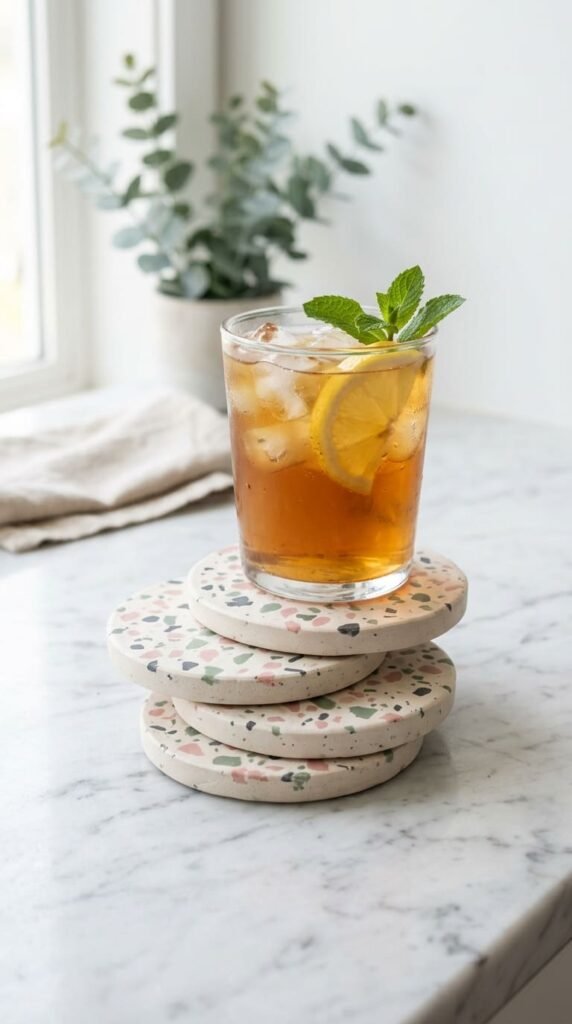
Terrazzo is the look everyone loves right now, and it’s shockingly simple to fake.
Take small bits of dry, colored clay. Crush them into tiny flecks. Press those flecks into a flat slab of fresh clay.
Roll it smooth with a rolling pin so the speckles sit flush.
Cut circles using a glass or a cookie cutter. Aim for a quarter inch thick so they don’t crack.
Let them dry flat for three to four days. Coasters are thick, so they take longer than most projects.
Seal both sides well. Coasters meet wet cups, and air dry clay is not waterproof on its own.
Budget tip: Save scraps from past projects to make your speckles for free.
A set of four makes a thoughtful housewarming gift. Tie them with twine and they look store-bought.
3. Moon and Star Incense Holder
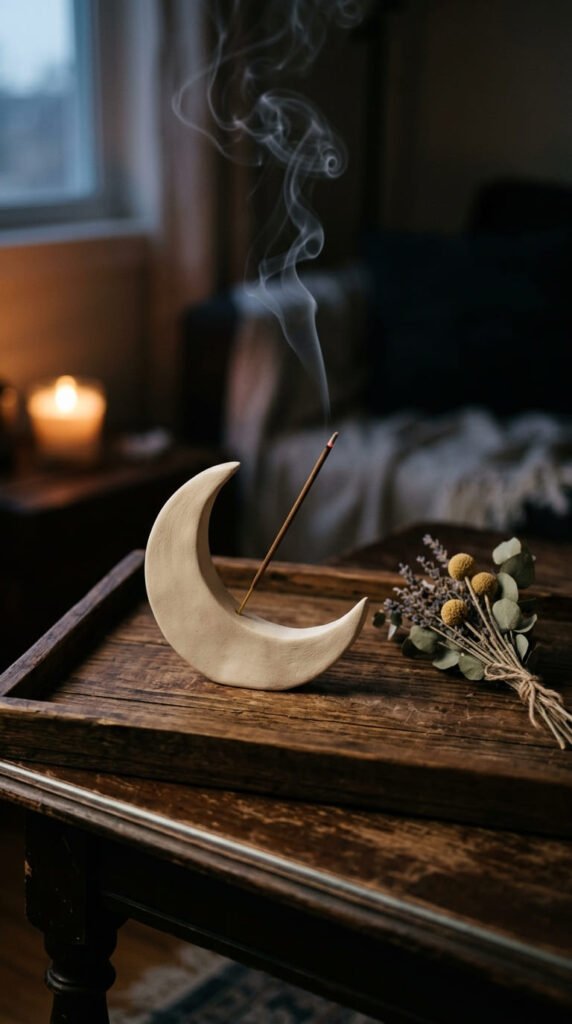
This little holder is functional art, and it sells like crazy at craft fairs.
Flatten a small slab of clay into a crescent moon. Use a butter knife to cut the shape.
While the clay is soft, poke a single hole with a toothpick. That hole holds your incense stick.
Make sure the hole tilts slightly so ash falls onto the holder, not your table.
Smooth the edges with a damp finger.
Budget tip: A standard toothpick is the only “tool” you need here.
Paint it a calm cream or deep navy. Add tiny gold star dots for charm.
Let it cure fully before lighting anything. You want it bone dry.
These cost almost nothing to make and look great on a shelf or windowsill.
4. Bedside Ring Holder
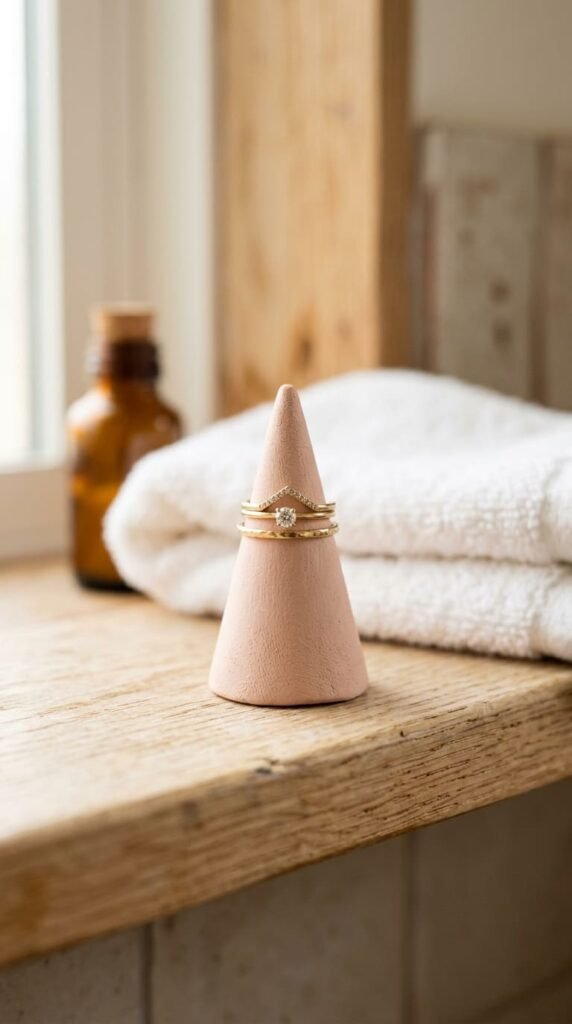
If your rings end up scattered by the sink, this one’s for you.
Roll clay into a smooth cone shape. Think of a tiny mountain. The pointed top is where rings stack.
Press the base flat so it stands steady.
Want it sturdier? Make the base wider and the cone short.
Budget tip: Shape it freehand. No mold required, and it takes five minutes.
Let it dry standing upright. Check that it doesn’t lean.
Paint the base one color and leave the tip natural for a two-tone look.
Seal it if it lives near water, like a bathroom counter.
Keep one by your bed and one by the kitchen sink. You’ll never lose a ring down the drain again.
5. Tiny Tea Light Candle Holder
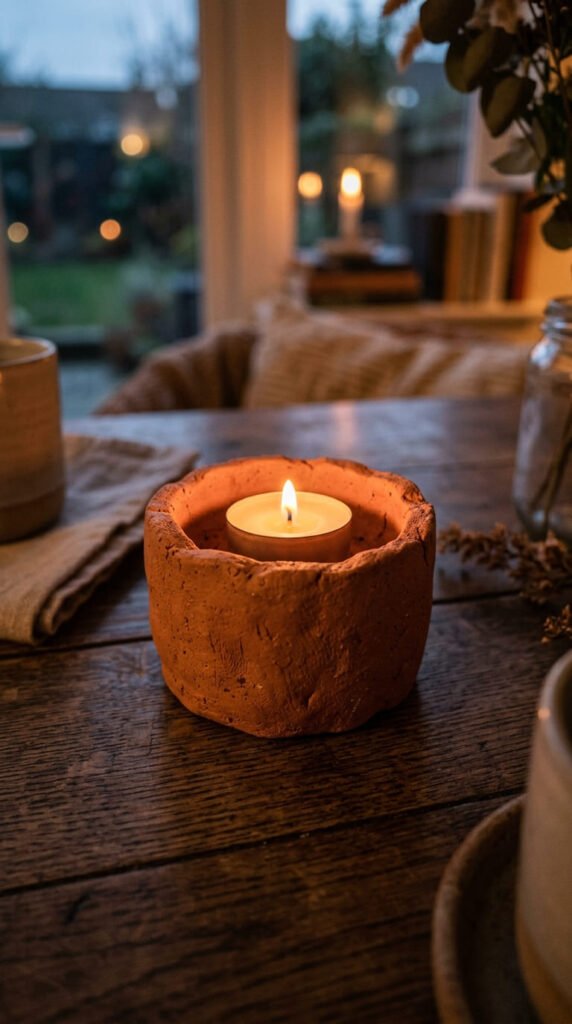
Nothing makes a room feel warm like candlelight, and these holders are a breeze.
Press a ball of clay around the base of a tea light to size the hollow. Remove the candle before drying.
Keep the walls thick and short. A chunky shape looks modern and stays stable.
Only ever use battery tea lights or real flames in metal cups. Air dry clay is not flameproof on its own.
Budget tip: A votive glass works as a mold, then just slide it out.
Smooth the rim with a wet sponge for a clean finish.
Paint it in earthy tones. Terracotta, sage, and cream all photograph beautifully.
Make a row of three at slightly different heights for a styled shelf moment.
6. Statement Clay Earrings
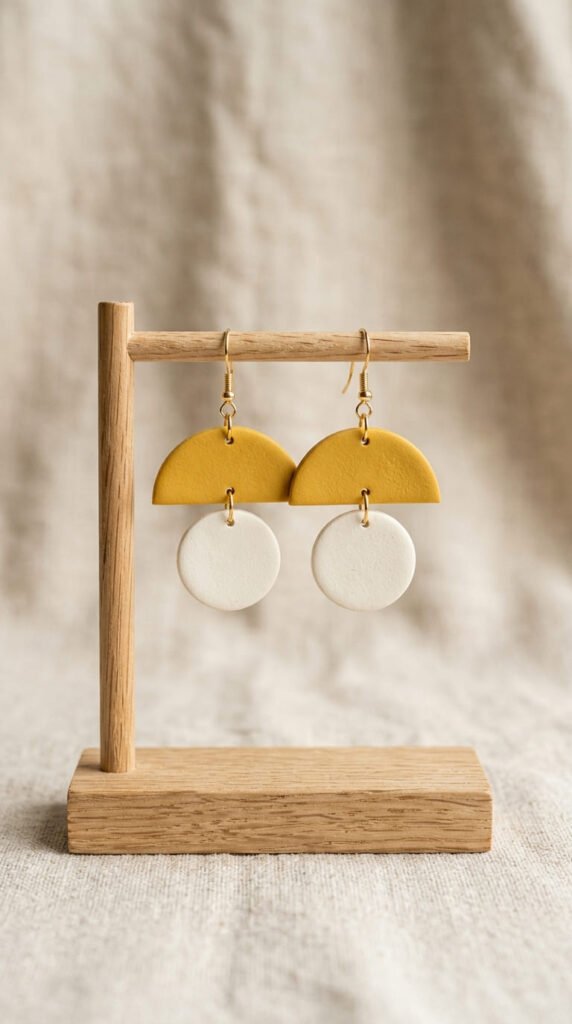
Handmade earrings are light, cheap to make, and endlessly customizable.
Roll the clay thin, about an eighth of an inch. Thinner means lighter on your ears.
Cut shapes with a small cookie cutter or a knife. Circles, arcs, and triangles all work.
Poke a hole at the top before the clay dries. That’s where the jump ring goes.
Budget tip: A pack of earring hooks from a craft store costs a couple dollars and makes dozens of pairs.
Once dry, sand any rough edges smooth.
Paint with acrylics or leave them natural with a clear seal.
Attach the hooks and you’re wearing them the same day.
These also sell well online. A pair takes minutes and costs almost nothing in materials.
7. Happy Face Fridge Magnets

Magnets are the ultimate kid project. Fast, forgiving, and fun.
Roll out thin clay. Cut small shapes with cutters. Hearts, stars, and circles are easy wins.
Let them dry, then paint with bright acrylics.
Glue a small magnet disc to the back once everything is dry and sealed.
Budget tip: A bag of craft magnets costs about two dollars and makes a whole batch.
Keep the shapes small so the magnet can actually hold them up.
Let kids draw faces or doodles on theirs. No two will match, and that’s the charm.
These brighten up any fridge or locker.
They also make sweet little party favors for a craft-themed birthday.
8. Mini Fruit Magnets
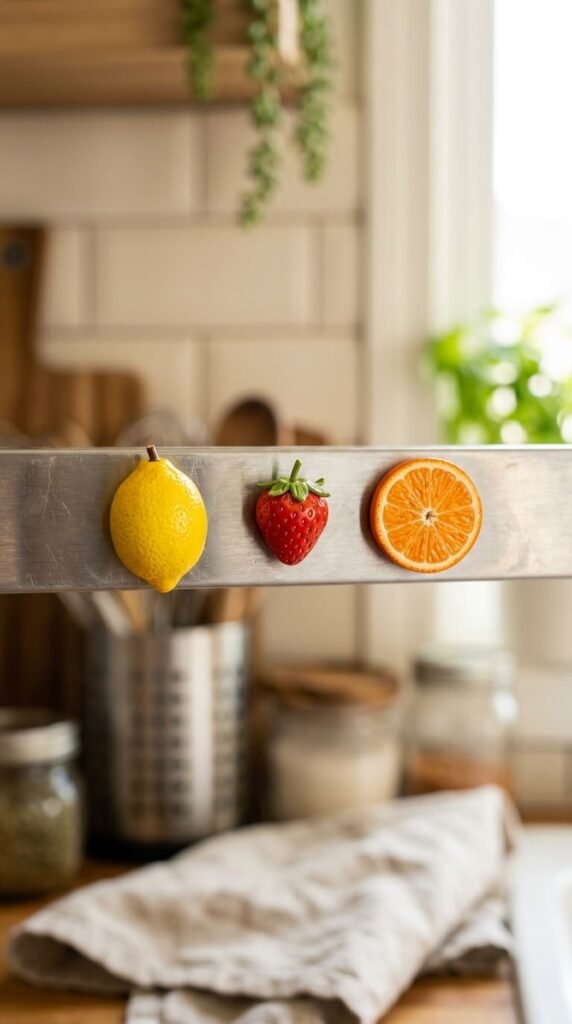
These are the cutest version of magnets, and adults love them just as much as kids.
Pinch tiny balls of clay into fruit shapes. A lemon, a strawberry, an orange slice.
Use a toothpick to add texture. Tiny dots for strawberry seeds, little lines for citrus.
Budget tip: A single block of clay makes dozens of these, so the cost per magnet is basically nothing.
Let them dry, then paint with realistic colors.
Add a clear gloss seal so they look juicy and shiny.
Glue a small magnet on the back.
Stick them on the fridge to hold up notes and photos.
A little jar of these makes a charming handmade gift for a foodie friend.
9. Modern Photo Holder
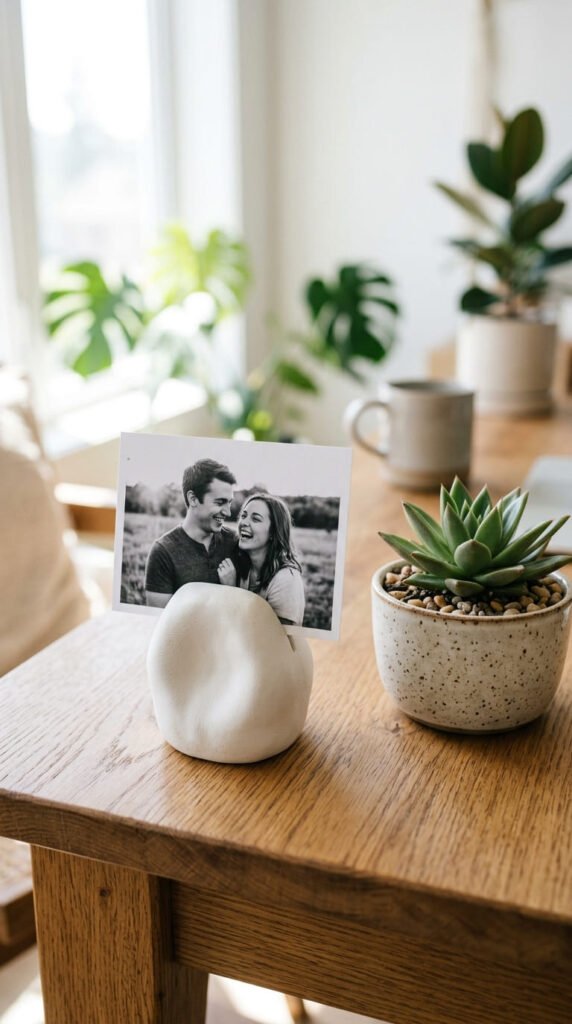
A photo holder is a tiny project with a big payoff for your desk or shelf.
Roll a small ball of clay into a smooth base. Flatten the bottom so it stands.
While soft, press a knife into the top to cut a thin slot. That slot holds a photo or note card.
Keep the slot narrow. Paper is thin, and a snug fit looks neater.
Budget tip: Make several at once to use as place card holders for a dinner party.
Smooth the surface with a wet sponge for that clean modern look.
Let it dry standing up. Paint it a single soft color.
These also hold business cards, recipe cards, or reminders.
Simple shapes look the most polished here, so resist the urge to overdo it.
10. Faux Plant Pot
A clay pot adds cozy charm to any corner, with one rule to remember.
Build it by pinching a ball of clay outward into a bowl. Or coil thin clay snakes into a stacked pot.
Smooth the seams with a damp finger as you go.
Keep the walls even so it dries without cracking.
Important: Use it for faux plants only. Air dry clay softens with water and won’t survive a real, watered plant.
Budget tip: A fake succulent from a dollar store finishes the look cheaply.
Let the pot dry slowly to avoid cracks. A cool, shaded spot helps.
Paint it terracotta for a classic look, or white for something modern.
Group a few in different sizes on a shelf for instant cottagecore vibes.
11. Beaded Jewelry Tray
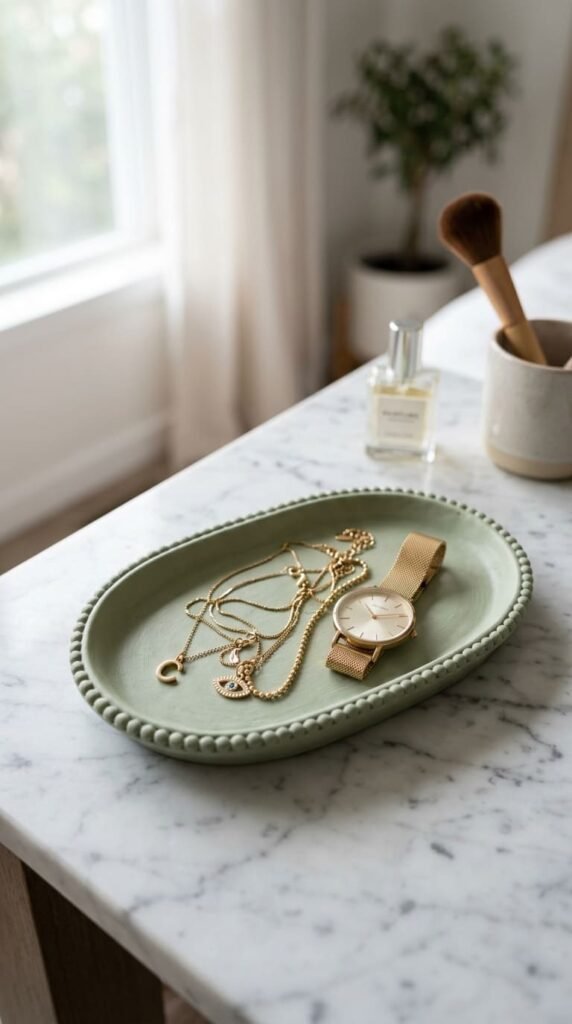
A jewelry tray keeps your everyday pieces in one tidy spot.
Roll out a flat slab. Cut it into an oval or rounded square.
Gently lift the edges to make a low lip. This stops earrings from rolling away.
Want a beaded edge? Press small clay balls around the rim and smooth them in.
Budget tip: Use the bottom of a baking dish to shape the curve for free.
Let it dry flat so it stays level.
Paint it a soft, neutral shade. Sage, blush, and oatmeal all feel calm and modern.
Seal the surface so it wipes clean.
Keep it on your dresser for rings, watches, and necklaces.
It’s a five-minute project that makes your space feel instantly more put together.
12. Window Suncatcher
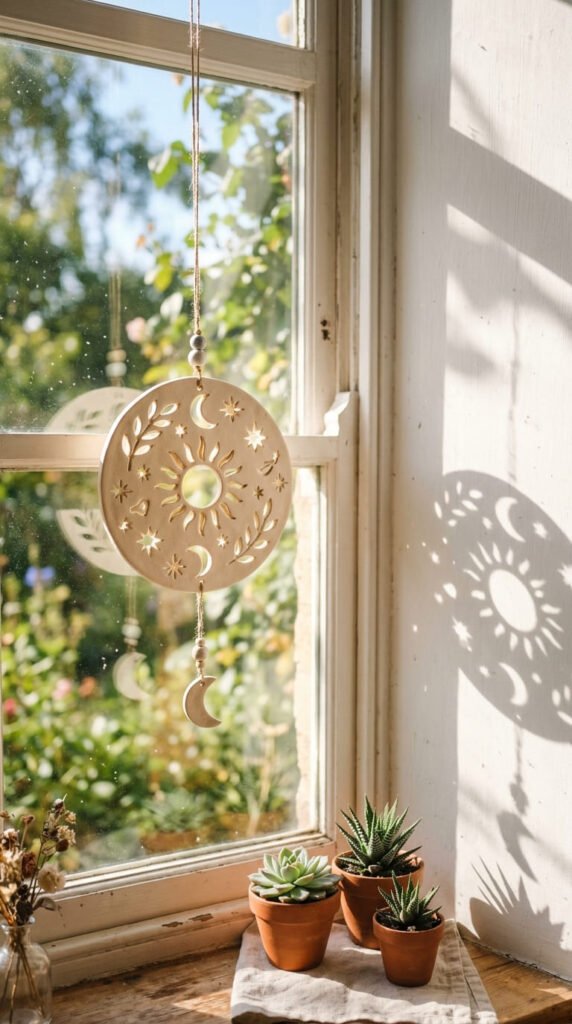
Suncatchers are a newer trend, and they look so pretty in a sunny window.
Roll a flat slab of clay. Cut a simple shape like a circle, leaf, or arch.
While soft, punch small holes through the clay for light to peek through.
Add one hole at the top for hanging.
Budget tip: A drinking straw makes clean little circles for almost nothing.
Let it dry flat so it stays even.
Paint it in soft pastels or leave it natural white.
Thread a thin cord or ribbon through the top hole.
Hang it where morning light hits it. The shadows it casts are the whole point.
Make a few in a row for a gentle, handmade window display.
13. Layered Necklace Charms

A clay pendant turns a plain chain into something personal.
Roll a small piece of clay into an abstract shape. Organic blobs look chic and modern.
Keep it thin and light so it sits well on a chain.
Poke a hole at the top before it dries.
Budget tip: A length of chain from a craft store makes several necklaces and costs very little.
Once dry, sand the edges smooth.
Paint it, or press a leaf into the clay first for a natural imprint.
Seal it so the color lasts.
Thread it onto a chain through a jump ring.
These layer beautifully with other necklaces. Make a set in matching colors and wear them stacked.
14. Chunky Bookends
Bookends are under-covered online, which makes them a fun thing to try.
These need some weight, so build them solid and chunky. Two matching blocks or curved shapes work well.
For extra heft, press a small stone or coin into the center before sealing the clay around it.
Keep the bottoms flat and wide so books don’t tip them.
Budget tip: A river rock from outside adds free weight inside the clay.
Let them dry fully. Thick pieces take several days.
Paint them in a bold color for a little art-shop energy.
Seal them so they stay sturdy.
Place one at each end of your favorite books.
They double as decor when the shelf is half empty.
15. Desk Organizer Tray
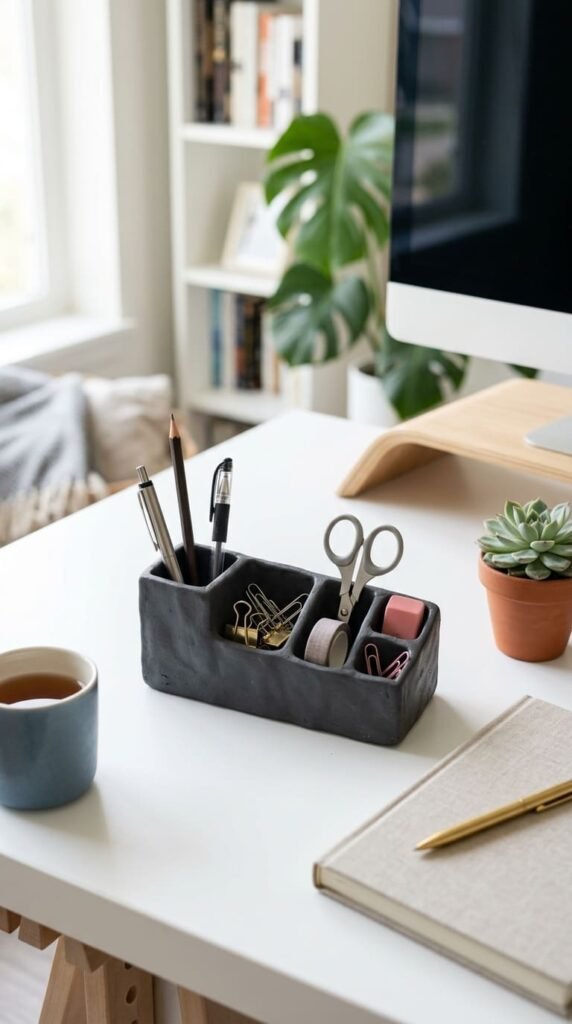
A little organizer tames the clutter on any desk.
Build a shallow rectangular tray from a flat slab. Lift the edges to make walls.
Want compartments? Press thin clay strips inside to divide the space.
Smooth every seam so the dividers hold tight.
Budget tip: Use a small box lid as your shape guide for straight edges.
Keep it shallow. Pens and clips don’t need deep walls.
Let it dry flat and even.
Paint it a calm, modern shade. Charcoal and white both look sharp on a desk.
Seal the inside so ink and dust wipe away.
Fill it with pens, sticky notes, and paperclips.
It keeps your workspace tidy and looks far nicer than plastic.
16. Little Salt Spoon
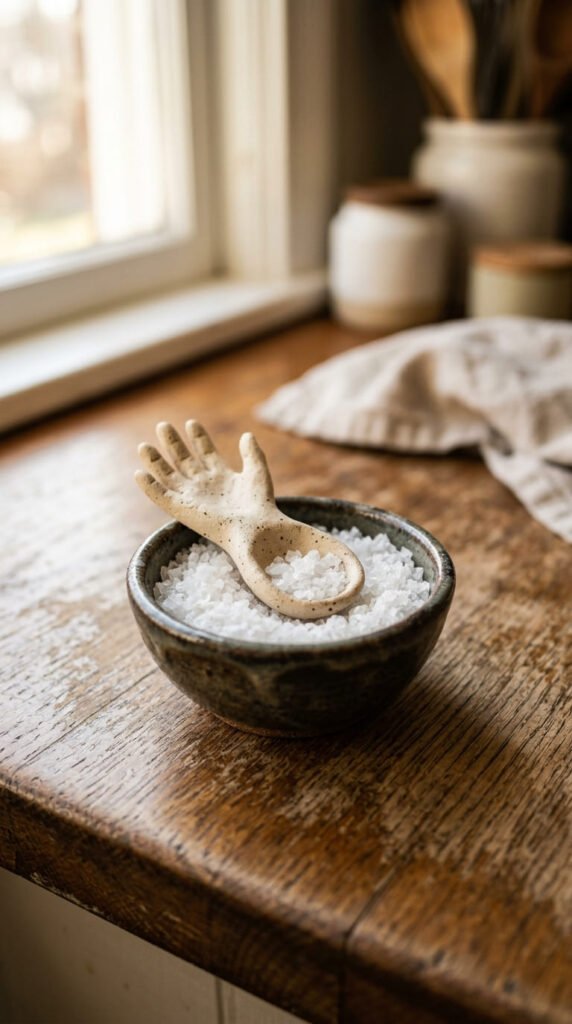
A salt spoon is a charming, tiny project that feels fancy on a table.
Roll a small piece of clay into a short handle. Press a thumb into one end to make the little scoop.
Keep the scoop shallow. It only holds a pinch.
Smooth it well so salt doesn’t stick in rough spots.
Budget tip: Pair it with a small jar of sea salt for a sweet, low-cost gift.
Let it dry, then seal it so it resists moisture.
Paint the handle if you like, but natural white looks clean too.
Rest it in a salt cellar by the stove.
It’s a small detail that makes everyday cooking feel a little special.
People always notice handmade touches like this.
17. Vase Flower Frog
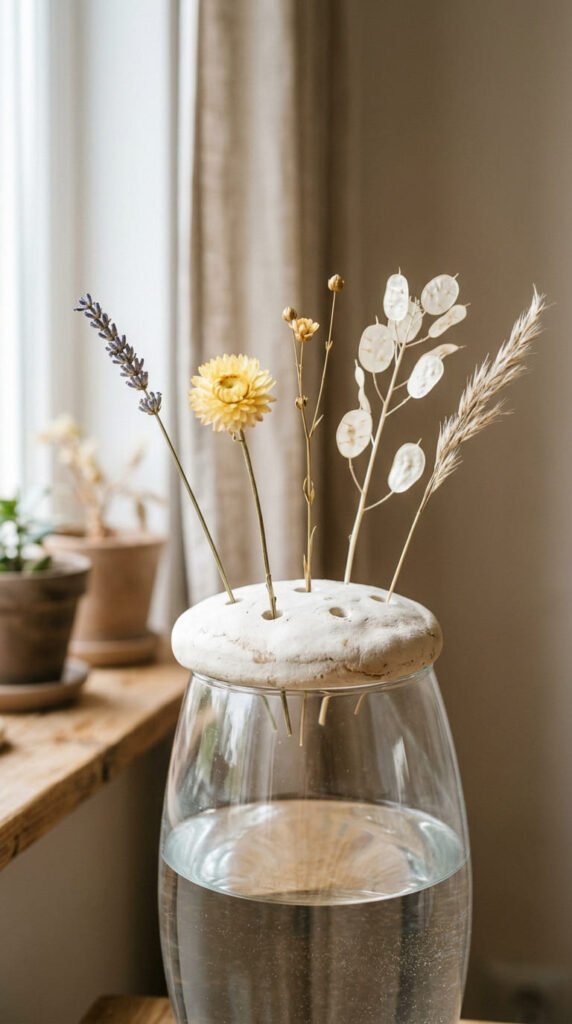
A flower frog is a clever, rarely-seen project that solves a real problem.
It sits over the mouth of a vase. The holes hold flower stems in place so they don’t flop.
Roll a flat clay disc to match your vase opening.
While soft, poke several holes through it with a pencil or chopstick.
Space the holes evenly so stems spread out nicely.
Budget tip: Size it to a vase you already own. No new vase required.
Let it dry flat.
Seal it well, since it will touch water during use.
Set it over the vase and slot in your stems.
It turns a few grocery-store flowers into a styled arrangement in seconds.
18. Keepsake Handprint Ornament
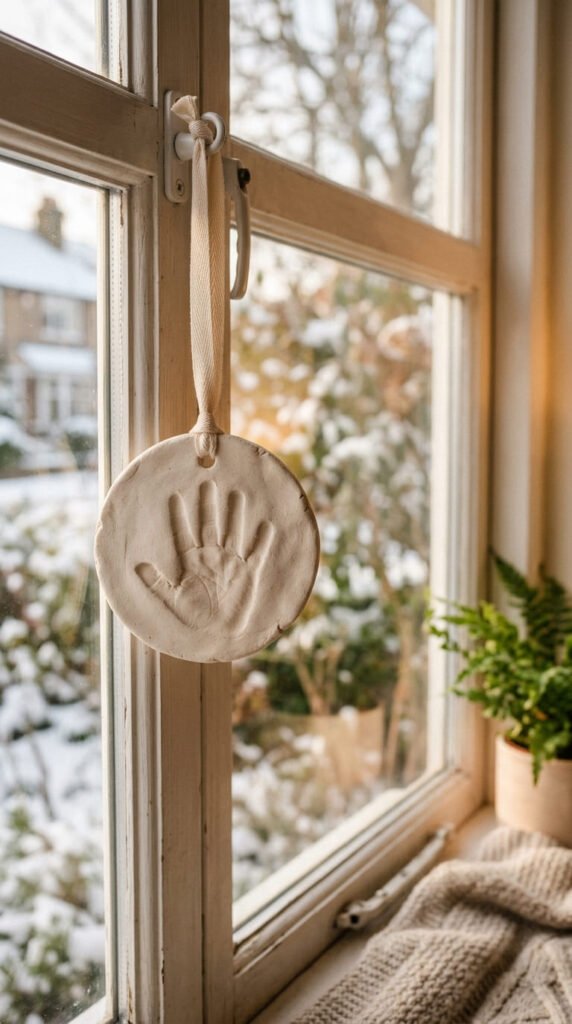
This one is pure sentiment, and it takes about ten minutes.
Roll a flat clay circle, about a quarter inch thick.
Press a child’s hand, a pet’s paw, or your own thumbprint into the center.
Poke a hole at the top for hanging before the clay dries.
Budget tip: A length of ribbon you already have at home finishes it off.
Let it dry flat so it doesn’t warp.
Paint it, or leave the print natural and just seal it.
Add the date with a fine brush if you want a keepsake.
Thread ribbon through the hole.
Hang it on a tree, a mirror, or a wall.
These make grandparents tear up every single time. It’s the easiest meaningful gift on this list.
19. Little Clay Pumpkin
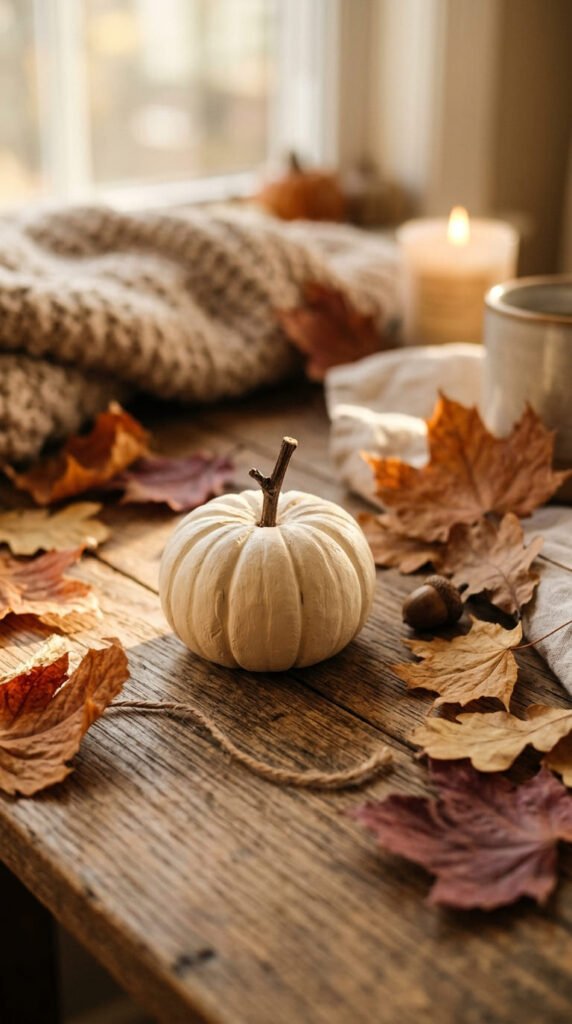
Seasonal projects are some of the most searched, and pumpkins are the easy fall favorite.
Roll a ball of clay. Gently flatten the top and bottom so it sits like a pumpkin.
Use a butter knife to press soft ridges down the sides.
Poke a small hole in the top for the stem.
Budget tip: A real twig from the yard makes a free, rustic stem.
Let it dry, then push the twig into the hole.
Paint it classic orange, or go modern with cream and white.
A clear seal gives it a nice finish.
Make a few in different sizes for a styled autumn cluster.
Line them along a mantel or windowsill.
They store flat and come out every fall, year after year.
20. DIY Wall Clock
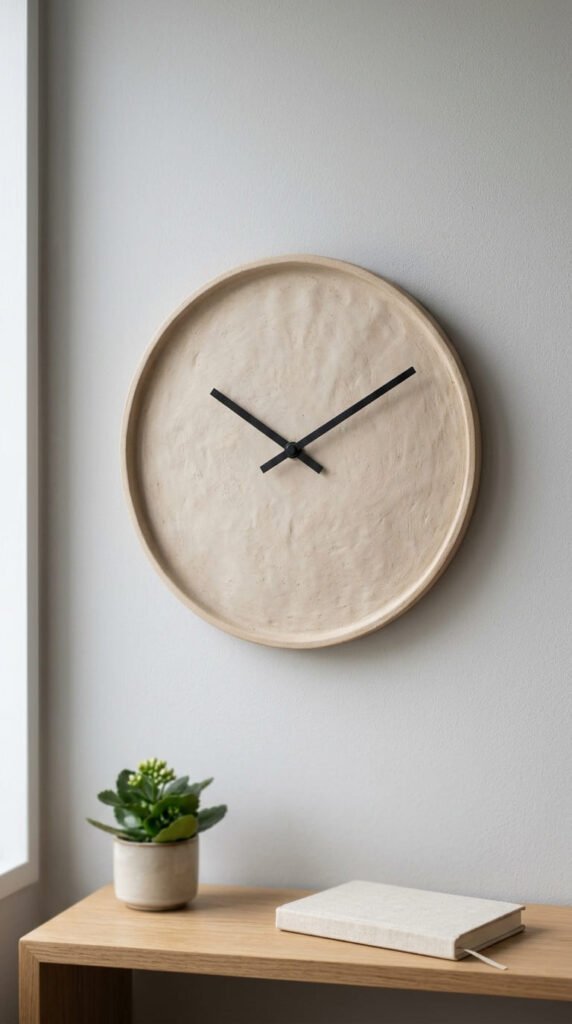
A clock sounds hard, but the clay part is the easy bit.
Roll a thick, flat clay circle. This is your clock face.
Poke a hole dead center, sized for a clock mechanism shaft.
Keep the face smooth, or press a texture in for interest.
Budget tip: A basic clock movement kit costs only a few dollars online and includes the hands.
Let the clay dry fully and flat. Any warp will throw off the hands.
Paint it a single modern color. Skip the numbers for a clean look.
Push the clock mechanism through the center hole from the back.
Attach the hands and pop in a battery.
Hang it on the wall.
You just made functional decor for less than the cost of a cheap store clock.
21. Handmade Domino Set
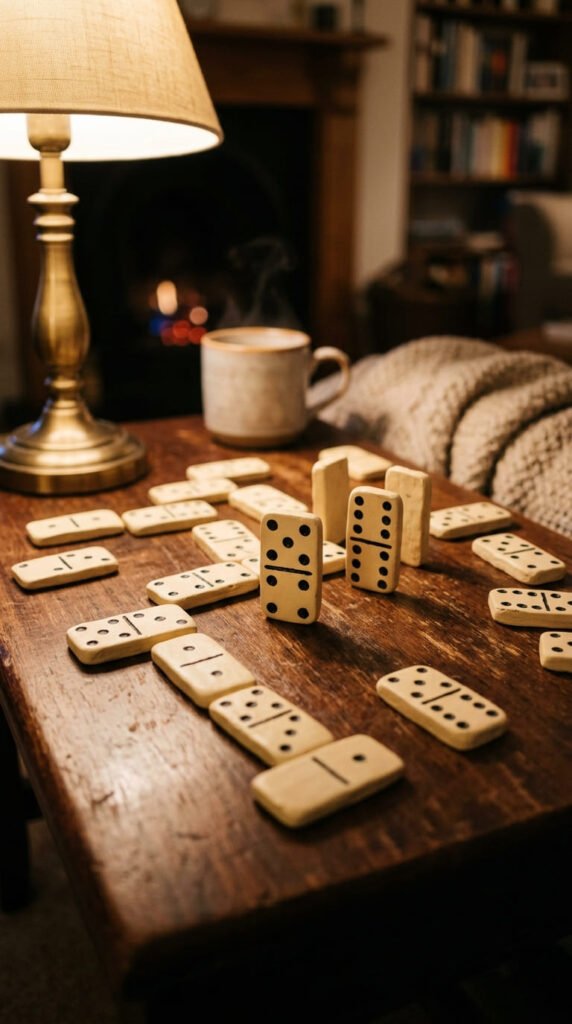
A handmade game set is a creative project that doubles as a gift.
Roll clay into a flat slab. Cut small even rectangles with a knife.
Aim for matching sizes so they stack and stand.
Press a line across the middle of each tile with a ruler edge.
Poke dots into each half with a toothpick to make the numbers.
Budget tip: One block of clay makes a full set. Cheaper than buying one.
Let the tiles dry flat.
Paint them cream, then fill the dots with black.
Seal them so they hold up to handling.
Store the set in a little cloth bag.
It’s a slow, satisfying project, and the result is a game you’ll actually play.
22. Pinch Pot Bowl

The pinch pot is the oldest clay trick, and the most beginner-proof project here.
Roll a ball of clay. Press your thumb into the center.
Pinch the walls outward and upward, turning as you go.
Keep the walls even so it dries without cracking.
Don’t worry about perfect. The handmade, fingerprinted look is the charm.
Budget tip: This uses one small lump of clay and zero tools.
Smooth the rim with a damp finger if you like, or leave it raw.
Let it dry slowly to avoid cracks.
Paint the inside one color and leave the outside natural for contrast.
Use it as a catch-all for keys, coins, or candy.
It’s the perfect last project to use up your leftover scraps.
Conclusion
That’s 22 projects you can shape, dry, and show off without a kiln or a big budget. Most cost only the price of a clay block and a few cheap acrylics. Start with a trinket dish or a pinch pot if you’re new, then work your way up to a clock or a domino set. The best part is how giftable these are, so one afternoon can cover birthdays, housewarmings, and holidays at once. Pick one project, grab your clay, and make something today. Save this list and come back when you’re ready for your next one.


