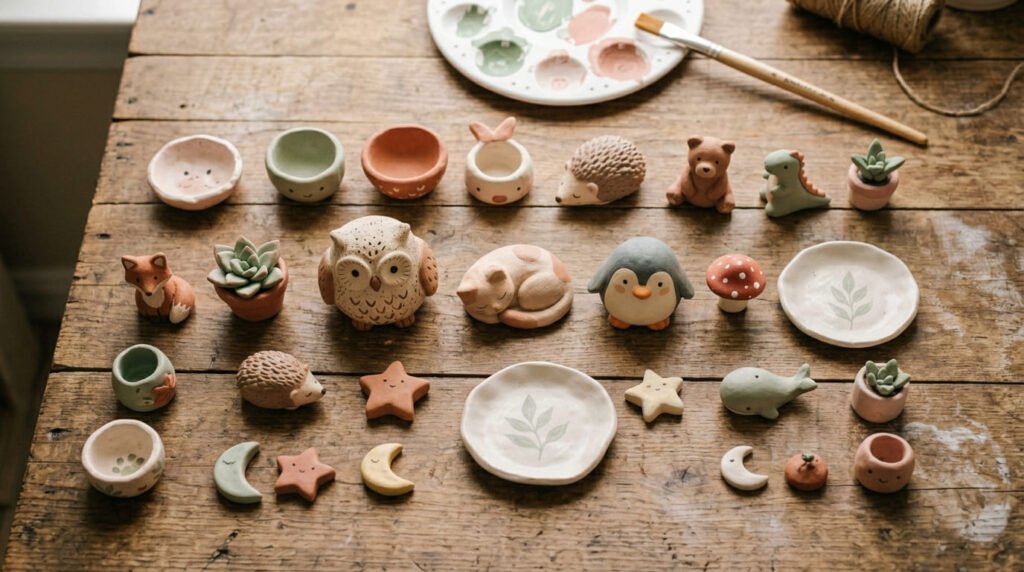

Working with clay feels like magic the first time a shapeless lump turns into a little owl in your hands. The best part? You don’t have to be an artist to start. A block of air-dry clay, a few kitchen tools, and an afternoon are enough. No kiln. No fancy studio. No experience required. This guide walks you through 25 simple projects you can finish at home for a few dollars each. Most are palm-sized, which keeps them cheap and quick to dry. Some make sweet handmade gifts. Others double as everyday items like trays and coasters. Grab some clay, clear a corner of the table, and let’s make something.
1. Chunky Owl Pinch Pot
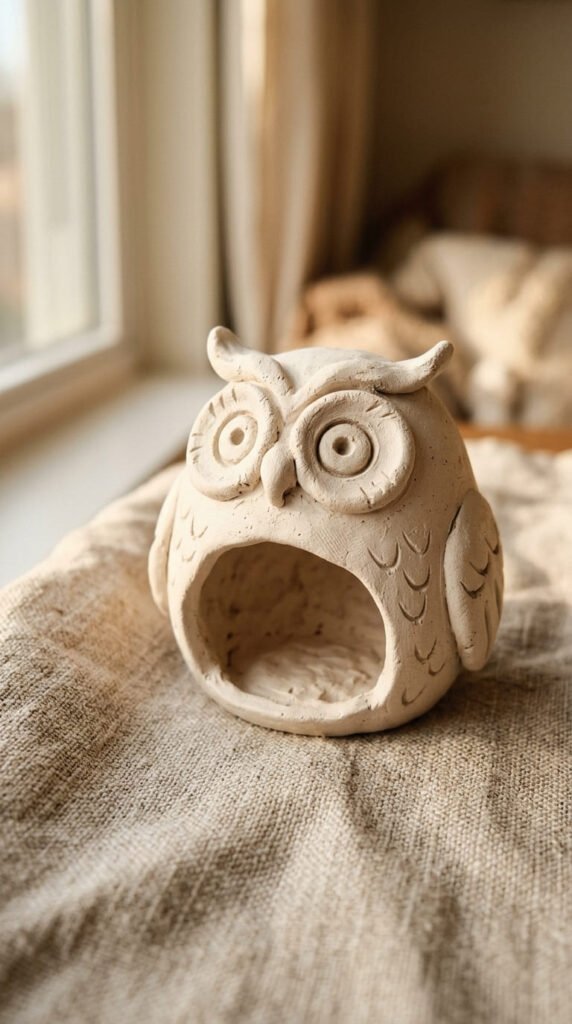
The owl is where almost everyone starts, and for good reason. You build it with the pinch pot method, which means no tools at all to begin. Roll a ball of clay about the size of a lime. Press your thumb into the center. Pinch the walls outward until you have a little cup.
Now turn it upside down. That’s your owl’s body.
Pinch two small points at the top for ears. Press two balls onto the front for eyes. Use the back of a spoon to push in a beak.
Want feathers? Press the rounded tip of a teaspoon across the belly in rows. It leaves a scalloped pattern that looks like feathers in seconds.
Budget tip: skip store-bought tools. A spoon, a pencil, and a toothpick handle most of the detail work. Total cost is basically the clay.
Let it dry a full day before painting. A simple brown or grey body with white eyes reads as an owl instantly. This one is forgiving, fast, and a great confidence builder.
2. Sleepy Cat Figurine
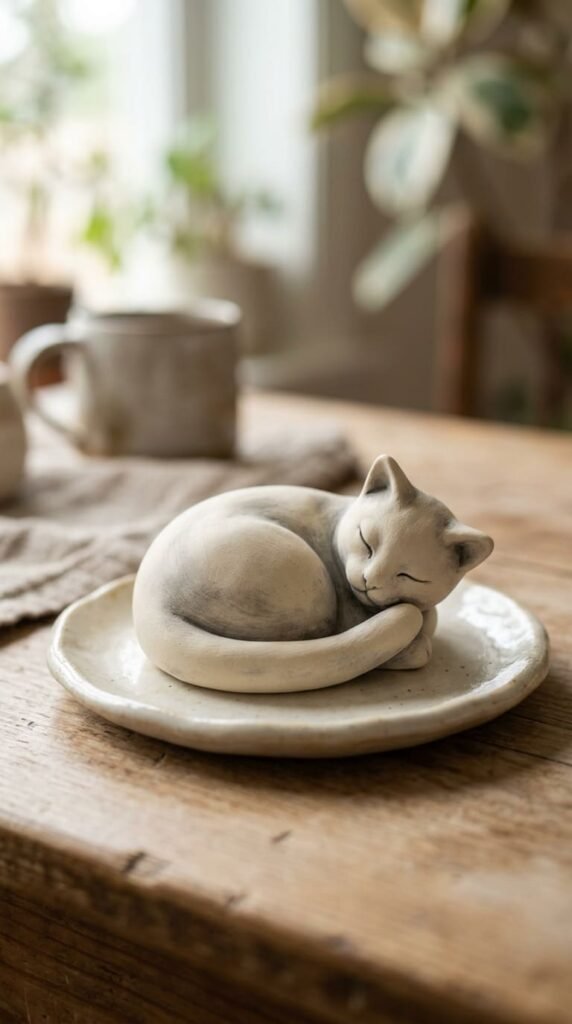
A curled-up cat is one of the cosiest shapes you can make. The trick is to keep it rounded and lazy looking.
Start with a ball of clay. Roll one side into a fat teardrop. Curve the tail end around so it hugs the body. That curve does all the work.
Pinch two tiny triangles at the top for ears. Press a toothpick into the face for closed, sleepy eyes. A small ball of clay makes the nose.
Smooth the seams with a damp finger. Clay loves a little water to soften rough spots.
Realistic DIY example: a friend made a row of three of these in grey, ginger, and black to match her real cats. They sit on her windowsill. Total spend was under five dollars.
Keep the legs tucked in. Standing animals crack and tip over. A sleeping pose stays sturdy and dries evenly.
Paint with thin acrylic paint once dry. A soft grey base with darker stripes looks great. Add tiny pink ears for charm.
3. Smiling Frog
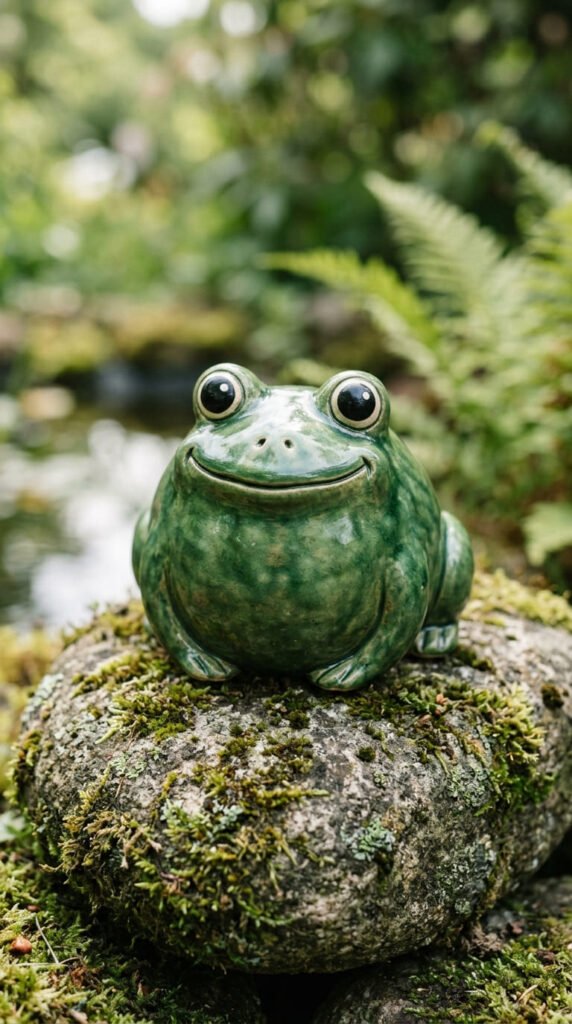
Frogs are pure fun. They’re round, goofy, and almost impossible to mess up.
Roll a ball for the body and flatten the bottom so it sits flat. Add two smaller balls on top for the eyes. Press a black dot or paint one on later.
Use a butter knife to carve a wide curved smile across the front. Bigger is funnier.
For legs, roll two thin snakes of clay. Fold each into a Z-shape and press them to the sides. Smooth the joins with a wet finger so they don’t pop off.
Budget tip: a glossy frog needs sealing, not glaze. Skip the kiln entirely. Once painted, brush on a cheap clear craft varnish for that wet, shiny look. One small bottle seals dozens of projects.
Green is the obvious color, but pastel frogs in pink or yellow look adorable too.
These make great desk buddies. Make a few and line them up by size. A frog family costs almost nothing and takes one quiet evening to build.
4. Little Turtle
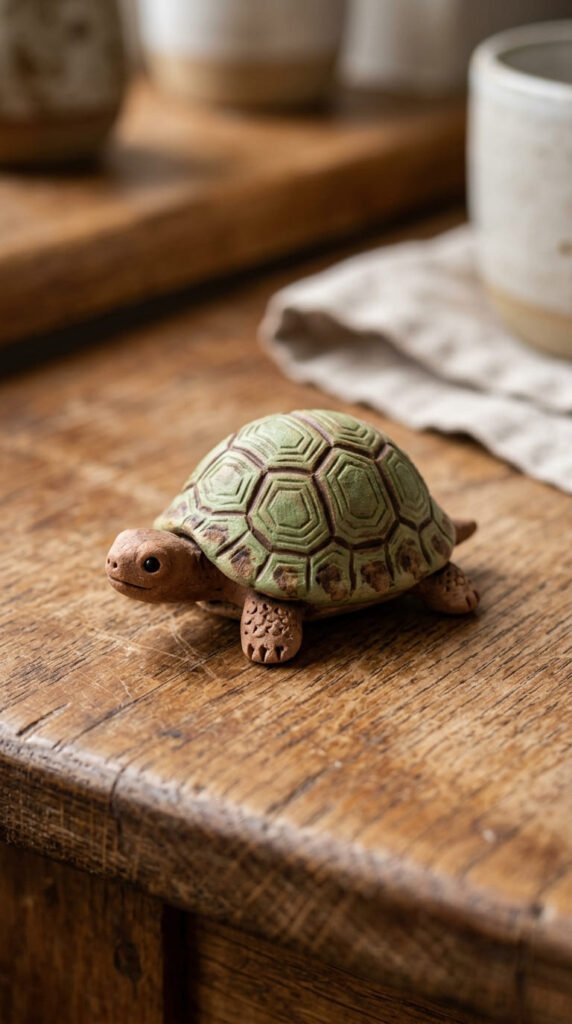
A turtle is a perfect second project. The shell hides any rough edges underneath.
Make a half-dome for the shell by flattening one side of a clay ball. Roll a slightly squashed log for the body and tuck the dome on top.
Pinch out a head at one end. Add four little stubs for legs and a tiny pointed tail at the back.
Now the fun part. Use a toothpick to draw hexagon shapes across the shell. This simple pattern makes it look detailed without any real skill.
Realistic DIY example: kids love this one because the shell pattern feels like drawing, not sculpting. It keeps small hands busy for ages.
Smooth all the leg joins with water. Legs are where animals usually crack, so press them on firmly.
Paint the shell in two greens, dark in the carved lines and light on the raised parts. Wipe the lines with a damp cloth to make the pattern pop.
This one fits in your palm and dries fast. A whole pond of turtles costs the price of one clay block.
5. Round Penguin
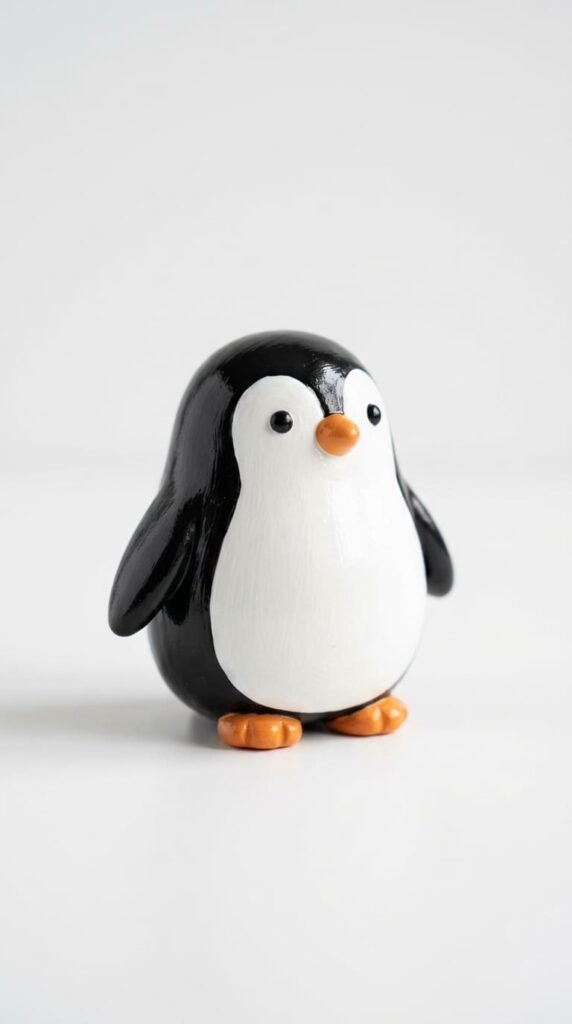
Penguins are basically an egg shape, which makes them one of the easiest animals to nail.
Roll a fat oval. Stand it upright and press the bottom flat so it balances. That’s the whole body.
Pinch a small beak near the top. Add two flat oval flippers on the sides. Press two tiny feet at the base.
No carving needed. The shape does everything.
Budget tip: the magic here is all in the paint, so spend zero on extras. Paint the back black, the belly white, and the feet and beak orange. Three colors, total. A basic acrylic set covers this and a dozen future projects.
Keep the body chunky. A plump penguin looks far cuter than a skinny one, and a wide base won’t tip over while it dries.
Make a parent and a baby for a sweet set. The baby is just a smaller egg.
These look great on a shelf in winter. They’re an easy holiday gift too, and nobody will guess how little they cost to make.
6. Tiny Hedgehog
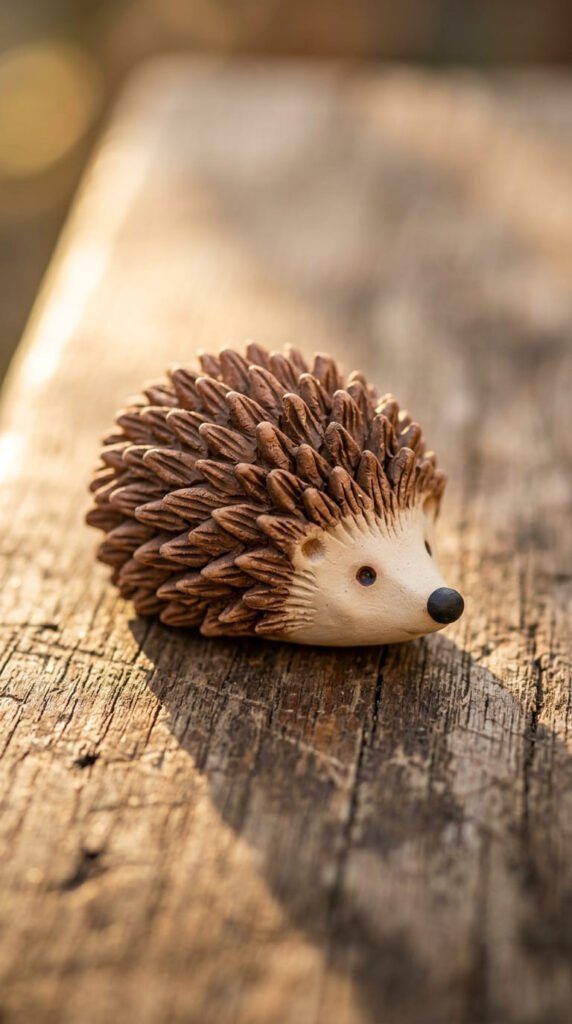
A hedgehog looks complicated but takes ten minutes. The spikes do all the heavy lifting.
Shape a ball into a teardrop. The pointed end becomes the nose.
Now grab small scissors. Snip tiny pinches into the back, lifting each cut upward. Work in rows from the face backward. Each snip becomes a spike.
No scissors? A toothpick poked in at an angle works too, just slower.
Add a tiny ball nose at the point. Press two dots for eyes.
Realistic DIY example: this is a popular kids’ project because cutting the spikes feels like a game. Lay down newspaper first, since the little clay bits fly everywhere.
Keep the body low and rounded so it sits flat and dries without cracking.
Paint the face and belly cream. Brush the spikes brown, then dry-brush a lighter tan on the tips so they stand out.
Budget tip: these use barely any clay, so one block makes a whole family. Set a few on a bookshelf and they look like a tiny woodland scene for the cost of pocket change.
7. Trinket Dish
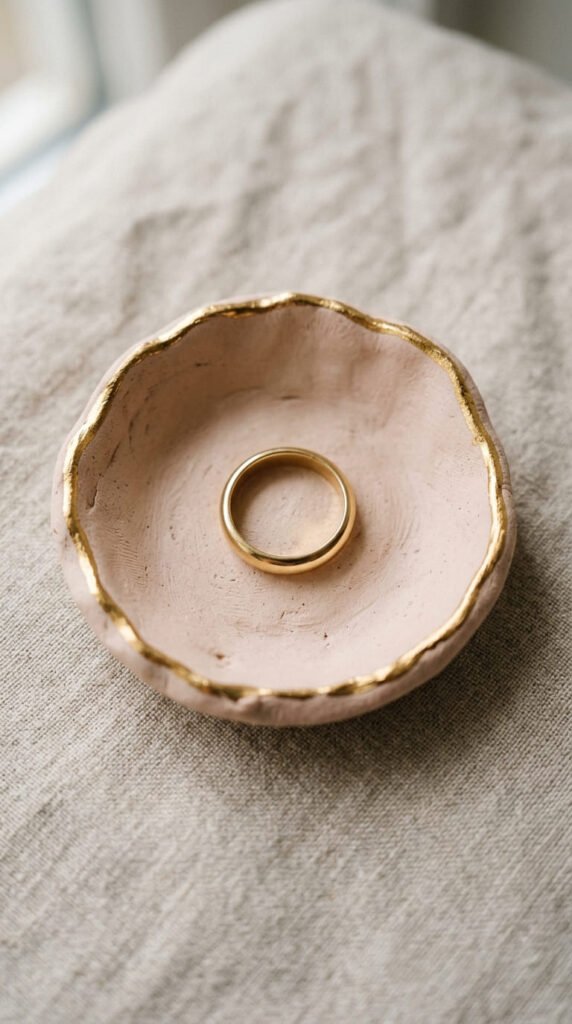
A trinket dish is the most useful thing on this list. It catches rings, keys, and earrings, and it takes minutes.
Roll a ball and flatten it into a thick pancake. Gently push the center down and lift the edges to form a shallow bowl.
Pinch the rim a little so it has soft, wavy edges. Perfect circles are hard. Organic shapes look intentional and modern.
Press a leaf or a piece of textured fabric into the bottom for a printed pattern. Lace doilies work beautifully here.
Budget tip: these sell for real money at markets, but cost cents to make. A single clay block makes five or six.
Smooth the inside well so small jewelry won’t snag. A wet finger does the job.
Let it dry flat. Once hard, paint the inside a soft color and the rim metallic gold. That gold edge is the whole trick. It turns a plain dish into something that looks store-bought.
Seal the inside if you want it wipe-clean. These make easy, thoughtful gifts that anyone actually uses.
8. Terrazzo Coaster
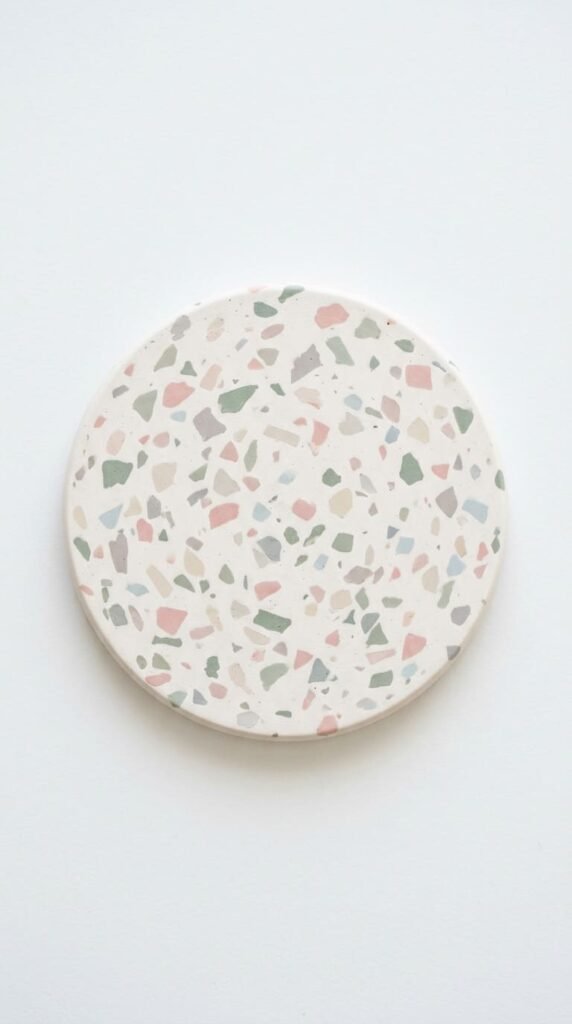
Terrazzo is that speckled pattern you see in trendy cafes. You can fake it with clay scraps, which makes it nearly free.
Start with a flat round base of light clay. Roll it about as thick as your finger.
Take small leftover bits of colored clay. Press flat chips of them randomly across the surface. Then roll over the top gently to push them in flush.
The mismatched chips become the terrazzo speckles. There’s no wrong way to scatter them.
Budget tip: this is the best use for clay scraps you’d normally throw out. Save your offcuts in a bag just for this.
Cut a clean circle using the rim of a cup or a cookie cutter. Smooth the edges with a damp finger.
Let it dry completely flat under a sheet of plastic so it doesn’t curl.
A coaster touches water, so seal it. Brush on two coats of clear waterproof varnish once dry. Add little felt dots underneath to protect your table.
A set of four looks modern and costs almost nothing beyond the sealant.
9. Air-Dry Clay Earrings
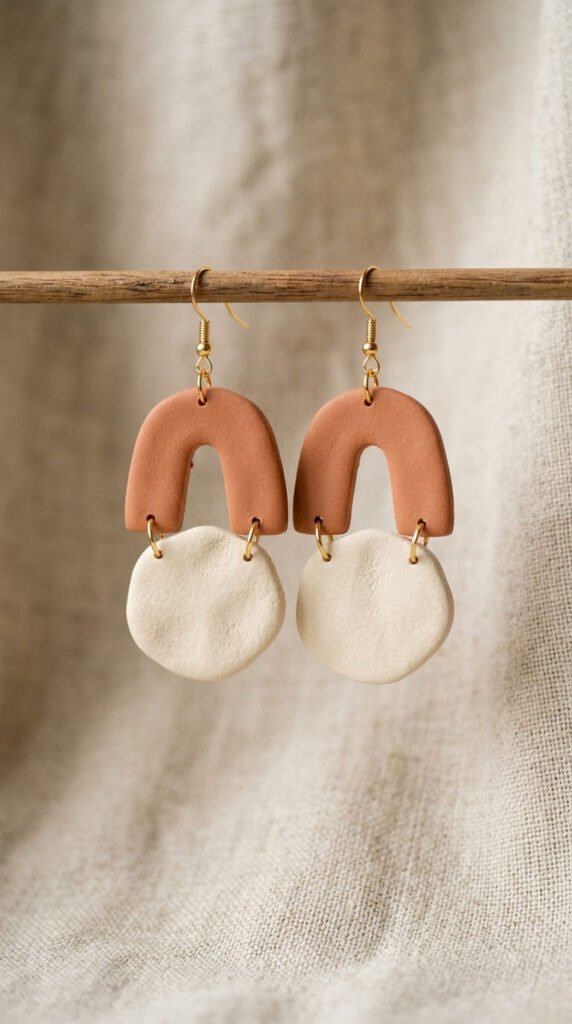
Clay earrings are light, cheap, and genuinely fashionable right now. People pay a lot for these online.
Roll your clay thin, about as thick as a coin. Use a small cookie cutter or a bottle cap to cut simple shapes. Arches, circles, and teardrops all work.
Before drying, poke a hole near the top with a toothpick. Don’t forget this step or you can’t hang them.
Budget tip: a pack of earring hooks costs a couple of dollars and makes dozens of pairs. That’s your only real expense beyond clay.
Keep them small and flat so they stay light on the ear. Chunky clay earrings get heavy fast.
Let them dry on a flat surface so they don’t warp.
Paint both sides once hard. Matching pairs matter, so paint them side by side. Two-tone halves look modern and hide small flaws.
Thread a jump ring through the hole, then attach the hook. A pair of pliers helps but isn’t required.
Make a few sets in different colors. They’re a fast, fun gift that looks far more expensive than it is.
10. Mini Whale
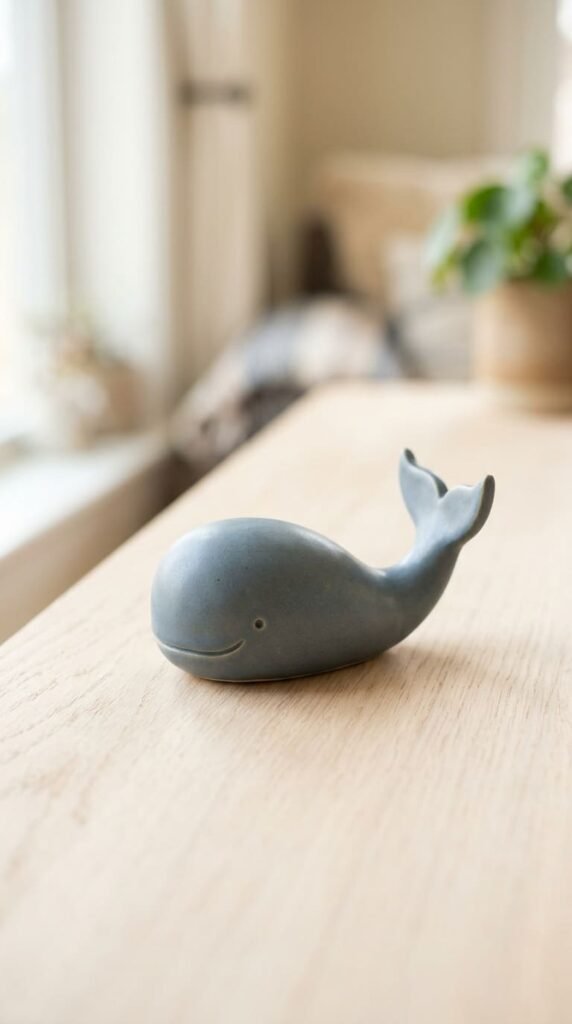
A whale is a study in smooth, simple curves. It’s one of the most calming things to make.
Roll a fat log. Taper one end and pinch it upward into a little tail fin. Round the other end for the head.
That’s almost the whole shape. The beauty is in the simplicity.
Press a small smile into the face with a butter knife. Add a tiny dot for the eye.
Want a spout? Roll a thin coil, curl it, and press it on top of the head.
Realistic DIY example: a minimalist white whale with no paint at all looks clean and modern. Just smooth it well and leave it raw. Zero paint cost.
Keep the belly flat so it sits without rolling.
Smooth the whole surface with a damp finger and a soft cloth. The smoother the clay, the more polished it looks.
Budget tip: these need so little clay that one block makes a whole pod. Make them in graduated sizes for a sweet shelf display.
This shape suits soft pastel blues and greys if you do choose to paint.
11. Cute Mushroom
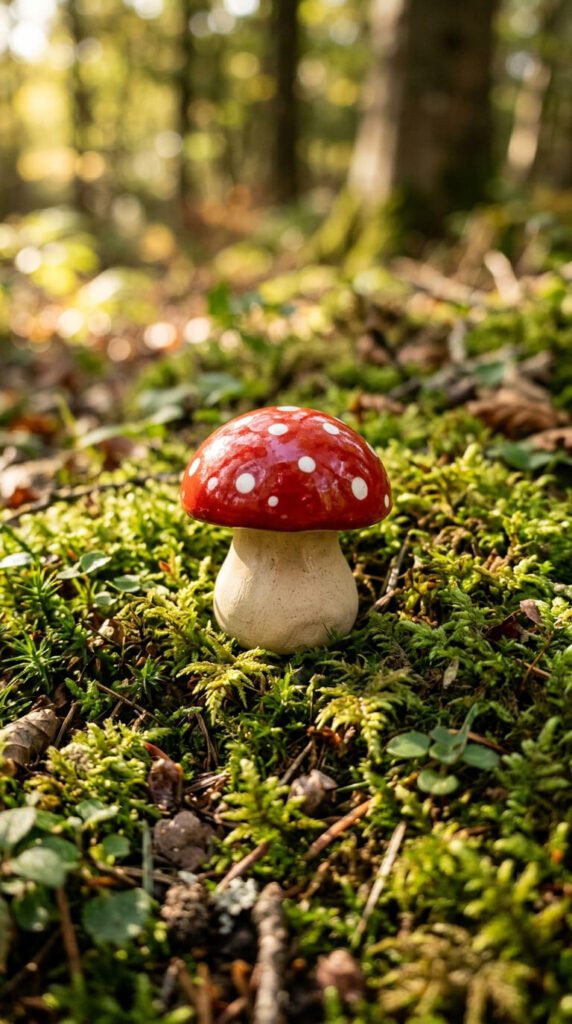
Mushrooms are tiny, cheerful, and a great way to use up odd clay scraps.
Roll the stem first. Roll a short, fat cylinder and flatten the base so it stands.
For the cap, shape a ball and flatten the bottom into a dome. Press it onto the stem and smooth the join underneath.
That’s it. Two pieces.
Budget tip: mushrooms are scrap-clay heroes. The leftover bits from bigger projects are exactly the right size.
The classic look is a red cap with white dots. Paint the cap red, let it dry, then dab white dots with the end of a paintbrush. Easy and instantly recognizable.
Try pastel versions too. Pink, blue, and yellow caps look like something from a storybook.
Group three or four together at different heights for a little mushroom patch. Vary the sizes so it looks natural.
Seal them glossy if you want that fairy-tale shine.
These make adorable plant pot decorations. Tuck a few into a potted houseplant and the whole pot feels styled, all for the cost of a paint dab.
12. Pinch Pot Bowl
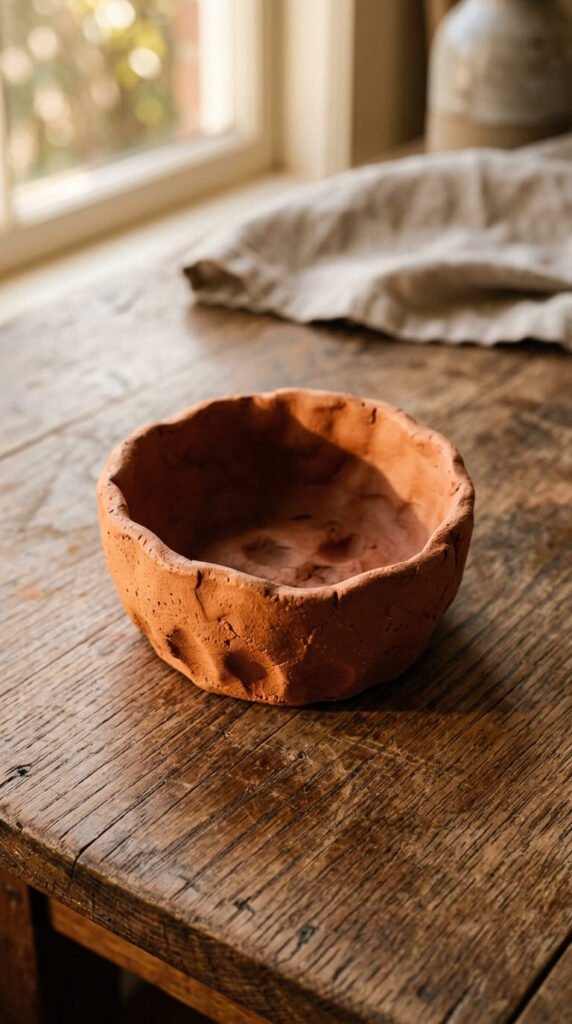
Every clay maker should know the pinch pot. It’s the foundation for half the projects on this list.
Roll a smooth ball. Press your thumb straight into the middle, stopping before you reach the bottom.
Now pinch. Squeeze the walls between your thumb and fingers, turning the ball slowly as you go. The walls thin out and the bowl grows.
Go slow. Even walls dry without cracking. Thick spots and thin spots crack.
Realistic DIY example: this little bowl is perfect for holding rings on a nightstand or salt by the stove.
Keep the rim a little uneven. Handmade charm beats a perfect machine look.
Smooth the inside with a wet finger if you want it sleek, or leave the thumb marks for a rustic feel. Both look good.
Let it dry slowly under loose plastic to avoid cracks at the rim.
Budget tip: this project needs nothing but clay and your hands. No tools, no paint required. An earthy raw clay bowl looks intentional and modern.
Once you’ve made one, you can build owls, cats, and frogs from the same start.
13. Tiny Food Charms
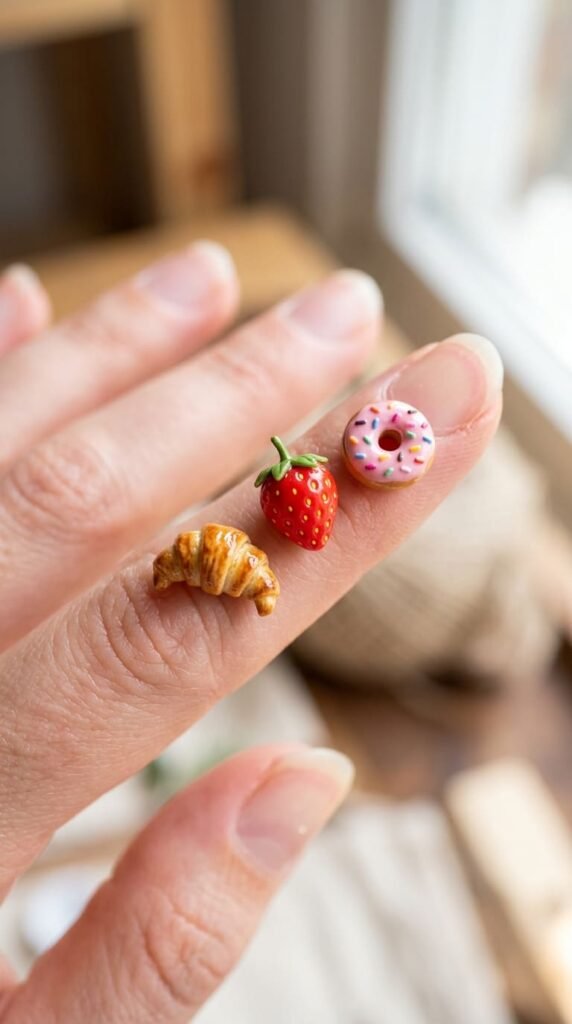
These are the project people stop and stare at. Tiny food charms look unbelievably detailed but use basic shapes.
Use polymer clay for these, not air-dry. Polymer holds fine detail and bakes hard in your home oven.
Start with a donut. Roll a small ball, poke a hole, and flatten slightly. Roll thin colored clay for the icing and drape it over the top.
A strawberry is a red teardrop with tiny seed dots pressed in with a toothpick.
Budget tip: a single block of polymer clay makes hundreds of charms. The colors stretch incredibly far at this size.
Keep everything small, around the size of a pea. The tiny scale is what makes them cute.
Bake on a foil-lined tray following the pack instructions, usually a low oven for a short time. Always check the temperature on the packet.
Once cool, brush on clear gloss for a shiny, juicy finish.
Glue a small eye pin into the top before baking and you’ve got a keychain or earring charm. These make the cheapest, most impressive little gifts you can give.
14. Candle Holder
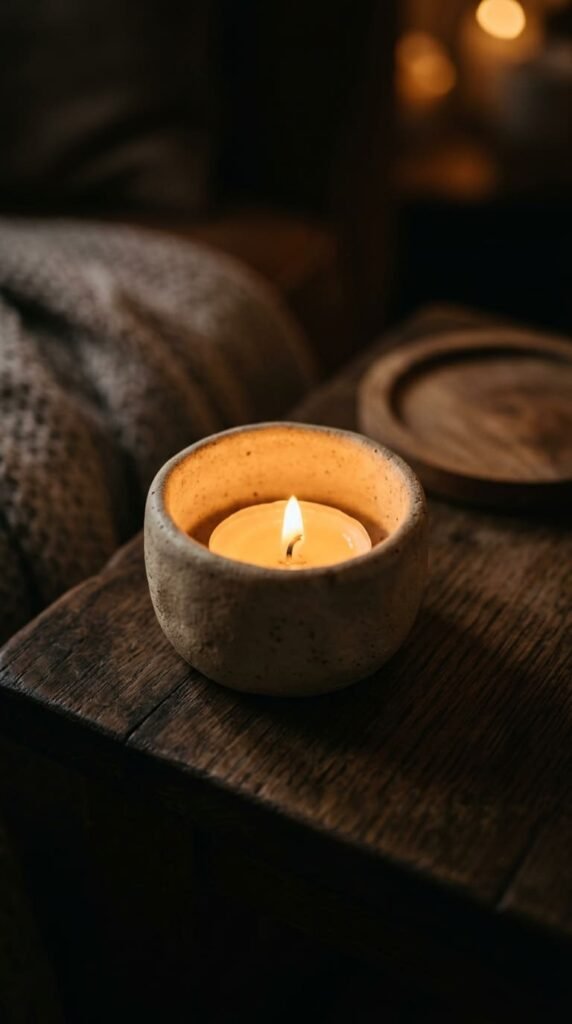
A clay candle holder turns any evening cosy, and it’s a quick build.
Use the pinch pot method to make a thick-walled little cup. The walls should be sturdy, not thin.
Only use this with flameless LED tealights or place a real tealight inside its own metal cup. Safety first, always.
Press patterns into the outside walls before it dries. A fork makes lines. A pencil eraser makes dots. Poke small holes through the wall and the light will twinkle through.
Budget tip: a pack of battery tealights costs a couple of dollars and lasts for ages. No fire risk and you can use them indoors freely.
Keep the base wide and flat so it sits steady.
Smooth the rim so it feels nice to hold.
Let it dry slowly and fully. Thick walls take longer, sometimes two days.
Paint the outside in a warm earthy tone and leave the inside raw. Or carve the holes and skip paint entirely for a natural clay glow.
A row of three in different heights makes a lovely table centerpiece for the cost of one clay block.
15. Fridge Magnets
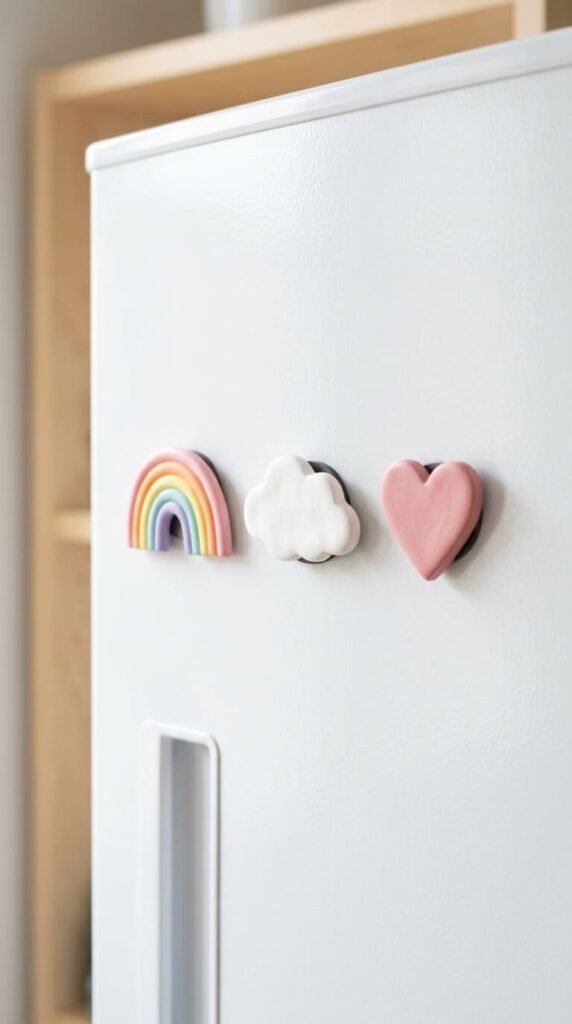
Magnets are flat, fast, and endlessly customizable. They’re a perfect first project for kids.
Roll the clay flat, about as thick as a coin. Cut simple shapes with cookie cutters. Hearts, stars, clouds, and rainbows all work.
Keep them small and light so the magnet can actually hold them up.
Budget tip: a strip of small craft magnets costs almost nothing and makes a whole batch. Buy the self-adhesive kind to skip the glue step.
Let the clay shapes dry completely flat. Curled magnets won’t sit against the fridge.
Paint the fronts in bright, cheerful colors. Simple is best at this size.
Once the paint is dry, glue or stick a magnet to the back. Press firmly and let it set.
Realistic DIY example: make a set of letter or number magnets for a kid’s fridge. They’re great for practice and cost a fraction of the store version.
A batch of a dozen takes one afternoon. They make easy party favors or little gifts.
Seal the front with clear varnish so the paint survives sticky fingers.
16. Elephant Figurine
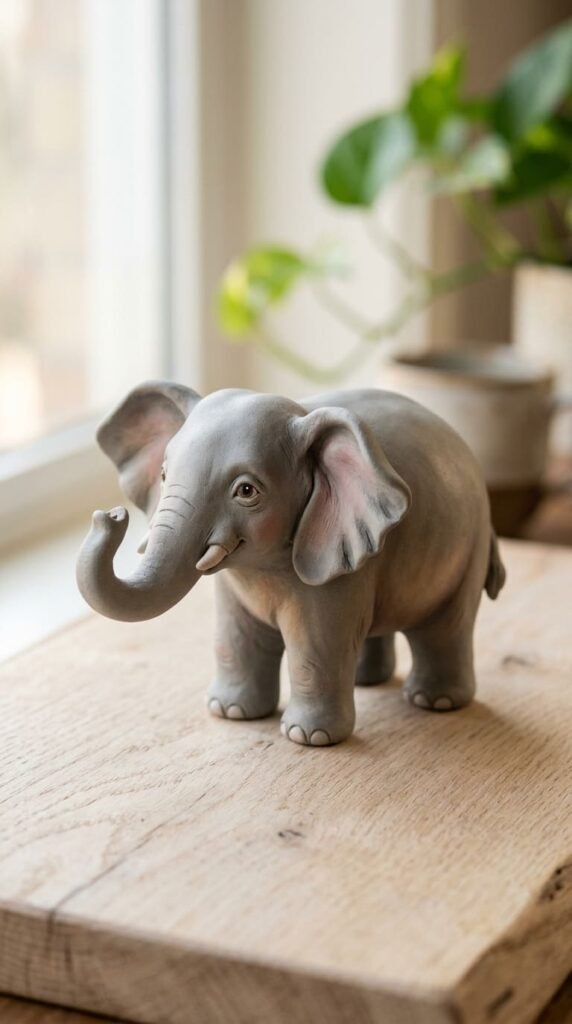
An elephant looks ambitious but breaks down into easy parts.
Roll a fat oval for the body. Make four short, thick legs and press them on. Keep the legs stubby so it stands without toppling.
For the head, attach a smaller ball at the front. Pinch out a trunk and curl the end upward. An upward trunk is the lucky pose, and it dries better than a hanging one.
Flatten two balls for the big ears and press them on the sides of the head.
Budget tip: smooth all the joins with water instead of buying special tools. Water is the clay sculptor’s best free helper.
Keep the whole thing chunky. Rounded shapes crack less than thin ones, and they look friendlier too.
Add tiny tusks and a curled tail if you want extra detail.
Let it dry slowly. The legs and trunk are thin spots that dry faster than the body, so loose plastic over the top helps it dry evenly.
Paint soft grey with a slightly darker wash in the wrinkles. A small white tusk finishes it off.
17. Heart Bowl
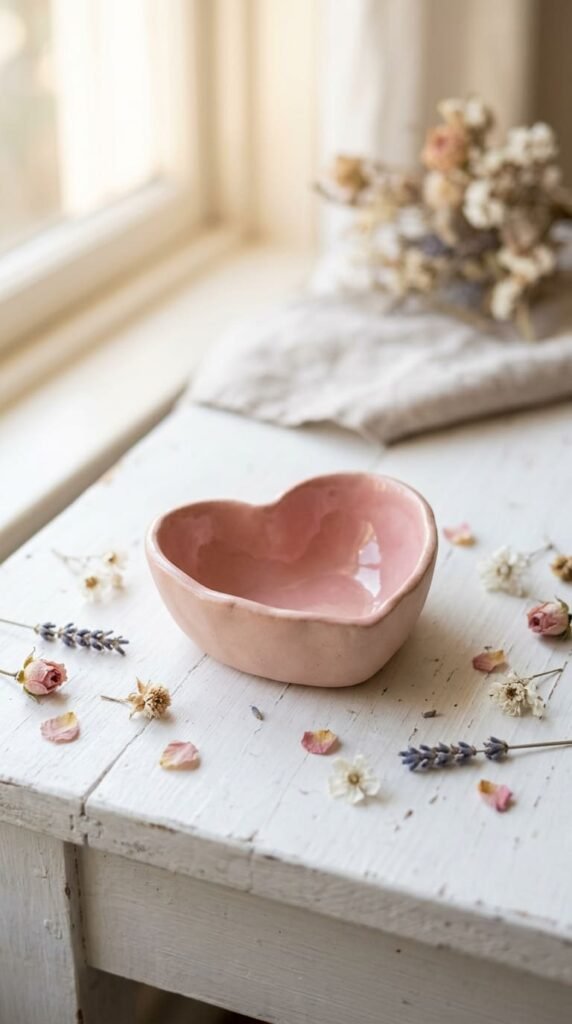
A heart bowl is the sweetest little gift, and it’s almost as easy as a plain pinch pot.
Roll a ball and flatten it into a thick disc. Pinch one end into a soft point. Press a small dent into the opposite side. Now it reads as a heart.
Curl the edges up gently to make it a shallow dish.
Smooth the inside well so jewelry won’t catch.
Realistic DIY example: these make perfect Valentine’s gifts. Make one for a partner to drop their wedding ring in at night.
Budget tip: a single block of clay makes several. Far cheaper than a shop-bought trinket dish, and far more personal.
Keep the walls even so it dries without cracking.
Let it dry flat under loose plastic.
Paint the inside soft pink or red, and the rim gold for that polished look. Or leave it natural and just gloss the inside.
Seal it if you want it wipe-clean.
Tuck a small chocolate or a folded note inside before gifting. A handmade heart bowl says far more than anything from a store, and costs next to nothing.
18. Halloween Pumpkin
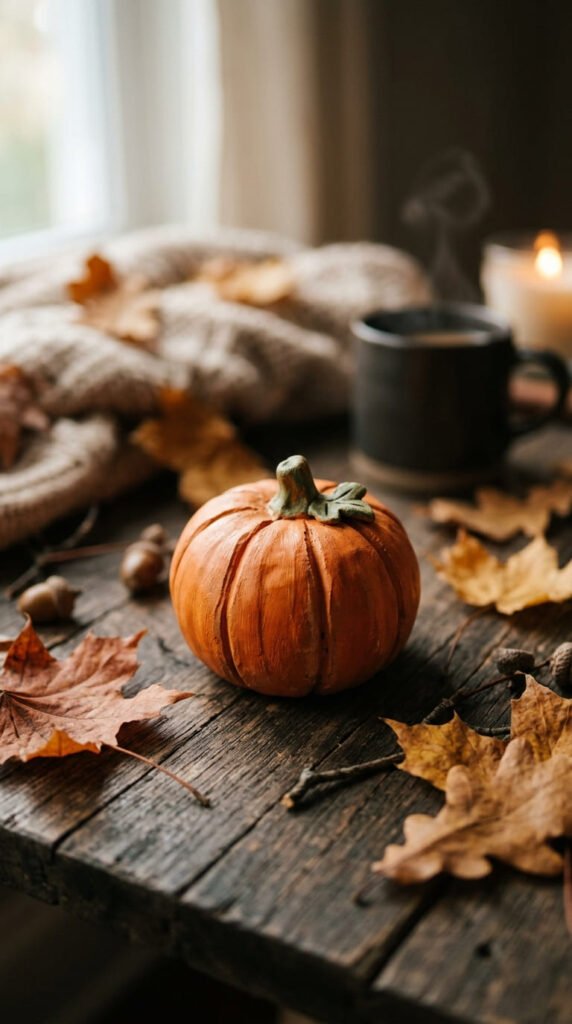
A clay pumpkin is a seasonal favorite that lasts year after year, unlike the real thing.
Roll a ball and gently flatten the top and bottom. Pumpkins are wider than they are tall.
Now carve the ridges. Press a toothpick or the back of a knife from top to bottom in evenly spaced lines all around. These grooves give it that classic pumpkin shape.
Roll a tiny green stem and press it into the top. Curl a thin coil beside it for a vine.
Budget tip: make a cluster in different sizes from one clay block. A pumpkin patch on the mantel costs only the paint.
Keep the base flat so it sits steady.
Paint the body warm orange and the stem green. For a fancier look, try white or pale blue pumpkins, which are trendy and just as easy.
Seal with gloss for a polished finish or matte varnish for a natural look.
Realistic DIY example: make tiny ones as place markers for a Halloween dinner. Write names on them with paint pen after sealing. Cheap, cute, and reusable every fall.
19. Christmas Ornaments
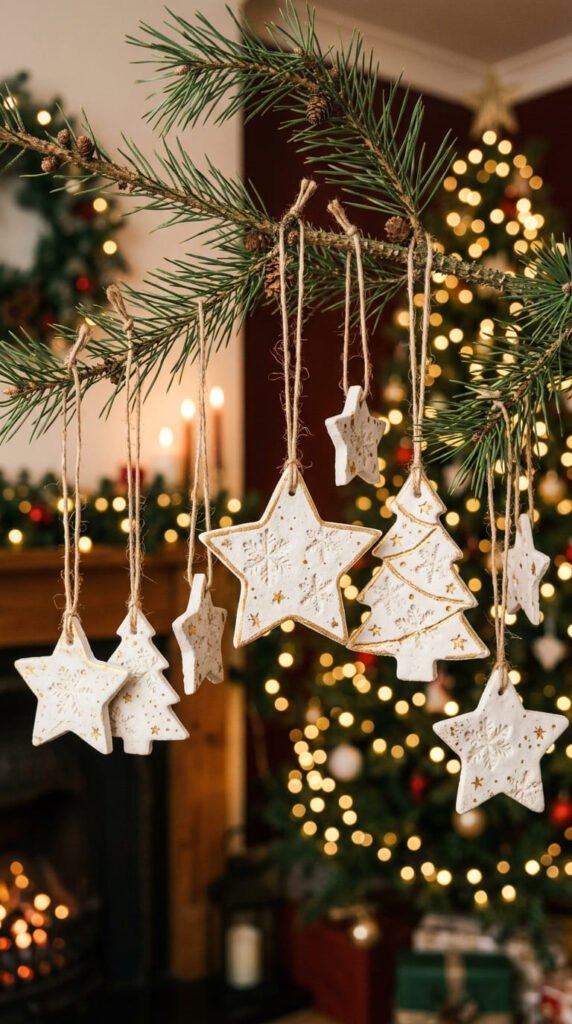
Handmade ornaments make a tree feel personal, and they’re one of the cheapest holiday crafts going.
Roll the clay flat, about as thick as a coin. Cut shapes with cookie cutters. Stars, trees, and circles all work.
Before drying, press a hole near the top with a straw or a pencil. This is where the ribbon goes, so don’t skip it.
Add texture while the clay is soft. Press a real sprig of pine, a snowflake stamp, or even bubble wrap for a dotty pattern.
Budget tip: one clay block makes a whole tree’s worth. Cheaper than a single shop ornament for a dozen of your own.
Let them dry flat so they don’t warp.
Paint them white, then dry-brush gold or silver over the texture so the pattern shines through. Or paint them in classic red and green.
Thread twine or ribbon through the hole to hang.
Realistic DIY example: press a child’s name or the year into each one with letter stamps. These become keepsakes families pull out every December for years.
Seal with gloss to protect them through seasons of storage.
20. Ring Holder Cone
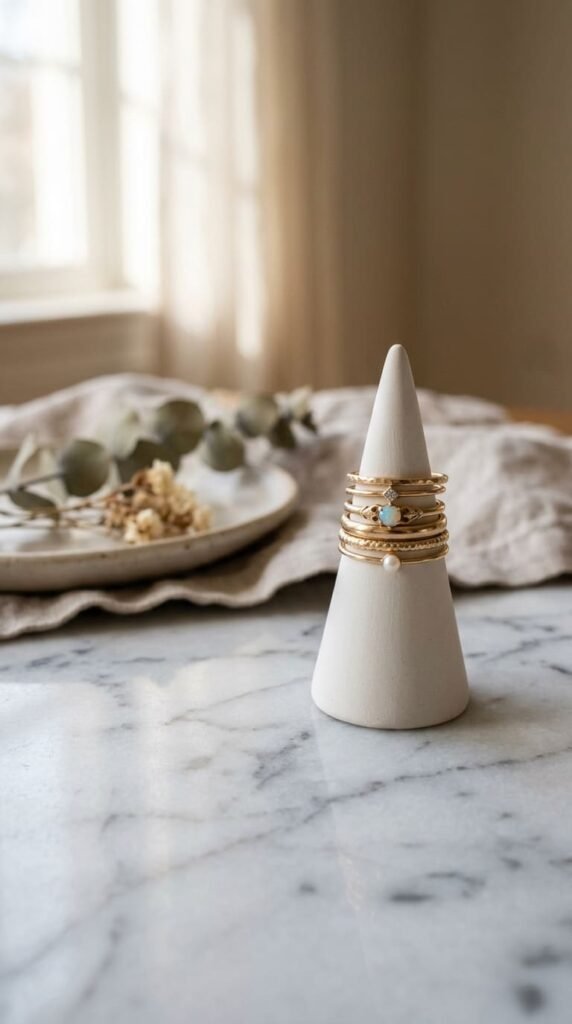
A ring cone keeps jewelry tidy and looks like something from a boutique.
Roll a ball for the base and flatten the bottom so it sits flat. Then shape the top into a tall, smooth cone. Think of a tiny mountain.
Keep the point smooth and rounded, not sharp, so rings slide on and off easily.
Smooth the whole surface with a damp finger and a cloth. A polished surface is what sells this look.
Budget tip: this uses one small lump of clay. The boutique version costs real money, and yours costs cents.
Let it dry slowly and fully. A solid cone is thick, so give it two days.
Paint it a single clean color. White with a gold-dipped base looks high-end. Or try soft terracotta for a warm, earthy feel.
Realistic DIY example: make one for a bathroom counter to hold rings while washing dishes or hands. Saves rings from going down the drain.
Seal it smooth so rings glide without scratching.
This is one of those projects that looks far harder than it is. A simple cone, well smoothed, reads as polished design.
21. Graceful Swan
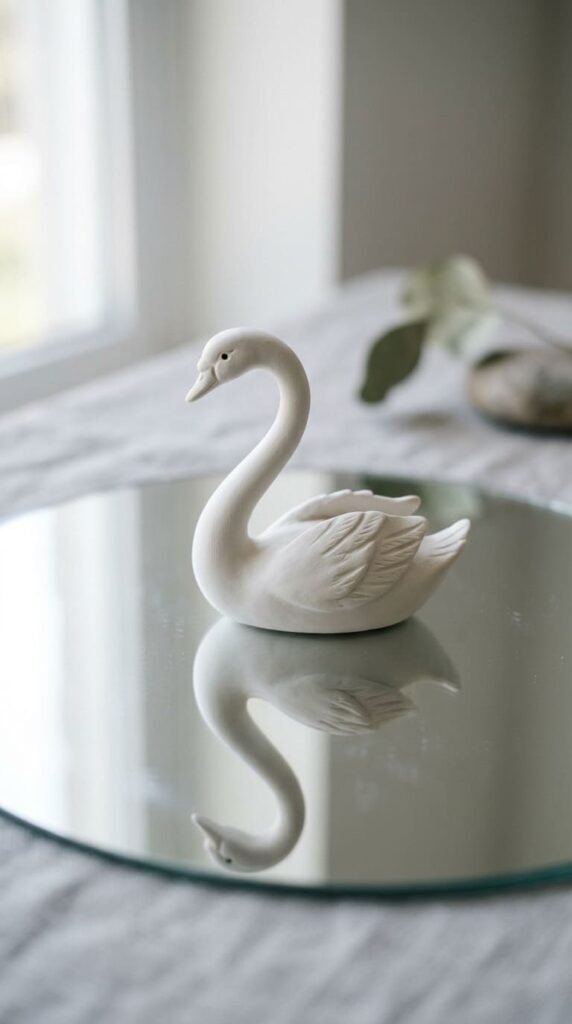
A swan is a step up, but the result feels worth the extra care.
The neck is the tricky part. A long thin neck of clay alone will droop and crack. Use a short piece of floral wire as a support inside it. This is called an armature.
Wrap clay around the wire and curve it into the classic S-shape.
For the body, roll a fat oval and pinch one end up to meet the neck. Smooth the join carefully.
Pinch the back end into a little upturned tail.
Score the sides lightly with a toothpick to suggest wing feathers.
Budget tip: a single roll of floral wire costs little and supports many projects. It’s the secret behind any thin, tall shape.
Keep the body chunky to balance the slim neck.
Let it dry slowly under loose plastic so the neck doesn’t crack.
Paint it crisp white with a small orange beak and a black mask around the eye.
Realistic DIY example: a pair of swans with necks curved toward each other forms a heart shape. A lovely, low-cost wedding or anniversary gift.
22. Friendly Unicorn
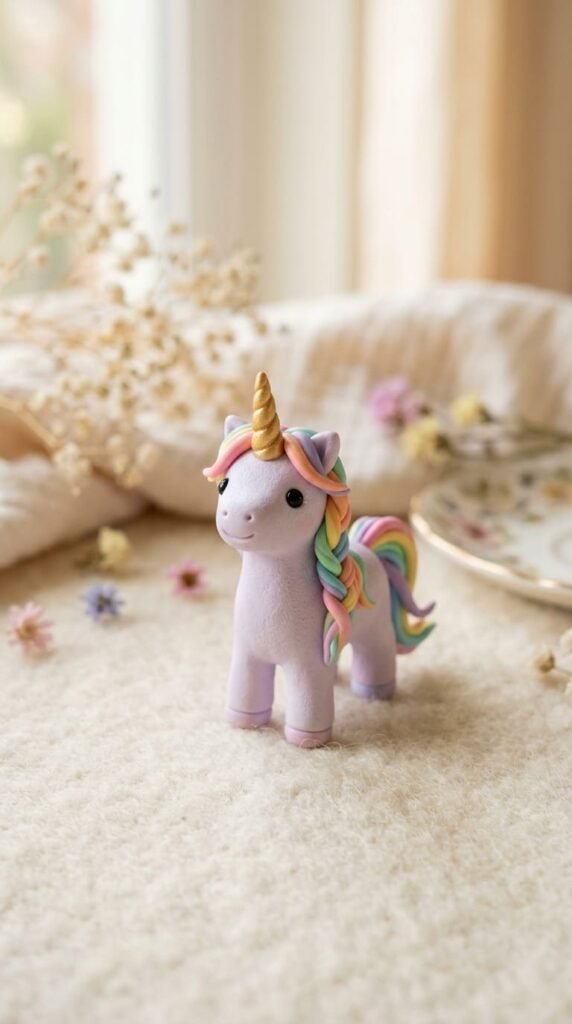
A unicorn is just a horse with magic on top, and the magic is the fun part.
Build a chunky horse body first. Fat oval body, four stubby legs, a raised neck, and a small head. Keep the legs thick so it stands.
Now add the unicorn touches. Roll a thin coil, twist it into a spiral, and press it onto the forehead as the horn.
For the mane, roll several thin strands of clay and lay them along the neck. Press a coil onto the back for the tail.
Budget tip: use pastel clay if you have it, or paint a plain body afterward. Either way, one small block does the whole thing.
Keep the head and body rounded and friendly rather than realistic. Cute beats accurate here.
Let it dry slowly so the legs and horn don’t crack.
Paint the body a soft pastel. Color the mane in rainbow stripes and paint the horn gold.
Realistic DIY example: kids adore making these. Let them pick the mane colors. It’s a cheap rainy-day project that keeps them busy for an hour.
23. Incense Holder
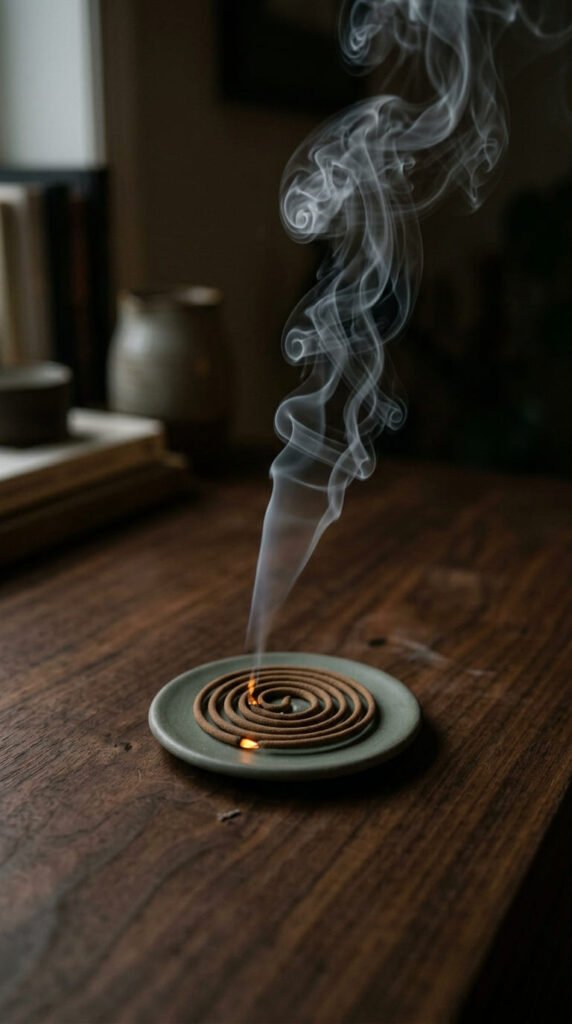
An incense holder is practical, calming, and a fast build.
Roll the clay flat into a thick oval or leaf shape. This catches the ash, so make it long enough.
Poke one hole near one end to hold the incense stick. Use a toothpick or a thin nail to make a hole that fits your sticks snugly. Test it before drying.
Press a shallow channel down the length to catch falling ash.
Budget tip: this is one of the cheapest useful things to make. One small piece of clay, no extras.
Smooth the surface so ash wipes away easily.
Press a leaf or a pattern into the top for decoration while it’s soft.
Let it dry flat.
Paint it an earthy, calming color. Grey, sage green, or natural clay all suit the mood.
Seal it so you can wipe off ash.
Realistic DIY example: make a couple for a meditation corner, or give one with a pack of incense as a thoughtful, low-cost gift.
Test the hole again once dry to be sure a stick stands upright and steady.
24. Personalized Pet Sculpture
Making a little version of someone’s real pet turns clay into a keepsake.
Start with the basic animal shape from earlier projects. A sitting dog or cat is the most stable pose.
Don’t aim for a perfect copy. Capture one or two signature features instead. Floppy ears, a fluffy tail, a particular color. Those details make it recognizable.
Keep the pose simple and sitting. Standing legs are fragile and the sculpture should last.
Budget tip: this is a free upgrade to any animal project. You’re just matching the paint to a real pet, which costs nothing extra.
Smooth the body so paint goes on cleanly.
Let it dry fully before painting.
Paint the base coat first, then add markings. Work from a photo on your phone for the colors and patterns.
Realistic DIY example: make a tiny version of a friend’s dog and gift it with a photo of the real one beside it. It’s the kind of present people keep forever, made for the price of clay and a little paint.
A pet that has passed can be remembered this way too. Gentle, personal, and handmade.
25. Plump Bunny
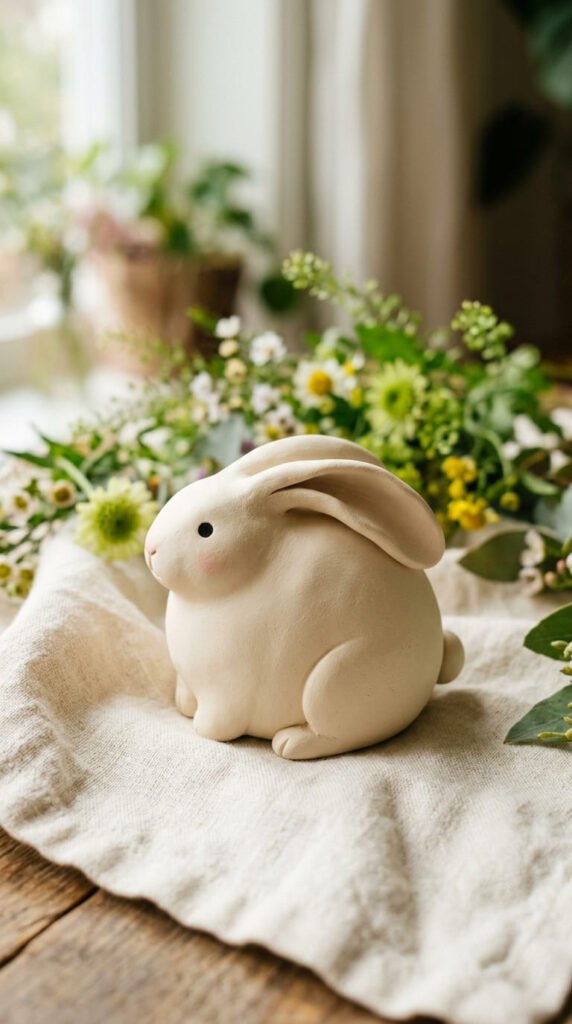
A bunny is the perfect project to end on. It’s round, soft, and forgiving.
Roll a fat egg shape for the body. Sit it upright with the wider end at the bottom. Flatten the base so it balances.
Pinch a small head at the top, or just round off the top of the egg.
Roll two long ovals for the ears. Press them on and fold them back slightly for a relaxed look.
Add a tiny ball at the back for a tail. Press two small dots or paint them for eyes.
Budget tip: keep it chunky and you’ll use one small lump of clay. A plump bunny looks cuter than a slim one anyway.
Smooth the join where the ears meet the head with a wet finger.
Let it dry slowly so the thin ears don’t crack.
Paint it soft cream or grey with a pink nose and inner ears.
Realistic DIY example: a row of bunnies in graduated sizes makes a sweet spring display. Add them to an Easter basket as handmade, reusable decorations that cost almost nothing.
Conclusion
You don’t need a studio, a kiln, or years of practice to make something you’re proud of. A few dollars of air-dry clay, a spoon, a toothpick, and a quiet afternoon are enough to build any of these 25 projects. Start small with an owl or a pinch pot. Once your hands learn the basic moves, the frogs, bunnies, and trinket dishes follow easily. Keep your shapes chunky, smooth the joins with water, and let everything dry slowly to avoid cracks. Save your scraps for terrazzo coasters and tiny mushrooms so nothing goes to waste. Most of these cost less than a coffee and make gifts people actually treasure. Pick one that makes you smile, roll up your sleeves, and squish some clay. The first try is never perfect, and that’s exactly the charm of handmade. Grab a block today and see what your hands can shape.


